Key lime pie is more than just a dessert; it’s a slice of nostalgia, a burst of tangy sunshine, and a reminder of lazy summer days spent in the warmth of family and friends. I remember the first time I tried a key lime pie, a delightful dessert that my grandmother would whip up during our family gatherings. The first bite transported me to the sun-drenched shores of Key West, where the limes are as vibrant as the culture itself. It was a simple recipe, yet each layer of flavor told a story, drawing from the rich history of this beloved treat.
As I dug deeper into the world of key lime pie, I discovered that this was not merely a recipe passed down through generations; it was a cultural emblem, rooted in the heart of Florida. The tartness of the key limes, the buttery graham cracker crust, and the cool, creamy topping all harmonize beautifully, creating a dessert that is not only delicious but also steeped in tradition. Each time I prepare this dish, I feel a connection to my grandmother and all the family members who have relished its unique flavor over the years.
The Story Behind This Recipe
Key lime pie’s origins can be traced back to the Florida Keys, where the small, aromatic key limes flourished in the tropical climate. The recipe itself began to take shape in the late 19th century, becoming a staple among the fishermen and families living in the area. It is said that a woman named Aunt Sally, who lived in the Keys, was one of the first to make this delightful dessert, using the ingredients that were readily available: sweetened condensed milk, egg yolks, and key lime juice.
What makes this recipe particularly special is its simplicity. Unlike other pies that require a plethora of ingredients or complicated techniques, key lime pie is refreshing in its straightforwardness. For busy families, this is a lifesaver! You can whip it up quickly after dinner or prepare it ahead of time for a summer barbecue. The cooking process can be done in less than an hour, but the satisfaction it brings lasts much longer. It’s a dish that can be made with love, even on the busiest of days.
Why You’ll Love This Dish
Key lime pie is the epitome of a perfect dessert for any occasion. Whether you’re celebrating a birthday, hosting a summer picnic, or simply looking for a sweet treat to end a weeknight dinner, this pie fits the bill. It’s light and refreshing, making it an excellent choice for warmer months when heavier desserts can feel overwhelming. I often find myself baking it in early spring, as the days start to warm up, and it feels like a celebration of the season.
The emotional connection to key lime pie runs deep in my family. Each time I bake it, I can almost hear my grandmother’s laughter and feel the warmth of her kitchen. The aroma of the pie baking in the oven, the anticipation of that first slice, and the joy on my family’s faces as they savor each bite—it’s a beautiful reminder of the love we share and the memories we’ve created. This dish is not just food; it’s a conduit for love, laughter, and cherished moments.
In this article, you will learn everything there is to know about key lime pie, from its rich history to the best recipes that will have your family asking for seconds. Whether you’re a seasoned baker or a novice in the kitchen, I’ll guide you through the steps to create your own masterpiece, all while exploring the cultural significance and nutritional benefits of this delightful dessert. Prepare to embark on a delicious journey that combines history, flavor, and a bit of personal magic into every slice of key lime pie.
The Rich History and Cultural Significance of key lime pie
The rich history and cultural significance of key lime pie go far beyond its sweet and tangy flavor. This iconic dessert has become a symbol of Florida’s culinary heritage, representing the state’s tropical climate and the vibrant culture of the Florida Keys. To truly appreciate key lime pie, we must dive into its origins, regional variations, and how it has evolved over time.
Origins and History
The roots of key lime pie can be traced back to the late 1800s in the Florida Keys, where the small, seedless key lime became a prized ingredient. Unlike its larger Persian counterpart, key limes are smaller, with a more intense flavor that adds a unique tartness to dishes. The pie itself is believed to have been invented by the local sponge fishermen, who created it using the ingredients they had on hand: sweetened condensed milk, lime juice, and egg yolks. The simplicity of the recipe reflects the resourcefulness of those early Floridians.
The first recorded recipe for key lime pie appeared in a 1931 cookbook titled “The Original Key Lime Pie,” published by a woman named Mrs. G. W. E. Hinson. Since then, the pie has undergone various transformations, with different interpretations and techniques emerging. For example, some recipes incorporate meringue toppings, while others stick to the classic whipped cream finish. Regardless of the variation, one thing remains constant: the key lime pie is a true representation of Florida’s culinary roots.
Cultural Significance
Key lime pie is more than just a dessert; it’s a cultural icon in Florida. In 2006, the state of Florida officially designated key lime pie as its official state pie, recognizing its significance in the state’s history and cuisine. This designation speaks to the pride Floridians have for this beloved dessert, and it’s often featured in local restaurants, bakeries, and even during festivals celebrating the unique flavors of the region.
Traditionally, key lime pie is served during family gatherings, holiday celebrations, and summer barbecues. It has a way of bringing people together, often serving as the centerpiece of dessert tables. In many families, the recipe is passed down through generations, with each baker adding their own unique twist. It’s a dish that embodies the spirit of community and shared experiences, making it a cherished part of Florida’s culinary landscape.
Nutritional Benefits
While key lime pie may not be the first dessert that comes to mind when thinking of health-conscious options, it does have some nutritional benefits worth noting. Key limes are packed with vitamin C, providing a boost to the immune system. The tartness of the limes also makes this pie a refreshing option, especially during the hot summer months.
Additionally, using sweetened condensed milk in the recipe means that the pie has a rich, creamy texture without the need for heavy cream, which can be higher in calories and fat. While moderation is key, indulging in a slice of key lime pie can be a delightful treat that offers a hint of health benefits, especially when enjoyed in the context of a balanced diet.
As we delve deeper into the world of key lime pie, it becomes clear that this dessert is not just a culinary creation; it’s a story woven from the fabric of Florida’s history and culture. From its humble beginnings to its status as a beloved state symbol, key lime pie continues to capture the hearts and taste buds of many. In the sections to follow, we will explore beloved recipes, tips for creating the perfect pie, and further insights into the delightful world of key lime pie. Prepare yourself for a journey that tantalizes your taste buds while connecting you to the rich history and culture that surrounds this iconic dessert.
Essential Ingredients for Perfect key lime pie
Making the perfect key lime pie begins with selecting the right ingredients. Each component plays a crucial role in the flavor and texture of this beloved dessert. Here, I’ll take you through the essential ingredients needed for key lime pie bars, explaining their importance, how to choose quality options, and even some tips for substitutions if you’re facing dietary restrictions. Let’s dive in!
Essential Ingredients
- 1 1/2 cups graham cracker crumbs (about 12 full sheets, crushed)
- 1/3 cup granulated sugar
- 6 Tablespoons butter, melted
- 2 14-ounce cans sweetened condensed milk
- 4 ounces cream cheese, softened
- 3/4 cup key lime juice*
- Zest of 2 regular limes, or 4 key limes
- Fresh whipped cream, for topping, optional
Key Lime Pie Bars
Ingredients
Graham Cracker Crust:
- 1 1/2 cups graham cracker crumbs, (about 12 full sheets, crushed)
- 1/3 cup granulated sugar
- 6 Tablespoons butter, , melted
Key lime filling:
- 2 14 ounce cans sweetened condensed milk
- 4 ounces cream cheese, , softened
- 3/4 cup key lime juice
- zest of 2 regular limes, , or 4 key limes
- fresh whipped cream, , for topping, optional
Instructions
- Make Crust: For the crust, combine the graham cracker crumbs, sugar, and butter and press into an 8” square baking pan.
- Bake at 350 degrees F for 10 minutes. Allow to cool before adding filling.
- Filling: Add cream cheese to a mixing bowl then beat well with electric beaters until smooth. Add both cans of sweetened condensed milk, lime juice, and lime zest then mix again until smooth.
- Bake: Pour over prepared graham cracker crust and bake in preheated oven for 10 minutes. Allow to cool for about 30 minutes, then refrigerate for at least 3 hours, before serving.
- Serve: Top with a dollop of fresh whipped cream, if desired.
Each ingredient in this list contributes to the overall flavor and texture of your key lime pie. Let’s break them down:
- Graham cracker crumbs: These form the base and crust of your key lime pie bars. When crushed, they create a sweet, slightly nutty flavor that complements the tangy lime filling perfectly. Look for high-quality graham crackers without added artificial flavors or preservatives. If you’re feeling adventurous, you can use digestive biscuits or even gingersnap cookies for a different flavor profile.
- Granulated sugar: This sweetener balances the tartness of the lime juice. It’s crucial to measure accurately, as too much sugar can overpower the delicate lime flavor, while too little can make the bars overly tangy. For a healthier option, consider using coconut sugar or a sugar substitute that measures like granulated sugar.
- Butter: Melted butter is essential for binding the graham cracker crumbs together, forming a cohesive crust. Choose unsalted butter for better control over the overall saltiness of your dessert. Always opt for high-quality butter, as it can significantly impact the flavor of your crust.
- Sweetened condensed milk: This creamy, thick milk is a key player in the filling, providing richness and sweetness. It’s essential for achieving the creamy texture of your filling. Look for brands with minimal ingredients for the best flavor.
- Cream cheese: Softened cream cheese adds a luxurious texture to the filling, making it rich and creamy. Ensure it’s at room temperature for smooth incorporation; otherwise, you risk lumps in your filling. If you’re looking for a lighter option, consider using Neufchâtel cheese, which has less fat.
- Key lime juice: The star of the show! Freshly squeezed key lime juice offers a unique tartness that’s hard to replicate. Look for vibrant, fragrant limes, and if key limes are unavailable, regular limes are a suitable substitute, though the flavor will differ slightly.
- Lime zest: This addition elevates the flavor by providing aromatic oils that enhance the overall lime experience. Choose organic limes if possible, as they are less likely to have pesticide residues. Grate just the outer green layer, avoiding the bitter white pith.
- Fresh whipped cream: Although optional, a dollop of freshly whipped cream on top adds a lovely contrast to the tart filling. You can make it easily by beating heavy cream with a bit of sugar until soft peaks form. For a more stable whipped cream, consider adding a little cornstarch.
Shopping Tips
When shopping for the ingredients for your key lime pie, consider the following tips to enhance your cooking experience:
- For graham crackers, check the baking aisle for brands that offer whole grain or organic options. They often provide better flavor and texture.
- Purchase sugar in bulk when possible; it tends to be more cost-effective and can be stored indefinitely if kept dry.
- For butter, look for grass-fed varieties if you want to indulge in richer flavors. They often have a more vibrant yellow color, indicating higher beta-carotene content.
- Choose reputable brands for sweetened condensed milk, as some may contain additives that could affect the final taste of your pie.
- When selecting cream cheese, check the expiration date and opt for full-fat versions for the best results.
- For limes, smell them! Fresh limes should have a fragrant aroma, indicating ripeness and flavor. If possible, buy them in season for the best prices and quality.
Substitutions and Alternatives
If you have dietary restrictions or preferences, don’t worry! The following substitutions can help you create a delicious key lime pie that fits your needs:
- For a gluten-free crust, replace graham cracker crumbs with almond flour or gluten-free cookie crumbs. Combine with melted butter as you would with traditional crumbs.
- Granulated sugar can be substituted with agave syrup or honey, but remember to adjust the quantity as these are sweeter than sugar.
- If you need a dairy-free version, opt for coconut cream or cashew cream in place of cream cheese. Just ensure you blend it thoroughly to achieve a smooth consistency.
- Fresh lime juice can be replaced with bottled key lime juice in a pinch, but always opt for fresh when you can to ensure the best flavor.
Storing your ingredients properly can also extend their shelf life. Keep graham crackers in an airtight container to prevent them from becoming stale. Butter should be refrigerated, while sweetened condensed milk can be stored in a cool, dry place until opened, after which it should be refrigerated and consumed within a week.
With these ingredients and tips in mind, you’re well on your way to creating your very own delicious key lime pie bars that are sure to impress family and friends. Let’s move on to the next step in our key lime pie journey: the cooking instructions!
Detailed Step-by-Step key lime pie Cooking Instructions
Now that you have all the essential ingredients for your key lime pie bars, it’s time to dive into the detailed step-by-step cooking instructions. This is where the magic happens! In this section, I’ll guide you through each stage of making these delightful treats, from preparing your workspace to the final assembly. Let’s get started!
Preparation Steps
- Gather Your Ingredients: Begin by assembling all your ingredients on the countertop. This will streamline your cooking process and ensure you don’t miss anything. Having everything ready (known as mise en place) is crucial for a smooth cooking experience.
- Preheat Your Oven: Preheat your oven to 350°F (175°C). This ensures that your pie crust will bake evenly and come out perfectly crisp.
- Prepare the Graham Cracker Crust: In a large mixing bowl, combine the graham cracker crumbs, granulated sugar, and melted butter. Stir until the mixture resembles wet sand. You want it to hold together when pressed. This is the key to a great crust, so make sure you mix it well!
- Press the Crust into the Pan: Grease an 8×8-inch baking dish or a similar size pan. Pour the graham cracker mixture into the pan and press it firmly into the bottom using the back of a measuring cup or your hands. Make sure it’s packed evenly to prevent it from crumbling later.
- Bake the Crust: Place the crust in the preheated oven and bake for 8-10 minutes or until it’s golden brown. Keep a close eye on it, as it can burn quickly. The aroma of toasting graham crackers is heavenly and a sure sign that you’re on the right track!
Cooking Process
- Cool the Crust: Once baked, remove the crust from the oven and allow it to cool while you prepare the filling. This step is essential; if you pour the filling onto a hot crust, it may not set properly.
- Prepare the Filling: In a mixing bowl, beat the softened cream cheese until smooth and creamy. This is crucial, as lumpy filling will not yield the silky texture you desire. I often use a hand mixer for this step, but a stand mixer can work just as well.
- Add Sweetened Condensed Milk: Gradually add the sweetened condensed milk to the cream cheese, mixing constantly until well blended. The mixture should be smooth and glossy.
- Incorporate Lime Juice and Zest: Slowly mix in the key lime juice and lime zest. This is where the magic happens, and the pie starts to take shape! The acid from the lime juice helps to thicken the filling, so don’t skip this step!
- Taste for Sweetness: Before pouring the filling into the crust, taste it! You might find you want a touch more sweetness or acidity. This is your pie, so adjust to your preference.
Final Assembly
- Pour Filling into Crust: Carefully pour the key lime filling over the cooled graham cracker crust. Use a spatula to spread it evenly and ensure it fills all corners.
- Bake: Return the assembled pie to the oven and bake for another 15-20 minutes. You’ll know it’s done when the filling is set but still has a slight jiggle in the center. This is crucial for that melt-in-your-mouth texture.
- Cool and Chill: Once baked, remove the pie from the oven and let it cool at room temperature for about 30 minutes. Then, cover it and place it in the fridge for at least 2 hours (or overnight if you have the time) to allow it to set completely.
- Prepare Whipped Cream: If you’re adding whipped cream, now is the time! In a bowl, beat heavy cream with a little sugar until soft peaks form. This will add a delightful lightness to the rich filling.
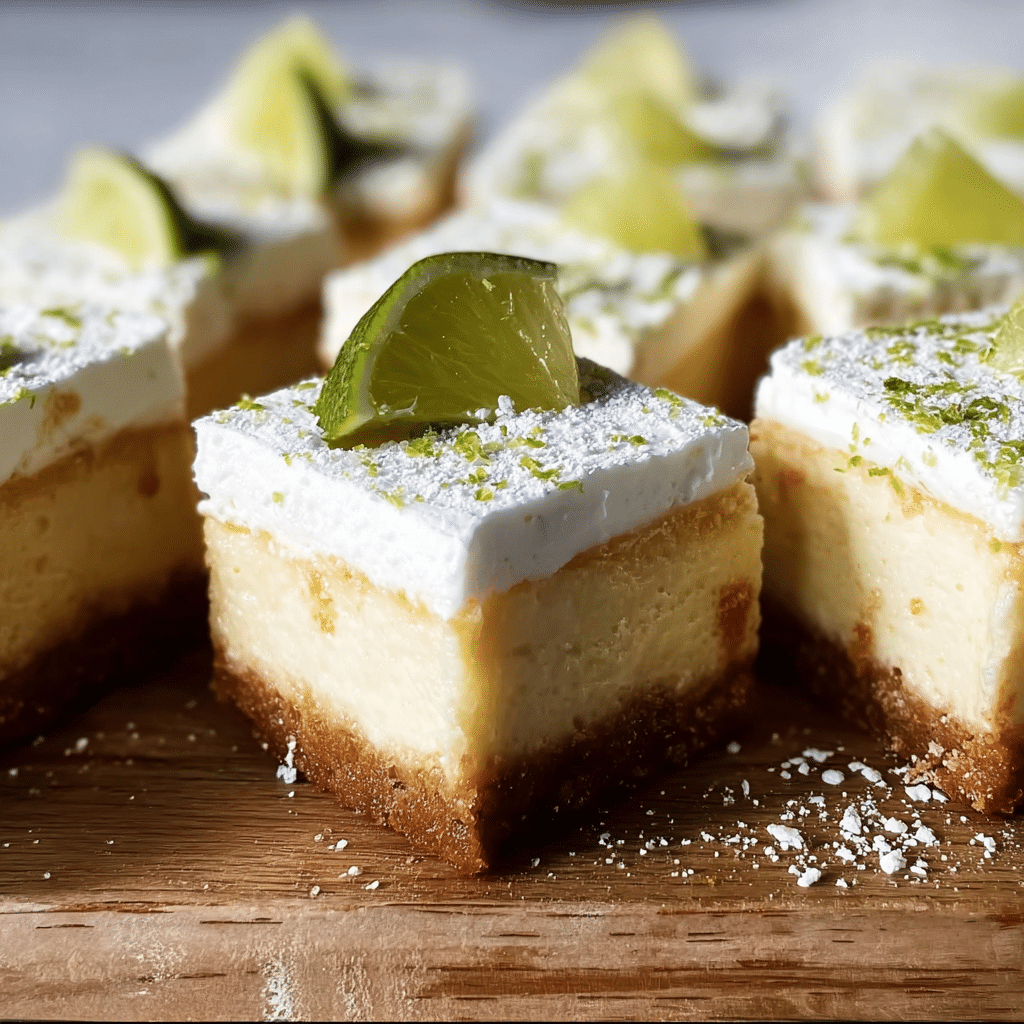
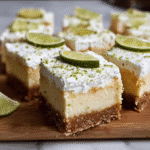
- Serve: Once chilled, cut your key lime pie bars into squares and top each piece with a dollop of fresh whipped cream. Garnish with additional lime zest for a pop of color and flavor. Enjoy your creation!
Throughout this process, remember that the key to a great key lime pie is patience. Take your time, enjoy the aromas, and remember that cooking is as much about the journey as it is about the destination. Following these steps will lead you to a delicious outcome that’s perfect for any occasion!
Professional Tips and Techniques for key lime pie
When it comes to creating the perfect key lime pie, the difference between good and great often lies in the details. As someone who has spent countless hours in the kitchen experimenting with various recipes, I’ve gathered an arsenal of professional tips and techniques that can elevate your key lime pie game to new heights. Whether you’re a seasoned chef or a home cook, these insider secrets will help you navigate through common pitfalls and deliver a stunning dessert that will impress everyone at your table.
Professional Techniques
First and foremost, let’s talk about the crust. A traditional key lime pie crust is typically made from graham crackers, but the texture and flavor can significantly change depending on how you prepare it. For a buttery, crispy crust, I recommend toasting the crushed graham crackers in the oven for about 10 minutes at 350°F before mixing them with melted butter and sugar. This process not only enhances the flavor but also helps achieve that sought-after crunch.
For those who want to get a bit more creative, consider adding a touch of finely grated coconut or even crushed nuts to your crust mixture. This will give your key lime pie a unique twist that your guests won’t forget. And remember, pressing the crust firmly into the pan is crucial. Use the bottom of a measuring cup to pack it down evenly, which will help prevent it from crumbling later on.
When it comes to the filling, the quality of your key limes makes all the difference. If you can find fresh key limes, use them! They are smaller and more aromatic than regular limes and give a tartness that’s essential for the authentic flavor profile of a key lime pie. If fresh key limes are unavailable, bottled key lime juice can work in a pinch, but opt for a high-quality brand to avoid artificial ingredients.
Mixing your filling is another area where attention to detail pays off. When whisking together the sweetened condensed milk, egg yolks, and lime juice, it’s important to do so gently. Overmixing can introduce air bubbles that may cause your filling to crack during baking. Aim for a smooth, homogenous mixture without incorporating too much air.

Troubleshooting Guide
Even the most experienced bakers encounter issues from time to time. If you find that your key lime pie has cracked on the surface, it may be a result of baking at too high a temperature or overbaking. To avoid this, always bake at a low temperature—around 325°F—and keep a close eye on it. The pie is done when the edges are set but the center still has a slight jiggle.
Another common issue is a filling that doesn’t set properly. This can happen if you don’t use enough egg yolks or if the mixture is not baked long enough. Make sure to follow the recipe closely, and remember that the pie will continue to firm up as it cools in the refrigerator.
Finally, let’s talk about the dreaded soggy crust. To combat this, you can pre-bake the crust for about 10 minutes before adding the filling. This will create a barrier that helps keep the crust crisp. Additionally, consider brushing a thin layer of melted chocolate over the cooled crust before adding the filling for an extra layer of protection and a delightful flavor combination.
Presentation Tips
Once your key lime pie has cooled and set, it’s time for the finishing touches. Presentation is key when it comes to desserts, especially something as vibrant as a key lime pie. A dollop of freshly whipped cream on top is classic, but why not elevate it with a sprinkle of lime zest or a few edible flowers for a pop of color? If you’re feeling adventurous, you can even create a lime wheel garnish by thinly slicing a key lime and placing it atop the whipped cream.
For serving, consider using a serrated knife dipped in hot water to slice the pie cleanly. This will give you those beautiful, sharp edges that look so professional. Pair your key lime pie with a refreshing beverage like iced tea or a crisp white wine. A chilled Sauvignon Blanc or a sparkling wine complements the tartness beautifully, making for an unforgettable dessert experience.
Finally, remember to take pictures! A well-presented key lime pie deserves its moment in the spotlight on social media. Show off your creation and share your story with friends and family. After all, food is not just about taste; it’s about the experiences we create around it.
Creative Variations and Adaptations of key lime pie
While the classic key lime pie is a beloved dessert, there are countless ways to put a spin on this traditional recipe. From seasonal adaptations to dietary modifications, the possibilities are endless! As a passionate home cook, I love to explore creative variations that not only cater to different tastes but also keep the essence of the original pie intact. In this section, we’ll delve into a variety of adaptations that will inspire you to get creative in the kitchen.
Seasonal Variations
One of the joys of cooking is adapting recipes to the ingredients that are in season. During the summer, consider infusing your key lime pie with fresh berries. A swirl of raspberry or blueberry puree can add a delightful burst of color and flavor. Simply blend your chosen berries with a bit of sugar, strain to remove seeds, and then swirl into your filling before baking. Not only does this look beautiful, but it also adds a layer of complexity to the classic lime flavor.
In the fall, you might want to experiment with spices. Adding a touch of cinnamon or nutmeg to the filling can create a warm flavor profile that makes your key lime pie feel cozy and inviting. A sprinkle of crushed ginger cookies in the crust could also provide a spicy kick that pairs beautifully with the citrus.
Dietary Adaptations
In today’s world, dietary restrictions are more common than ever, but that doesn’t mean you have to give up on making a delicious key lime pie. For those following a keto lifestyle, you can substitute the sweetened condensed milk with a keto-friendly alternative. There are various recipes available that utilize cream cheese and erythritol to mimic the creamy texture without the carbs. You can also make a gluten-free crust using almond flour instead of graham crackers, ensuring that everyone can enjoy a slice of your delicious creation.
If you’re catering to a vegan audience, consider using coconut cream mixed with a plant-based sweetener and a vegan egg replacement for the filling. A crust made from oats and dates can also be a perfect foundation for your dairy-free key lime pie. This way, no one has to miss out on the delightful tartness of this iconic dessert!
Creative Twists
Sometimes, the best way to breathe new life into a classic dessert is to think outside the box! One fun idea is to transform your key lime pie into a parfait. Layer the filling and crust in individual jars with whipped cream and fresh fruit for a trendy, on-the-go treat. This is not only visually appealing but also makes portion control a breeze.
Another unique twist is to turn your pie into a frozen dessert. By blending the filling with some coconut milk and freezing it in popsicle molds, you can create refreshing key lime pops that are perfect for hot summer days. Just imagine the joy of biting into a creamy, tart popsicle that captures the essence of a key lime pie!
Lastly, don’t forget about presentation. Instead of a traditional pie, consider making mini key lime pies in tart shells or individual cups. These bites of goodness are perfect for parties and gatherings, allowing guests to indulge without committing to a full slice. Plus, they look adorable on any dessert table!
In conclusion, the world of key lime pie is vast and full of opportunities for creativity. Whether you’re adapting it to seasonal ingredients, accommodating dietary needs, or simply putting your own spin on a classic, there’s no limit to what you can create. So roll up your sleeves, gather your ingredients, and let your imagination run wild in the kitchen!
Storage, Reheating, and Meal Prep for key lime pie
When it comes to enjoying a delicious key lime pie, knowing how to properly store, reheat, and prepare it in advance can significantly enhance your experience. Whether you’re making this classic dessert for a special occasion or just for a casual weeknight treat, understanding the best practices for storage can ensure that your key lime pie maintains its flavor and texture. Let’s dive deep into how to make the most of your key lime pie bars with detailed storage instructions, freezing guidelines, reheating tips, and more.
Short-term Storage
Once you’ve whipped up a batch of your delightful key lime pie bars, you might find yourself wondering how best to store them. If you plan to indulge in them within a few days, the refrigerator is your best friend. Allow the bars to cool completely at room temperature before transferring them to an airtight container. It’s essential to keep the layers of the bars intact, so consider using parchment paper between layers if you stack them. This will prevent that delightful key lime filling from sticking to itself and losing its delicious texture.
Generally, key lime pie bars can last in the refrigerator for about 4 to 5 days. However, be mindful that the longer they sit, the more the citrus flavor will mellow out. If you’re hosting a gathering, try to serve your key lime pie bars within two to three days for optimal freshness. Place the container in the coldest part of your fridge, usually at the back, to ensure that they stay chilled.
Freezing and Long-term Storage
If you’re looking to store your key lime pie bars for a longer period, freezing is definitely a viable option. Freezing not only extends the shelf life but also preserves the vibrant flavors of your key lime pie. To properly freeze your bars, first, ensure they have cooled completely. Then, cut them into individual portions for easy access later on. Wrap each piece tightly in plastic wrap, ensuring no exposed areas that could lead to freezer burn.
After wrapping, place the pieces in a freezer-safe container or a heavy-duty freezer bag. Label with the date so you can keep track of how long they’ve been stored. Key lime pie bars can be frozen for up to two to three months. When you’re ready to enjoy them, simply transfer them to the refrigerator to thaw overnight. This slow thawing method helps maintain their texture. If you’re in a hurry, you can leave them at room temperature for a couple of hours, but be cautious; this may slightly alter their consistency.
Reheating Best Practices
Reheating key lime pie bars is somewhat different than reheating other desserts. Since the bars are best served chilled, you won’t want to heat them in the conventional sense. Instead, if you prefer them slightly warm, the best method is to leave them out at room temperature for about 15-30 minutes before serving. This slight warming can enhance the flavors without compromising their delightful texture.
In terms of meal prep, making key lime pie bars in advance is a fantastic strategy. You can prepare a batch over the weekend, freeze them, and then enjoy them throughout the week. This is especially great for busy families or individuals who want to indulge in a homemade dessert without spending extra time in the kitchen during the week. Just remember to portion out what you need to avoid thawing and refreezing, which can lead to undesirable texture changes.
Food safety is also crucial when storing key lime pie bars. Always ensure that your bars are kept at safe temperatures. The USDA recommends that perishable items should not be left at room temperature for more than two hours. Keeping your key lime pie bars stored properly will not only safeguard their delicious taste but also ensure you’re enjoying them safely.
In conclusion, mastering the storage, freezing, and reheating techniques for key lime pie bars can elevate your dessert experience. With the right approach, you can savor every last crumb, whether you’re indulging immediately after baking or enjoying a slice weeks later. Remember, it’s all about keeping those vibrant flavors intact while maintaining the delightful texture that makes key lime pie so irresistible.
Nutritional Benefits and Health Information
When indulging in a slice of key lime pie, it’s easy to focus solely on the delightful taste and refreshing zing of citrus. However, it’s equally important to explore the nutritional benefits and health information associated with this classic dessert. Understanding the nutritional profile of key lime pie can help you make informed decisions about how it fits into your dietary lifestyle.
Nutritional Profile
Let’s break down the nutritional components of key lime pie. Typically, a serving of key lime pie contains about 300 to 400 calories, depending on the recipe and portion size. The primary ingredients include key lime juice, sweetened condensed milk, eggs, and graham cracker crust. A standard serving can provide around 10-15 grams of fat, 40-50 grams of carbohydrates, and 5-7 grams of protein. While it may seem indulgent, key lime pie also brings some surprisingly beneficial nutrients to the table.
The key lime juice is packed with Vitamin C, which is essential for immune function, skin health, and antioxidant protection. Additionally, the eggs contribute protein and healthy fats, while the sweetened condensed milk adds a touch of calcium, though it also introduces sugar into the mix. The graham cracker crust, while often overlooked, provides a small amount of fiber and carbohydrates.
Health Benefits
Key lime pie isn’t just a dessert; it can offer several health benefits, thanks to its key ingredients. The high Vitamin C content in key lime juice promotes better skin health and can help your body absorb iron more efficiently. Some studies suggest that Vitamin C can even aid in reducing the risk of chronic diseases, making that slice of pie feel a little less guilty.
Furthermore, the healthy fats found in eggs are vital for brain health and hormone production. It’s worth noting that while key lime pie can be rich in sugars and fats, moderation is key. Enjoying a small slice can satisfy a sweet tooth while providing some beneficial nutrients.
Dietary Considerations
When it comes to dietary considerations, key lime pie can present some challenges for those with specific dietary restrictions. Traditional recipes are not suitable for vegans due to the use of eggs and dairy. However, there are numerous adaptations available that utilize plant-based alternatives, such as coconut cream or silken tofu, to create a vegan key lime pie. Gluten-free options are also achievable by substituting the graham cracker crust with a gluten-free alternative, ensuring that everyone can enjoy this delightful dessert.
For those watching their sugar intake, consider making a reduced-sugar version of key lime pie. You can substitute some of the sweetened condensed milk with unsweetened coconut milk, or use a sugar alternative to cut down on calories while still maintaining that sweet flavor we all love. The versatility of key lime pie allows it to accommodate various dietary needs while still delivering a delicious experience.
When comparing key lime pie to similar desserts, such as lemon meringue pie, key lime pie often contains fewer calories due to its simpler ingredient list. Additionally, the tartness of key limes may provide a more refreshing taste, making it a popular choice in warmer months.
In conclusion, while key lime pie is undoubtedly a treat, it can also fit into a balanced diet when enjoyed in moderation. With its unique flavors and refreshing qualities, this dessert can be both indulgent and beneficial. Whether you choose to enjoy a slice on special occasions or as a satisfying finish to a weeknight meal, understanding its nutritional benefits can help you appreciate key lime pie even more.
Conclusion: Mastering the Perfect key lime pie
Creating the perfect key lime pie is more than just following a recipe—it’s about understanding the techniques, ingredients, and cultural significance behind this beloved dish. Throughout this comprehensive guide, we’ve explored everything from the historical origins to modern variations, ensuring you have all the knowledge needed to make this recipe your own.
Whether you’re a beginner cook or an experienced chef, the techniques and tips we’ve shared will help you create a key lime pie that’s not only delicious but also meaningful. Remember that cooking is a journey of discovery, and each time you make this dish, you’ll learn something new.
We encourage you to experiment with the variations we’ve discussed, adapt the recipe to your dietary needs, and most importantly, share it with the people you love. Food has the incredible power to bring people together, and Key Lime Pie Bars is the perfect dish to create lasting memories around your dinner table.

Don’t forget to share your cooking adventures with us on social media, and feel free to ask questions in the comments below. Happy cooking!
Share this recipe and let us know how it turned out! Tag us on social media for a chance to be featured.