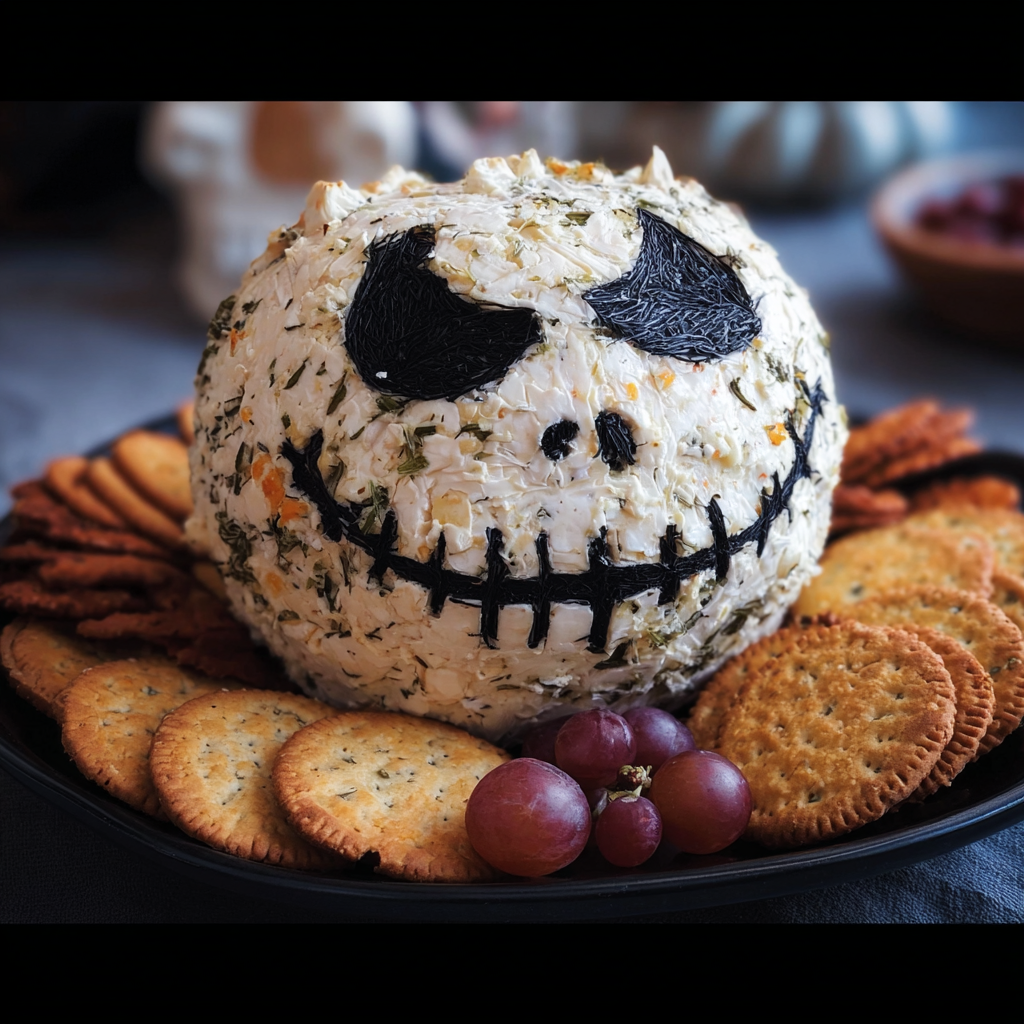
Skellington cheese ball is not just a dish; it’s a delightful centerpiece that brings joy and festivity to any gathering. I first stumbled upon this whimsical cheese ball recipe during a Halloween-themed potluck at a friend’s house a few years ago. As I entered the room, the sight of a cheese ball shaped like a grinning skeleton instantly drew me in. My friend, who had a knack for creating magical dishes, had transformed a simple cheese ball into something extraordinary. With its playful design and creamy, savory flavor, it was an instant hit, and I knew I had to recreate it in my own kitchen.
As we all gathered around, dipping crackers and veggies into the rich cheese spread, I couldn’t help but feel a sense of nostalgia wash over me. It reminded me of childhood gatherings where food was the highlight, and laughter filled the air. The skellington cheese ball was more than just an appetizer; it was a conversation starter, a source of joy, and a touch of creativity on a platter. That night, I learned that cooking isn’t just about feeding the body; it’s about nourishing connections and creating memories.
The Story Behind This Recipe
Delving into the cultural background of the skellington cheese ball, we discover that cheese balls themselves have a long-standing history in American cuisine, stemming from gatherings and celebrations. The earliest cheese balls date back to the 1800s, where they were often made with simple cream cheese and various flavorings. However, the craft of styling a cheese ball into a playful shape, like a skeleton, seems to have gained popularity with the rise of Halloween-themed parties in the late 20th century.
What makes the skellington cheese ball special is its playful design combined with the rich, creamy flavors it offers. Unlike traditional cheese balls that may simply be rolled in nuts or herbs, this recipe elevates the experience by incorporating fun elements like olives for eyes and a smile, making it visually appealing and delicious. For busy families, this recipe serves as a quick dinner solution, allowing them to whip up something enjoyable without spending hours in the kitchen. It’s perfect for those on-the-go weeknights or impromptu gatherings when you want to impress guests without the fuss.
Seasonally, the skellington cheese ball shines brightest during the fall, particularly around Halloween. Its spooky yet charming form adds a festive touch to any autumn gathering, from family parties to school events. There’s something about presenting this fun dish that sparks joy and excitement, making it a highlight of the evening. The emotional connection to the dish stems from its ability to evoke laughter and create shared moments, making it a staple in my party repertoire.
Throughout this article, I promise to share the ins and outs of crafting your very own skellington cheese ball. You’ll learn the essential ingredients, step-by-step instructions, and tips on how to make it both delicious and visually stunning. Plus, I’ll provide insights on variations and how to personalize it for different palates, ensuring that this dish becomes a beloved favorite in your home, just as it has in mine.
The Rich History and Cultural Significance of skellington cheese ball
The skellington cheese ball, while a modern twist on a classic appetizer, carries with it a rich history and cultural significance that reflects the evolution of American culinary traditions. To understand its origins, we must first look at the humble cheese ball itself. Cheese balls likely originated in the United States in the 1800s, a time when cream cheese was becoming more widely available. Early cheese balls were simple mixtures of cream cheese and herbs, often served at social gatherings and holiday parties. Their popularity grew in the 1950s and 1960s, as entertaining at home became a more common practice.
Origins and History
The skellington cheese ball, however, is a relatively recent creation that emerged as Halloween festivities gained traction in American culture. As families began to embrace Halloween not just as a day for costumes and trick-or-treating, but as an occasion for hosting themed parties, the concept of playful food took on new significance. The skellington cheese ball embodies this spirit by merging traditional flavors with a festive presentation, transforming an ordinary cheese ball into an artistic expression that delights both the eyes and the palate.
Through the years, variations of the cheese ball have popped up, often incorporating different cheeses, spices, and toppings. The skellington cheese ball stands out due to its unique shape and the creativity involved in decorating it. Many home cooks have taken to social media to showcase their interpretations, leading to an explosion of ideas and flavors that keep this dish fresh and exciting. Whether it’s a smoky cheddar base or a mix of herbs and spices, the skellington cheese ball can be adapted to suit any taste preference.
Cultural Significance
In terms of cultural significance, the skellington cheese ball is much more than just an appetizer; it has become a symbol of community and celebration during Halloween. It is a dish that encourages connection, drawing people together around the table to share laughter and stories. Families often make it a tradition to prepare this dish together, allowing children to participate in the decorating process, fostering a sense of creativity and teamwork.
Moreover, the skellington cheese ball has found its way into various gatherings beyond Halloween, making appearances at Thanksgiving parties, harvest festivals, and even football tailgates. Its versatility allows it to transcend a single occasion, making it a staple in many homes year-round. As food is often tied to memories and traditions, the skellington cheese ball has woven itself into the fabric of many families, becoming a cherished recipe that is passed down through generations.
Nutritional Benefits
From a nutritional standpoint, the skellington cheese ball can hold its own, especially if you choose to use healthier ingredients. Cheese, while often perceived as indulgent, can provide calcium and protein. By incorporating fresh herbs and spices, you can enhance its flavor while also adding nutritional value. Pairing the cheese ball with a variety of dippables such as whole-grain crackers, fresh vegetables, and fruits not only complements the dish but also contributes to a balanced snack or appetizer that everyone can enjoy.
In conclusion, the skellington cheese ball is more than just a festive treat; it’s a representation of cultural evolution, creativity in cooking, and a means of connection among friends and family. As you dive into the recipe, you’ll discover how this delightful cheese ball can bring joy and flavor to your gatherings, creating memories that last long after the last bite has been enjoyed.
Essential Ingredients for Perfect skellington cheese ball
When it comes to crafting the perfect skellington cheese ball, the ingredients you choose can make all the difference. This delightful appetizer not only pleases the palate but also serves as a fantastic centerpiece for any festive gathering. Let’s delve into the essential ingredients required to whip up this spooktacular treat, exploring not only what you need but why each component is crucial in achieving that perfect flavor and texture.
Essential Ingredients
- 8 oz cream cheese, softened – The base of your skellington cheese ball. Cream cheese adds a rich, creamy texture and acts as a binder for all the other ingredients. Opt for full-fat cream cheese for the best taste.
- 1 cup shredded cheddar cheese – This adds a sharp, tangy flavor that contrasts beautifully with the creaminess of the cream cheese. Choose a good quality sharp cheddar for a more pronounced flavor.
- 1/2 cup crumbled blue cheese – For those who appreciate a bit of funk in their cheese ball, blue cheese adds depth and complexity. If blue cheese isn’t your thing, feel free to substitute with feta for a milder flavor.
- 1/2 cup chopped green onions – These lend a fresh, vibrant note and a bit of crunch. Green onions also add a pop of color, enhancing the visual appeal of your skellington cheese ball.
- 1/2 cup chopped walnuts or pecans – Nuts provide a satisfying crunch and a nutty flavor that complements the cheese. If you’re allergic to nuts, sunflower seeds can serve as a great alternative.
- 1 tablespoon Worcestershire sauce – This adds umami and depth to the flavor profile, tying all the ingredients together beautifully.
- 1 teaspoon garlic powder – Garlic powder enhances the overall flavor, giving it a warm, savory note without being overpowering.
- 1 teaspoon onion powder – Similar to garlic powder, this adds a layer of flavor that enhances the overall taste of your skellington cheese ball.
- Salt and pepper to taste – Essential for seasoning, they help to bring out the flavors of the cheeses and other ingredients.
- Optional: Black olives for decoration – To create the skellington face, black olives can be used. They add a fun touch to the final presentation.
Each ingredient plays a vital role in the overall outcome of your skellington cheese ball. The cream cheese is essential for creating that creamy base, while the cheddar and blue cheese bring distinct flavors that make each bite exciting. The green onions and nuts contribute texture, and the Worcestershire sauce and spices enhance the flavor profile, making every bite a delight.
Print
Skellington Cheese Ball Recipe
Ingredients
- 2 8 oz. Packages of Cream Cheese
- 1 ½ Cups Pepper Jack Cheese
- ⅓ Cup Green Onions
- ½ Cup Bacon Cooked and Diced
- ½ tablespoon Worcestershire Sauce
- Black Olives some whole and some cut into halves
Instructions
-
Start by cooking the bacon and allow to cool. Once cooled, cut into small diced pieces and set aside. While your bacon is cooking, allow your cream cheese to set out of the fridge for easier mixing.
-
Add all ingredients into a stand mixer and mix well. You can also use a bowl and a handmixer if you have that instead.
-
Place combined ingredients onto wax paper. Pick up the cheese mixture and use hands to form a ball. You want to make it as round as possible.
-
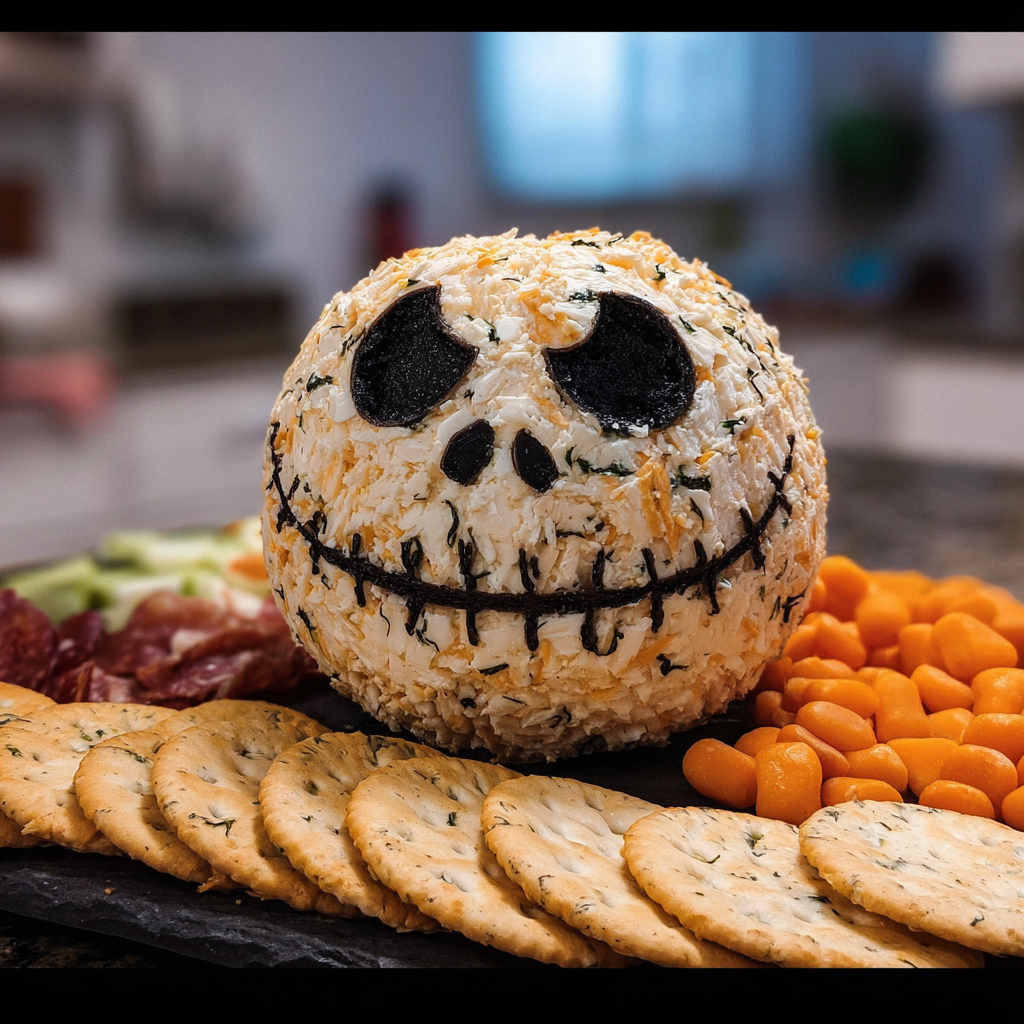
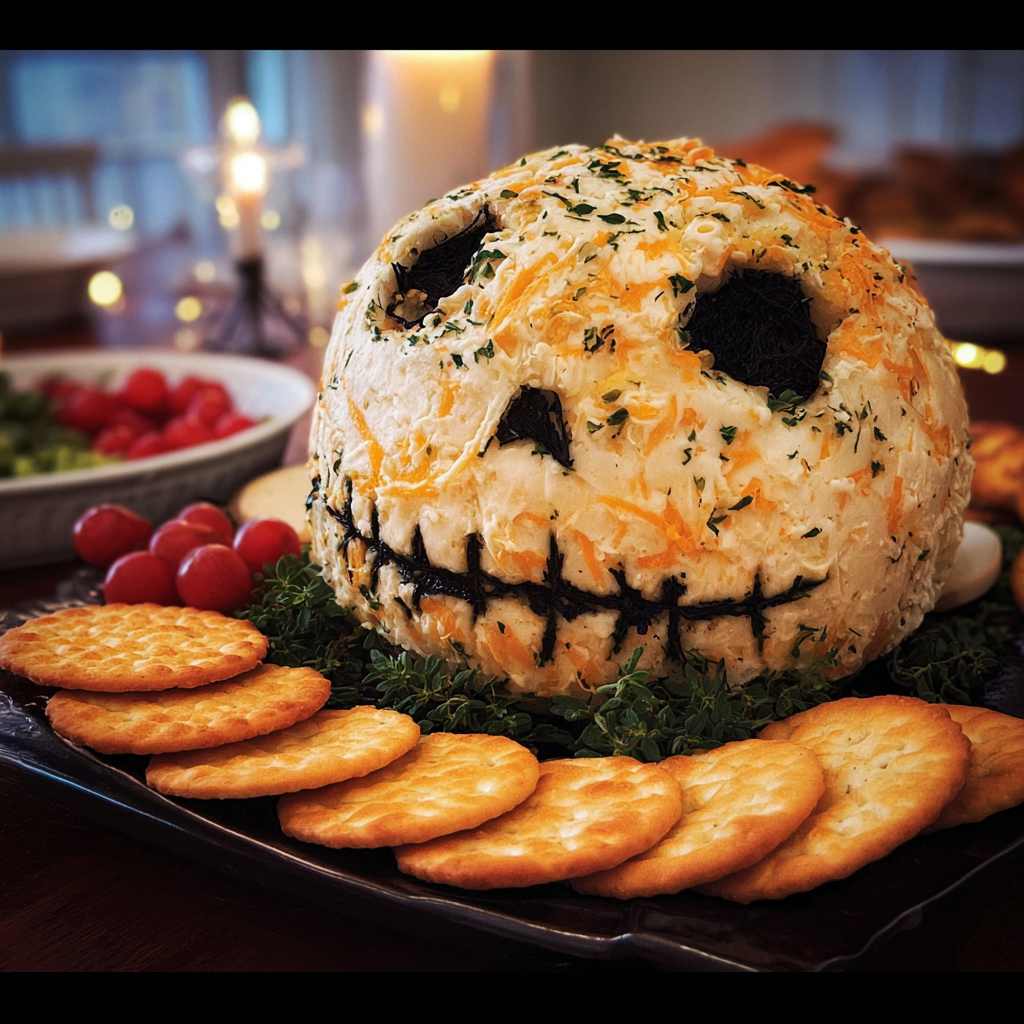
Next, place the ball onto the wax paper and add the details of Jack’s face using the black olives. We used 2 whole olives for his eyes and then sliced olives cut in half for his mouth. You can give him that stitched look by alternating the way the cut olives are facing.
-
Now, place in refrigerator for one hour to allow the cheeseball to set.
-
Once set, remove from fridge and serve with our homemade pumpkin tortilla chips or crackers of your choice.
-
Enjoy!
Shopping Tips
When shopping for your skellington cheese ball ingredients, quality matters. Look for cream cheese that is fresh and creamy, ideally from a reputable brand. For cheeses, consider visiting a local cheese shop or farmer’s market where you can find artisanal options that taste far superior to mass-produced varieties. The same goes for herbs and produce; fresh is always better.
For the nuts, purchasing whole nuts and chopping them yourself will often yield a fresher taste. If nuts are on your mind, look for options that are not overly salted or seasoned to maintain control over the flavors in your cheese ball.
Substitutions and Alternatives
Dietary restrictions can often pose a challenge when cooking, but with this skellington cheese ball, you have plenty of room for substitutions. If you’re vegetarian, ensure that the Worcestershire sauce you choose is vegetarian-friendly, as some brands may contain anchovies. For a vegan alternative, use a plant-based cream cheese and nutritional yeast in place of the cheese, maintaining the flavor while adhering to dietary preferences.
If you want to avoid dairy entirely, consider using a nut-based cheese and adjusting the quantities of your seasonings to fit the flavor profile. Remember that experimenting with ingredients not only caters to dietary needs but can also lead to delightful new flavors that you may fall in love with!
Lastly, as you prepare your ingredients, think about storage. Cream cheese and other dairy products should be kept in the fridge and used before their expiration date. Nuts can be stored in an airtight container in a cool, dark place to prevent rancidity. When buying produce, use fresh ingredients as much as possible, and remember that pre-chopped options often come at a premium price. In terms of budget, consider shopping at bulk stores for nuts and even cheese, which can lead to significant savings.
Detailed Step-by-Step skellington cheese ball Cooking Instructions
Creating your skellington cheese ball is an exciting culinary adventure that balances preparation and creativity. With the right ingredients and a dash of imagination, you can impress your guests with this festive appetizer. In this section, I’ll guide you through each step of the process, ensuring that you have all the tips and tricks needed to make your cheese ball a showstopper.
Preparation Steps
- Gather your ingredients: Before you dive into making your skellington cheese ball, ensure all your ingredients are measured and ready to go. This is known as mise en place, a French culinary term meaning “everything in its place.” It makes the cooking process smoother and helps avoid mistakes.
- Soften the cream cheese: Since cream cheese is the base of your cheese ball, it’s essential to let it soften at room temperature for about 30 minutes. This makes it easier to blend with the other ingredients, ensuring a creamy texture.
- Chop your green onions and nuts: Finely chop the green onions and your choice of nuts. The smaller the pieces, the better they will incorporate into the cheese ball, providing a consistent texture.
- Prepare the cheese mixture: In a large mixing bowl, combine the softened cream cheese, shredded cheddar cheese, crumbled blue cheese, chopped green onions, and nuts. Use a spatula or a large wooden spoon to mix everything together until well combined.
- Add flavorings: Stir in the Worcestershire sauce, garlic powder, onion powder, salt, and pepper. Taste the mixture and adjust the seasoning to your preference. This is your opportunity to get creative—don’t be afraid to add a little more spice or cheese if you feel inspired!
Cooking Process
- Form the cheese ball: Once your mixture is well-blended, it’s time to shape it into a ball. Use your hands to gather the mixture and form it into a ball. Don’t worry about making it perfect, as some rusticity adds to the charm!
- Chill the cheese ball: Wrap the cheese ball in plastic wrap and refrigerate it for at least 30 minutes. This helps it firm up and makes it easier to handle when you’re ready to decorate it.
- Prepare for decoration: While the cheese ball is chilling, you can prepare any garnishes or decorations. If you’re using olives for the skellington face, slice them into desired shapes. You can also prepare fresh herbs or additional nuts for coating the cheese ball.
- Decorate the cheese ball: Once chilled, unwrap the cheese ball and roll it in chopped nuts or herbs if desired. Then, arrange the olives on the surface to create a fun skellington face. Be creative and let your personality shine through in the presentation!
Final Assembly
- Transfer to a serving platter: When your skellington cheese ball is fully decorated, carefully place it onto a serving platter. This is where you’ll want to think about presentation. Consider surrounding it with crackers, veggie sticks, or festive bread to make it a complete appetizer spread.
- Serve with style: As you serve your cheese ball, don’t forget to remind your guests of its festive nature. Share a little background about the recipe—how it can be adapted for various occasions and how you’ve personalized it. This adds a personal touch and makes the experience more enjoyable.
- Enjoy! As your guests dig in, relish in the joy that your skellington cheese ball brings to the table. This is more than just food; it’s about creating memories and sharing laughter with loved ones. Take a moment to savor the flavors and appreciate the effort you put into crafting such a delightful treat.
Remember, the key to a successful skellington cheese ball lies not only in the ingredients but also in the love and creativity you pour into it. So, roll up your sleeves, have fun, and enjoy the process of making this festive appetizer!
Professional Tips and Techniques for skellington cheese ball
When it comes to hosting a gathering, there’s something undeniably magical about a well-prepared cheese ball. Among the many variations, the skellington cheese ball stands out, especially as we approach Halloween or any spooky-themed event. This delightful appetizer not only pleases the palate but also serves as a conversation starter, thanks to its creative presentation that captures the essence of the season. Let me share some professional tips and techniques to elevate your skellington cheese ball experience.
Professional Techniques
Creating the perfect skellington cheese ball is all about technique and quality ingredients. Start by selecting your cheeses wisely; a mix of cream cheese and sharp cheddar creates a creamy yet tangy base. Don’t forget to let your cream cheese sit at room temperature for about 30 minutes before mixing. This step is crucial as it allows for easier blending with the other ingredients.
When mixing your cheeses, use a food processor if you want a super smooth texture, but if you prefer a chunkier cheese ball, hand-mixing is the way to go. Incorporating finely chopped herbs or spices can add an extra layer of flavor, so feel free to experiment. For instance, a pinch of smoked paprika or fresh chives can elevate your skellington cheese ball to gourmet status.
One of my insider secrets is to chill the cheese ball mixture for at least an hour before shaping it into a skeleton form. This not only makes it easier to mold but also allows the flavors to meld beautifully. As you shape your cheese ball, consider using a piece of parchment paper to help form it into a rounded shape. This technique keeps your hands clean and prevents sticking.
Troubleshooting Guide
Even the most experienced cooks encounter challenges when preparing a skellington cheese ball. One common issue is the mixture being too soft to hold its shape. If this happens, simply add more shredded cheese or a bit of powdered sugar to help firm it up. Alternatively, chilling it longer in the fridge can also work wonders.
Another problem might be the cheese ball not sticking to its coating. To tackle this, ensure you roll your cheese ball in the coating (like crushed nuts or herbs) while it’s still slightly sticky. If it has dried too much, lightly wet your hands and roll it again to create a bit more surface moisture.
Presentation Tips
Presentation is key when it comes to a skellington cheese ball. The classic skeleton shape can be achieved by using a small melon baller or a spoon to carve out features. Use olives or peppercorns for eyes and cut strips of red bell pepper for a mouth if you’re feeling adventurous. Placing your cheese ball on a rustic wooden board surrounded by an assortment of crackers, sliced veggies, and nuts can create an inviting display.
To enhance the spooky vibe, consider decorating your cheese ball with edible embellishments—like fake spider webs made from melted cheese or small plastic spiders. Your guests will love the attention to detail, and it will make your gathering unforgettable.
Wine and Beverage Pairings
Pairing drinks with your skellington cheese ball can elevate the entire snacking experience. A crisp, chilled white wine, like Sauvignon Blanc, complements the tangy cheese, while a light red, such as Pinot Noir, can balance the richness. For non-alcoholic options, serve sparkling water with slices of lime or a festive punch that ties in with your Halloween theme.
In conclusion, the skellington cheese ball is more than just a cheese appetizer; it’s a culinary canvas where creativity meets flavor. With these professional tips, you’re well on your way to creating a stunning and delicious centerpiece for your next gathering. So roll up your sleeves and get ready to impress your friends and family!
Creative Variations and Adaptations of skellington cheese ball
While the classic skellington cheese ball is an absolute crowd-pleaser, there are countless variations and adaptations that can cater to different tastes, dietary needs, and seasonal ingredients. Let’s dive into the creative world of cheese balls and explore how you can customize this appetizer to suit any occasion.
Seasonal Variations
When it comes to seasonal flavors, the sky’s the limit for your skellington cheese ball. In the fall, consider incorporating roasted pumpkin puree and spices like nutmeg and cinnamon for a festive twist. This variation not only tastes delightful but also embraces the seasonal spirit of Halloween.
During the holiday season, try adding cranberries or pecans for a pop of color and flavor. A cheese ball rolled in crushed pistachios and topped with dried cranberries can evoke the festive colors of the season. In the spring, fresh herbs like dill or basil can brighten the flavor profile, making it ideal for outdoor picnics or brunch gatherings.
Dietary Adaptations
In today’s world, accommodating different dietary needs is essential, and the skellington cheese ball can easily be adapted. For those following a keto diet, consider using cream cheese and a blend of shredded cheeses like mozzarella and parmesan, while omitting any high-carb ingredients. For a vegan version, you can use cashew cheese or store-bought vegan cream cheese mixed with nutritional yeast for a cheesy flavor.
Gluten-free guests will appreciate you rolling the cheese ball in gluten-free crackers or seeds instead of traditional breadcrumbs or nuts. By being mindful of dietary restrictions, you can ensure that everyone at your gathering can enjoy this delightful appetizer.
Creative Twists
Want to add an international flair to your skellington cheese ball? Why not try a Mediterranean twist by adding sun-dried tomatoes, kalamata olives, and feta cheese? This combination provides a tangy, savory flavor that can transport your guests to a sun-drenched villa in Greece.
If you’re feeling adventurous, consider a spicy Mexican-inspired cheese ball with jalapeños, cilantro, and a hint of lime. Serve it with tortilla chips and salsa for a fun and vibrant appetizer that packs a punch. For those who love sweet and savory combinations, a cheese ball with dried figs or apricots mixed with goat cheese can create an unexpectedly delightful treat.
Leftover transformations are another exciting aspect of the skellington cheese ball. If you have any leftover cheese ball mix, consider using it as a filling for stuffed peppers or as a topping for baked potatoes. You can also roll it into smaller bite-sized balls, coat them in breadcrumbs, and bake them for a delicious snack.
In conclusion, the versatility of the skellington cheese ball makes it an ideal choice for any occasion. From seasonal variations to dietary adaptations and creative twists, there’s no limit to how you can customize this delightful appetizer. So unleash your culinary creativity and enjoy the process of making a cheese ball that’s not just tasty but uniquely yours!
Storage, Reheating, and Meal Prep for skellington cheese ball
When it comes to entertaining, the skellington cheese ball is a perennial favorite. Its festive appearance and delicious flavors make it a perfect appetizer for Halloween parties, festive gatherings, or cozy family nights. But once the party is over, how do you store the leftovers? In this section, we will explore everything you need to know about storing your skellington cheese ball, including short-term storage, freezing options, reheating best practices, meal prep strategies, and essential food safety tips.
Short-term Storage
After you’ve crafted the perfect skellington cheese ball and served it to your guests, you may find yourself with some leftovers. First things first, it’s important to store it properly to maintain its flavor and texture. Ideally, you should refrigerate your cheese ball within two hours of serving. To do this, gently wrap the cheese ball in plastic wrap or aluminum foil, ensuring that it is tightly sealed to prevent air exposure. You can also place it in an airtight container, which is my preferred method. Not only does it keep the cheese ball fresh, but it also prevents any fridge odors from seeping in.
In the refrigerator, the skellington cheese ball will last for about 3 to 5 days. However, the sooner you consume it, the better the flavor and texture will be. When storing, think about portioning the cheese ball into smaller pieces if you know you won’t finish it all at once. This way, you can take out only what you need without exposing the entire cheese ball to air multiple times.
Freezing and Long-term Storage
If you find yourself with more leftovers than you can eat within a few days, you might consider freezing your skellington cheese ball. Freezing is a great way to extend its shelf life while maintaining its delicious taste. To freeze your cheese ball, first wrap it tightly in plastic wrap, ensuring that no air can enter. Then, wrap it again in aluminum foil for extra protection, or place it in a freezer-safe airtight container. Properly stored, your cheese ball can last for up to 2 months in the freezer.
When you’re ready to enjoy your frozen skellington cheese ball, the best approach is to transfer it to the refrigerator and allow it to thaw slowly overnight. This gradual thawing helps maintain the creamy texture of the cheese. Once it is thawed, you can serve it as is or give it a quick mix to restore its smoothness. Avoid refreezing once it has been thawed, as this can compromise the quality of the cheese ball.
Reheating Best Practices
While the skellington cheese ball is typically served cold, there may be occasions when you want to warm it slightly to enhance its flavors. If you decide to reheat it, do so gently to avoid altering its creamy texture. Preheat your oven to a low temperature, around 300°F (150°C), and place the cheese ball on a baking sheet lined with parchment paper. Heat it for about 10-15 minutes, keeping a close eye to ensure it doesn’t melt too much. The goal is to warm it up without compromising its structure.
Another method is to microwave the cheese ball on a microwave-safe plate. Use the defrost setting or heat for short intervals, such as 10-15 seconds at a time, checking frequently. This method is quicker but requires more care to prevent overheating.
Meal Prep and Batch Cooking Strategies
The skellington cheese ball is an excellent candidate for meal prep, especially around the holidays. Preparing cheese balls in advance means less stress on the day of your event. You can make the cheese ball mixture a few days ahead and store it in the refrigerator until you’re ready to shape it. Alternatively, you can roll the cheese ball and freeze it, allowing you to have a ready-made appetizer on hand. Just remember to account for thawing time if you choose this route.
For batch cooking, consider making multiple cheese balls with different flavors or toppings to cater to various palates. You can experiment with different spices, herbs, or even mix in some finely chopped vegetables. Once they’re made, follow the storage techniques discussed earlier to keep them fresh and ready to impress your guests.
Food Safety Considerations and Guidelines
Food safety is paramount when it comes to handling any kind of cheese dish, including your skellington cheese ball. Always ensure that your hands and all utensils are clean when preparing your cheese ball. Keep it refrigerated until you’re ready to serve, and never leave it out for more than two hours. If you’re hosting a longer event, consider serving the cheese ball on a chilled platter or using a serving bowl with ice beneath it to keep it cool.
When it comes to leftovers, always check for signs of spoilage before consuming. If the cheese ball has an off smell, changes in texture, or visible mold, it’s best to err on the side of caution and discard it. Following these guidelines will not only keep you safe but also ensure that your cheese ball remains a delightful treat for all!
In conclusion, understanding how to properly store, freeze, and reheat your skellington cheese ball can make all the difference in preserving its deliciousness. With these tips and strategies, you can enjoy this festive appetizer long after the last guest has left, making it a staple in your culinary repertoire!
Nutritional Benefits and Health Information
As we dive into the world of the skellington cheese ball, it’s essential to not only appreciate its delightful flavors but also its nutritional profile. This appetizer, while indulgent, can be part of a balanced diet when consumed mindfully. In this section, we will explore the nutritional benefits of the key ingredients, dietary considerations, and some healthy modification suggestions to make this cheese ball even better for you.
Nutritional Profile
The main ingredients that typically make up a classic skellington cheese ball include cream cheese, shredded cheddar cheese, various seasonings, and sometimes nuts or herbs for added flavor and texture. Let’s break down the nutritional content of these components:
- Cream Cheese: A primary ingredient, cream cheese is rich in fat, with about 33 calories and 3.2 grams of fat per tablespoon. While it’s higher in calories, it also provides a creamy base that enhances the overall texture of the cheese ball.
- Shredded Cheddar Cheese: This cheese brings a wonderful sharpness and flavor. One ounce (28 grams) of shredded cheddar cheese contains approximately 113 calories, 9 grams of fat, and 7 grams of protein, making it a good source of calcium and phosphorus.
- Nuts: If you incorporate nuts, like chopped pecans or walnuts, they add healthy fats, protein, and fiber. A handful (about 1 ounce) of nuts can provide around 160-200 calories, depending on the type.
- Herbs and Spices: Fresh herbs like chives or parsley add minimal calories but pack a punch in terms of flavor and nutritional value, providing antioxidants and vitamins.
When you combine these ingredients, a typical serving of skellington cheese ball (about 2 ounces) can range from 150 to 250 calories, depending on the specific ingredients and proportions used. It’s important to be mindful of portion sizes, especially during festive occasions when it’s easy to overindulge.
Health Benefits
While the skellington cheese ball is undeniably a rich treat, the key ingredients offer various health benefits too. For instance:
- Calcium and Protein: Both cream cheese and cheddar cheese are excellent sources of calcium and protein, essential for bone health and muscle maintenance.
- Healthy Fats: If you choose to add nuts, you’re introducing healthy fats into the mix, which are crucial for heart health and can help keep you feeling satisfied.
- Vitamins and Antioxidants: The addition of herbs not only enhances flavor but also contributes vitamins A and K, as well as various antioxidants that support overall health.
While the cheese ball may not be a health food per se, it can still fit into a balanced diet when enjoyed in moderation, especially when paired with fresh vegetables or whole-grain crackers.
Dietary Considerations
When serving a skellington cheese ball, it’s crucial to consider dietary restrictions and preferences. Here are some common considerations:
- Gluten-Free: The cheese ball itself is gluten-free, but be cautious with the crackers or dippers used for serving. Opt for gluten-free versions to accommodate those with gluten sensitivities.
- Vegetarian: The cheese ball is vegetarian-friendly, making it a great option for gatherings that include vegetarians.
- Dairy-Free Alternatives: For those who are lactose intolerant or following a dairy-free lifestyle, consider using plant-based cream cheese and cheese alternatives. Many brands offer delicious substitutes that can mimic the taste and texture of traditional cheese.
- Low-Carb/Keto Options: If you’re on a low-carb or keto diet, the cheese ball can fit right in! Pair it with low-carb vegetables like cucumber, bell peppers, or celery for a satisfying snack.
In summary, the skellington cheese ball can be a delightful addition to any gathering, providing both flavor and nutrition. By understanding its nutritional profile and making mindful choices, you can enjoy this festive appetizer while keeping your dietary goals in check. So go ahead, whip up that cheese ball, and impress your friends and family with both its taste and its thoughtful nutritional benefits!
Frequently Asked Questions About Skellington Cheese Ball
Creepy peepers cheese ball
The Creepy Peepers Cheese Ball is a fun and spooky twist on traditional cheese balls, perfect for Halloween gatherings. To make this dish, start with your favorite cheese ball base—cream cheese, cheddar, and spices work well. Shape the mixture into a ball and then cover it with black olives or sliced almonds to create the “eyes.” For an added creepy effect, use small pieces of red bell pepper or pimento for the pupils. Serve it with an assortment of crackers and veggies for dipping, and watch your guests delight in the eerie presentation!
Skeleton head cheese ball
The Skeleton Head Cheese Ball is a striking centerpiece for any Halloween party, resembling a spooky skull. To create this, mix cream cheese with garlic powder, herbs, and shredded cheese, and form it into a skull shape. For the anatomical details, use black olives for the eyes, and a piece of carrot or pepper for the nose. You can also create teeth using sliced almonds or mini marshmallows. To enhance the presentation, serve it on a platter surrounded by crackers, veggies, and a drizzle of balsamic glaze for a blood-like effect!
Scary cheeseball
A Scary Cheeseball can be as simple or elaborate as you want, and it’s sure to impress your guests. Start by mixing cream cheese with your choice of shredded cheese, herbs, and spices, then shape it into a ball. To give it a frightening appearance, coat it with crushed nuts or spices like paprika for a “dirt” effect. Use items like pretzel sticks or edible eyes to create a creepy face. For a more interactive experience, consider creating a “bloody” dipping sauce using ketchup or a spicy sriracha-mayo mix to accompany the cheeseball, making it an unforgettable treat!