No-bake protein balls are an absolute game-changer in the world of quick snacks and healthy meal options. I still vividly remember the day I stumbled upon this delightful recipe while searching for a solution to satisfy my family’s cravings without compromising our health. My kids, like many others, were notorious for turning their noses up at anything that remotely resembled a “healthy” snack. One afternoon, with a looming deadline for a school project and a hungry crowd to feed, I found myself scrolling through countless recipes online. That’s when I discovered the magic of no-bake protein balls. Little did I know, this would become a staple in our household, transforming how we approach snacks and meal prep.
The first time I made no-bake protein balls, I felt like a culinary magician. I gathered oats, nut butter, honey, and a few chocolate chips—ingredients I already had at home. As I mixed them together, the aroma of the nut butter and the sweetness of the honey filled the air, igniting my excitement. I rolled the mixture into bite-sized balls and placed them in the refrigerator. When the kids came home, they were skeptical at first, but one bite in, and I saw their eyes light up. “These are so good!” they exclaimed, and just like that, no-bake protein balls became our family’s go-to snack. The joy and surprise on their faces when they realized they were eating something healthy was priceless.
The Story Behind This Recipe
No-bake protein balls are not just a convenient snack; they embody a larger movement towards healthier eating, particularly in busy families. The beauty of this dish lies in its versatility. You can mix and match ingredients to suit your family’s taste or dietary restrictions. They are often made with a base of oats or nut butter, combined with protein powder and sweeteners like honey or maple syrup. What makes no-bake protein balls special is that they require no cooking or baking, making them an excellent choice for those who may not have the time or energy to whip up elaborate meals.
This recipe is also perfect for busy families looking for quick dinner solutions. Whether you need a quick breakfast on the go, a post-workout snack, or a satisfying dessert, no-bake protein balls fit the bill perfectly. They can be prepared in bulk and stored in the fridge for several days, making them an ideal option for meal prep. This flexibility allows families to enjoy a nutritious snack without the stress of cooking every day. Plus, the excitement of rolling the balls together can turn into a fun family activity, creating lasting memories in the kitchen.
Why You’ll Love This Dish
No-bake protein balls are also seasonally relevant. While they can be enjoyed year-round, they are particularly delightful in the summer when you want something refreshing but not too heavy. Picture this: a picnic at the park, a sunny day, and a cooler filled with these delicious bites. It’s a perfect treat for summer outings, road trips, or even just a lazy afternoon at home. The emotional connection to this dish is profound; it’s not just about nourishing the body but also about bringing the family together, sharing stories, and creating cherished moments.
In this article, readers will learn how to make their own no-bake protein balls, with tips on ingredient substitutions, variations, and storage solutions. I promise that by the end, you will be well-equipped to create your own version of this snack that can cater to your family’s tastes and dietary needs. Whether you are a seasoned chef or a kitchen novice, you will find that making no-bake protein balls is as easy as it is rewarding. So, roll up your sleeves, and let’s dive into the wonderful world of no-bake protein balls!
The Rich History and Cultural Significance of no-bake protein balls
No-bake protein balls have gained immense popularity in recent years, but their roots stretch back to various traditional snacks that have long been enjoyed around the world. The concept of combining healthy ingredients into a portable, energy-boosting snack is not new; it’s a practice that has been embraced in different cultures for generations. The evolution of no-bake protein balls reflects a growing awareness and demand for nutritious food options that fit seamlessly into our busy lifestyles.
Origins and History
The modern interpretation of no-bake protein balls, particularly in the Western world, took off with the rise of health-conscious eating during the late 20th century. With more people becoming aware of the benefits of protein and its role in muscle recovery and overall health, recipes began to emerge that catered to this demand. The introduction of protein powders also played a significant role in the evolution of these snacks, allowing for a quick and easy way to boost protein intake without the need for cooking.
Cultural Significance
The cultural significance of no-bake protein balls is evident in their adaptability. In today’s world, where convenience often trumps time-consuming cooking processes, these snacks bridge the gap between health and taste. As more families seek quick meal solutions, no-bake protein balls can be tailored to fit dietary restrictions, whether gluten-free, vegan, or paleo. They are often seen at potlucks, school events, and even gym sessions, showcasing their versatility as a snack that appeals to various palates and preferences.
Moreover, no-bake protein balls have become a symbol of the changing landscape of food culture, where convenience and nutrition go hand in hand. They reflect a shift towards mindful eating, where families are looking for ways to integrate healthier choices into their daily routines without sacrificing flavor or enjoyment.
Nutritional Benefits
From a nutritional standpoint, no-bake protein balls offer an impressive array of health benefits. Packed with protein, fiber, and healthy fats, they provide sustained energy without the crash that comes from sugary snacks. The primary ingredients—oats, nut butters, and seeds—are rich in nutrients that support overall health. Oats are a great source of complex carbohydrates, providing lasting energy, while nut butters offer healthy fats and protein that keep you satiated.
Additionally, no-bake protein balls can be customized to include superfoods such as chia seeds, flaxseeds, or even spirulina, further enhancing their nutritional value. For families striving to maintain a balanced diet, these snacks serve as an accessible way to incorporate more whole foods and nutrients into their meals. They can also be a great post-workout snack, helping with muscle recovery due to their protein content.
In conclusion, no-bake protein balls are not just a trendy snack; they carry a rich history and cultural significance that reflects our evolving relationship with food. As we embrace healthier eating habits, these delightful bites serve as a reminder that nutritious food can also be convenient and delicious. Whether you’re a busy parent, a fitness enthusiast, or just someone who enjoys a good snack, no-bake protein balls are sure to find a special place in your heart—and your kitchen.
Essential Ingredients for Perfect no-bake protein balls
When it comes to creating delicious no-bake protein balls, the ingredients you choose play a pivotal role in both flavor and nutrition. Let’s dive into the essential components that will help you whip up these delightful snacks while ensuring they are packed with goodness.
Essential Ingredients
- Rolled Oats: 1 cup
- Nut Butter: ½ cup (such as almond butter or peanut butter)
- Protein Powder: ½ cup (whey, pea, or your favorite plant-based protein)
- Honey or Maple Syrup: ¼ cup
- Dark Chocolate Chips: ½ cup (optional, for a sweet touch)
- Chia Seeds or Flaxseeds: 2 tablespoons (for added omega-3s)
- Vanilla Extract: 1 teaspoon
- Salt: a pinch (to enhance flavor)
Each of these ingredients not only contributes to the flavor but also plays a significant role in the nutritional profile of your no-bake protein balls. For instance, the rolled oats provide a wholesome base that is rich in fiber, helping you feel full longer and providing sustained energy. Nut butters add healthy fats and protein, making these snacks satisfying and nourishing.
Protein powder is crucial for those looking to increase their protein intake, especially for active individuals or those following a fitness regimen. Sweeteners like honey or maple syrup not only add a touch of sweetness but also help bind the ingredients together. If you’re looking for a little decadence, the addition of dark chocolate chips elevates the flavor profile while providing antioxidants.
Chia seeds or flaxseeds are fantastic additions for their omega-3 fatty acids, which are essential for heart health. A drop of vanilla extract enhances the overall taste, while a pinch of salt balances the sweetness and brings out the flavors. Now that we’ve covered what goes into these delightful bites, let’s talk about how to select the best ingredients.
Print
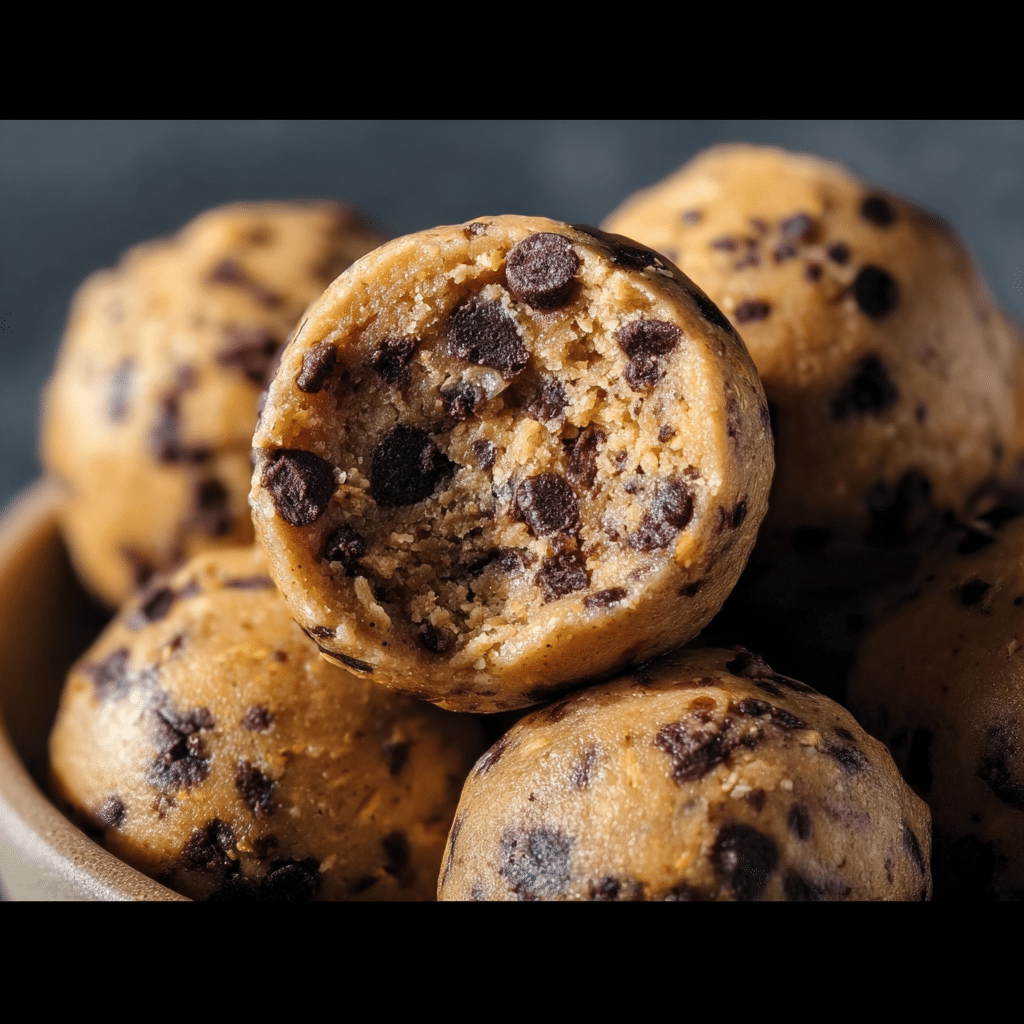
No-Bake Protein Balls with Cookie
Ingredients
- 2 cups oat flour
- ⅓ cup protein powder
- ½ cup nut butter, melted and slightly cooled
- 4 Tablespoons maple syrup
- 2 teaspoons pure vanilla extract
- ½ cup milk
- optional: ¼-1/3 cup mini chocolate chips
Instructions
- Line a baking sheet or plate with parchment paper or a silicone baking mat. Set aside.
-
In a large bowl, whisk together the oat flour and protein powder. Using a rubber spatula or wooden spoon, stir in the nut butter, maple syrup, vanilla, and milk. The mixture should be like a cookie dough consistency- come together, but shouldn’t be sticky. If it’s too dry, add 1 Tablespoon milk. Stir in the chocolate chips, if desired.
-
Using a cookie scoop or spoon, grab 1.5-2 Tablespoons of dough and roll into balls. Set the rolled balls on the baking sheet or plate as you finish the rest. Store in an airtight container in the refrigerator for up to 1 week.
Shopping Tips
When shopping for ingredients to make your no-bake protein balls, quality matters. For rolled oats, look for whole grain options without added sugars or flavors. Organic oats can be a great choice, as they are less likely to be processed with chemicals.
For nut butter, choose natural varieties without added sugars, oils, or preservatives. If you’re worried about allergens, there are sunflower seed butters or soy nut butters available as alternatives. When selecting protein powder, consider your dietary preferences—whey protein is popular for its effectiveness, while plant-based options like pea protein cater to vegan diets.
Honey and maple syrup should be pure and organic when possible, as they are less processed and retain more nutrients. As for chocolate chips, opt for dark chocolate with a cocoa content of 70% or higher for a richer flavor and more health benefits.
Substitutions and Alternatives
Dietary restrictions? No problem! There are plenty of substitutions you can make while still enjoying your no-bake protein balls. If you’re allergic to nuts, consider using sunflower seed butter or tahini. For a vegan-friendly option, swap honey for agave nectar or brown rice syrup. If you prefer a low-carb option, coconut flour can replace oats, but you may need to adjust the liquid content to maintain the right consistency.
For gluten-free versions, ensure your oats are certified gluten-free, as cross-contamination can occur in facilities that process both gluten and gluten-free grains. If you’re looking to reduce sugar intake, you can use mashed bananas or unsweetened applesauce as a sweetener, but remember that this may alter the texture slightly.
Storage is key for making your no-bake protein balls last. Store them in an airtight container in the fridge for up to a week, or freeze them for up to three months. Just be sure to separate layers with parchment paper to prevent sticking.
In terms of cost-saving tips, buying ingredients in bulk can significantly reduce your expenses. Look for bulk bins at local grocery stores for oats, seeds, and nut butters. Additionally, consider making your own nut butters at home if you have a food processor—it’s easier than you think!
Lastly, when it comes to organic versus conventional ingredients, while organic options can be pricier, they often provide more health benefits and are better for the environment. Weigh the costs against the benefits based on your personal values and budget.
With these ingredients and tips in hand, you are well on your way to making delicious and nutritious no-bake protein balls that will keep you fueled and satisfied throughout the day!
Detailed Step-by-Step no-bake protein balls Cooking Instructions
Making no-bake protein balls is a fun and straightforward process that anyone can master. With just a handful of ingredients and a little bit of time, you’ll have a delicious snack ready to go. Let’s take a detailed look at the step-by-step process to create these nutritious bites.
Preparation Steps
- Gather Your Ingredients: Before you start, make sure you have all your ingredients measured and ready to go. This is known as mise en place and helps streamline the cooking process. You’ll need rolled oats, nut butter, protein powder, honey or maple syrup, dark chocolate chips, chia seeds or flaxseeds, vanilla extract, and salt.
- Choose Your Mixing Bowl: Select a large mixing bowl that can accommodate all the ingredients. A sturdy bowl will help with mixing and ensure no ingredients spill over. You can also use a stand mixer if you prefer.
- Mix Dry Ingredients: Start by adding the rolled oats, protein powder, and chia or flaxseeds into the bowl. Mix them together until evenly combined. This will help distribute the protein powder and seeds uniformly throughout the mixture.
- Combine Wet Ingredients: In a separate bowl, mix your nut butter, honey or maple syrup, and vanilla extract. If your nut butter is too thick, you might want to warm it slightly in the microwave (about 10-15 seconds) to make it easier to mix.
Cooking Process
- Combine Wet and Dry Mixtures: Pour the wet mixture into the dry ingredients. Use a spatula or wooden spoon to mix everything together. The mixture should start to come together and be slightly sticky. If it feels too dry, add a teaspoon of water or more nut butter until you reach the desired consistency.
- Add Chocolate Chips: If you’re using chocolate chips, fold them in gently after the mixture has come together. This way, you’ll have little pockets of chocolate goodness in your no-bake protein balls.
- Test the Consistency: You want your mixture to be moldable but not too sticky. If it’s too wet, add a little more protein powder or oats. Conversely, if it’s too dry, you can add a drizzle of honey or a splash of water.
- Chill the Mixture: For better handling, consider refrigerating the mixture for about 10-15 minutes. This helps it firm up and makes it easier to shape into balls.
Final Assembly
- Shape the Balls: Once the mixture is chilled, use your hands to scoop out about one tablespoon of the mixture and roll it into a ball. You can make them as big or small as you like, but standard sizes are about 1 inch in diameter.
- Place on a Baking Sheet: Line a baking sheet with parchment paper and lay out the formed balls. This prevents them from sticking and makes for easy cleanup.
- Refrigerate Again: For best results, place the baking sheet in the refrigerator for at least 30 minutes. This helps the no-bake protein balls firm up and hold their shape better.
- Store Properly: Once they are firm, transfer them to an airtight container. You can keep them in the refrigerator for up to a week or freeze them for longer storage. Just be sure to separate layers with parchment paper if you’re stacking them in the container.
Common mistakes to avoid include overmixing or under-measuring ingredients. Too much nut butter can make the mixture too greasy, while too little can cause the balls to crumble. The key is to maintain a balance so that the no-bake protein balls hold their shape without being overly sticky.
Chef secrets? Feel free to experiment! You can add spices like cinnamon or nutmeg for an added flavor kick, or even dried fruits like cranberries or raisins for a chewy texture. Don’t be afraid to get creative with your mix-ins! Timing is crucial, so ensure you’re multitasking efficiently—while the mixture chills, clean up your workspace to save time later.
In just about 30 minutes, you’ll have a batch of no-bake protein balls that not only taste delicious but also provide a nutritious snack option for any time of the day. Whether you grab them for breakfast, a post-workout treat, or a midday pick-me-up, these protein-packed bites are sure to become a staple in your kitchen!
Professional Tips and Techniques for no-bake protein balls
When it comes to creating the perfect no-bake protein balls, there’s so much more than just throwing ingredients together in a bowl. These little bites of energy and nutrition can be crafted with care, using professional tips that elevate them from simple snacks to culinary delights. Whether you’re a beginner or an experienced cook, mastering these techniques will ensure your no-bake protein balls are not only delicious but also visually appealing and nutritionally balanced.
Professional Techniques
To begin, let’s dive into some professional cooking techniques that can enhance your no-bake protein balls. The foundation of any good no-bake protein ball is the balance of flavors and textures. Start with a base of protein, such as protein powder or nut butter, and combine it with a binding agent like honey or maple syrup. But here’s a pro tip: heat your nut butter slightly in the microwave before mixing. This makes it easier to incorporate and creates a smoother texture that allows the other ingredients to blend seamlessly.
Using a food processor can also be a game-changer in achieving that perfect consistency. Instead of mixing by hand, pulse your oats, nuts, and any dry ingredients first to create a finer texture. Then, add in your protein powder and wet ingredients, pulsing until everything is just combined. This method ensures that the flavors are evenly distributed, and you won’t end up with clumps of dry ingredients in your final product.
For those looking to get fancy, consider rolling your no-bake protein balls in various coatings. From shredded coconut to crushed nuts or even a light dusting of cocoa powder, these coatings can add an appealing visual element and an extra crunch. Just remember to refrigerate the balls after coating them, as this helps the coating to adhere better.
Troubleshooting Guide
Even with the best intentions, things can go awry in the kitchen. Here’s a troubleshooting guide for common issues you may encounter while making no-bake protein balls.
- Too Crumbly: If your mixture is too dry and crumbly, simply add a splash more of your binding agent. A teaspoon of honey or nut butter can make all the difference.
- Too Sticky: Conversely, if the mixture is too sticky to handle, incorporate a bit more dry ingredients, like oats or protein powder, to achieve the right consistency.
- Flavor Balance: Sometimes, the flavor might be off. If it’s too sweet, add a pinch of salt. If it’s lacking flavor, consider adding spices like cinnamon, nutmeg, or even a splash of vanilla extract to elevate the taste.
These simple adjustments can save your no-bake protein balls from potential disaster, ensuring they turn out just right every time.
Presentation Tips
The presentation of your no-bake protein balls can elevate your snacking experience. Consider using decorative paper liners for individual servings, which not only makes them look professional but also makes them easy to grab on the go. Arranging your protein balls on a beautiful platter and garnishing with fresh fruit or drizzling some melted dark chocolate over the top can create an impressive display for gatherings.
For added flair, you can use cookie cutters to shape the protein mix into fun shapes before chilling. This adds a playful element, especially for children or themed parties. Remember, we eat with our eyes first, so make your no-bake protein balls as visually appealing as they are tasty!
Lastly, consider pairing your no-bake protein balls with beverages that enhance the experience. A refreshing herbal tea or a glass of almond milk complements the nutty flavors beautifully. For adults, a light, fruity white wine can pair surprisingly well, creating a delightful contrast to the sweetness of the protein balls.
With these professional tips and techniques, you’re set to create no-bake protein balls that not only satisfy your hunger but also impress your friends and family. Remember, the joy of cooking lies not only in the taste but also in the creativity and presentation that you bring into your kitchen!
Creative Variations and Adaptations of no-bake protein balls
One of the many joys of making no-bake protein balls is the endless possibilities for creativity. These delightful snacks can be tailored to fit your taste preferences, dietary restrictions, and seasonal ingredients. The flexibility of no-bake protein balls allows you to explore different flavors, textures, and even cultural influences. Let’s take a journey through some creative variations and adaptations that can transform your no-bake protein balls into something truly extraordinary.
Seasonal Variations
As the seasons change, so can the ingredients in your no-bake protein balls. Take advantage of seasonal produce to keep your snacks fresh and exciting. In the fall, consider adding pumpkin puree, spices like cinnamon and nutmeg, and perhaps some chopped pecans for a delicious autumn-inspired treat. These pumpkin spice protein balls are perfect for cozying up with a warm drink.
In the spring and summer, you can incorporate fresh fruits like mashed bananas or chopped dates, which not only add natural sweetness but also a moist texture to your protein balls. For a tropical twist, try adding shredded coconut and dried pineapple or mango. This not only creates a flavor explosion that transports you to a sunny beach but also provides a vibrant, colorful treat.
Dietary Adaptations
Adapting your no-bake protein balls to fit various dietary needs is easy and fun. For those following a vegan lifestyle, simply swap honey for agave syrup or maple syrup. Use plant-based protein powder to maintain the protein content without compromising on dietary restrictions. Gluten-free options are also available by ensuring your oats are certified gluten-free and using nut flours instead of regular flour.
If you’re looking for a low-carb option, consider swapping the oats for ground almonds or coconut flour. Adding ingredients like chia seeds or flaxseeds not only boosts the nutritional profile but also helps bind the mixture together. For a keto-friendly version, you can use erythritol or stevia as a sweetener to maintain sweetness without the carbs.
Creative Twists
Don’t be afraid to mix things up! One of my favorite twists on traditional no-bake protein balls is incorporating international flavors. For example, try adding matcha powder for an Asian-inspired flavor profile, or infuse your mixture with tahini and date syrup for a Middle Eastern flair. You can also create a Mexican chocolate version by adding cocoa powder, cinnamon, and a hint of chili powder for some warmth.
Another exciting adaptation is to experiment with different cooking methods. While no-bake protein balls are typically chilled, you can lightly toast oats or nuts in a pan to bring out their flavor before mixing. This adds an extra layer of complexity to your snack.

And don’t forget about leftovers! If you find yourself with extra no-bake protein balls, they can easily be transformed into a nutritious breakfast. Crumble them over yogurt or smoothie bowls, or blend them into your morning smoothie for a protein-packed kickstart to your day.
The versatility of no-bake protein balls is truly remarkable. With endless variations, you can tailor your snacks to fit any occasion, dietary need, or flavor profile. So get creative, and let your taste buds take the lead!
Storage, Reheating, and Meal Prep for no-bake protein balls
When it comes to creating and enjoying no-bake protein balls, one of the key aspects that can dramatically enhance your experience is understanding how to store them properly. These delightful little bites are not just a nutritious snack; they are also incredibly versatile and convenient. However, to maintain their freshness, flavor, and texture, it’s essential to follow some guidelines for storage, reheating, and meal prep.
Short-term Storage
After you’ve whipped up a batch of no-bake protein balls, you might be tempted to dive right into them. I know I am! But if you want to savor them over several days, proper short-term storage is crucial. The best way to store your freshly made protein balls is in an airtight container in the refrigerator. This method keeps them fresh and prevents them from drying out or absorbing odors from other foods.
When selecting a container, consider using glass or BPA-free plastic containers with tight-fitting lids. These materials not only help maintain optimal moisture levels but also protect the protein balls from contamination. If you’ve made a larger batch, you might want to portion them out into smaller containers. This way, you can grab a quick snack without having to open the entire batch, which can expose the rest to air and reduce their shelf life.
Typically, no-bake protein balls can last up to a week in the refrigerator. However, I’ve found that the flavors often deepen and improve after a day or two, making them even more enjoyable. It’s like a fine wine; the longer they sit, the better they get!
Freezing and Long-term Storage
If you’ve made a big batch of no-bake protein balls or simply want to enjoy them over an extended period, freezing is an excellent option. To freeze your protein balls effectively, start by placing them in a single layer on a baking sheet lined with parchment paper. This prevents them from sticking together. Once they are frozen solid (about 1-2 hours), you can transfer them to a freezer-safe container or a resealable plastic bag. Don’t forget to label the bag with the date, so you know how long they’ve been in there.
Frozen protein balls can last for up to three months, maintaining most of their flavor and texture. When you’re ready to indulge, simply take out the desired amount and let them thaw in the refrigerator or at room temperature for about 30 minutes. I love having a stash of these in my freezer—nothing beats the convenience of having a healthy snack on hand when cravings hit!
Reheating Best Practices
While no-bake protein balls are typically enjoyed cold or at room temperature, there are times when you might want to warm them up slightly. If you’re feeling adventurous, try microwaving one or two for about 10-15 seconds. This can enhance the flavors and make them a bit softer and more indulgent. Just be cautious, as overheating can cause them to lose their delightful texture. Remember, they’re meant to be enjoyed as a no-bake treat, so don’t go overboard with the heat!
Meal prepping is another fantastic way to ensure you always have no-bake protein balls on hand. Consider dedicating a day each week to whip up a large batch. You can customize flavors and ingredients based on your cravings or dietary needs, creating a variety of protein balls that suit all your snack-time moods. With this strategy, you can easily portion them into snack-sized containers, making it convenient to grab one before a workout or as an afternoon pick-me-up.
Food Safety Considerations and Guidelines
When storing no-bake protein balls, it’s essential to consider food safety. Always ensure that your hands and any utensils or containers you use are clean to avoid contamination. If you’re using ingredients that are prone to spoilage, like fresh fruits or dairy-based products, be particularly mindful of storage times. As a general rule, if anything smells off or looks questionable, it’s best to err on the side of caution and discard it.
The shelf life of your protein balls will depend on the ingredients you’ve included. For instance, those made with nut butter and oats will last longer than those with perishable fruits. Always trust your instincts—if something doesn’t seem right, it’s better to be safe than sorry.
Portioning and Packaging Tips
When it comes to portioning your no-bake protein balls, consider making them in bite-sized pieces. This not only makes them easier to eat on the go but also allows for portion control. If you’re planning to take them with you for a busy day, pack them in small snack bags or containers that fit nicely in your bag or lunchbox. I often keep a few in my car for those moments when I need a quick energy boost while running errands.
In conclusion, mastering the art of storage for no-bake protein balls can enhance your snacking experience significantly. By following these guidelines on short-term and long-term storage, reheating methods, and meal prep strategies, you’ll ensure that your delicious, nutritious treats are always at your fingertips. And let’s be honest, who doesn’t love having a healthy snack ready to go?
Nutritional Benefits and Health Information
Understanding the nutritional benefits of no-bake protein balls is crucial for anyone looking to boost their health through diet. These tasty treats are not only a great way to satisfy your sweet tooth, but they are also packed with nutrients that can support your overall well-being. Let’s dive deep into the nutritional profile, health benefits, and dietary considerations associated with these delightful snacks.
Nutritional Profile
The beauty of no-bake protein balls lies in their versatility. You can customize them with a variety of ingredients, making their nutritional value highly adaptable. On average, a single protein ball contains anywhere from 100 to 200 calories, depending on the ingredients used. The primary macronutrients typically include carbohydrates, protein, and fats.
For example, if you make your protein balls with oats, nut butter, and protein powder, you can expect a distribution of approximately 10-15 grams of carbohydrates, 5-10 grams of protein, and 5-10 grams of healthy fats per ball. This combination makes them an excellent source of sustained energy, particularly for those with active lifestyles. Additionally, they often include fiber from oats and nuts, which promotes digestive health and keeps you feeling full longer.
Health Benefits
The key ingredients in no-bake protein balls contribute to their numerous health benefits. For instance, oats are a fantastic source of complex carbohydrates and fiber, which help regulate blood sugar levels and keep energy levels stable throughout the day. They are also rich in vitamins and minerals, including manganese, phosphorus, and magnesium.
Nut butters, whether almond, peanut, or cashew, add healthy fats and protein, making these protein balls satiating and nourishing. They provide essential fatty acids, which are crucial for heart health and brain function. Moreover, nut butters are packed with antioxidants and can help reduce inflammation.
Adding ingredients like chia seeds or flaxseeds can further enhance the nutritional profile of your protein balls. These seeds are high in omega-3 fatty acids and provide a good source of plant-based protein and fiber. Additionally, if you include dried fruits like cranberries or dates, you’ll benefit from natural sweetness along with vitamins, minerals, and antioxidants.
Dietary Considerations
When considering no-bake protein balls as part of your diet, it’s essential to be mindful of potential allergens. Common allergens include nuts, dairy, and gluten, depending on the ingredients you choose. If you’re preparing these snacks for a group, it’s wise to ask about dietary restrictions beforehand. There are plenty of alternatives available, such as using sunflower seed butter for nut-free options or gluten-free oats for those with gluten sensitivities.
For those following specific dietary plans, no-bake protein balls can easily be tailored to fit various lifestyles. For example, if you’re on a vegan diet, you can use plant-based protein powder and maple syrup instead of honey. If you’re following a ketogenic diet, simply swap out the oats for crushed nuts and seeds, and reduce the sweetener to keep the carb count low.
The caloric content and macronutrient distribution can also be adjusted based on your fitness goals. If you’re looking to gain muscle, you can increase the protein content by adding more protein powder or Greek yogurt. Conversely, if you’re aiming for weight loss, focus on portion control and using lower-calorie ingredients like unsweetened cocoa powder or coconut flour.
In summary, no-bake protein balls offer a highly customizable and nutritious snack option that can fit seamlessly into various diet plans. With their rich nutritional profile, health benefits from key ingredients, and the ability to cater to dietary restrictions, these little bites can be a powerful addition to your daily routine. So, the next time you’re in need of a quick, healthy snack, consider reaching for your homemade protein balls—you won’t regret it!
Frequently Asked Questions About No-Bake Protein Balls
Cookie dough protein balls recipe
To make delicious cookie dough protein balls, you can start by combining oats, nut butter, honey, and mini chocolate chips in a bowl. Use rolled oats for a chewy texture, and natural nut butter like almond or peanut for added flavor and protein. If you prefer a sweeter taste, consider adding a tablespoon of maple syrup. Once all ingredients are mixed well, roll them into small balls and refrigerate for at least 30 minutes to firm them up. These protein balls can be stored in an airtight container in the fridge for up to a week, making them a convenient snack on-the-go.

Protein balls recipe without protein powder
You can easily create protein balls without using protein powder by incorporating ingredients that naturally contain protein. Start with a base of oats and nut butter, and add seeds like chia or flaxseed for an extra protein boost. Dried fruits, such as cranberries or apricots, add sweetness and flavor, while a small amount of honey or maple syrup can help bind the mixture together. To enhance the taste, consider adding spices like cinnamon or vanilla extract. Once mixed, roll the mixture into balls and chill them in the refrigerator for a quick, nutritious snack that’s packed with protein!
Cookie dough protein balls cottage cheese
Using cottage cheese in cookie dough protein balls adds a creamy texture and boosts the protein content significantly. Start by blending cottage cheese with oats, a sweetener like honey or agave, and vanilla extract for flavor. You can also mix in chocolate chips and a pinch of salt to mimic the classic cookie dough flavor. This mixture can be rolled into bite-sized balls and refrigerated to achieve a firmer consistency. These protein balls are not only tasty but also provide a good source of calcium and other nutrients, making them a healthy snack option.
Protein balls with dates
Dates are a fantastic natural sweetener and binder for protein balls, providing a chewy texture and rich flavor. To make protein balls with dates, start by pitting and blending the dates in a food processor until smooth. Combine this date paste with oats, nut butter, and any add-ins like nuts, seeds, or cocoa powder for extra flavor and nutrition. Roll the mixture into small balls and chill in the fridge for a refreshing snack. For added variety, consider experimenting with different types of nuts or spices to create a unique flavor profile!
Conclusion: Mastering the Perfect no-bake protein balls
Creating the perfect no-bake protein balls is more than just following a recipe—it’s about understanding the techniques, ingredients, and cultural significance behind this beloved dish. Throughout this comprehensive guide, we’ve explored everything from the historical origins to modern variations, ensuring you have all the knowledge needed to make this recipe your own.
Whether you’re a beginner cook or an experienced chef, the techniques and tips we’ve shared will help you create a no-bake protein balls that’s not only delicious but also meaningful. Remember that cooking is a journey of discovery, and each time you make this dish, you’ll learn something new.
We encourage you to experiment with the variations we’ve discussed, adapt the recipe to your dietary needs, and most importantly, share it with the people you love. Food has the incredible power to bring people together, and No-Bake Protein Balls with Cookie is the perfect dish to create lasting memories around your dinner table.