Banana pudding cheesecake is a delightful fusion of two beloved desserts, and it has captured the hearts of many dessert enthusiasts, including mine. I still vividly remember the first time I stumbled upon this incredible recipe. It was a warm summer afternoon, and I was visiting my grandmother. She had just taken a batch of her famous banana pudding out of the refrigerator, and the aroma wafting through her kitchen was intoxicating. As much as I loved her traditional banana pudding, I was intrigued when she mentioned that she had been experimenting with a new cheesecake variation. That day, I learned that banana pudding could not only stand alone as a classic dessert but could also be transformed into a creamy, dreamy cheesecake that would leave anyone craving more.
As we sliced into the chilled dessert, the layers of creamy cheesecake, ripe bananas, and buttery vanilla wafers created a beautiful mosaic. I could hardly contain my excitement as I took my first bite. The sweet, rich flavors danced on my tongue, and I immediately knew this banana pudding cheesecake would become a staple in my own kitchen. I started making this treat for family gatherings, birthday parties, and holiday celebrations, always receiving rave reviews. It became a cherished recipe, one that I was proud to share with friends and family.
The Story Behind This Recipe
The banana pudding cheesecake is not just a recipe; it’s a story of culinary evolution that reflects the influence of Southern comfort food. Traditional banana pudding, with its creamy custard and crispy vanilla wafers, has been a staple in Southern kitchens for generations. The origins of banana pudding can be traced back to the mid-19th century when it was popularized in the United States, often featuring baked custards layered with bananas and whipped cream.
As the decades passed, the dessert began to evolve. The introduction of cream cheese into the mix transformed banana pudding into a cheesecake, marrying the textures and flavors of both desserts. This innovation is a testament to the creativity and adaptability of home cooks who strive to modernize traditional recipes while keeping their essence intact. My own take on banana pudding cheesecake honors this history while adding a few personal twists that make it uniquely mine.
Why You’ll Love This Dish
This banana pudding cheesecake is more than just a delicious dessert; it’s a lifesaver for busy families looking for quick dinner solutions. The beauty of this dish lies in its simplicity. You can prepare it in advance, allowing the flavors to meld together in the refrigerator overnight. This makes it perfect for those hectic weeknights when you need a sweet treat without the stress of last-minute baking. Plus, who wouldn’t want to impress their family with a dessert that looks as stunning as it tastes?
Seasonally, banana pudding cheesecake is incredibly versatile. While it shines during the warm months with fresh, ripe bananas, it can also bring comfort during the colder seasons. Imagine serving it at a holiday gathering, adorned with festive toppings like crushed gingersnaps or a sprinkle of nutmeg to evoke a cozy, winter vibe. The emotional connection to this dish is profound; it’s not just about satisfying a sweet tooth but also about bringing loved ones together, sharing stories, and creating memories.
In this guide, you’ll discover the secrets to making the perfect banana pudding cheesecake, from selecting the freshest ingredients to mastering the art of layering. I’ll share tips and tricks that I’ve learned over the years, along with variations to suit every palate. Whether you’re a seasoned baker or a novice in the kitchen, this banana pudding cheesecake will become a cherished recipe in your own family.
The Rich History and Cultural Significance of banana pudding cheesecake
The rich history and cultural significance of banana pudding cheesecake reflect a beautiful tapestry woven through generations of culinary creativity. To fully appreciate this delightful dessert, we must explore its origins, regional variations, and the evolution of the recipe over time. This journey will not only deepen your understanding of banana pudding cheesecake but also enhance your appreciation for the flavors and traditions it embodies.
Origins and History
The roots of banana pudding can be traced back to the mid-1800s in the United States, particularly in the South. The original recipe was simple, featuring layers of vanilla custard, sliced bananas, and crispy vanilla wafers. This combination became a beloved dessert for family gatherings and celebrations. The introduction of cream cheese into the banana pudding recipe marked a significant turning point, giving birth to the banana pudding cheesecake we know and adore today.
In the Southern United States, banana pudding cheesecake holds a special place in the hearts of many. It was often served at potlucks, church picnics, and family reunions. The recipe has evolved with time, with various adaptations reflecting different family traditions and regional flavors. Some may add a layer of chocolate or caramel, while others incorporate different types of nuts or fruit. Each variation tells a story and showcases the creativity of home cooks who put their unique spin on this classic dessert.
Cultural Significance
Banana pudding cheesecake is more than just a dessert; it represents the essence of Southern hospitality and the importance of family gatherings. In many Southern households, food is a way to show love and care. Sharing a slice of banana pudding cheesecake is an invitation to connect, reminisce, and create lasting memories with loved ones.
Throughout the years, banana pudding cheesecake has made its mark on special occasions. It is often the star of birthday parties, holiday dinners, and summer barbecues. The sight of a beautifully layered cheesecake gracing the dessert table brings smiles and excitement, evoking feelings of nostalgia for many who grew up enjoying this treat. In this way, the dessert transcends generations, becoming a beloved tradition that families pass down through the years.
Nutritional Benefits
While banana pudding cheesecake is undoubtedly a decadent treat, it also offers some nutritional benefits worth noting. Bananas are a rich source of potassium, vitamin C, and dietary fiber. They provide natural sweetness and creaminess, making them an ideal ingredient in both banana pudding and cheesecake. Additionally, the use of cream cheese contributes calcium and protein to the dessert, making it a more satisfying option than other sugary treats.
Of course, moderation is key. While banana pudding cheesecake can be a delightful indulgence, being mindful of portion sizes will allow you to enjoy this dessert without guilt. By incorporating fresh fruit and wholesome ingredients, you can savor the flavors while also reaping some health benefits. It’s all about balance, and this dessert can fit into a well-rounded diet if enjoyed occasionally.
As we uncover the rich history and cultural significance of banana pudding cheesecake, it becomes clear that this dessert is not just about taste. It’s about family, tradition, and the stories we share over a slice. Whether you’re making it for a special occasion or simply to treat yourself, this dessert carries with it a legacy of love that is sure to resonate with anyone who takes a bite.
Essential Ingredients for Perfect banana pudding cheesecake
When it comes to creating the perfect banana pudding cheesecake, the foundation lies in the ingredients we choose. A delectable dessert starts with quality components, each playing a crucial role in the final outcome. Let’s dive into the essential ingredients that make up our delicious banana pudding cheesecake squares, and how each contributes to this sweet treat.
Essential Ingredients
- Vanilla Wafer Crust
- 1½ cup (168 g) vanilla wafer crumbs
- 4 tablespoon (59 ml) salted butter – melted
- 3 tablespoon (44 ml) granulated sugar
- Banana Cheesecake Filling
- 1½ medium overripe bananas – puréed
- 16 oz (454 g) cream cheese – room temperature
- ½ cup (118 ml) heavy cream – room temperature
- 2 large eggs – room temperature
- ½ cup (100 g) sugar
- 1 tablespoon (15 ml) pure vanilla extract
- 1 tablespoon (15 ml) cornstarch
- Custard and Toppings
- 12 oz (340 g) evaporated milk – 1 can
- 3 large egg yolks
- ½ cup (100 g) granulated sugar
- 2 teaspoon (10 ml) pure vanilla extract
- 4 tablespoon (59 ml) salted butter
- 1 tablespoon (15 ml) cornstarch
- mini vanilla wafers – optional
- bananas – barely ripe, sliced (optional)
- vanilla wafer crumbs – optional
Banana Pudding Cheesecake Squares
Ingredients
Vanilla Wafer Crust
- 1½ cup (168 g) vanilla wafer crumbs
- 4 tablespoon (59 ml) salted butter – melted
- 3 tablespoon (44 ml) granulated sugar
Banana Cheesecake Filling
- 1½ medium overripe bananas – puréed
- 16 oz (454 g) cream cheese – room temperature
- ½ cup (118 ml) heavy cream – room temperature
- 2 large eggs – room temperature
- ½ cup (100 g) sugar
- 1 tablespoon (15 ml) pure vanilla extract
- 1 tablespoon (15 ml) cornstarch
Custard and Toppings
- 12 oz (340 g) evaporated milk – 1 can
- 3 large egg yolks
- ½ cup (100 g) granulated sugar
- 2 teaspoon (10 ml) pure vanilla extract
- 4 tablespoon (59 ml) salted butter
- 1 tablespoon (15 ml) cornstarch
- mini vanilla wafers – optional
- bananas – barely ripe, sliced (optional)
- vanilla wafer crumbs – optional
Instructions
Vanilla Wafer Crust
- Preheat oven to 350°F and line a 9×9 baking pan with parchment paper, leaving an overhang to allow for easy removal.
- Crush vanilla wafers with a food processor, or place in a gallon freezer bag and crush with a rolling pin. Pour into a medium bowl.
- Add granulated sugar and stir to combine.
- Add melted butter and stir well until mixture is well saturated with butter.
- Pour into baking pan and press evenly into the bottom of the pan.
- Bake in preheated oven for 10 minutes. Remove from oven and let cool.
Banana Cheesecake
- Reduce oven temperature to 325°F.
- In a large bowl, purée overripe bananas with a hand mixer or immersion blender until smooth.
- Beat in granulated sugar and cream cheese, mixing well until smooth.
- Add eggs, vanilla, and heavy cream and beat until smooth after each addition.
- Add cornstarch and mix well. Pour into cooled vanilla wafer crust and smooth on top.
- Bake in preheated oven for 35 minutes, or until outside of pan is puffed but center of cheesecake still jiggles slightly.
- Cool completely at room temperature, then cover and chill at least 4 hours or overnight.
Custard and Toppings
- Heat evaporated milk and butter in a medium saucepan over medium heat, stirring until butter is melted and mixture reaches a simmer. There should be small bubbles near the outside of the pan, but don’t let it boil. Turn off heat.
- In a medium bowl, whisk together egg yolks, sugar, and cornstarch until smooth. Add about half of scalded milk mixture very gradually, ½ cup at a time, pouring slowly and whisking the egg mixture constantly. This is to temper the eggs and prevent them from curdling.
- Return the saucepan to medium heat and gradually pour the tempered egg-and-milk mixture back into the pan, whisking constantly.
- Cook custard mixture, stirring constantly with a whisk or wooden spoon, for 10-15 minutes, until mixture thickens and coats the back of a spoon. Remove from heat and set aside.
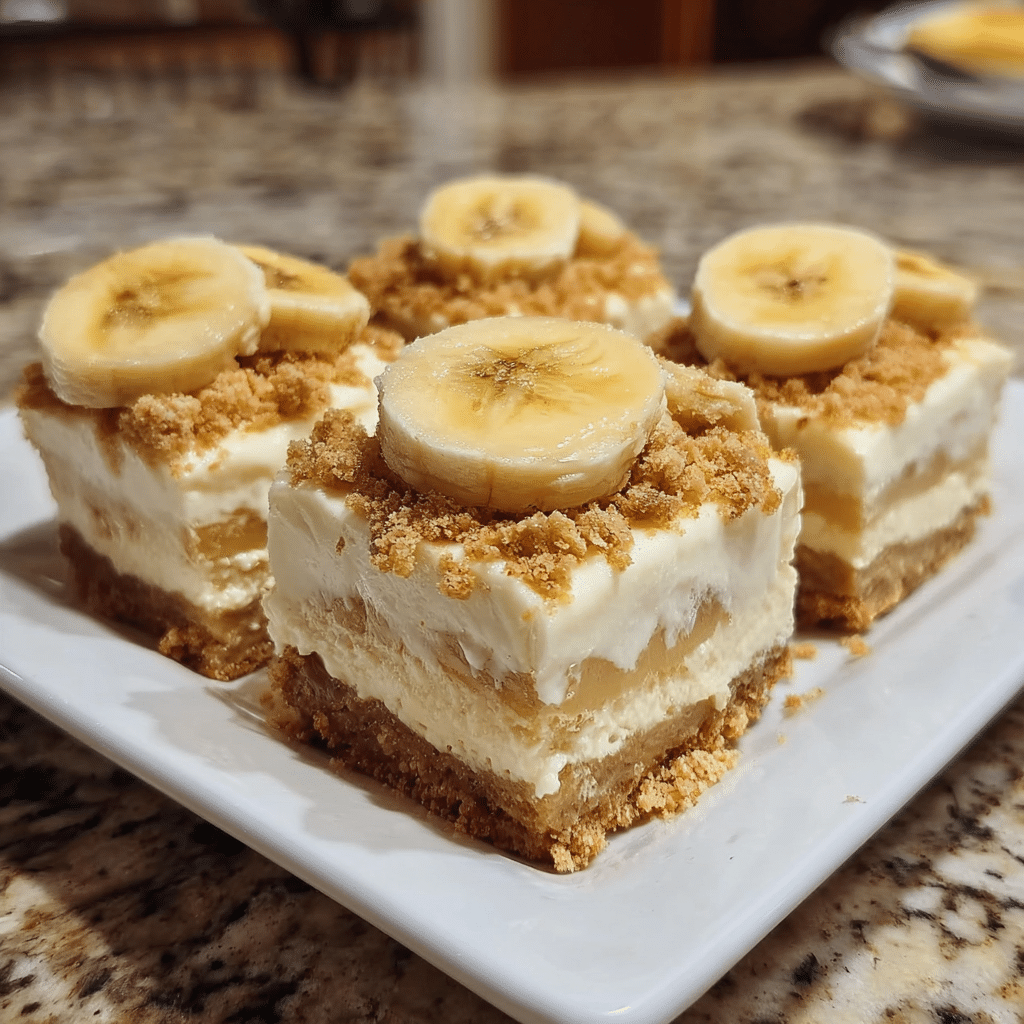
- Top cheesecake layer with fresh banana slices and mini vanilla wafers. Pour slightly cooled custard on top, and cut into squares. Alternatively, you can cut the cheesecake squares first and top each with custard individually.
- Sprinkle with more vanilla wafer crumbs, if desired. Serve immediately or refrigerate until ready to serve, keeping in mind these squares are best served the same day.
Shopping Tips
When shopping for ingredients for your banana pudding cheesecake, quality is paramount. Choose ripe bananas with brown spots for maximum sweetness and flavor. For cream cheese, opt for full-fat varieties; they whip up smoother and creamier than low-fat alternatives. If you can, visit local farmers’ markets for fresh eggs and dairy products, as they often taste better. Check expiration dates on evaporated milk to ensure freshness, and don’t be afraid to splurge on pure vanilla extract — it truly makes a difference in flavor.
Substitutions and Alternatives
For those with dietary restrictions, there are several substitutions you can make without compromising the integrity of your banana pudding cheesecake. If you need a gluten-free option, consider using gluten-free vanilla cookies for the crust. For a dairy-free version, swap out the cream cheese for a vegan cream cheese (like cashew-based) and use coconut milk in place of evaporated milk. To make it lighter, you can use Greek yogurt instead of cream cheese, though this will alter the flavor and texture slightly.
In terms of storage, keep your ingredients fresh by storing bananas at room temperature until they ripen, then move them to the refrigerator to extend their shelf life. Cream cheese and heavy cream should always be refrigerated after purchase and used by their expiration dates. If you have leftover custard, it can be refrigerated for a few days but should be reheated gently to maintain its creamy texture.
In conclusion, the ingredients for your banana pudding cheesecake are more than just a list; they are the building blocks of a dessert that brings joy and nostalgia. With careful selection and a little creativity, you can create a cheesecake that not only satisfies your sweet tooth but also tells a story of flavor, texture, and love.
Detailed Step-by-Step banana pudding cheesecake Cooking Instructions
Now that we have gathered all the essential ingredients for our banana pudding cheesecake, it’s time to roll up our sleeves and get cooking! This dessert may seem complex, but with a detailed step-by-step guide, you’ll find it’s quite manageable and incredibly rewarding. Let’s embark on this culinary adventure together!

Preparation Steps
- Preheat the oven: Start by preheating your oven to 325°F (163°C). This ensures that your cheesecake bakes evenly from the moment you place it in the oven, which is crucial for achieving that perfect texture.
- Prepare the crust: In a medium bowl, combine 1½ cups of vanilla wafer crumbs, 4 tablespoons of melted salted butter, and 3 tablespoons of granulated sugar. Mix until the crumbs are fully coated in butter. The mixture should resemble wet sand. Press this mixture firmly into the bottom of a 9×9-inch baking dish. Use the bottom of a measuring cup to compact the crust evenly. Bake this crust in the oven for 10 minutes, until it’s lightly golden. This baking step helps to set the crust, making it sturdy enough to hold the cheesecake filling.
- Cool the crust: Once baked, remove the crust from the oven and let it cool completely while you prepare the filling. Cooling is essential, as adding warm filling to a hot crust can lead to a soggy bottom.
Cooking Process
- Prepare the banana filling: In a large mixing bowl, purée 1½ medium overripe bananas until smooth. You can use a fork or a food processor for this step. The riper the bananas, the sweeter and more flavorful your cheesecake will be. Add 16 oz of room-temperature cream cheese to the bowl and beat with an electric mixer until smooth. This is where you want to ensure there are no lumps, as they can affect the final texture of your cheesecake.
- Add remaining ingredients: Next, add ½ cup of heavy cream, 2 large eggs (also at room temperature), ½ cup of sugar, 1 tablespoon of pure vanilla extract, and 1 tablespoon of cornstarch to the cream cheese mixture. Mix until everything is fully incorporated and smooth. Be careful not to overmix, as this can introduce too much air into the batter, leading to cracks during baking.
- Pour filling into crust: Gently pour the banana cheesecake filling over the cooled crust, spreading it evenly with a spatula. This layer is going to rise a bit during baking, so ensure it’s level.
- Bake the cheesecake: Place the baking dish in the oven and bake for 30 minutes, or until the edges are set and the center still has a slight jiggle. This is a crucial step; overbaking can result in a dry cheesecake, so keep an eye on it! If the edges begin to brown, it’s time to take it out.
Final Assembly
- Prepare the custard topping: While the cheesecake is baking, you can prepare the custard. In a saucepan, combine 12 oz of evaporated milk, 3 large egg yolks, ½ cup of granulated sugar, 2 teaspoons of vanilla extract, 4 tablespoons of salted butter, and 1 tablespoon of cornstarch. Whisk everything together over medium heat until the mixture thickens and begins to bubble. This should take around 5-7 minutes. Stir constantly to prevent burning! The custard adds an additional layer of richness and flavor.
- Cool the cheesecake: Once the cheesecake has finished baking, remove it from the oven and let it cool at room temperature for about 10 minutes. Then, pour the custard over the top of the cheesecake while it’s still warm, ensuring an even distribution.
- Chill: Allow the cheesecake to cool to room temperature before transferring it to the refrigerator. Chill for at least 4 hours or overnight for the best results. This step allows all the flavors to meld and the cheesecake to fully set.
- Serve: Once chilled, slice the banana pudding cheesecake into squares. For an extra touch, garnish with banana slices and mini vanilla wafers on top. Serve chilled, and watch as your friends and family rave about this delightful dessert!
Throughout this process, remember to embrace the experience. Baking is as much about the journey as it is about the destination. The sweet aroma of bananas and vanilla wafting through your kitchen as you create this banana pudding cheesecake will surely bring smiles all around. Enjoy every bite, knowing you’ve crafted a delicious treat that combines the best of banana pudding and cheesecake into one indulgent dessert!
Professional Tips and Techniques for banana pudding cheesecake
When it comes to creating the perfect banana pudding cheesecake, the journey from the kitchen counter to the dining table is as delightful as the dessert itself. This rich and creamy treat combines the beloved flavors of banana pudding with the smooth texture of cheesecake, making it a showstopper for any gathering. As you embark on this culinary adventure, I’m excited to share some professional tips and techniques that will elevate your banana pudding cheesecake to new heights.
Professional Techniques
Creating a remarkable banana pudding cheesecake begins with understanding the science behind the ingredients. One of the first steps is to ensure that all your ingredients are at room temperature. This includes cream cheese, eggs, and sour cream. Room temperature ingredients blend more smoothly, resulting in a creamy texture.
When mixing your cheesecake batter, avoid overmixing once you add the eggs. Overmixing can incorporate too much air, leading to cracks in your cheesecake as it bakes. Instead, mix just until the ingredients are combined. For the banana pudding element, you can either use instant banana pudding mix for quick preparation or make a homemade version for a richer flavor.
Another insider secret is to bake your cheesecake in a water bath, or bain-marie. This technique involves placing your cheesecake pan in a larger baking dish filled with hot water. The steam from the water helps regulate the temperature and keep the cheesecake moist, preventing cracks. If you’re concerned about water seeping into your springform pan, wrap the bottom with aluminum foil to create a watertight seal.
Troubleshooting Guide
Even the most experienced bakers encounter issues from time to time. One common problem with banana pudding cheesecake is a cracked surface. If you notice cracks forming, it’s often due to rapid temperature changes. To prevent this, turn off the oven and let the cheesecake cool inside with the door slightly ajar. This gradual cooling process can help maintain the integrity of your dessert.
Another issue could be the cheesecake not setting properly. If this happens, it could be due to underbaking. Always check for doneness by gently shaking the pan; the center should slightly jiggle but not be liquid. If your cheesecake is too soft, you can return it to the oven for a few more minutes, but keep a watchful eye on it.
For those who prefer a firmer texture, consider adding a tablespoon of cornstarch to your batter. This can help stabilize the filling and enhance the creamy consistency. And if you find your banana pudding cheesecake too sweet, a pinch of salt can balance the flavors beautifully.
Presentation Tips
Once your banana pudding cheesecake is baked and cooled, it’s time for the fun part—presentation! A well-presented dessert can elevate the dining experience. Start by removing the cheesecake from the springform pan carefully. You can use a hot knife to cut around the edges, which helps release it easily.
For an outstanding presentation, consider topping your cheesecake with freshly whipped cream and slices of ripe banana. A sprinkle of crushed vanilla wafers can add a delightful crunch and visual appeal. You might even drizzle some caramel or chocolate sauce for extra indulgence.
When it comes to plating, serve individual slices on decorative dessert plates. A sprig of mint or a dusting of powdered sugar can add an elegant touch. Pair your banana pudding cheesecake with a glass of dessert wine like late-harvest Riesling, or for a non-alcoholic option, a sweet iced tea infused with lemon can complement the flavors beautifully.
Finally, if you’re looking to make your dessert a bit more festive, consider adding a layer of banana chips or chocolate shavings on top. These not only enhance the visual appeal but also introduce additional textures that will delight your guests.
In conclusion, mastering the art of banana pudding cheesecake involves understanding techniques, troubleshooting common problems, and focusing on presentation. With these tips, you’ll be well-equipped to create a delicious dessert that’s sure to impress family and friends. So roll up your sleeves, gather your ingredients, and let the baking begin!
Creative Variations and Adaptations of banana pudding cheesecake
Banana pudding cheesecake is a versatile dessert that invites creativity and adaptation. Whether you’re looking to switch things up for the seasons or accommodate dietary preferences, there are countless ways to put your own spin on this delightful treat. Let’s dive into some creative variations and adaptations that can transform your banana pudding cheesecake into a new experience.
Seasonal Variations
One of the joys of cooking is the ability to incorporate seasonal ingredients. For instance, during the fall months, you can add a layer of spiced pumpkin puree to your banana pudding cheesecake. The warming spices like cinnamon and nutmeg complement the bananas beautifully, creating a cozy dessert perfect for autumn gatherings.
In the summer, consider using fresh berries to brighten the flavors. Swapping out some bananas for strawberries or blueberries can add a refreshing twist. You can even create a berry compote to drizzle on top, enhancing both the flavor and visual appeal of your cheesecake.
Winter is the perfect time to infuse your banana pudding cheesecake with flavors like peppermint or gingerbread. Crushed peppermint candies can be mixed into the cheesecake batter or sprinkled on top as a garnish, while gingerbread cookies can replace traditional vanilla wafers for the crust.
Dietary Adaptations
In today’s culinary landscape, accommodating various dietary needs is essential. For those following a keto diet, you can create a low-carb version of banana pudding cheesecake by using almond flour for the crust and a sugar substitute like erythritol in the cheesecake filling. This will provide that classic flavor without the extra carbs.
For a vegan twist, you can substitute traditional cream cheese with a plant-based alternative made from cashews or tofu. Use a flaxseed meal mixed with water as a binder in place of eggs, and opt for coconut cream to achieve that luscious texture. You can also use agave syrup or maple syrup as a sweetener.
Gluten-free variations are also easy to achieve. Simply use gluten-free cookies for the crust and ensure that all other ingredients are certified gluten-free. The key is to maintain the same delicious flavor while accommodating different dietary restrictions.
Creative Twists
If you’re feeling adventurous, consider experimenting with international fusion variations. For example, a tropical twist could involve incorporating coconut milk into the cheesecake batter and topping it with toasted coconut flakes. This not only enhances the flavor but transports your taste buds to a sunny beach.
Another creative approach is to infuse your banana pudding cheesecake with flavors inspired by classic desserts from around the world. For instance, a tiramisu-inspired banana pudding cheesecake could include coffee and cocoa powder layered between the banana pudding and cheesecake layers. The combination of flavors can create an incredibly indulgent dessert experience.
Leftover banana pudding cheesecake also offers opportunities for culinary creativity. Crumbled cheesecake can be transformed into a parfait layered with fresh fruit and granola for breakfast or a quick snack. Alternatively, you can turn it into cheesecake bars by chilling the leftovers in a pan and cutting them into bite-sized pieces.
In summary, the versatility of banana pudding cheesecake allows for endless variations and adaptations. With seasonal ingredients, dietary modifications, and global inspirations, you can create a unique dessert that suits any occasion or palate. So don’t hesitate to experiment and make this beloved dessert your own!
Storage, Reheating, and Meal Prep for banana pudding cheesecake
When it comes to enjoying the delightful layers of banana pudding cheesecake, knowing how to properly store your creation is just as important as the recipe itself. Whether you have leftovers from a big family gathering or you’re batch-cooking for the week ahead, understanding the nuances of storage can help maintain the integrity and flavor of your banana pudding cheesecake.

Short-term Storage
After you’ve whipped up a luscious banana pudding cheesecake, the first step is to ensure that it’s stored correctly for short-term enjoyment. If you plan to eat it within a few days, refrigerating it is your best option. The ideal container for storage is airtight; this prevents any unwanted odors from the fridge from seeping into your dessert. Use a glass or plastic container with a tight-fitting lid to preserve freshness.
Before sealing the container, it’s wise to place a piece of parchment paper or wax paper between the cheesecake and the lid. This helps avoid any condensation that could form and drip onto the surface of your cheesecake, which could make it soggy. Store your banana pudding cheesecake in the refrigerator at a temperature below 40°F (4°C). Under these conditions, it can last up to 5 days without losing its delectable taste and texture.
Freezing and Long-term Storage
If you have made a large batch of banana pudding cheesecake or simply want to save some for a later date, freezing is a fantastic option. To freeze your cheesecake, first, allow it to cool completely if it has just been baked. Next, slice it into individual squares, which makes it easier to thaw only what you need later on.
Wrap each square tightly in plastic wrap to prevent freezer burn, and then place them in a freezer-safe container or a heavy-duty freezer bag. This double layer of protection is crucial because banana pudding cheesecake can absorb odors from other foods in the freezer. For best results, consume the frozen cheesecake within 2 to 3 months. Although it can technically last longer, the quality may diminish over time.
When you’re ready to indulge in your frozen banana pudding cheesecake, the best method for thawing is to transfer it to the refrigerator and let it slowly come to temperature overnight. This gradual thawing process helps maintain the creamy texture without causing the cheesecake to become too watery. If you’re in a hurry, you can also thaw it at room temperature for about 30 minutes, but be careful not to leave it out too long to avoid food safety issues.
Reheating Best Practices
Though banana pudding cheesecake is typically enjoyed cold, if you prefer it slightly warmed, reheating is an option. However, you need to be cautious, as overheating can lead to a loss of texture and flavor. The best way to warm up your cheesecake is to use a microwave. Place a square on a microwave-safe plate and heat it on low power (about 30% to 50%) in short increments of 10 to 15 seconds until it reaches your desired warmth.
Alternatively, if you’re reheating multiple squares, you can use the oven. Preheat it to 300°F (150°C), place the cheesecake squares in an oven-safe dish, and cover with aluminum foil to keep moisture in. Heat for about 10-15 minutes or until warmed through. Just keep an eye on it to avoid overcooking!
Meal prepping banana pudding cheesecake can also be a game changer, especially for busy weeks. Consider making a big batch on the weekend and portioning it out into individual servings. This not only helps with portion control but also allows for easy grab-and-go desserts throughout the week. Pairing each square with a small dollop of whipped cream or a slice of fresh banana before you pack it away can elevate your treat even further.
Food safety is paramount when storing any baked goods, including your banana pudding cheesecake. Be sure to keep an eye on how long it’s been stored and look out for any signs of spoilage, like an off smell or changes in texture. The general shelf life, when refrigerated, is about 5 days, while frozen cheesecake can last for several months. Always label your containers with the date they were made for easy tracking.
In summary, mastering the art of storage for your banana pudding cheesecake will ensure that every bite is just as delightful as the first. Whether you’re enjoying it fresh out of the fridge, or savoring a piece that’s been frozen, these storage tips will keep your dessert in prime condition!
Nutritional Benefits and Health Information
As we dive into the nutritional aspects of banana pudding cheesecake, it’s important to recognize that desserts, while often indulgent, can also offer surprising benefits depending on their ingredients. This particular dessert is a delightful combination of flavors and textures, layered with creamy cheesecake and sweet banana pudding, making it a favorite among many. Let’s explore the nutritional profile of banana pudding cheesecake in detail.
Nutritional Profile
A typical serving of banana pudding cheesecake—let’s say about 1 square (or roughly 100 grams)—contains approximately 250 to 300 calories. The macronutrient breakdown usually includes around 15-20 grams of fat, 30-35 grams of carbohydrates, and 4-6 grams of protein. The fat content primarily comes from the cream cheese and whipped cream used in the recipe, while carbohydrates are sourced from the sugar and any crust components.
This dessert also offers some vitamins and minerals, particularly if you include fresh bananas. Bananas are a great source of potassium, vitamin C, and vitamin B6. Potassium is essential for heart health and maintaining proper muscle function, while vitamin C helps boost the immune system. Moreover, the presence of cream cheese adds calcium to the mix, which is important for bone health.
Health Benefits
Despite being a dessert, banana pudding cheesecake can have health benefits when enjoyed in moderation. The bananas provide fiber, which aids in digestion and can help you feel fuller for longer. This fiber can also play a role in maintaining healthy blood sugar levels. Additionally, the presence of dairy in the cheesecake contributes to a good source of protein, which is vital for muscle repair and overall health.
For those who love the taste of banana pudding cheesecake but are concerned about their sugar intake, there are healthy modification suggestions to consider. You can reduce the amount of sugar in the recipe or substitute with natural sweeteners like honey or maple syrup. Additionally, using Greek yogurt instead of some of the cream cheese can boost the protein content while lowering the fat. You can also opt for a gluten-free crust made from almond flour or oats for a healthier alternative.
Dietary Considerations
When preparing banana pudding cheesecake, it is essential to be mindful of dietary restrictions and allergen information. Traditional recipes typically contain dairy and gluten, which may not be suitable for everyone. For those who are lactose intolerant, dairy-free cream cheese and non-dairy whipped toppings are excellent substitutes. Furthermore, if you need to make the dessert gluten-free, ensure that you use gluten-free cookies or a nut-based crust.
As you consider how banana pudding cheesecake fits into various diet plans, it’s clear that moderation is key. For individuals following a low-carb diet, the carb content may be a concern, but enjoying a smaller portion can allow for a sweet treat without significantly impacting your daily carb intake. Those on ketogenic diets may need to adjust the recipe further, focusing on low-carb sweeteners and reducing the crust component.
When comparing banana pudding cheesecake to other desserts, it often holds its own in terms of flavor and satisfaction. Many desserts are laden with empty calories, while banana pudding cheesecake, particularly with the addition of bananas and cream cheese, offers a bit more in terms of nutritional value. It’s a dessert that feels indulgent yet can be adapted to fit a more health-conscious lifestyle.
In conclusion, while banana pudding cheesecake is a delightful dessert that many love, understanding its nutritional aspects allows for a more mindful indulgence. Whether you choose to enjoy it as is or make thoughtful modifications to suit your dietary needs, this dessert can certainly have a place on your table without the guilt!
Frequently Asked Questions About Banana Pudding Cheesecake
Philadelphia banana pudding cheesecake squares
Philadelphia cream cheese is a fantastic base for banana pudding cheesecake squares, as it provides a rich and creamy texture. Begin by softening the cream cheese to ensure a smooth mixture; this can be done by leaving it at room temperature for about 30 minutes. Incorporate a layer of banana pudding made with milk, and fold in whipped cream for lightness. For extra flavor, consider adding sliced bananas on top before chilling; this will enhance the banana flavor in your squares. Finally, allow the cheesecake to set in the refrigerator for at least 4 hours, or overnight, for the best texture.
No bake banana pudding cheesecake squares
No bake banana pudding cheesecake squares are a delicious, easy dessert that requires no oven time, making them perfect for warm weather. Start by creating a crust from crushed Nilla wafers mixed with melted butter, pressing it into a baking dish. For the filling, blend together softened cream cheese, banana pudding mix, and cold milk until smooth, then fold in whipped topping for a light finish. Layer the filling over the crust and refrigerate until set, usually about 4-6 hours. For an extra touch, top with sliced bananas and a drizzle of caramel sauce before serving.
Banana pudding cheesecake squares recipe
To create a delicious banana pudding cheesecake squares recipe, begin with a crust made from crushed graham crackers or Nilla wafers, mixed with melted butter. For the filling, beat together cream cheese and sugar until creamy, then add in banana pudding mix, followed by milk and vanilla extract for flavor. Fold in whipped cream or Cool Whip for added lightness and a fluffy texture. Pour the filling over the crust, layer with banana slices, and refrigerate until set. Don’t forget to add a topping of whipped cream and crushed cookies just before serving for an appealing finish.
Old fashioned banana pudding cheesecake squares
For an old-fashioned twist on banana pudding cheesecake squares, incorporate classic ingredients like vanilla wafers and fresh bananas. Start by making a traditional vanilla wafer crust, pressing it firmly into the bottom of your dish. For the cheesecake filling, combine cream cheese, sugar, and vanilla extract, mixing until smooth. Layer in banana pudding made from scratch for an authentic taste, and fold in whipped cream for a fluffy texture. Chill the squares for several hours to allow the flavors to meld, and serve with additional banana slices on top for a nostalgic touch.
Easy banana pudding cheesecake squares
Easy banana pudding cheesecake squares can be achieved with minimal ingredients and effort, making them a go-to dessert for busy bakers. Start with a simple crust using crushed cookies and melted butter, then press it into a lined square pan. For the filling, mix together cream cheese, sugar, and banana pudding mix, adding milk gradually until you reach the desired consistency. Fold in whipped cream for a light texture and layer this over the crust. Chill for a few hours, and you’ll have a delightful treat that’s both easy and satisfying.
Best banana pudding cheesecake squares
To make the best banana pudding cheesecake squares, focus on high-quality ingredients to enhance the overall flavor. Use fresh, ripe bananas for the best taste and texture, and opt for real vanilla extract instead of imitation for a deeper flavor profile. A well-prepared crust is crucial; consider toasting the cookie crumbs slightly for added crunch. Allow the cheesecake squares to set in the refrigerator overnight for optimal firmness and flavor development. Finally, garnish with freshly whipped cream and banana slices for an impressive presentation that will wow your guests.
Banana cheesecake bars
Banana cheesecake bars are a delightful dessert that combines the flavors of cheesecake and banana in a convenient bar form. Start with a crumbly crust made from crushed graham crackers or Nilla wafers, and press it into a baking dish. For the cheesecake filling, beat together cream cheese, sugar, and mashed ripe bananas until smooth, then add eggs for structure. Bake until the filling is set, and allow it to cool completely before slicing into bars. Serve chilled and consider drizzling with chocolate or caramel sauce to elevate the flavors further.
Banana pudding cheesecake no bake
The no-bake version of banana pudding cheesecake is a quick and hassle-free dessert that still packs a flavorful punch. To start, create a base with crushed Nilla wafers combined with melted butter, pressing it into your dish. For the filling, blend cream cheese with banana pudding mix and milk until smooth, then fold in whipped topping for a light and airy texture. Layer the filling over the crust, and refrigerate for several hours until set. For added flavor, consider topping with sliced bananas and a sprinkle of crushed cookies before serving, making it visually appealing and delicious.


