Cheeseburger sliders have become a beloved staple in many households, a delightful twist on the classic burger that brings joy and satisfaction in every bite. My journey with cheeseburger sliders began on a bustling summer evening, when my friends and I were gathered for a backyard barbecue. As the sun dipped below the horizon, the aroma of grilled beef wafted through the air, and I found myself captivated by the sight of these miniature burgers sizzling on the grill. Each slider was adorned with melted cheese, crisp lettuce, and a dollop of tangy ketchup and mustard, and I couldn’t help but feel an overwhelming sense of nostalgia as I took my first bite. The flavors danced on my palate, instantly transporting me to carefree summer days filled with laughter and the warmth of friendship.
As I savored that first cheeseburger slider, I was struck by how this dish encapsulated a sense of togetherness and joy. It wasn’t just a meal; it was an experience that brought people together, sparking conversation and laughter around the table. As I learned more about cheeseburger sliders, I discovered that they are not just a quick meal option for busy families, but also a canvas for creativity in the kitchen. From experimenting with various toppings to adjusting the types of cheese used, cheeseburger sliders can easily be customized to suit personal tastes and preferences.
The Story Behind This Recipe
The cultural significance of cheeseburger sliders can be traced back to the mid-20th century, when sliders began to take shape as a popular fast-food item in the United States. Originally, the term “slider” referred to small, greasy burgers served at diners, often eaten as late-night snacks. However, these delicious morsels quickly evolved into a versatile dish that could be enjoyed at gatherings, parties, and family dinners alike. What makes cheeseburger sliders so special is their ability to bring people together, regardless of the occasion. Whether you’re hosting a game day party or simply looking for a quick weeknight dinner, these sliders fit seamlessly into any setting.
For busy families, cheeseburger sliders offer a practical solution to mealtime challenges. With the right ingredients, they can be whipped up in under 30 minutes, allowing parents to spend more time with their loved ones and less time in the kitchen. Their bite-sized nature makes them perfect for little hands, and kids can get involved in the cooking process, creating their own personalized sliders with toppings of their choice. This hands-on approach to cooking fosters a sense of teamwork and bonding within the family, creating lasting memories around the dinner table.
As the seasons change, cheeseburger sliders remain a versatile dish that adapts beautifully to various occasions. In the summer, they can be grilled outdoors, paired with fresh garden vegetables and served with a side of coleslaw. As the cooler months approach, they can be baked in the oven and served with hearty toppings like caramelized onions and sautéed mushrooms. The adaptability of cheeseburger sliders makes them a go-to option for anyone looking to celebrate the changing seasons with delicious food.
Emotionally, cheeseburger sliders evoke a sense of nostalgia and comfort. They remind us of summer barbecues, family gatherings, and carefree moments spent with friends. Each bite carries with it the essence of warmth and familiarity, making them a cherished dish for many. In this guide, readers will not only learn how to create their own delicious cheeseburger sliders but also discover tips and tricks to elevate their slider game, ensuring that every gathering is filled with joy and flavor.
Why You’ll Love This Dish
In this comprehensive guide, you will uncover the secrets behind the perfect cheeseburger sliders, from selecting the right ingredients to mastering the cooking techniques that will elevate your sliders to new heights. You’ll learn about various toppings that can enhance the flavor profile of your sliders, as well as creative twists to surprise your guests. Additionally, we will explore the rich cultural history of cheeseburger sliders, providing you with a deeper appreciation for this iconic dish. Whether you’re a seasoned cook or a novice in the kitchen, this guide promises to inspire and empower you to create mouthwatering cheeseburger sliders that will impress your family and friends. Get ready to embark on a culinary adventure that celebrates the joy of good food and the memories it creates!
The Rich History and Cultural Significance of cheeseburger sliders
The rich history and cultural significance of cheeseburger sliders is a tapestry woven through decades of American culinary evolution. To truly appreciate these delightful mini-burgers, we must journey back to their origins, when the hamburger itself first emerged in the United States. While the exact beginnings of the hamburger are hotly debated, it is widely acknowledged that the concept of placing a meat patty between two slices of bread gained popularity in the early 20th century. The first mention of a “hamburger sandwich” can be traced back to the 1904 St. Louis World’s Fair, where it captured the hearts of many.
Origins and History
As the hamburger grew in fame, so did the idea of smaller versions of this classic dish. The term “slider” was coined in the 1940s, primarily associated with the White Castle chain, which introduced these bite-sized burgers to a wider audience. Originally, sliders were known for their greasy texture and small size, making them the perfect late-night snack for those seeking a quick and satisfying bite. The evolution of sliders into cheeseburger sliders came when chefs began to experiment with adding cheese—a simple twist that transformed the dish into a crowd-pleaser.
Over the years, cheeseburger sliders have evolved significantly, adapting to current food trends and dietary preferences. Today, sliders can be made with a variety of meats, including turkey, chicken, and even plant-based options, catering to an increasingly health-conscious public. This versatility has allowed cheeseburger sliders to maintain their popularity in restaurants and homes alike, making them a favorite for gatherings, parties, and casual dinners.
Cultural Significance
Cheeseburger sliders hold a special place in American culture, often serving as a symbol of comfort food and celebration. They are frequently associated with summer barbecues, tailgating events, and family-friendly gatherings, where the act of sharing food brings people together. The communal nature of sliders encourages sharing and interaction, fostering connections among friends and family. Moreover, they often appear in celebrations such as Super Bowl parties or Fourth of July festivities, symbolizing unity and joy.
Throughout the years, many famous chefs and restaurants have put their unique spins on cheeseburger sliders, further elevating their status in the culinary world. From gourmet sliders topped with artisanal cheeses and house-made sauces to fun variations featuring international flavors, the cheeseburger slider has transcended its humble beginnings to become a beloved dish enjoyed by all.
Nutritional Benefits
While cheeseburger sliders are often perceived as indulgent fare, they can also offer nutritional benefits when prepared thoughtfully. By opting for leaner cuts of meat or plant-based alternatives, you can create a slider that is lower in fat and calories without sacrificing flavor. Incorporating fresh vegetables as toppings not only adds texture and flavor but also boosts the nutritional profile of the dish. For instance, adding lettuce, tomato, and avocado can increase your intake of vitamins and healthy fats.
Additionally, cheeseburger sliders can be a great way to control portion sizes, making them an excellent choice for those seeking to enjoy a balanced meal without overindulging. By serving sliders alongside healthy sides such as salads or roasted vegetables, you can create a well-rounded meal that satisfies both cravings and nutritional needs.
In summary, the rich history and cultural significance of cheeseburger sliders reflect their status as more than just a meal; they represent the connections we forge through food and the joy it brings to our lives. As you embark on your own cheeseburger slider journey, take a moment to appreciate the legacy of this iconic dish and the role it plays in bringing people together over delicious food.
Essential Ingredients for Perfect cheeseburger sliders
When it comes to making the ultimate cheeseburger sliders, the ingredients you choose can make all the difference. Each component plays a crucial role in creating a delicious and satisfying bite-sized burger. Here’s a breakdown of the essential ingredients you’ll need for perfect cheeseburger sliders, along with tips on how to select the best options, storage solutions, and even some cost-saving alternatives.
Essential Ingredients
- 2 lb lean ground beef (90/10 or 93/7 fat content): The foundation of any great cheeseburger slider is high-quality ground beef. Choosing a lean blend of 90/10 or 93/7 ensures you get a juicy burger without excess grease. Look for bright red meat with a firm texture, and if possible, ask your butcher for freshly ground beef. Avoid any meat that looks dull or has an off smell.
- 12 Tbsp olive oil: Olive oil serves two purposes in this recipe—it adds moisture and richness to the beef and helps in cooking the onions. When selecting olive oil, extra virgin is the best choice for flavor. Look for oils with a harvest date on the bottle to ensure freshness, and opt for dark bottles to protect the oil from light.
- 1 tsp salt: Salt enhances the natural flavors of the beef and onion. Kosher salt is preferred for its larger grains, which can be easily pinched and sprinkled. Always taste your mixture to find the right balance of saltiness, as you can always add more but can’t take it out.
- 1 tsp black pepper: Freshly ground black pepper adds warmth and a bit of spice. Invest in a pepper grinder for the freshest taste, as pre-ground pepper can lose its potency over time.
- 1 tsp garlic powder: Garlic powder offers a concentrated garlic flavor without the moisture of fresh garlic, which can alter the texture of the sliders. If you prefer a fresher taste, feel free to substitute with minced fresh garlic, but use it sparingly.
- 12 large yellow onions, finely diced: Onions add sweetness and depth to the sliders. Yellow onions are ideal for caramelizing, so choose firm onions without soft spots or blemishes. If you want a milder flavor, you can substitute with sweet onions or even shallots.
- 1/4 cup mayonnaise: This ingredient brings creaminess to the cheeseburger sliders and helps bind the meat mixture. Look for high-quality mayonnaise made with natural ingredients. You can even make your own at home if you’re feeling adventurous!
- 8 slices medium cheddar cheese: Cheddar cheese is a classic choice for cheeseburgers, and medium cheddar melts beautifully, adding that gooey texture we all crave. Opt for blocks of cheese that you can slice yourself for the best flavor. Always check the expiration date when purchasing pre-sliced cheese.
- 6 oz medium cheddar shredded or more sliced cheese: For added cheesiness, shredded cheddar can be mixed into the beef or used as a topping. Look for shredded cheese without anti-caking agents to ensure it melts smoothly.
- 24 dinner rolls (or 2 packs of 12): The bread should be soft yet sturdy enough to hold the sliders together. Look for dinner rolls that are fresh and pliable. If you prefer a different flavor, consider using pretzel rolls or brioche for an elevated twist.
- 2 Tbsp unsalted butter, melted: Butter is essential for brushing on the rolls before baking, giving them a golden, crispy crust. Always choose unsalted butter so you can control the salt in your dish better.
- 1 Tbsp sesame seeds: Sesame seeds add a lovely crunch and visual appeal. If sesame isn’t your style, feel free to omit them or try poppy seeds instead.
Cheeseburger Sliders
Ingredients
- 2 lb lean ground beef, (90/10 or 93/7 fat content)
- 1/2 Tbsp olive oil
- 1 tsp salt
- 1 tsp black pepper
- 1 tsp garlic powder
- 1/2 large yellow onion, finely diced
- 1/4 cup mayonnaise
- 8 slices medium cheddar cheese
- 6 oz medium cheddar, shredded (or used more sliced cheese)
- 24 dinner rolls, (or use 2 packs of 12)
- 2 Tbsp unsalted butter, melted, plus more to grease baking sheet
- 1 Tbsp sesame seeds
Instructions
- Preheat oven to 350˚F. Butter the bottom of a rimmed baking sheet.
- Place a large skillet over medium/high heat with 1/2 Tbsp olive oil. Add diced onion then 2 lbs ground beef and break up with a spatula. Season with 1 tsp salt, 1 tsp black pepper, and 1 tsp garlic powder. Sautee over medium/high heat, breaking up the beef and cook just until cooked through then remove from heat.
- Tilt skillet to spoon off and discard excess fat. Stir 1/4 cup mayo into the ground beef.
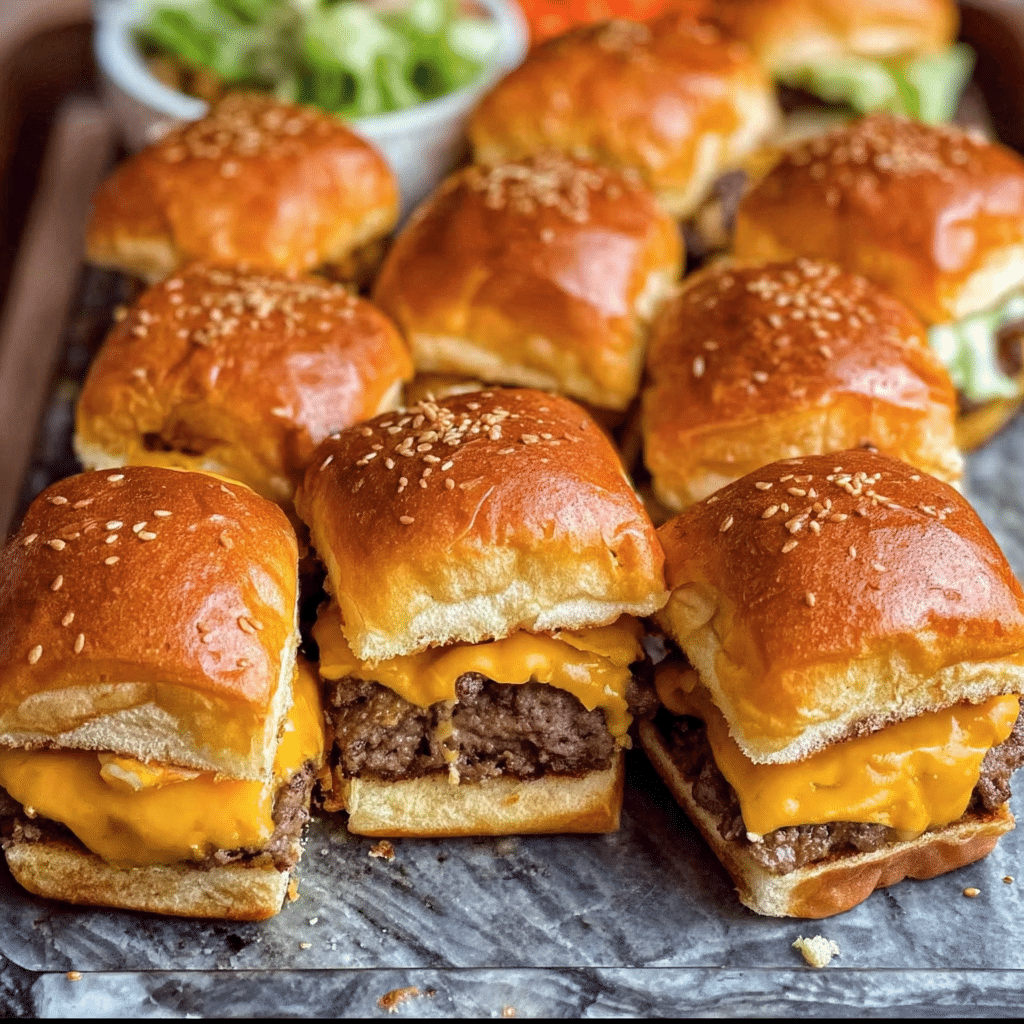
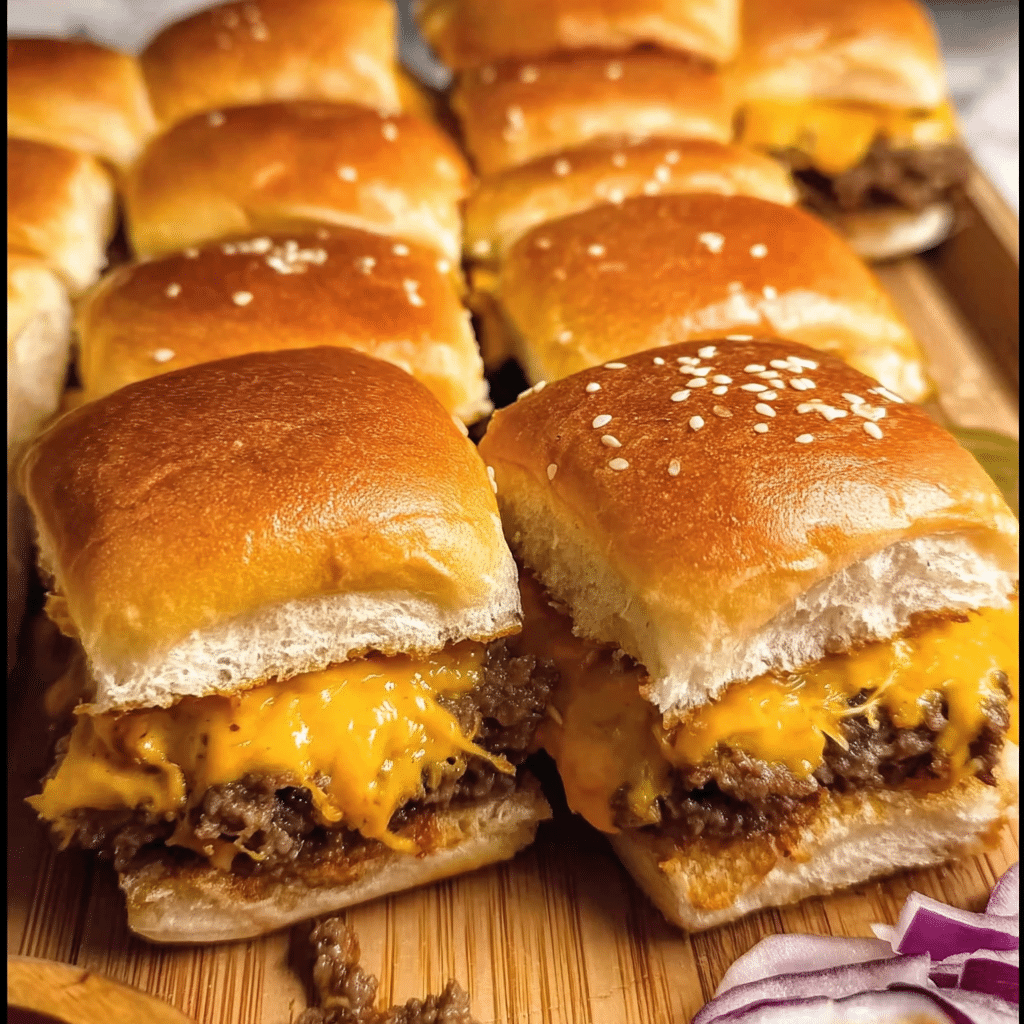
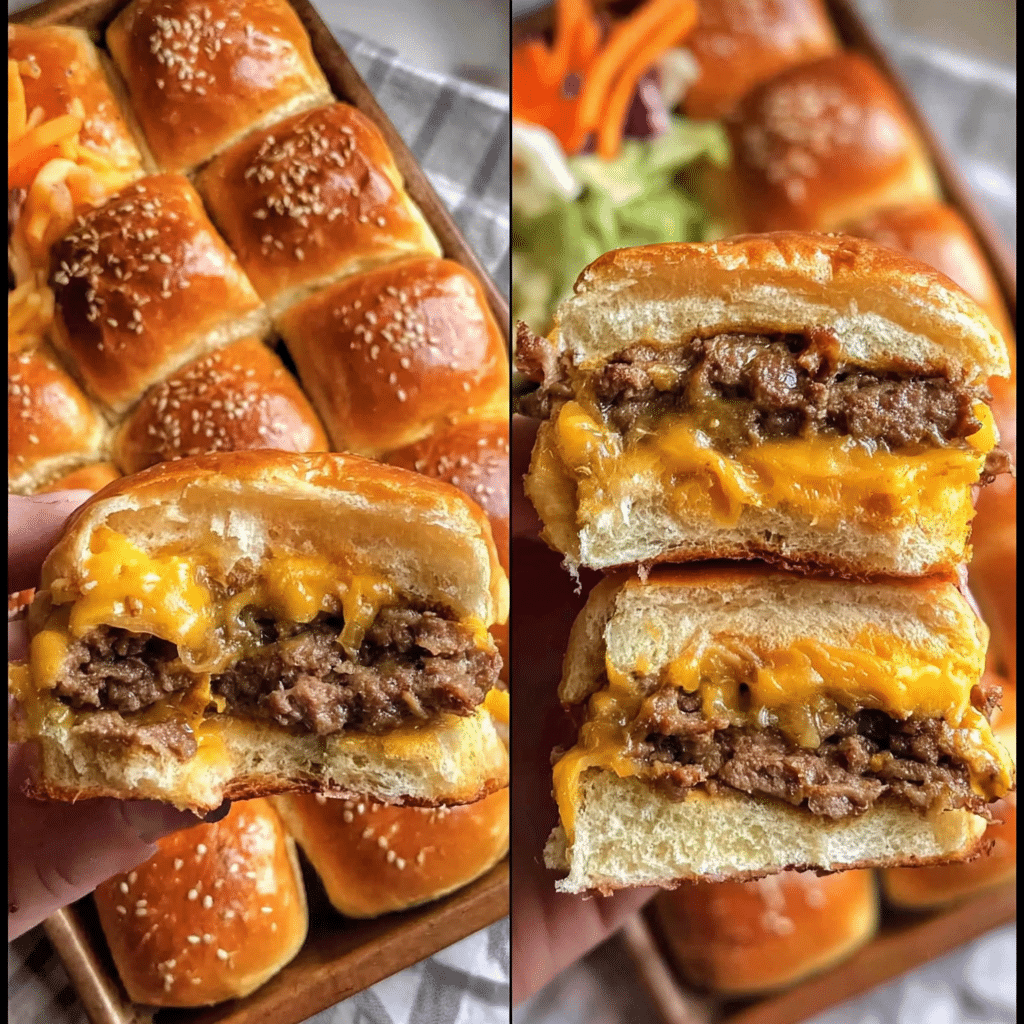
- Cut buns in half. Place bottom half of dinner rolls on buttered baking sheet and line bread with sliced cheese. Spread ground beef mixture evenly over the sliced cheese, using the back of a spatula to square off the edges. Cover the ground beef with 6 oz of shredded cheddar.
- Place the top of buns, cut-side down, over the burgers. Brush tops with 2 Tbsp melted butter and immediately sprinkle tops with sesame seeds. Bake at 350˚F for 12-15 minutes, or until cheese is melted and tops are golden brown.
Shopping Tips
When shopping for ingredients, sourcing quality products can significantly elevate your cheeseburger sliders. For meats, local butcher shops often have fresher options compared to mass-market grocery stores. If you can, visit a farmer’s market for fresh vegetables and possibly local beef. Organic ingredients are a good choice if you prefer to avoid pesticides and GMOs, especially for items like onions and mayonnaise. However, conventional ingredients can be just as effective, especially if you’re on a budget.
Substitutions and Alternatives
Dietary restrictions can be accommodated by making a few simple substitutions. For a gluten-free option, look for gluten-free dinner rolls. If you want a leaner meat, ground turkey or chicken can be used, although the flavor and moisture will differ significantly. For a vegan alternative, consider using plant-based ground meat and vegan cheese. You can also replace mayonnaise with a vegan mayo or avocado for creaminess. Don’t hesitate to experiment with spices and cheeses to customize your sliders to your taste!
Understanding the role of each ingredient allows you to make informed choices, ensuring your cheeseburger sliders turn out perfectly every time. The next step is to dive into the cooking process, where your selection of ingredients will truly shine!
Detailed Step-by-Step cheeseburger sliders Cooking Instructions
Now that you have your ingredients ready, it’s time to transform them into mouthwatering cheeseburger sliders. Cooking these sliders is not just about following a recipe; it’s an experience filled with aromas, flavors, and the anticipation of that first bite. Let’s break down the process into a detailed step-by-step guide to ensure you create sliders that will impress everyone at your next gathering.
Preparation Steps
- Gather your ingredients: Before you start cooking, make sure you have all your ingredients measured and ready to go. This is known as mise en place, a French culinary term that means “everything in its place.” It prevents chaos in the kitchen and allows you to focus on the cooking.
- Preheat your oven: Preheat your oven to 350°F (175°C). This temperature is perfect for baking the sliders to a golden perfection without overcooking them.
- Dice the onions: Finely dice the 12 large yellow onions. This can be a tearful task, but using a sharp knife will help reduce the release of onion oils that cause tearing. If you want to minimize tears, chill the onions in the refrigerator before cutting.
- Cook the onions: In a large skillet, heat 4 tablespoons of olive oil over medium heat. Add the diced onions and a pinch of salt. Sauté the onions until they are translucent and golden, about 15-20 minutes. Stir them occasionally to ensure even cooking. The goal here is to develop their natural sweetness, which will enhance the overall flavor of your sliders.
- Mix the beef: In a large mixing bowl, combine the ground beef with the sautéed onions, garlic powder, black pepper, and remaining salt. Use your hands to mix the ingredients gently; overmixing can lead to tough sliders.
- Form the patties: Divide the beef mixture into 24 equal portions and shape them into small patties. They should be slightly larger than the dinner rolls since they will shrink during cooking. Make a small indentation in the center of each patty to prevent them from puffing up.
Cooking Process
- Heat the skillet: In the same skillet (or a grill if you prefer), add 2 tablespoons of olive oil and heat over medium-high heat. This will give the sliders a nice sear. If you’re using a grill, preheat it and oil the grates lightly.
- Cook the patties: Place the patties in the skillet or on the grill, ensuring not to overcrowd them. Cook for about 3-4 minutes on one side until a nice crust forms, then flip them over and cook for another 3-4 minutes. The internal temperature should reach 160°F (71°C) for safe consumption.
- Add cheese: In the last minute of cooking, place a slice of medium cheddar cheese on each patty, allowing it to melt. If you’re using shredded cheese, sprinkle it generously over the patties instead.
- Prepare the dinner rolls: While the sliders are cooking, brush the tops of the dinner rolls with melted butter and sprinkle with sesame seeds. This step adds flavor and ensures the rolls are beautifully golden.
Final Assembly
- Remove the patties: Once cooked, carefully remove the patties from the skillet or grill and set them aside to rest. This step allows the juices to redistribute, making for a juicier bite.
- Assemble the sliders: Slice the dinner rolls in half horizontally. Place a patty on the bottom half of each roll, then add a dollop of mayonnaise and any other toppings you desire, such as pickles, lettuce, or tomatoes. Top with the other half of the roll.
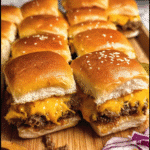
- Serve: Arrange the assembled sliders on a platter and serve warm. These cheeseburger sliders are perfect for parties, game days, or any casual gathering where good food is a must!
With these detailed steps, you’ll not only create delicious cheeseburger sliders but also gain confidence in your cooking abilities. Whether you’re a novice cook or a seasoned chef, the joy of crafting these sliders lies not just in the final product but in the process of cooking, sharing, and enjoying them with family and friends. Bon appétit!
Professional Tips and Techniques for cheeseburger sliders
When it comes to crafting the perfect cheeseburger sliders, a few professional tips and techniques can elevate your dish from ordinary to extraordinary. These little bites of heaven are not just mini burgers; they are a canvas for flavor, texture, and creativity. Whether you’re hosting a game day gathering or a cozy family dinner, mastering the art of cheeseburger sliders can turn any occasion into a celebration.
Professional Techniques
Starting with the basics, the foundation of any cheeseburger sliders lies in the quality of your ingredients. Opt for freshly ground beef with a fat content of around 80/20 for that juicy, flavorful bite. The fat not only enhances the flavor but also keeps the patties moist during cooking. If you’re feeling adventurous, consider blending different meats such as pork or lamb with beef for a unique flavor profile.
Forming the patties is another crucial step. Use a gentle hand to shape them, making sure they’re slightly larger than your slider buns since they will shrink while cooking. A secret technique is to create a small dimple in the center of each patty. This allows for even cooking and prevents the sliders from puffing up, ensuring a perfect bite every time.
Cooking methods vary, but grilling and baking are two of the most popular. If you’re grilling, preheat your grill to medium-high heat and make sure to oil the grates to prevent sticking. For baking, consider using a cast-iron skillet for even heat distribution. Whichever method you choose, always allow your sliders to rest for a few minutes after cooking. This helps redistribute the juices, resulting in a juicy slider.
Troubleshooting Guide
Even the best cooks can run into problems when making cheeseburger sliders. One common issue is dry patties. To avoid this, resist the urge to overwork the meat when mixing your seasonings. Additionally, cooking them at too high a temperature can lead to dryness. Instead, cook them at a moderate temperature for a longer time to ensure they stay juicy.
Another frequent concern is burgers that are too salty. This can often happen when using pre-packaged seasoning mixes. To control the salt level, I recommend using fresh herbs and spices that you can adjust to your taste. If you accidentally oversalt, serving with a creamy sauce or a side of pickles can help balance the flavors.
For those who prefer a cheeseburger slider with a crispy exterior, a quick broil in the oven after cooking can achieve that delightful crust. Just be sure to watch them closely, as they can burn easily!
Presentation Tips
When it comes to serving your cheeseburger sliders, presentation can make all the difference. Arrange the sliders on a large platter, stacking them slightly for a visually appealing display. Garnish with fresh herbs like parsley or chives, which not only add a splash of color but also enhance the flavor profile.
Consider serving with a variety of toppings on the side, allowing guests to customize their sliders. Think beyond the traditional—offer options like avocado, jalapeños, or even caramelized onions for a gourmet touch. For a fun twist, provide a selection of sauces such as spicy mayo, barbecue, or garlic aioli to elevate the flavor experience.
Pairing your sliders with the right beverages can also enhance the meal. A crisp lager or a fruity IPA complements the savory flavors of the cheeseburger sliders beautifully. If you’re looking for non-alcoholic options, consider serving a refreshing lemonade or iced tea, which can cleanse the palate between bites.
Lastly, if you’re making these sliders for a special occasion, consider creating a themed menu. For instance, a backyard BBQ could feature cheeseburger sliders alongside homemade potato salad and grilled corn on the cob, creating a cohesive dining experience that leaves guests raving about your culinary skills.
Creative Variations and Adaptations of cheeseburger sliders
Cheeseburger sliders are incredibly versatile, allowing for endless creativity in the kitchen. As we dive into the world of variations and adaptations, you’ll discover how to tailor these delicious bites to suit any palate or occasion, making them a perennial favorite at gatherings.
Seasonal Variations
Seasonal ingredients can bring new life to your cheeseburger sliders. In the spring, consider incorporating fresh herbs such as dill or basil into your beef mixture. Adding finely chopped spinach or arugula not only boosts the nutritional value but also adds a vibrant flavor that complements the richness of the beef. In the summer, why not add grilled peaches or pineapple slices for a sweet and savory twist? The caramelization of these fruits enhances the overall flavor profile, bringing a hint of summer sweetness to your sliders.
As fall approaches, consider swapping out the traditional toppings for roasted butternut squash or apple slices, paired with a sharp cheddar cheese that melts beautifully. This not only takes advantage of seasonal produce but also introduces a warm, comforting element to your sliders, perfect for those cooler nights. In winter, a hearty beef and mushroom slider topped with melted Swiss cheese and a touch of caramelized onions can create a comforting meal that warms the soul.
Dietary Adaptations
In our increasingly health-conscious world, offering dietary adaptations can make your cheeseburger sliders inclusive for everyone. For those following a keto diet, using ground turkey or chicken can significantly reduce the carb content while still delivering a fantastic flavor. You can also replace the traditional bun with lettuce wraps, which provide a crunchy texture and fresh taste without the carbs.
Vegan options are also on the rise. Consider using plant-based patties made from black beans, lentils, or chickpeas. These not only provide protein but can also be seasoned to mimic the classic cheeseburger flavor. Topping them with vegan cheese and avocado can create a rich and satisfying alternative for those abstaining from animal products.
If gluten is a concern, opt for gluten-free buns or even portobello mushrooms as a bun substitute. The meaty texture of mushrooms holds up well and adds a delicious umami flavor that pairs beautifully with numerous toppings.
Creative Twists
For those looking to experiment, international fusion variations can take your cheeseburger sliders on a global journey. For instance, try a Mexican-inspired twist by incorporating taco seasoning into your beef and topping with guacamole and pico de gallo. Another idea is to go Italian by using a blend of ground beef and Italian sausage, topped with marinara sauce and mozzarella cheese for a slider that tastes like a meatball sub.
Different cooking methods can also yield unique flavors and textures. Slow cooking your sliders can infuse them with spices and create a tender texture that melts in your mouth. For a smoky flavor, consider using a wood pellet grill, which imparts a rich, smoky essence that elevates the cheeseburger slider experience.
Lastly, let’s not forget about leftover transformations! If you have sliders leftover from a gathering, consider turning them into a savory breakfast hash. Simply chop the sliders and sauté them with diced potatoes, bell peppers, and onions for a delicious breakfast that’s full of flavor and nostalgia.
In conclusion, cheeseburger sliders are not just a dish; they are a delightful canvas for experimentation. With the right techniques, variations, and adaptations, you can create sliders that are not only delicious but also suited to any palate or dietary need. So, roll up your sleeves and get creative—the world of cheeseburger sliders is yours to explore!
Storage, Reheating, and Meal Prep for cheeseburger sliders
When it comes to making cheeseburger sliders, one of the most appealing aspects is their versatility—not just in flavor, but also in how you can store, reheat, and prepare them for future meals. I remember the first time I made a big batch of these little delights for a family gathering; we had leftovers aplenty, and I was thrilled to discover just how easy it was to store them for later enjoyment. In this section, we’ll dive deep into the ins and outs of storing cheeseburger sliders, ensuring that they remain delicious even after they’ve cooled off or been frozen.
Short-term Storage
For those moments when you create a batch of cheeseburger sliders and have some leftover, short-term storage is key. Ideally, you want to eat your sliders within a few days of making them. The best way to store them is to place the sliders in an airtight container, ensuring that you cover them tightly to keep out any moisture and air, which can lead to sogginess. I often use glass containers with sealed lids for this purpose, as they tend to keep the flavors intact better than plastic.
If you’re planning on storing your cheeseburger sliders in the refrigerator, they can stay fresh for about 3 to 4 days. To maximize freshness, consider separating the sliders from any condiments like ketchup or mustard, as these can make the bread soggy. Instead, keep the condiments in small containers to add just before serving. When I store them this way, it’s like having a mini burger party ready to go at a moment’s notice!
Freezing and Long-term Storage
For longer storage solutions, freezing cheeseburger sliders is an excellent option. When properly frozen, these sliders can last up to 2 to 3 months without losing their delicious qualities. To freeze them, I recommend wrapping each slider individually in plastic wrap or aluminum foil. This not only helps prevent freezer burn but also allows you to take out as many as you need without thawing the entire batch. After wrapping, place the sliders in a freezer-safe bag or container and label them with the date. This little step makes it easy to keep track of how long they’ve been stored.
When it comes to preparing your cheeseburger sliders for the freezer, I also like to undercook them slightly before freezing. This way, when you reheat them later, they won’t dry out and will retain that juicy flavor. Just be sure to let them cool completely before wrapping and storing them. Remember, the key to successful freezing is to keep as much air out as possible, so ensure the bags or containers are tightly sealed.
Reheating Best Practices
Reheating cheeseburger sliders can be an art form in itself, especially if you want to maintain their freshness and flavor. The microwave is often the quickest method, but it can leave the bread a little chewy. If you use the microwave, I suggest placing a damp paper towel over the sliders to help retain moisture. Heat them on medium power in short increments, checking frequently to avoid overheating.
For a more flavorful option, consider reheating your cheeseburger sliders in the oven. Preheat your oven to 350°F (175°C) and place the sliders on a baking sheet. Cover them with aluminum foil to help keep them moist, and heat them for about 10-15 minutes or until they’re warmed through. This method not only keeps the bread soft but also helps recreate that crispy exterior that makes cheeseburger sliders so delightful.
Another method I’ve enjoyed lately is using an air fryer for reheating. It gives the sliders a nice crispiness while keeping the insides juicy. Just set your air fryer to 350°F (175°C) and heat them for about 5-7 minutes, checking to ensure they’re heated through.
When it comes to food safety, always make sure to reheat your cheeseburger sliders to an internal temperature of 165°F (74°C) to eliminate any foodborne bacteria. I always keep a kitchen thermometer handy for these occasions—it’s a small investment for peace of mind!
As for meal prep, cheeseburger sliders are fantastic for batch cooking. You can make a big batch on a Sunday evening, store them properly, and have delicious lunches or quick dinners ready throughout the week. I often prepare different variations of cheeseburger sliders—some with classic toppings, others with unique flavors like barbecue sauce or spicy jalapeños—this way, I have a little something for every craving!
In terms of shelf life, keep in mind that while the flavors may still be good after a few days in the fridge, the texture of the bread can start to decline. So, it’s best to consume them within the recommended time frames for optimal taste and experience. Portioning your sliders into individual servings or smaller batches also makes it easier to manage storage and prevents waste—saving your taste buds and your wallet!
Ultimately, knowing how to store, freeze, and reheat cheeseburger sliders can elevate your cooking game, giving you the freedom to enjoy these delightful mini meals whenever the craving strikes. With a little bit of preparation, you can always have a delicious slider at the ready!
Nutritional Benefits and Health Information
When we think about cheeseburger sliders, our minds often drift to the delicious flavors and satisfying bites. However, understanding the nutritional aspects of these little burgers can enhance our appreciation for them and help us make healthier choices. As someone who has whipped up countless batches of cheeseburger sliders, I’ve come to realize that they can be as nutritious as they are tasty. Let’s unpack the nutritional benefits and health information surrounding cheeseburger sliders.
Nutritional Profile
To illustrate the nutritional profile of cheeseburger sliders, it’s essential to consider their main components: the bun, the beef patty, and the toppings. A typical cheeseburger slider made with a small beef patty, cheese, and a bun (without toppings) may contain around 250-350 calories. This can vary based on the size of the patty, the type of cheese used, and any additional toppings or sauces.
In terms of macronutrients, cheeseburger sliders usually provide a balanced distribution of protein, fats, and carbohydrates. The beef patty contributes a significant amount of protein, which is crucial for muscle repair and growth. A single slider can contain about 12-20 grams of protein, depending on the meat’s fat content. The cheese adds additional protein and calcium, which is essential for bone health.
The bun, while providing carbohydrates for energy, can also add to the caloric content. Whole grain or whole wheat buns can offer more fiber, which is beneficial for digestive health. If you opt for slider buns made from white bread, consider the trade-off in terms of fiber and nutrients. It’s all about making informed choices while still enjoying these tasty treats!
Health Benefits
The health benefits of cheeseburger sliders can be quite impressive when made with quality ingredients. The beef in the sliders provides essential nutrients like iron and zinc, which support immune function and energy levels. Leaner beef options can help reduce saturated fat intake while still offering plenty of flavors. I often choose ground turkey or chicken when I want a lighter option, and trust me, they’re just as satisfying!
Adding vegetables as toppings is another way to boost the nutritional value of cheeseburger sliders. Fresh lettuce, tomatoes, pickles, and onions not only enhance the flavor but also add vitamins, minerals, and antioxidants. For instance, tomatoes are rich in vitamin C and lycopene, a powerful antioxidant that can support heart health. Incorporating these extra toppings can turn a simple slider into a nutrient-packed meal.
Dietary Considerations
When it comes to dietary considerations, cheeseburger sliders can be adapted to fit various dietary needs. For those following a low-carb or ketogenic diet, you can easily swap out the bun for lettuce wraps or use cauliflower buns. Additionally, gluten-free options are available for those with gluten sensitivities—many grocery stores now carry gluten-free slider buns that maintain great taste.
Vegetarians and vegans can also join in on the fun by using plant-based patties made from beans, lentils, or commercially available meat alternatives. These options can be just as flavorful and satisfying, proving that cheeseburger sliders can cater to a wide range of dietary preferences.
It’s also crucial to consider allergen information. Common allergens in cheeseburger sliders include gluten (from the bun), dairy (from the cheese), and certain condiments. Always check labels when using pre-packaged ingredients, and don’t hesitate to modify recipes to accommodate any dietary restrictions.
In terms of calorie content, cheeseburger sliders can serve as a satisfying meal without being overly heavy. They can fit well into a balanced diet when consumed in moderation. Pairing sliders with a side of fresh veggies or a light salad can create a well-rounded meal that satisfies both hunger and nutritional needs.
Healthy modifications can make cheeseburger sliders even better. For example, using lean ground meat, reducing cheese portions, or opting for homemade sauces can significantly reduce calories and unhealthy fats. When I make sliders at home, I enjoy experimenting with flavors, such as adding spices to the meat or using avocado instead of mayonnaise for a creamy texture without the extra calories.
Furthermore, comparing cheeseburger sliders with similar dishes like traditional burgers or other sandwiches reveals that sliders can offer a more controlled portion size. You can enjoy the same flavors with less commitment, giving you the flexibility to savor multiple varieties without overindulging.
Ultimately, cheeseburger sliders can be a part of a nutritious and balanced diet when prepared thoughtfully. Whether you’re serving them up at a party or enjoying them as a quick weeknight meal, these little burgers can be both a delicious treat and a healthy choice. So, the next time you bite into a cheeseburger slider, remember that you’re not just indulging in flavor; you’re also nourishing your body in delightful ways!
Frequently Asked Questions About Cheeseburger Sliders
What is a cheeseburger sliders recipe?
A cheeseburger sliders recipe typically involves small, bite-sized burgers that are perfect for parties or casual gatherings. To make them, you’ll need ground beef, cheese, slider buns, and your choice of seasonings. Start by shaping the ground beef into small patties and grilling or pan-frying them until they reach your desired doneness. Top each patty with a slice of cheese just before they finish cooking, allowing it to melt beautifully. Serve the sliders on toasted buns with your favorite toppings, such as lettuce, tomato, onions, and condiments for a delicious treat!
How do I make cheeseburger sliders with Hawaiian rolls?
Making cheeseburger sliders with Hawaiian rolls adds a sweet and soft touch to your sliders, enhancing their overall flavor. Start by preheating your oven and preparing a baking dish. Slice the Hawaiian rolls in half and place the bottom halves in the dish. Cook your ground beef with seasonings, and then layer the beef, cheese, and the top halves of the rolls in the dish. Bake until the cheese is melted and the rolls are golden brown for a delightful twist on traditional sliders that will impress your guests!
What are sheet pan cheeseburger sliders?
Sheet pan cheeseburger sliders are a convenient way to make a large batch of sliders all at once using a single baking sheet. To prepare them, simply spread a layer of seasoned ground beef on a sheet pan, and bake it until it’s cooked through. Then, cut the cooked beef into slider-sized portions, and place them on slider buns. Add cheese and any toppings you desire, then return the pan to the oven briefly to melt the cheese. This method is perfect for feeding a crowd and minimizes cleanup!
How do I cook cheeseburger sliders in the oven?
Cooking cheeseburger sliders in the oven is a straightforward process that yields great results. Preheat your oven to around 350°F (175°C) and prepare a baking dish by greasing it lightly. Form your slider patties and place them in the dish, then bake for about 15-20 minutes, or until they reach an internal temperature of 160°F (71°C). To finish, add cheese on top of the patties for the last few minutes of baking, and serve them on warm, toasted buns for a tasty and easy meal!
Where can I find cheeseburger sliders near me?
To find cheeseburger sliders near you, start by checking local restaurants or burger joints that offer slider options on their menu. Using food delivery apps or platforms like Yelp or Google Maps can help you explore nearby eateries quickly. Don’t forget to read reviews to ensure you’re visiting a place known for its delicious sliders. Additionally, many food trucks and catering services provide sliders, making it worth your while to seek out these mobile options for a unique dining experience!
How many calories are in cheeseburger sliders?
The calorie count in cheeseburger sliders can vary significantly based on the ingredients and portion sizes used. On average, a single cheeseburger slider can contain between 200 to 300 calories, depending on the type of meat, cheese, and toppings. To make healthier choices, consider using lean ground beef or turkey, whole-grain buns, and loading up on veggies. Always check the specific nutritional information for the ingredients you use to get a more accurate calorie count for your sliders!
Can I order cheeseburger sliders for catering?
Yes, many catering services and restaurants offer cheeseburger sliders as part of their catering menu, making them an excellent option for parties or events. When selecting a catering service, be sure to inquire about their slider options, including the variety of meats, toppings, and sauces available. It’s also beneficial to discuss dietary restrictions with the caterer, as they may provide alternatives such as vegetarian sliders. Ordering sliders for catering allows guests to enjoy a fun, casual dining experience that caters to different tastes!
How can I enhance cheeseburger sliders with pickles?
Enhancing cheeseburger sliders with pickles can add a delightful crunch and tanginess that complements the rich flavors of the beef and cheese. You can use dill pickles, bread and butter pickles, or even spicy pickles depending on your preference. For added flavor, consider making a pickle relish by chopping pickles and mixing them with a bit of mustard and mayonnaise. Additionally, you can layer pickles directly on the sliders, or serve them on the side for guests to customize their sliders to their liking!


