Cheesy Halloween breadstick, a delightful fusion of spooky fun and cheesy goodness, is a dish that not only tantalizes your taste buds but also brings a warm sense of nostalgia. I remember the first time I stumbled upon this recipe; it was during a bustling autumn afternoon when the leaves were just beginning to change color. My kitchen was filled with laughter and the sweet, earthy scent of pumpkin spice wafting through the air. My daughter, with her little ghost costume already on, was eager to help me prepare something festive for our Halloween party. It was then that I decided to experiment with some simple breadsticks, turning them into fun, bone-shaped treats that would soon become our family’s favorite Halloween tradition.

As I rolled out the dough and shaped it into whimsical bones, my daughter squealed in delight, her eyes lighting up as she saw the transformation from mere ingredients to something that would soon dance on our dinner table. We covered the cheesy Halloween breadsticks with a generous layer of mozzarella and sprinkled them with herbs, creating a dish that was not just visually appealing but also bursting with flavor. That day marked the beginning of a cherished tradition, and every year since, we’ve made these breadsticks, each batch accompanied by stories, laughter, and the ghostly excitement of Halloween.
The Story Behind This Recipe
Cheesy Halloween breadsticks, while seemingly simple, encapsulate a rich cultural heritage. Breadsticks have origins that date back to ancient cultures, with variations across Italy, where they are known as ‘grissini.’ These long, crunchy sticks were traditionally served as an appetizer and have evolved into countless variations over time. The Halloween twist on this classic not only makes it festive but also adds an element of creativity, allowing families to bond over food while celebrating the seasonal spirit.
This recipe stands out because it invites everyone to participate in the cooking process, making it an engaging family activity. It’s perfect for busy families looking for quick dinner solutions, as it can be whipped up in about 30 minutes, allowing you to spend more time enjoying each other’s company instead of slaving away in the kitchen. The cheesy Halloween breadsticks are not just a meal; they’re a canvas for creativity and a means of building memories that last a lifetime.
Why You’ll Love This Dish
Another reason this recipe is special is its seasonal relevance. As Halloween approaches, the excitement of dressing up and preparing spooky treats fills the air. The cheesy Halloween breadstick fits perfectly into this atmosphere, making it an ideal dish for parties, family gatherings, or even a cozy night in with a Halloween movie marathon. Its versatility allows for creative twists; you can incorporate different cheeses, add spices, or even serve it with a variety of dipping sauces.
Emotionally, cheesy Halloween breadsticks hold a special place in our hearts. They symbolize togetherness, creativity, and the joy of sharing food with loved ones. Each year, as we gather around the table, the aroma of freshly baked breadsticks fills the air, reminding us of the warmth of home and the importance of family traditions. My daughter often tells her friends about our Halloween breadstick-making ritual, and it fills me with pride to know that we’re passing down something meaningful.
In this article, you will learn everything you need to know to create your very own cheesy Halloween breadsticks. From the ingredients to the step-by-step process, tips for making them extra cheesy, and ideas for fun variations, you’ll be equipped to make this dish a staple in your Halloween festivities. So, roll up your sleeves, gather your loved ones, and let’s embark on this delicious journey together!
The Rich History and Cultural Significance of cheesy halloween breadstick
The rich history and cultural significance of cheesy Halloween breadsticks may not be immediately apparent, but delve a little deeper, and you’ll find a fascinating story that intertwines culinary creativity with festive celebration. The origins of breadsticks can be traced back to 14th-century Italy, where they were first created as a way to preserve bread. These long, thin sticks of bread were not only easy to transport but also served as a delightful accompaniment to meals. Over time, variations emerged, with different regions developing their unique takes on this classic treat.
Origins and History
While cheesy Halloween breadsticks specifically may not have a storied history, they are a modern adaptation of traditional breadsticks infused with seasonal flair. The idea of incorporating themed elements into food is not new; cultures worldwide have long engaged in the practice of celebrating holidays through culinary creations. In Italy, for instance, various holiday breads are crafted with festive shapes and flavors, and the concept of creating themed foods has spread globally, gaining popularity in home kitchens during festive seasons.
As Halloween became a widely celebrated holiday in the United States, particularly in the 20th century, the trend of creating spooky-themed foods grew. Cheesy Halloween breadsticks are a perfect example of this evolution, combining the classic appeal of breadsticks with the fun and whimsy of Halloween. The fun shapes and cheesy flavor create an inviting atmosphere, making these breadsticks a perfect addition to any Halloween spread.
Cultural Significance
The cultural significance of cheesy Halloween breadsticks lies in their ability to bring families together during the Halloween season. Food has always played a pivotal role in cultural celebrations, serving as a means of connection and expression. The act of cooking and sharing meals fosters community and creates lasting memories. In our family, these cheesy Halloween breadsticks symbolize the joy of gathering, creativity, and the excitement that comes with the holiday.
Moreover, cheese itself has a rich cultural history, being a beloved ingredient in many cuisines around the world. Its versatility allows it to blend seamlessly into various dishes, and during Halloween, the association of cheese with comfort food makes cheesy Halloween breadsticks a natural choice for many families. They are often served alongside other Halloween favorites like pumpkin soup or spooky dips, enhancing the overall festive experience.
Nutritional Benefits
In conclusion, cheesy Halloween breadsticks are more than just a delicious treat; they represent a blending of history, culture, and family traditions. As you embark on making your own version, you’ll be participating in a culinary journey that celebrates the spirit of Halloween while honoring the rich legacy of breadsticks. So, gather your ingredients, invite your little ghouls into the kitchen, and let the magic of cheesy Halloween breadsticks unfold!
Essential Ingredients for Perfect cheesy halloween breadstick
When it comes to creating the perfect cheesy Halloween breadstick, the ingredients are not just the building blocks of flavor; they’re the heart and soul of the dish. Each element plays a crucial role in crafting these delightful treats, and understanding their importance can elevate your baking game to a whole new level. Let’s dive into the essential ingredients that will transform your Halloween gathering into a culinary celebration.
Essential Ingredients
- All-Purpose Flour: 2 cups
- Instant Yeast: 1 packet (about 2 1/4 teaspoons)
- Warm Water: 3/4 cup (about 110°F)
- Olive Oil: 2 tablespoons
- Salt: 1 teaspoon
- Garlic Powder: 1 teaspoon
- Shredded Cheese: 1 cup (mozzarella or cheddar)
- Poppy Seeds or Sesame Seeds: for garnish (optional)
- Egg Wash (optional): 1 egg beaten with 1 tablespoon of water
Let’s break down the significance of each of these ingredients:
All-Purpose Flour acts as the backbone of your cheesy Halloween breadstick. It provides the structure and texture. When choosing flour, look for a brand that is unbleached and has a high protein content, which will ensure a chewier texture. You can also opt for bread flour if you want an even sturdier stick.
Instant Yeast is essential for creating that lovely rise. It works quickly, so you don’t have to wait long to enjoy your breadsticks. Be sure to check the expiration date for freshness; old yeast can lead to disappointing results.
Warm Water is crucial for activating the yeast. The ideal temperature is around 110°F. If your water is too hot, you risk killing the yeast, while too cold will prevent it from activating. Using a thermometer can help achieve the perfect temperature.
Olive Oil adds flavor and moisture to your breadsticks. It also helps create a softer texture. For a more pronounced flavor, consider using extra virgin olive oil. When shopping, look for oils that are labeled as “cold-pressed” for the best quality.
Salt is not just a seasoning; it also strengthens the dough and enhances flavor. Kosher salt is preferable because it dissolves easily and has a clean taste. Avoid using table salt, as it can lead to over-salting due to its finer grains.
Garlic Powder imparts a warm, aromatic flavor that perfectly complements the cheesy goodness of your cheesy Halloween breadstick. If you prefer fresh garlic, use 1-2 cloves minced, but be mindful of the moisture content in the dough.
Shredded Cheese is the star of the show. Whether you choose mozzarella for its melty quality or cheddar for sharpness, make sure it’s freshly shredded for the best texture. Pre-packaged shredded cheese often contains anti-caking agents that can affect meltability.
Poppy Seeds or Sesame Seeds can be used for garnish to give your breadsticks an attractive finish. They also add a nice crunch. These seeds are typically available year-round and can be found in the spice aisle of your grocery store.
The Egg Wash gives your breadsticks a beautiful golden color and a lovely sheen. It’s optional, but if you want to impress your guests, it’s worth the extra step.
Print
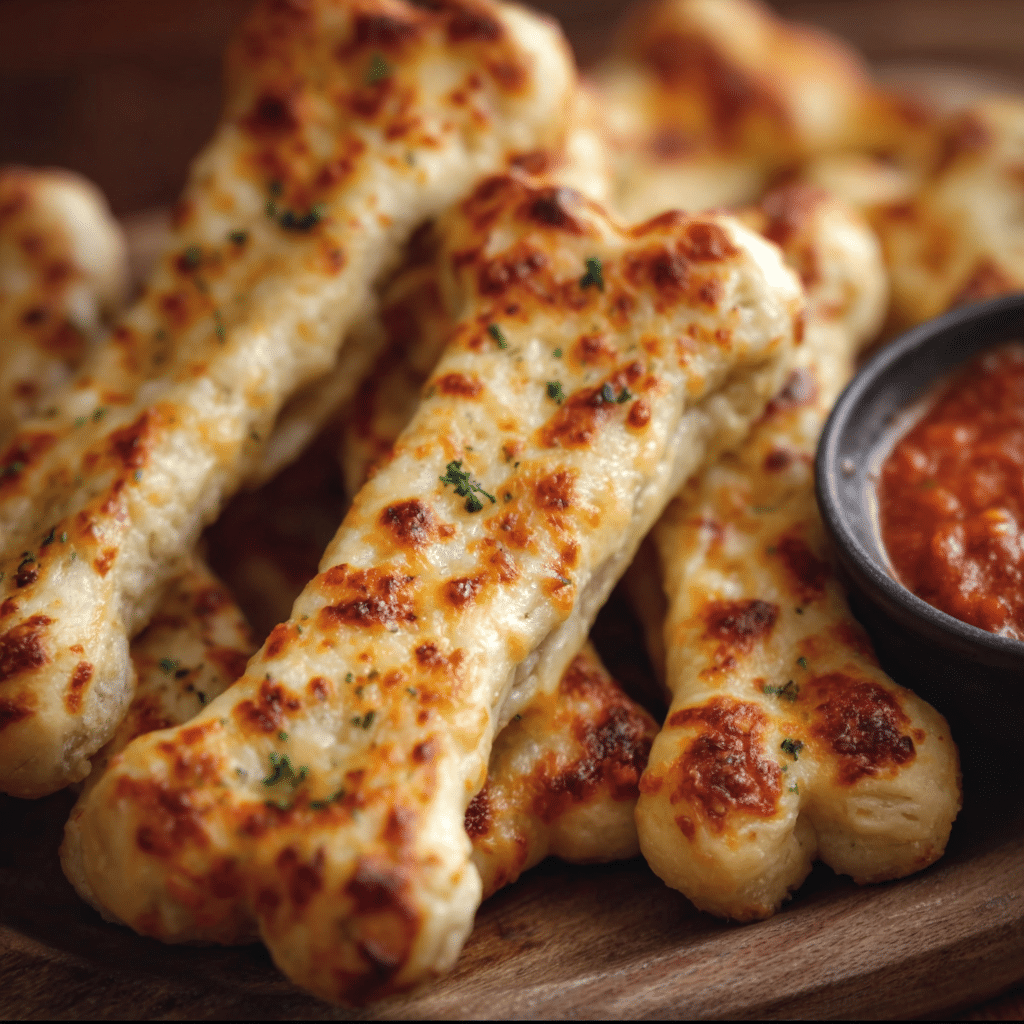
Cheesy Halloween Breadstick Recipe
Ingredients
- All-purpose flour, for dusting work surface
- 1 pound homemade or store-bought pizza dough
- 2 Tablespoons unsalted butter, melted
- 1/2 cup grated Parmesan cheese
- 1 cup shredded mozzarella cheese
- Homemade or store-bought marinara sauce, for serving
Instructions
-
Preheat the oven to 375°F. Line two baking sheets with parchment paper or Silpats. Lightly flour your work surface.
-
Divide the dough into 10 equal balls. Roll each ball into an 8-inch rope slightly larger on the ends. Arrange five breadsticks on each baking sheet, spacing them at least 2 inches apart. Using scissors, cut a 1-inch slit on the ends of each breadstick and gently stretch each of the cut pieces apart to form the ends of the bones.
-
Brush the breadsticks with the melted butter then sprinkle on the grated Parmesan cheese. Bake the breadsticks for about 15 minutes then remove them from the oven and top them with the mozzarella cheese. Return the breadsticks to the oven for an additional 5 to 7 minutes or until the cheese is melted. Remove the breadsticks from the oven and serve them warm with marinara sauce for dipping.
Shopping Tips
When shopping for these ingredients, consider visiting local farmers’ markets for the freshest produce and high-quality olive oil. Many markets offer freshly milled flour, which can significantly enhance your breadstick’s flavor. If you’re looking for convenience, grocery stores offer everything you need, but always check for organic options if that’s your preference.
Pay attention to seasonal availability, especially for ingredients like garlic. Fresh garlic is usually best in late summer through early fall. During Halloween season, you may also find themed ingredients like pumpkin spice variations of garlic powder, which could add a fun twist to your cheesy Halloween breadstick.
Substitutions and Alternatives
For those with dietary restrictions, there are plenty of substitutions you can make. If you’re gluten-free, consider using a gluten-free flour blend, ensuring that it contains a binding agent to mimic the properties of gluten.
For a vegan version, substitute the egg wash with a mixture of plant-based milk and a bit of maple syrup to achieve a similar golden color. You can use vegan cheese or omit cheese altogether for an equally satisfying breadstick.
When it comes to storage, keep your ingredients in airtight containers to maintain freshness. Flour can be stored in a cool, dry place for up to a year, while olive oil should be kept in a dark bottle to avoid oxidation. Cheese should be wrapped tightly in plastic wrap to prevent it from drying out.
For cost-saving options, buy ingredients in bulk, especially flour and yeast, as they have a long shelf life. Consider making a larger batch of cheesy Halloween breadstick to freeze and enjoy later; they can be reheated in the oven for that fresh-out-of-the-oven taste.
As we prepare to bring these ingredients together, remember that the quality of each component contributes to the overall success of your dish. By selecting the best ingredients, you’re setting yourself up for a Halloween treat that will delight your friends and family.
Detailed Step-by-Step cheesy halloween breadstick Cooking Instructions
Now that you have a solid understanding of the essential ingredients for your cheesy Halloween breadstick, let’s delve into the detailed cooking instructions. This step-by-step guide will ensure that you not only create delicious breadsticks but also enjoy the process of making them. Whether you’re a seasoned baker or a novice in the kitchen, these instructions will help you along the way.
Preparation Steps
- Gather Your Ingredients: Before you start baking, it’s crucial to have all your ingredients ready. This process, known as mise en place, will help streamline your cooking experience. Measure out 2 cups of all-purpose flour, 1 packet of instant yeast, 3/4 cup of warm water, 2 tablespoons of olive oil, 1 teaspoon of salt, and 1 teaspoon of garlic powder. Don’t forget your 1 cup of shredded cheese, optional seeds for garnish, and egg wash ingredients if you choose to use them.
- Activate the Yeast: In a small bowl, combine the warm water and instant yeast. Let it sit for about 5-10 minutes until it becomes foamy. This indicates that your yeast is active and ready to work its magic.
- Mix Dry Ingredients: In a large mixing bowl, combine the flour, salt, and garlic powder. Whisk them together to ensure an even distribution of the salt and garlic.
- Create the Dough: Once the yeast is foamy, create a well in the center of your dry ingredients. Pour the yeast mixture and olive oil into the well. Using a wooden spoon, mix until a shaggy dough forms. At this point, you might need to add a little more flour if the dough is too sticky, or a bit more water if it feels too dry.
- Knead the Dough: Transfer the dough onto a lightly floured surface. Knead the dough for about 5-7 minutes until it becomes smooth and elastic. If the dough sticks to your hands, sprinkle a little flour on top rather than adding too much flour initially.
- First Rise: Place the kneaded dough into a greased bowl, cover it with a clean kitchen towel, and let it rise in a warm place for about 1 hour or until it has doubled in size. This is the magic of yeast at work!
Cooking Process
- Preheat Your Oven: While your dough is rising, preheat your oven to 375°F (190°C). This will ensure that your oven is hot and ready to create a crispy exterior on your cheesy Halloween breadstick.
- Shape the Dough: Once the dough has risen, punch it down gently to release the air. Transfer it back to your floured surface and divide it into equal portions—about 8-10 pieces depending on how thick you want your breadsticks. Roll each piece into a long, narrow shape, about 6-8 inches in length.
- Add the Cheese: Before baking, sprinkle a generous amount of shredded cheese along the center of each breadstick. Fold the dough over the cheese and pinch the edges to seal it in. This step is crucial for avoiding cheesy spills during baking.
- Second Rise: Place the shaped breadsticks on a baking sheet lined with parchment paper. Cover them with a towel and let them rise for another 20-30 minutes. This helps to achieve a light and airy texture.
- Brush with Egg Wash: If you’re using the egg wash, brush the tops of the breadsticks gently with the egg mixture to give them a beautiful golden color once baked. Sprinkle poppy or sesame seeds on top for added texture and visual appeal.
Final Assembly
- Bake the Breadsticks: Place the baking sheet in the preheated oven and bake for 15-20 minutes, or until golden brown. Keep an eye on them towards the end of the baking time to prevent burning. The visual cue to look for is a deep golden brown color and a cheesy aroma wafting through your kitchen.
- Cool and Serve: Once baked, remove the breadsticks from the oven and let them cool on a wire rack for about 5 minutes. This cooling period allows the cheese to set slightly, making them easier to handle. Serve warm with marinara sauce or your favorite dip.
- Storing Leftovers: If you have leftover cheesy Halloween breadstick, store them in an airtight container at room temperature for up to two days. For longer storage, wrap them in plastic wrap and freeze. To reheat, simply pop them in a warm oven for about 10 minutes.
- Avoiding Common Mistakes: One common mistake is over-kneading the dough, which can lead to tough breadsticks. Aim for a smooth, elastic texture. Also, ensure your yeast is fresh; expired yeast won’t rise properly, resulting in dense breadsticks.
- Chef Secrets: For an extra flavor boost, try adding herbs like dried oregano or basil to your dough. You can also experiment with different types of cheese; pepper jack adds a spicy kick, while gouda can provide a smoky flavor.
With these instructions, you’re well on your way to creating a delicious batch of cheesy Halloween breadstick that will charm your family and friends. Remember, the key to great baking is patience and practice, so don’t rush the process. Enjoy the aroma, the mess, and above all, the delectable results!
Professional Tips and Techniques for cheesy halloween breadstick
Halloween is one of my favorite times of the year, not just for the costumes and candy, but also for the playful creativity that comes with food. One of the most delightful and spooky treats I love to prepare is cheesy Halloween breadstick bones. These whimsical breadsticks are not only fun to make, but they also serve as a fantastic appetizer or side dish for any Halloween gathering. To help you nail this recipe and impress your guests, I’ve compiled a treasure trove of professional tips and techniques that will elevate your cheesy Halloween breadstick game.

Professional Techniques
When it comes to crafting the perfect cheesy Halloween breadstick, preparation is key. Start with a high-quality dough, whether you choose to make it from scratch or use store-bought. If you’re going the homemade route, ensure your yeast is fresh and your ingredients are at room temperature for optimal rise. Kneading the dough properly is crucial; aim for about 10 minutes until it becomes smooth and elastic. This helps develop gluten, giving your breadsticks that wonderful chewy texture we all love.
Another tip is to infuse flavor into the dough itself. Consider adding garlic powder, Italian herbs, or even a hint of cayenne for a subtle kick. This not only enhances the flavor of your cheesy Halloween breadsticks but also elevates the overall dish. Once your dough has risen, you can roll it out and cut it into bones. Use a pizza cutter for straight edges, and a knife to create the bone shapes. Don’t worry too much about perfection; the rustic look adds to the charm!
Troubleshooting Guide
Even the most seasoned cooks encounter hiccups, so here’s a troubleshooting guide to help you along the way. If your cheesy Halloween breadsticks are coming out too dry, it could be a matter of over-baking. Keep an eye on them toward the end of the baking time, and remember that they’ll continue to cook slightly after removing from the oven. If they’re too doughy or undercooked, you may need to adjust your oven temperature or baking time. Invest in an oven thermometer to ensure your oven is accurate.
If your dough isn’t rising properly, make sure your yeast is fresh and that your kitchen is warm enough. Yeast thrives in warmth, so a good trick is to preheat your oven for a minute, then turn it off and let the dough rise inside. This creates a cozy environment for your dough to double in size. Additionally, if you’re working with gluten-free or alternative flours, the texture may differ; consider blending in some vital wheat gluten or xanthan gum to mimic traditional bread textures.
Presentation Tips
When it comes to serving your cheesy Halloween breadsticks, presentation is everything! Arrange your breadsticks in a bone shape on a platter, and consider garnishing with fresh parsley or a sprinkle of Parmesan cheese for an extra touch of elegance. You can also pair your breadsticks with a spooky dipping sauce—think marinara with a dash of red food coloring or a vibrant green pesto. For an added Halloween flair, use cookie cutters to shape cheese slices into ghosts or pumpkins to decorate the platter.
For drinks, consider serving your cheesy Halloween breadsticks with a glass of dry white wine like a Sauvignon Blanc, which pairs beautifully with the richness of the cheese. If you prefer non-alcoholic options, a sparkling apple cider can add a festive touch and a refreshing contrast to the savory flavors. The key is to balance the flavors while keeping the spooky theme in mind.
Lastly, if you’d like to make ahead, these cheesy Halloween breadsticks can be frozen before baking. Simply shape them, place them on a baking sheet, and freeze until solid. Once frozen, transfer them to a zip-top bag. When you’re ready to bake, just pop them in the oven directly from the freezer—no need to defrost. This convenience allows you to enjoy fresh breadsticks with minimal effort on Halloween night!
Creative Variations and Adaptations of cheesy halloween breadstick
Now that you’ve mastered the basics, let’s dive into some creative variations and adaptations of cheesy Halloween breadsticks. The beauty of this recipe lies in its versatility; feel free to get creative and make it your own. Whether you’re looking to cater to different dietary needs or simply want to experiment with flavors, here are some ideas to inspire your culinary creativity.
Seasonal Variations
Autumn brings a bounty of seasonal ingredients that can elevate your cheesy Halloween breadsticks. Swap traditional cheese for pumpkin puree mixed with cream cheese or ricotta for a rich, fall-inspired twist. You can even fold in chopped roasted butternut squash for added texture and sweetness. Incorporating spices like nutmeg or cinnamon can also create a delightful contrast to the cheesy flavor.
Another seasonal variation could be to use fresh herbs like sage or rosemary, which pair beautifully with the savory notes of the breadsticks. Infusing the dough with apple cider vinegar can also add an interesting tang that complements the cheese. If you’re looking for a more visually striking presentation, consider swirling in some beet puree for a vibrant color that’s perfect for Halloween.
Dietary Adaptations
In our increasingly health-conscious world, offering adaptations for dietary restrictions is essential. For a gluten-free version of cheesy Halloween breadsticks, try using a gluten-free all-purpose flour blend. Make sure to add a binding agent like xanthan gum to mimic the elasticity of traditional dough. If you’re catering to a vegan crowd, substitute dairy cheese with vegan cheese and use plant-based yogurt or a flaxseed egg to bind the dough.
For those on a keto diet, you can create a low-carb cheesy breadstick using almond flour instead of regular flour. Combine it with mozzarella cheese and cream cheese for a dough that’s both delicious and compliant with low-carb guidelines. Season it generously with herbs and spices to enhance the flavor, as the almond flour can have a slightly different taste profile than traditional bread.
Creative Twists
Now let’s talk about international fusion variations! Think outside the box and infuse your cheesy Halloween breadsticks with flavors from around the world. For a Mexican twist, add jalapeños and cheddar cheese to the dough, and serve with a side of spicy salsa. You could also try using pesto and sun-dried tomatoes for an Italian flair, or incorporate curry powder with a side of mango chutney for an Indian-inspired experience.
When it comes to cooking methods, don’t feel limited to the oven. You can use an air fryer for a quick, crispy version of cheesy Halloween breadsticks. Simply preheat the air fryer and cook them in batches for about 8-10 minutes, checking for doneness. If you’re feeling adventurous, you could also experiment with a slow cooker; just layer your shaped breadsticks in the cooker and let them bake on low for a few hours.
If you find yourself with leftover cheesy Halloween breadsticks, don’t fret! They can be transformed into a delightful bread pudding by cubing the leftovers and mixing them with eggs, milk, and your choice of seasonings. Bake until golden and set for a completely new dish that’s perfect for breakfast or brunch.
In conclusion, the possibilities for cheesy Halloween breadsticks are truly endless. By embracing seasonal ingredients, accommodating dietary needs, and experimenting with flavors, you can create a dish that’s not just delicious, but also a fun focal point for your Halloween festivities. So roll up your sleeves, gather your ingredients, and get ready to create some spooky and scrumptious cheesy Halloween breadsticks!
Storage, Reheating, and Meal Prep for cheesy halloween breadstick
When it comes to making cheesy Halloween breadstick bones, one of the most delightful aspects is not just the eerie presentation, but also how well they store and reheat, making them perfect for pre-Halloween parties or gatherings. Whether you’re planning to serve these cheesy delights on Halloween night or saving them for later, understanding the best practices for storage, reheating, and meal prep can elevate your culinary experience and ensure that every bite is as fresh and flavorful as the first.
Short-term Storage
After whipping up a batch of cheesy Halloween breadstick bones, you might find yourself with leftovers—or you may want to prep them ahead of time for a party. For short-term storage, the best approach is to let your breadstick bones cool completely at room temperature. This helps to prevent condensation, which can lead to sogginess. Once cooled, transfer them to an airtight container lined with a paper towel to absorb any moisture. This container can be stored in the refrigerator for up to 3-4 days.
It’s important not to stack the breadsticks too tightly, as this can also lead to moisture buildup. Instead, consider using dividers or simply laying them in a single layer, if possible. If you anticipate that you’ll be consuming the breadsticks over several days, portioning them out can be a great strategy. This way, you only open what you need, reducing the risk of spoilage for the remaining sticks.
Freezing and Long-term Storage
If you want to enjoy your cheesy Halloween breadstick bones even longer, freezing is a fantastic option. Allow the breadsticks to cool thoroughly, then wrap each one tightly in plastic wrap. After wrapping, place them in a freezer-safe bag or container. This double-layer protection will help prevent freezer burn and maintain the cheesy goodness. When frozen properly, your breadsticks can last for up to 2-3 months.
When you’re ready to enjoy them again, it’s best to thaw the breadsticks overnight in the refrigerator. This gradual thawing process helps maintain their texture. Alternatively, you can reheat them directly from the freezer, but be prepared for a slightly longer cooking time. Just preheat your oven to 350°F (175°C) and bake for about 10-15 minutes, or until heated through.
Reheating Best Practices
Reheating cheesy Halloween breadstick bones can be tricky; you want to maintain that delightful cheesy pull and soft texture. The oven is your best friend here. Preheat to 350°F (175°C), place the breadsticks on a baking sheet lined with parchment paper, and heat for about 10 minutes. If you’re feeling indulgent, consider brushing them lightly with melted butter or olive oil before reheating to enhance the flavor.
Microwaving is another option for reheating, but it can lead to chewy, less appealing results. If you must use a microwave, place the breadsticks on a microwave-safe plate and cover them with a damp paper towel to add moisture. Heat on medium power in short intervals, checking frequently to avoid overcooking.
For those who are meal prepping, consider making a large batch of cheesy Halloween breadstick bones and freezing them in portions. This way, you can pull out just what you need for a quick snack or appetizer. When entertaining, you can even prepare the dough ahead of time, shape the bones, and then freeze them unbaked. Just pop them in the oven when guests arrive for a fresh, warm treat.
Food safety is also paramount when storing any food items, including your cheesy delights. Always ensure the breadsticks are cooled before storage to reduce the risk of bacterial growth. And remember, if you notice any off smell or changes in texture, it’s better to err on the side of caution and discard them.
In terms of shelf life, refrigerated cheesy Halloween breadstick bones are best consumed within the first few days. Freezing extends their life significantly, but the quality may diminish over time. It’s always a good idea to label your containers with the date they were made or frozen to keep track of freshness.
Lastly, portioning is key for meal prep. Consider using smaller containers or snack bags, especially if you’re planning to take them on-the-go. This not only helps with portion control but also makes it easier to enjoy these spooky snacks during movie nights or Halloween festivities. With these storage tips, your cheesy Halloween breadstick bones will be ready to delight your taste buds whenever the craving strikes!
Nutritional Benefits and Health Information
While the cheesy Halloween breadstick bones are a fun and festive treat, understanding their nutritional profile can help you enjoy them guilt-free and incorporate them into a balanced diet. Let’s delve into the health benefits of the key ingredients, their calorie content, and how this delightful dish fits into various dietary considerations.
Nutritional Profile
Each serving of cheesy Halloween breadstick bones typically contains a combination of carbohydrates, proteins, and fats. The exact nutritional breakdown can vary based on the specific recipe and ingredients used, but a basic serving might average around 150-200 calories. The breadsticks are usually made from flour, water, cheese, and seasonings, creating a delicious snack that is also a source of energy.
The primary macronutrients include:
- Carbohydrates: Flour is the main ingredient, providing energy. A typical serving contains about 25-30 grams of carbohydrates.
- Protein: Cheese not only adds flavor but also contributes to the protein content, with about 5-7 grams per serving.
- Fats: Depending on the type and amount of cheese used, the fat content can range from 5-10 grams, adding richness to the breadsticks.
Health Benefits
One of the key ingredients in cheesy Halloween breadstick bones is cheese, which is a great source of calcium and protein. Calcium is essential for strong bones and teeth, while protein supports muscle health and can help keep you feeling full. Additionally, many cheeses contain beneficial nutrients like vitamin B12, phosphorus, and zinc, which are vital for overall health.
However, it’s important to choose your cheese wisely. Opting for part-skim or lower-fat versions can help reduce the overall fat content while still delivering that cheesy flavor. If you’re looking to add some nutritional value, consider incorporating whole grain flour instead of white flour, which can increase fiber content and improve digestive health.
Dietary Considerations
When it comes to dietary restrictions, cheesy Halloween breadstick bones can be quite versatile. For those with gluten sensitivities or celiac disease, gluten-free flour can be used as a substitute. It’s essential to check that all other ingredients, including seasonings and cheese, are also gluten-free.
If you’re trying to reduce calorie intake or fat consumption, you can modify the recipe by using low-fat cheese and reducing the amount of cheese used overall. Alternatively, you can enhance the flavor with herbs and spices, allowing you to cut back on cheese without sacrificing taste.
For vegans or those avoiding dairy, using vegan cheese alternatives can offer a similar cheesy experience. There are many plant-based cheeses available that melt and stretch, making them an excellent option for your cheesy Halloween breadstick bones.
Comparing these breadsticks to similar dishes, such as traditional garlic bread or cheesy breadsticks from pizzerias, the homemade version allows for greater control over ingredients. Store-bought versions often contain preservatives and additives that may not align with your health goals. When you make them at home, you can tailor the ingredients to meet your dietary needs.
In summary, cheesy Halloween breadstick bones can be a nutritious addition to your Halloween festivities when made with care. By focusing on ingredients that offer health benefits while still delivering on flavor, you can indulge in this festive treat without compromising your health goals. Remember, it’s all about balance—so enjoy these cheesy delights as a fun part of your Halloween celebrations!
Frequently Asked Questions About Cheesy Halloween Breadstick
What are dog bone breadsticks and how can I make them for Halloween?
Dog bone breadsticks are a fun and creative twist on traditional breadsticks, shaped like dog bones to celebrate Halloween. To make them, roll out your pizza or breadstick dough and use a bone-shaped cookie cutter to cut out the shapes. For extra flavor, consider adding garlic powder or Italian herbs to the dough. Once baked, you can brush them with melted butter and sprinkle with Parmesan cheese to enhance their taste. These treats are not only great for the kids but also perfect for pet-themed Halloween parties!
What is the best recipe for cheesy Halloween breadsticks?
Cheesy Halloween breadsticks are a delightful and spooky addition to your Halloween festivities. To make them, start with store-bought or homemade pizza dough, and roll it out into a rectangle. Spread a mixture of melted butter, minced garlic, and your favorite herbs on top, then generously sprinkle shredded mozzarella cheese and some orange cheddar to enhance the Halloween theme. Cut the dough into strips and twist them slightly before baking at 400°F (200°C) for about 12-15 minutes or until golden and bubbly. Serve them warm with marinara sauce for a deliciously cheesy treat that everyone will love!
How can I create breadstick snakes for Halloween?
Creating breadstick snakes for Halloween is a fun and creative project that kids and adults will enjoy. Start by preparing your breadstick dough, whether homemade or store-bought, and roll it out into long, snake-like shapes. To add a spooky touch, you can use olives for eyes and slice pieces of bell peppers to create a forked tongue. Bake the snakes at 375°F (190°C) until golden brown, and serve them with a side of marinara sauce for dipping. This easy-to-make treat not only looks great on a Halloween platter but is also deliciously fun to eat!


