Chocolate peppermint cookie cups filled with cheesecake are a delightful twist on traditional holiday flavors, and the chocolate peppermint cookie is the star of this scrumptious treat. As soon as the air turns crisp and the leaves begin to fall, I find myself craving that signature combination of chocolate and peppermint. One December evening, while sorting through my grandmother’s old recipe box, I stumbled upon a handwritten note that read “Chocolate Peppermint Cookie Cups.” Intrigued, I decided to give it a try, and from that moment on, it became a cherished family favorite.
The journey to creating the perfect chocolate peppermint cookie began when I baked a batch for a school holiday event. I was overwhelmed by the positive feedback; the cookies were soft, chewy, and the subtle peppermint flavor was a refreshing surprise. Friends and family couldn’t get enough of them! With the holidays approaching, I knew I had to elevate this recipe, and that’s when the idea of combining chocolate peppermint cookies with a creamy cheesecake filling came to mind. The result was nothing short of magical, a dessert that perfectly balances sweetness and richness.
The Story Behind This Recipe
This recipe is not just another dessert; it is a culmination of tradition and innovation. The chocolate peppermint cookie has roots that spread far and wide. Chocolate has been a beloved ingredient for centuries, used in various forms, from drinks to desserts. Peppermint, on the other hand, brings a refreshing, aromatic quality that has been appreciated since ancient times. Together, they form a harmonious blend that evokes warmth and nostalgia, especially during the holiday season. The addition of cheesecake filling adds an unexpected twist that transforms the cookie into a decadent treat.
What makes this chocolate peppermint cookie recipe special is its versatility. It is perfect for busy families looking for quick dinner solutions. The cookie cups can be made in advance and stored in the refrigerator, which means you can whip up a batch during the weekend and have them ready to serve at a moment’s notice. They are ideal for holiday gatherings, cozy family nights, or even as a sweet surprise for someone special. The process is straightforward, allowing you to enjoy baking without feeling overwhelmed.
Why You’ll Love This Dish
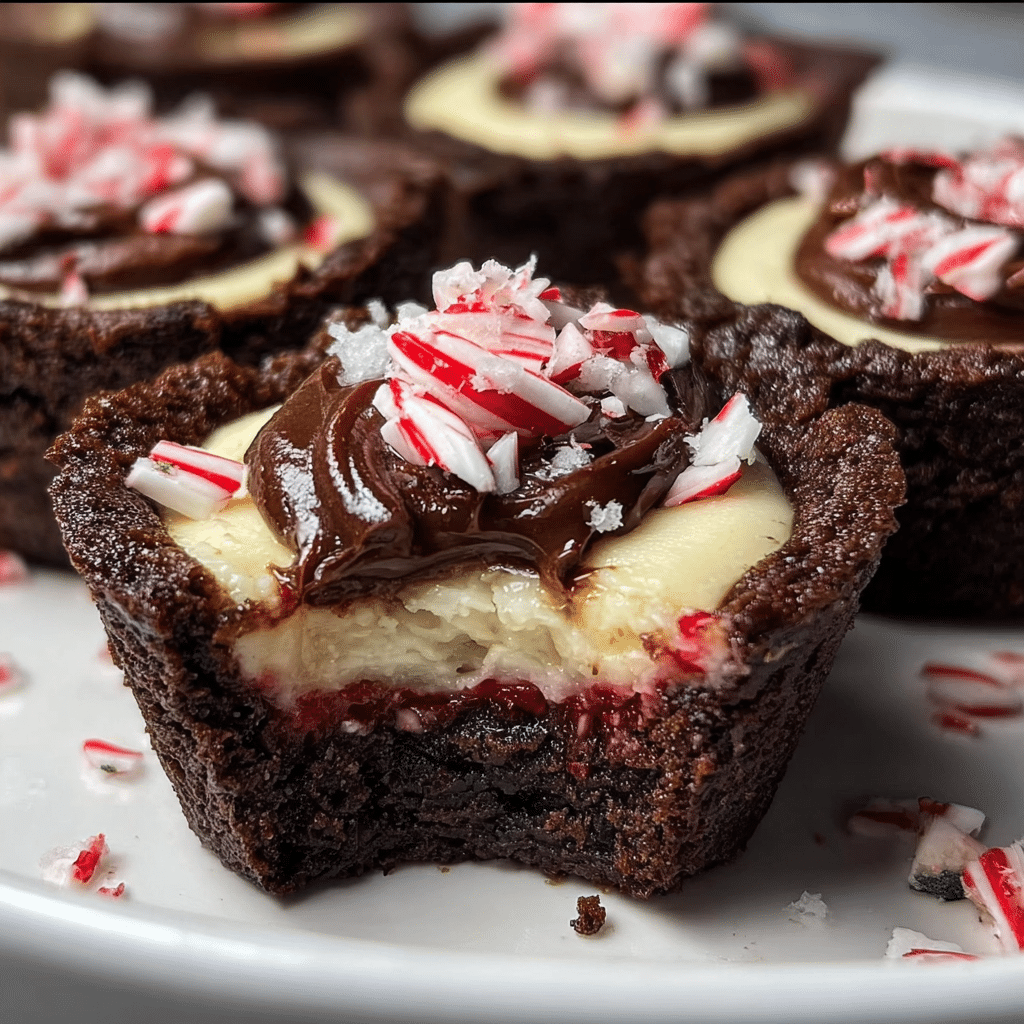
This dish is perfect for the holiday season, a time when families gather and create lasting memories. The chocolate peppermint cookie cups are visually stunning, with their rich chocolate base supporting a fluffy cheesecake filling topped with crushed peppermint candies. They embody the spirit of the holidays, combining flavors that evoke joy and celebration. This recipe invites you to slow down and enjoy the simple pleasure of baking with loved ones, creating not just desserts, but cherished moments.
As you dive into this guide, you will learn all about crafting the perfect chocolate peppermint cookie, from selecting the right ingredients to mastering the baking technique. You’ll discover tips for making the cheesecake filling light and airy, ensuring a delightful contrast to the rich cookie base. Whether you’re a seasoned baker or just starting, this recipe will become a staple in your home. So, grab your apron and get ready to create something truly special!
The Rich History and Cultural Significance of chocolate peppermint cookie
The chocolate peppermint cookie is a delightful fusion of flavors and textures, boasting a rich history that reflects the evolution of baking practices around the world. This treat combines the deep, rich taste of chocolate with the refreshing zing of peppermint, creating a cookie that is not only delicious but also culturally significant. The tradition of baking with chocolate can be traced back to the ancient Mesoamerican cultures, where cacao was used in both food and ceremonial drinks. Peppermint, on the other hand, has a long-standing history of use in culinary and medicinal practices, celebrated for its invigorating aroma and flavor.
Origins and History
The concept of combining chocolate and peppermint likely arose from the European influence on American sweets during the 18th and 19th centuries. Chocolate became widely accessible in the United States with the establishment of cocoa plantations and the advent of mass production. As baking evolved, so did the incorporation of flavorings like peppermint, which were popular for their aromatic qualities and digestive benefits. The chocolate peppermint cookie, as we know it today, emerged in the late 20th century, becoming a staple in holiday baking due to its festive colors and flavors.
As recipes evolved, various interpretations of the chocolate peppermint cookie emerged, ranging from traditional drop cookies to more sophisticated interpretations like cookie cups filled with cheesecake. Each variation reflects the personal touch of the baker, making it a versatile dessert perfect for any occasion. In this way, the chocolate peppermint cookie has transcended its humble origins, evolving into a beloved treat enjoyed across the globe.
Cultural Significance
Chocolate peppermint cookies hold a special place in holiday traditions, particularly in Western cultures. They are often associated with Christmas, where the rich flavors symbolize festivity and joy. It’s common to see these cookies served at holiday parties, given as gifts, or enjoyed during family gatherings. The act of baking these cookies can also serve as a bonding experience, with families coming together to share stories, laughter, and delicious treats. In many households, the recipe is passed down through generations, ensuring that the tradition of baking these cookies continues.
Beyond the holiday season, chocolate peppermint cookies can be enjoyed year-round. They make a delightful treat for birthdays, anniversaries, and any occasion that calls for a little sweetness. Many bakers have also embraced the trend of creating gluten-free or vegan variations, allowing everyone to indulge in this delicious dessert regardless of dietary restrictions.
Nutritional Benefits
While chocolate peppermint cookies are certainly a treat meant to be enjoyed in moderation, they can offer some nutritional benefits when made with wholesome ingredients. The use of high-quality dark chocolate can provide antioxidants, which are known for their health benefits, including improved heart health. Peppermint adds a refreshing flavor and can also aid digestion.
Incorporating ingredients such as whole wheat flour in your cookie base can increase the fiber content, making them a more satisfying option. Additionally, using cream cheese in the filling provides some calcium and protein. While these cookies are not a health food, they can be a part of a balanced diet when enjoyed occasionally.
In conclusion, the chocolate peppermint cookie is more than just a dessert; it is a reflection of cultural heritage and family traditions. Its rich history, combined with its incredible flavors and versatility, makes it a must-bake recipe for any holiday or special occasion. Whether you’re new to baking or a seasoned pro, this guide will help you create chocolate peppermint cookie cups that will impress your family and friends and leave lasting memories.
Essential Ingredients for Perfect chocolate peppermint cookie
When it comes to baking, the ingredients you choose are paramount. They not only contribute to the flavor and texture of your treats but also to the overall experience of making and enjoying them. Today, we’re diving deep into the essential ingredients for the perfect chocolate peppermint cookie cups with cheesecake filling. This delightful treat combines rich chocolate cookie cups with a creamy peppermint cheesecake filling, creating a symphony of flavors that will tantalize your taste buds and perhaps evoke some childhood holiday memories.
Essential Ingredients
Let’s break down each ingredient that goes into our chocolate peppermint cookie cups and explore their roles, qualities, and tips for selection:
- 2 cups all-purpose flour: This is the foundation of your cookie cups. All-purpose flour provides structure and stability. When measuring, be sure to spoon the flour into your measuring cup and level it off with a knife for accuracy.
- 1/4 cup Dutch processed cocoa powder sifted: Dutch cocoa powder is treated with an alkalizing agent to neutralize acidity, giving it a darker color and a more robust flavor. It’s perfect for our chocolate peppermint cookie cups. Make sure to sift it to avoid clumps.
- 1/4 cup black cocoa powder: This adds a deep, dark color and a rich chocolate flavor that elevates the cookie experience. Black cocoa is quite strong, so a little goes a long way.
- 1 tsp baking soda: A leavening agent that helps your cookies rise. It reacts with acidic ingredients, producing carbon dioxide bubbles that create a light texture.
- 1/2 tsp salt: Enhances the sweetness and balances flavors. Salt is crucial in baking; it brings out the best in chocolate.
- 1 cup unsalted butter (room temperature): Butter gives richness, flavor, and moisture. Room temperature butter is essential for proper creaming with sugars, which incorporates air for a lighter texture.
- 1/2 cup granulated sugar: This sweetener contributes to the overall sweetness and helps in browning the cookies.
- 1 cup light brown sugar (packed): Brown sugar adds moisture and a slight chewiness to the cookie cups, along with a hint of caramel flavor.
- 2 large eggs (room temperature): Eggs bind ingredients together and provide structure. Room temperature eggs mix more easily into the batter.
- 1 tsp vanilla extract: Vanilla enhances the flavors of chocolate and adds a pleasant aroma.
Peppermint Cheesecake Filling
- 1 cup heavy whipping cream (chilled): Heavy cream whips up beautifully to create a luscious, airy texture for the cheesecake filling.
- 8 oz cream cheese (full fat): Cream cheese is the base of our cheesecake filling, providing that creamy, tangy flavor that perfectly complements the chocolate.
- 1/2 cup granulated sugar: This sweetens the filling, balancing the cream cheese’s tanginess.
- 1 tsp peppermint extract: This is where the magic happens! Peppermint extract provides that iconic flavor that makes these cookies feel festive and special.
- Red color gel: Optional, but it can add a fun holiday touch to your filling, making it visually appealing.
- Candy canes (chopped): These not only add crunch but also enhance the peppermint flavor, making every bite a delight.
Chocolate Peppermint Cookie Cups with Cheesecake Filling
Ingredients
Chocolate Cookie Cups:
- 2 cups all-purpose flour
- 1/4 cup Dutch-processed cocoa powder sifted
- 1/4 cup black cocoa powder
- 1 tsp baking soda
- 1/2 tsp salt
- 1 cup unsalted butter room temperature
- 1/2 cup granulated sugar
- 1 cup light brown sugar packed
- 2 large eggs room temperature
- 1 tsp vanilla extract
Peppermint Cheesecake Filling:
- 1 cup heavy whipping cream chilled
- 8 oz cream cheese full fat
- 1/2 cup granulated sugar
- 1 tsp peppermint extract
- red color gel
- candy canes chopped
Instructions
Chocolate Cookie Cups:
- Preheat oven to 350°. Spray two regular sized cupcake tins with cooking spray.
- Whisk together flour, cocoa powders, baking soda, and salt. Set aside.
- Beat butter and sugars on med-high until light and fluffy (approx. 2-3mins). Reduce speed and add eggs one at a time and vanilla. Beat until combined. Add flour mixture and mix until just combined.
- Using a large cookie scoop (3 Tbsp) scoop dough into muffin tins.
- Bake for approx. 10-13mins or until mostly set, but still soft in the middle.
- Remove from oven and immediately use a small jar or container to press firmly down in the center to create a well.
- Cool in pans for 10mins, loosen each slightly by twisting it in the pan. Cool for 5 more minutes then remove from pan and cool completely on a wire rack.
Peppermint Cheesecake Filling:
- Whip heavy cream until stiff peaks (ideally with a cold whisk and in a cold bowl).
- In a separate bowl, beat cream cheese, sugar, and peppermint extract until smooth.
- Add whipped cream into cream cheese mixture and beat until combined.
- Using a small food-safe paintbrush, paint two stripes on the inside of a piping bag fitted with a large round tip. Carefully fill with cheesecake filling.
- Pipe a swirl into cooled cookie cups and refrigerate until set (approx. 1-2 hours).
- Sprinkle with chopped candy canes if desired.
- Serve chilled and eat within 2-3 days. Or freeze for up to 4 weeks (without chopped candy cane).
Shopping Tips
Now that you have a comprehensive list of ingredients, here are some tips for selecting the best quality options:
- Always opt for high-quality cocoa powder, as it significantly impacts the flavor of your chocolate peppermint cookie cups. Brands like Valrhona or Ghirardelli are excellent choices.
- When selecting butter, choose unsalted for better control over the sweetness and saltiness of your cookies.
- Freshness matters for ingredients like baking soda, cream cheese, and eggs. Check expiration dates to ensure peak flavor.
- Look for heavy cream in the dairy aisle that is labeled as “heavy whipping cream” for the best results in whipping.
Substitutions and Alternatives
If you or someone you know has dietary restrictions, fear not! Here are some substitutions:
- For a gluten-free version, substitute all-purpose flour with a gluten-free flour blend that includes xanthan gum.
- For a dairy-free option, use vegan butter and a dairy-free cream cheese alternative. Coconut cream can also work well in place of heavy cream.
- If you want to reduce sugar, consider using a sugar substitute that measures like sugar.
Understanding the role and quality of each ingredient in your chocolate peppermint cookie cups can elevate your baking game. With fresh, quality ingredients and a little love, you’ll create a treat that’s not only delicious but also full of memories and joy. So gather your ingredients, and let’s get ready to bake!
Detailed Step-by-Step chocolate peppermint cookie Cooking Instructions
Creating the perfect chocolate peppermint cookie cups with cheesecake filling is an experience that goes beyond just following a recipe. It’s about the joy of baking, the aromas that fill your kitchen, and the anticipation of biting into these delightful treats. Let’s walk through the step-by-step process together, ensuring that each stage is clear and manageable. By the end, you’ll have a batch of cookies that will impress anyone lucky enough to indulge.
Preparation Steps
- Gather your ingredients: Before you start baking, it’s essential to have all your ingredients ready. This is what chefs call “mise en place,” which means everything is in its place. Measure out your flour, cocoa powders, sugars, and other ingredients as noted in the ingredient list. This not only streamlines the process but also minimizes mistakes.
- Preheat your oven: Set your oven to 350°F (175°C). This allows your oven to reach the desired temperature by the time you finish preparing your cookie dough.
- Prepare your baking pan: Grab a cupcake or muffin tin and lightly grease it or use non-stick cooking spray. This will help your cookie cups release easily after baking.
- Combine dry ingredients: In a large mixing bowl, sift together the all-purpose flour, Dutch cocoa powder, black cocoa powder, baking soda, and salt. Sifting helps to aerate the flour and mix the dry ingredients evenly.
- Cream the butter and sugars: In a separate bowl, using a hand mixer or stand mixer, beat the unsalted butter until creamy. Gradually add the granulated sugar and light brown sugar, mixing until light and fluffy (about 2-3 minutes). This step is crucial as it incorporates air into the mixture, resulting in a lighter cookie cup.
- Add eggs and vanilla: Add the room temperature eggs one at a time, mixing well after each addition. Then, mix in the vanilla extract until just combined.
- Combine wet and dry ingredients: Gradually add the dry mixture to the wet mixture, mixing on low speed until just combined. Be careful not to overmix, as this can lead to tough cookies.
- Chill the dough: For about 15-20 minutes, chill the dough in the refrigerator. This will help the cookies maintain their shape while baking.
Cooking Process
- Fill the muffin tin: Using a cookie scoop or tablespoon, take about 2 tablespoons of dough and press it into the bottom and up the sides of each muffin cup. Make sure the dough is evenly distributed to create a cup shape.
- Bake the cookie cups: Place the muffin tin in the preheated oven and bake for 10-12 minutes. Keep an eye on them; they should look set but slightly soft in the center. The edges should be firm. Remember, they will continue to cook a bit after being removed from the oven.
- Cool the cookie cups: Once baked, allow the cookie cups to cool in the pan for about 5 minutes. Then, gently remove them and place them on a wire rack to cool completely.
Final Assembly
- Prepare the cheesecake filling: In a large bowl, beat the chilled heavy whipping cream until stiff peaks form. In another bowl, beat the cream cheese until smooth. Gradually add in the granulated sugar, followed by the peppermint extract. Mix until fully incorporated.
- Fold in the whipped cream: Gently fold the whipped cream into the cream cheese mixture, being careful not to deflate the whipped cream. This will create a light and airy filling.
- Add color and candy canes: If you’re using red color gel, add a few drops to the cheesecake mixture and gently fold until you achieve your desired color. Then, fold in the chopped candy canes for that festive crunch.
- Fill the cookie cups: Using a piping bag or a spoon, fill each cooled chocolate cookie cup with the peppermint cheesecake filling. Don’t be shy; fill them generously!
- Chill before serving: Refrigerate the filled cookie cups for at least 30 minutes to allow the filling to set. This also enhances the flavors as they meld together.
- Serve and enjoy: Once set, these delightful chocolate peppermint cookie cups are ready to serve! They make for an impressive dessert at holiday gatherings or a sweet treat for yourself.
By following these detailed steps, you’ll not only create a delectable dessert but also have a great time in the kitchen. Remember, baking is as much about the journey as it is about the destination. Enjoy the process, and may your chocolate peppermint cookie cups bring joy to all who taste them!
Professional Tips and Techniques for chocolate peppermint cookie
When it comes to baking, especially with something as delightful as a chocolate peppermint cookie, there’s no substitute for the right techniques and insider knowledge. As someone who has spent countless hours experimenting with cookie recipes, I can tell you that nailing the perfect cookie is an art form. Whether you are a seasoned baker or a novice looking to impress your friends and family, these professional tips will elevate your chocolate peppermint cookie experience.

Professional Techniques
First things first, let’s talk about the ingredients. For a truly decadent chocolate peppermint cookie, always opt for high-quality chocolate. The type of chocolate you use can dramatically affect the flavor and texture of your cookies. I prefer using semi-sweet chocolate chips or even chunks of dark chocolate for a rich, intense flavor. Combining chocolate with peppermint extract is a match made in heaven; however, be cautious with the amount of extract you use. Peppermint can be quite overpowering, so start with a teaspoon and adjust to taste.
When mixing your dough, it’s essential to cream your butter and sugars until they are light and fluffy. This step introduces air into the mixture, which helps create a chewy, tender texture in your chocolate peppermint cookies. Don’t rush this step; the fluffier the mixture, the better your cookies will turn out.
Another pro tip is to chill your cookie dough before baking. This may seem like an extra step, but chilling helps prevent the cookies from spreading too much while baking. I usually chill the dough for at least 30 minutes, but for best results, refrigerate it overnight. This not only helps the flavors meld together but also enhances the texture.
Troubleshooting Guide
Even the best bakers face challenges, and knowing how to troubleshoot can save your batch of chocolate peppermint cookies. One common issue is cookies that turn out too dry. This can happen if you’ve added too much flour. A quick fix is to add a tablespoon of milk to your dough to bring it back to the right consistency. On the flip side, if your cookies are too gooey, you may need to bake them a bit longer or add a touch more flour.
If your cookies spread too much, it’s often a sign that your butter was too soft or your dough wasn’t chilled long enough. To remedy this in the future, ensure your butter is softened to room temperature but not melted. Also, consider using parchment paper on your baking sheets, which can help cookies bake more evenly.
Equipment Recommendations
When it comes to equipment, using the right tools can make all the difference. A stand mixer is a fantastic investment for any baker, as it makes creaming butter and sugar an effortless task. Additionally, a set of measuring spoons and cups will ensure that you get the ratios just right. Don’t forget a quality baking sheet; I recommend using heavy-duty aluminum sheets that conduct heat evenly.
For rolling out cookie dough, a marble rolling pin not only looks elegant but also helps keep the dough cool as you work. And if you want to get fancy, consider investing in cookie cutters or molds that can create unique shapes for your chocolate peppermint cookies.
Make-Ahead and Meal Prep Strategies
One of the fantastic things about cookie recipes is how well they lend themselves to meal prep. You can make your chocolate peppermint cookie dough in advance, scoop it into balls, and freeze them. When you’re ready to bake, just pop the frozen dough balls onto a baking sheet and add a couple of extra minutes to the baking time. It’s like having fresh cookies ready at a moment’s notice!
Additionally, you can prepare the cheesecake filling ahead of time and store it in the refrigerator. Just give it a good stir before using it in your cookie cups. This will save you time and make the process smoother, especially if you’re preparing for a gathering or holiday party.
Presentation Tips
Presentation is key when it comes to serving your chocolate peppermint cookies. For an extra touch, dust the tops of your cookies with powdered sugar or drizzle with melted chocolate for a gorgeous finish. You could also garnish with crushed peppermint candies for that festive look.
When plating, consider using a tiered cake stand to display your cookies elegantly. This not only makes for a beautiful presentation but also allows guests to serve themselves easily. Pair your cookies with a warm cup of hot cocoa or a glass of milk for a delightful experience that will have everyone coming back for more.
Wine and Beverage Pairings
Lastly, let’s talk about beverages. When enjoying your chocolate peppermint cookies, you can elevate the experience with a perfect drink pairing. A rich, full-bodied red wine like a Merlot or Cabernet Sauvignon complements the chocolate beautifully. If you prefer something lighter, a sweet dessert wine like a Port or even a creamy Irish cream liqueur can enhance the peppermint notes.
For non-alcoholic options, consider serving your cookies with peppermint tea or a warm spiced latte. The flavors will harmonize beautifully, making your dessert table a delightful centerpiece for any occasion.
Creative Variations and Adaptations of chocolate peppermint cookie
As we dive into the world of chocolate peppermint cookie variations, it’s essential to remember that cooking is all about creativity. This delightful treat can be adapted in countless ways to suit different tastes, dietary needs, and seasonal celebrations. Let’s explore some exciting variations and adaptations that you can try!
Seasonal Variations
When you think of a chocolate peppermint cookie, it often evokes images of holiday baking. However, this cookie can easily adapt to celebrate other seasons. For example, during the fall, you can incorporate pumpkin spices such as cinnamon and nutmeg into the cookie dough to create a pumpkin spice twist. By adding a hint of crushed ginger or cardamom, you can craft a cookie that’s perfect for autumn gatherings.
As spring approaches, consider swapping out the peppermint for a burst of citrus. Orange zest and a splash of orange extract can give your cookies a refreshing flavor, creating a delightful contrast to the rich chocolate. During summer, you might even consider adding crushed berries like raspberries or strawberries for a fruity touch that pairs beautifully with chocolate.
Dietary Adaptations
In our increasingly health-conscious world, it’s vital to have options that cater to dietary restrictions. Fortunately, adapting your chocolate peppermint cookie recipe to meet various dietary needs can be easy. For those following a keto diet, you can substitute traditional flour with almond flour or coconut flour. Additionally, using a sugar alternative like erythritol or stevia can provide the necessary sweetness without the carbs.
If you’re looking for a vegan version, simply replace the eggs with flaxseed meal or applesauce, and use dairy-free chocolate chips along with plant-based butter. These substitutions allow you to enjoy the same rich flavors without any animal products. For gluten-free variations, consider using a gluten-free flour blend that contains xanthan gum to mimic the texture of traditional flour.
Creative Twists
One of the most enjoyable aspects of baking is experimenting with different flavors and textures. Try adding a layer of creamy cheesecake filling to your chocolate peppermint cookies. This not only adds a new dimension of flavor but also makes for a stunning presentation. Simply create a small well in the center of your cookie before baking, and add a dollop of cheesecake filling to it.
You can also experiment with the chocolate itself. For a unique twist, try incorporating white chocolate chips or even peanut butter chips into your dough. The combination of flavors can create an unexpected but delightful cookie that surprises your taste buds.
If you’re feeling adventurous, consider adding a pinch of chili powder or cayenne pepper to your cookie dough for a spicy kick. The heat from the spices contrasts beautifully with the sweetness of the chocolate and peppermint, creating a memorable treat.
Different Cooking Methods
While the traditional method of baking your chocolate peppermint cookie in the oven is tried and true, don’t shy away from exploring other cooking methods. For example, you can use a stovetop griddle to make cookie pancakes! Just drop spoonfuls of cookie dough onto a preheated griddle and cook until golden brown. This method results in a softer, chewy texture that’s perfect for a brunch treat!
Another exciting method is using a slow cooker. You can layer cookie dough and cheesecake filling in the slow cooker, cover it, and let it cook on low for a few hours. The result is a warm, gooey dessert that’s perfect for sharing at gatherings or cozy nights in.
Leftover Transformation Ideas
Lastly, let’s not forget about leftovers. If you find yourself with extra chocolate peppermint cookies, consider transforming them into an entirely new dessert. Crumble the cookies and use them as a topping for ice cream or yogurt. This can create a delicious sundae that brings together the flavors of your cookie with creamy goodness.
Alternatively, you can make cookie truffles by crushing the leftover cookies, mixing them with cream cheese or frosting, rolling them into balls, and then coating them in melted chocolate. These truffles are a fantastic way to repurpose your cookies into a bite-sized treat that’s perfect for parties or gifting.
The possibilities are endless when it comes to adapting and experimenting with your chocolate peppermint cookie recipe. Whether you’re changing up the flavors, accommodating dietary needs, or trying out different cooking methods, the joy of baking lies in the creativity and exploration of new tastes and textures.
Storage, Reheating, and Meal Prep for chocolate peppermint cookie
When it comes to baking, few things are as delightful as a chocolate peppermint cookie, especially during the festive season. These cookie cups, filled with a luscious cheesecake filling, are a crowd-pleaser and perfect for sharing—or hoarding for yourself! However, to fully enjoy these sweet treats over time, proper storage is key. Here’s everything you need to know about storing your chocolate peppermint cookie creations, from short-term to long-term options, along with reheating methods and meal prep strategies.
Short-term Storage
Once you’ve baked your chocolate peppermint cookie cups, you might be tempted to dig in right away. But if you have leftovers (or want to save some for later), short-term storage is essential. The best way to store your cookies is to let them cool completely on a wire rack. This cooling process prevents moisture buildup, which can lead to soggy cookies.
Once cooled, transfer your cookie cups into an airtight container. If you’re stacking them, place a piece of parchment paper between layers to prevent them from sticking together. Store the container in a cool, dry place, such as a pantry or cupboard. Under these conditions, your chocolate peppermint cookie cups will stay fresh for about 3 to 5 days. However, if you live in a particularly humid environment, it’s best to store them in the refrigerator to maintain their texture and flavor.
Freezing and Long-term Storage
For longer storage, freezing is an excellent option. To freeze your chocolate peppermint cookie cups, start by following the short-term storage instructions: allow them to cool completely. Then, individually wrap each cookie cup in plastic wrap or aluminum foil. This step is crucial as it helps prevent freezer burn and preserves the cookies’ flavors. After wrapping, place the cookie cups in a freezer-safe bag or container, ensuring you label it with the date.
Your chocolate peppermint cookie cups can last in the freezer for up to three months. When you’re ready to enjoy them, simply remove the desired number of cookie cups from the freezer and let them thaw in the refrigerator overnight. If you’re short on time, you can also thaw them at room temperature for a couple of hours, but don’t rush this process; you want them to regain their texture without becoming too soft or mushy.
Reheating Best Practices
Reheating your chocolate peppermint cookie cups can revitalize their taste and texture, making them feel freshly baked again. The key is to warm them gently. Preheat your oven to 350°F (175°C) and place the cookie cups on a baking sheet lined with parchment paper. Heat them for about 5–7 minutes, or until they’re warmed through. This method ensures that the cookie remains soft and the cheesecake filling is creamy.
Alternatively, if you’re in a hurry, you can use the microwave. Place a cookie cup on a microwave-safe plate and heat on low power for about 10–15 seconds. Be cautious not to overheat, as this can cause the cheesecake filling to become too warm and lose its lovely texture.
Meal Prep and Batch Cooking Strategies
Meal prep can be a game changer, especially during the busy holiday season. Preparing your chocolate peppermint cookie cups in advance allows you to enjoy them without the last-minute rush. Consider baking a large batch and storing them using the guidelines above. You can even make the cookie dough and freeze it in portions. When you’re ready to bake, simply thaw the dough in the refrigerator overnight, then scoop and bake as usual.
Another strategy is to prepare the cheesecake filling ahead of time. Store it in an airtight container in the refrigerator for up to 3 days. When you’re ready to assemble your cookies, simply fill the cookie cups with the chilled filling, top them with crushed peppermint, and voilà—your holiday treat is ready to impress!
Food Safety Considerations and Guidelines
Food safety is paramount when it comes to storing any baked goods, including your chocolate peppermint cookie cups. Always ensure that cookies are completely cooled before sealing them in an airtight container to prevent condensation. This simple step minimizes the risk of bacterial growth and keeps your treats fresher for longer.
Use your senses when checking for freshness. If you notice any off smells, changes in texture, or visible mold, it’s best to discard the cookies. Additionally, when freezing, always label your containers with the date, so you can keep track of how long they’ve been stored.
Shelf Life Expectations
Understanding the shelf life of your chocolate peppermint cookie cups helps you gauge when they’re best enjoyed. Freshly baked cookies can last about 3 to 5 days in the pantry, up to a week in the fridge, and around three months in the freezer. Remember, the sooner you indulge in these delectable treats, the better their flavor and texture will be.
Portioning and Packaging Tips
If you plan to give these delightful cookies as gifts, consider portioning them into smaller servings. Using decorative boxes or tins lined with wax paper can add a festive touch. For added flair, you can place a small card with the storage instructions so that your friends and family can enjoy their chocolate peppermint cookie cups at their best.
In summary, storing your chocolate peppermint cookie cups properly will ensure that you can enjoy these delicious treats long after the last batch has come out of the oven. Whether you’re indulging in them yourself or sharing with loved ones, following these storage guidelines will help maintain their delightful taste and texture.
Nutritional Benefits and Health Information
When we think of holiday treats, the word “nutritious” often doesn’t come to mind. However, understanding the nutritional profile of your favorite desserts, like the chocolate peppermint cookie cups with cheesecake filling, can help you make informed choices. Let’s dive into the delicious world of nutrition and explore the health benefits of the ingredients that make these cookie cups so irresistible.
Nutritional Profile
A typical chocolate peppermint cookie cup contains several key ingredients that contribute to its flavor and texture, including flour, sugar, cocoa powder, butter, eggs, cream cheese, and peppermint extract. To give you a clearer picture, let’s break down the nutritional components based on a standard serving size (one cookie cup).
On average, a single cookie cup contains about 150-200 calories, depending on the recipe variations and portion sizes. Here’s a quick overview of the macronutrient distribution:
- Calories: 150-200
- Fat: 7-10 grams
- Carbohydrates: 20-25 grams
- Protein: 2-4 grams
The fat content mainly comes from butter and cream cheese, providing a rich flavor while also adding to the overall calorie count. It’s essential to keep portion sizes in mind, especially if you are watching your calorie intake.
Health Benefits
While desserts are often considered indulgent, several ingredients in the chocolate peppermint cookie cups have health benefits worth mentioning. For example, cocoa powder is packed with antioxidants, particularly flavonoids, which are known to support heart health. These antioxidants can help reduce inflammation and lower blood pressure, making cocoa a healthier choice than many other sweeteners.
Peppermint, the other star ingredient in our cookie cups, is not only aromatic but also has digestive benefits. It can help relieve symptoms of indigestion and soothe the stomach. Additionally, the refreshing taste of peppermint can enhance your mood, making these cookie cups not just a treat for your taste buds but also a little boost for your spirits.
Dietary Considerations
When it comes to dietary considerations, the chocolate peppermint cookie cups can be adapted to meet various dietary needs. For those with gluten sensitivities, using gluten-free flour is an easy swap. You can also use alternative sweeteners, such as coconut sugar or stevia, to reduce the overall sugar content.
For individuals who are lactose intolerant, using dairy-free cream cheese and butter can create a similar texture without the discomfort. Vegan versions of the recipe can also be made by substituting eggs with flaxseed meal or applesauce, providing a delicious option for everyone to enjoy.
As you explore the nutritional aspects of these cookie cups, it’s also important to consider the balance of your overall diet. Enjoying a chocolate peppermint cookie cup as part of a varied and balanced diet can satisfy your sweet tooth without compromising your health goals.
Comparison with Similar Dishes
When comparing the chocolate peppermint cookie cups to other holiday treats, it’s clear that they offer a unique flavor profile and nutritional benefits. For instance, traditional sugar cookies or gingerbread cookies often have higher sugar content and fewer health benefits than our festive cookie cups. The addition of chocolate and peppermint not only elevates the flavor but also introduces those beneficial antioxidants.
In conclusion, while it’s easy to see desserts as purely indulgent, taking the time to understand the nutritional aspects of your chocolate peppermint cookie cups can lead to a more mindful enjoyment of these treats. With a few simple modifications, you can savor the flavors of the season while keeping your health in check. So go ahead, bake those cookie cups, and enjoy every delicious bite!
Frequently Asked Questions About Chocolate Peppermint Cookie
Mousse filled chocolate chip cookie cups
Mousse filled chocolate chip cookie cups are a delightful dessert that combines the rich flavor of chocolate chip cookies with the light, airy texture of mousse. To make these, bake your cookie dough in a muffin tin, creating cups that can hold the mousse. For the mousse, you can use store-bought or homemade; a simple chocolate mousse can be made with whipped cream, melted chocolate, and egg whites for lightness. Once the cookie cups are cooled, fill them generously with the mousse and chill for a bit to set. For an extra touch, top with whipped cream or chocolate shavings before serving!
Filled cookie cup recipes
Filled cookie cup recipes can vary widely, allowing you to experiment with different flavors and fillings. Common fillings include mousse, ganache, cream cheese frosting, or even fruit preserves. To create the cookie cups, use a basic cookie dough recipe, but be mindful of the baking time to ensure they’re cooked thoroughly yet soft enough to hold the filling. After baking, let them cool completely before adding your preferred filling. Get creative by mixing flavors or adding a sprinkle of sea salt on top for a sweet and salty contrast!
Chocolate chip cookie cups with frosting
Chocolate chip cookie cups with frosting provide a deliciously sweet twist on traditional cookies. Start by baking your chocolate chip cookie dough in a muffin tin to form small cups. Once cooled, you can top these cups with your favorite frosting—cream cheese frosting pairs beautifully with chocolate, while vanilla buttercream adds a classic touch. Consider sprinkling some mini chocolate chips or crushed candies on top for added texture and visual appeal. For a seasonal twist, you can flavor the frosting with peppermint extract during the holidays!
Chocolate cookie cups recipes
Chocolate cookie cups can be a rich alternative to traditional chocolate chip cookies, offering a deep chocolate flavor that’s hard to resist. To make them, simply substitute part of your regular cookie dough with cocoa powder, which enhances the chocolate taste. You can fill these cups with various fillings like chocolate ganache, mousse, or ice cream. Make sure to bake them just right to maintain a chewy center while the edges become slightly crispy. For a unique twist, add crushed nuts or peppermint pieces into the dough for added flavor and crunch!
Cookie cups filled with pudding
Cookie cups filled with pudding are an excellent choice for a creamy dessert that’s easy to prepare. Start by baking your cookie dough in muffin tins to create cups, then let them cool completely. You can use instant pudding mix combined with milk for a quick filling, or make a homemade pudding for a richer flavor. Once your cookie cups are cooled, fill them with the prepared pudding and chill in the refrigerator for a few hours to set. For added flair, top with whipped cream and chocolate shavings before serving!
Mini chocolate chip cookie cups recipe
A mini chocolate chip cookie cups recipe is perfect for bite-sized treats that are great for parties or gatherings. Use a standard chocolate chip cookie dough and bake in mini muffin tins for about 10-12 minutes. Once they’re slightly cooled, gently press the center to create a cup shape. Fill these adorable cups with your choice of filling, such as caramel sauce, whipped cream, or even ice cream. They’re not only delicious but also visually appealing, making them a hit among guests!
Chocolate Chip cookie cup filling
When it comes to chocolate chip cookie cup filling, the options are nearly endless, allowing you to tailor them to your taste. Popular fillings include chocolate ganache, flavored creams, or even fruit preserves. For a classic approach, try a simple vanilla frosting or whipped cream for a light touch. If you want something more decadent, consider a rich chocolate mousse or even a creamy cheesecake filling. Experiment with different flavor combinations to find the perfect balance that complements your cookie cups!
Chocolate chip cookie pudding cups
Chocolate chip cookie pudding cups are a delightful fusion of cookies and pudding that is both simple and satisfying. Begin by preparing a chocolate chip cookie dough and baking it in small cups. After they cool, fill each cup with chocolate pudding—either homemade or store-bought. To elevate this dessert, consider layering whipped cream on top and garnishing with chocolate chips or cookie crumbs. This dessert is not only delicious but also visually appealing, making it a fantastic option for entertaining!


