Chocolate thumbprint cookies are more than just a delightful treat; they are a nostalgic journey through my childhood and an enduring family favorite. I still remember the first time I tasted these delectable cookies during a family gathering. My grandmother, the queen of our family kitchen, always had a batch ready for us. The contrasting textures of the soft, slightly chewy cookie and the rich, gooey chocolate filling made my taste buds dance with joy. I was immediately captivated by their unique appearance, with a perfect little thumbprint inviting a dollop of chocolate or jam. It was love at first bite, and I knew I had to learn how to make them myself.
As I grew older, I discovered that chocolate thumbprint cookies are not just a family recipe; they have a rich cultural background and history that spans across various regions. These cookies are often found in different forms throughout Europe and have been adapted in countless kitchens worldwide. The thumbprint technique is thought to have originated in Scandinavia, where cookies were often filled with preserves and jam. Over time, chocolate thumbprint cookies emerged as a beloved version, combining the classic thumbprint style with the deep, satisfying flavor of chocolate. This fusion of flavors and techniques has made these cookies a staple in many homes, especially during festive occasions.
The Story Behind This Recipe
What makes chocolate thumbprint cookies so special is their versatility. They can be made with various fillings, from rich chocolate ganache to fruity jams, allowing families to customize them to their liking. In our home, we often filled them with homemade raspberry jam, which my grandmother would prepare each summer when berries were in season. This tradition not only brought us together in the kitchen but also instilled in me a love for baking and the joy of sharing food with loved ones.
For busy families, chocolate thumbprint cookies offer the perfect solution for quick dessert options. They come together fairly quickly, requiring just a few simple ingredients that most of us already have on hand. The dough can be prepared in advance, rolled into balls, and then frozen until you’re ready to bake. This makes it easy to whip up a batch whenever unexpected guests drop by or when you’re in need of a sweet treat after dinner. Plus, the baking process fills the kitchen with an irresistible aroma, creating a warm and inviting atmosphere that everyone will love.
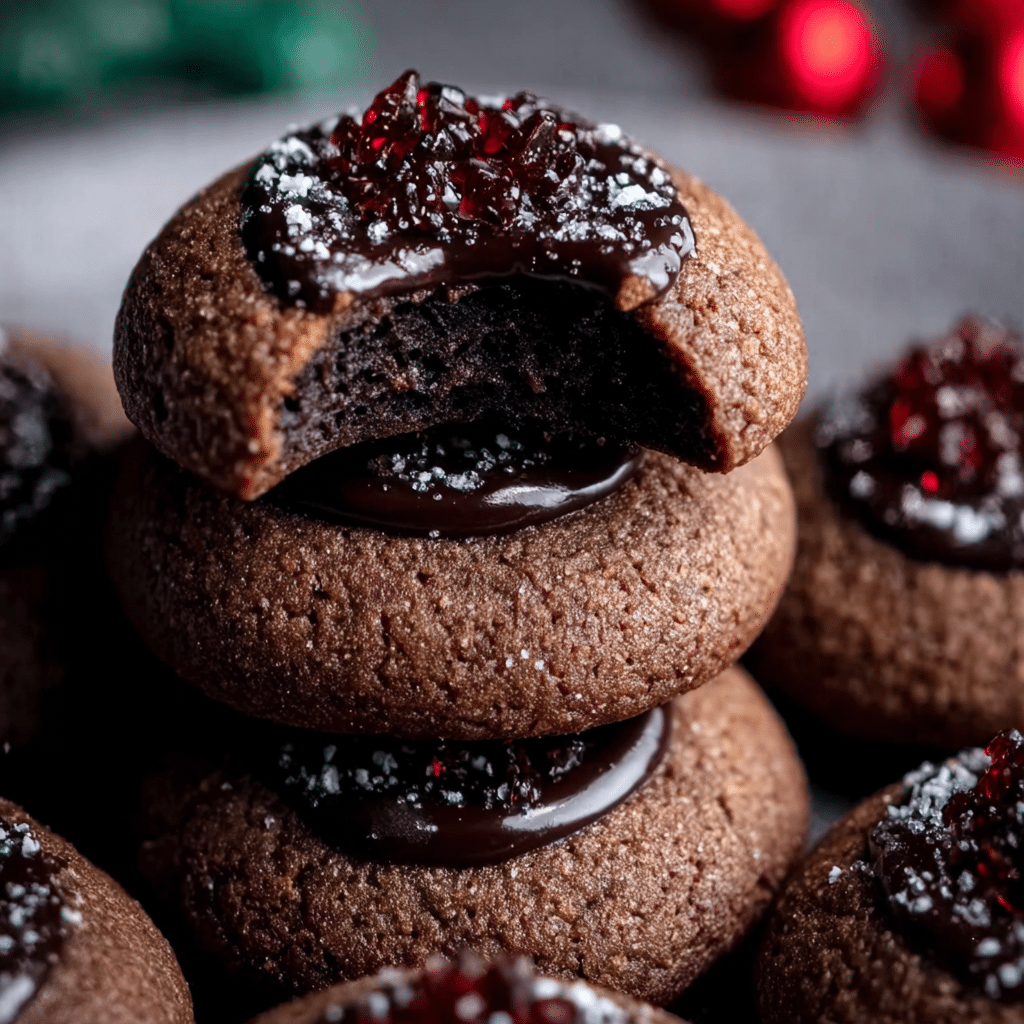
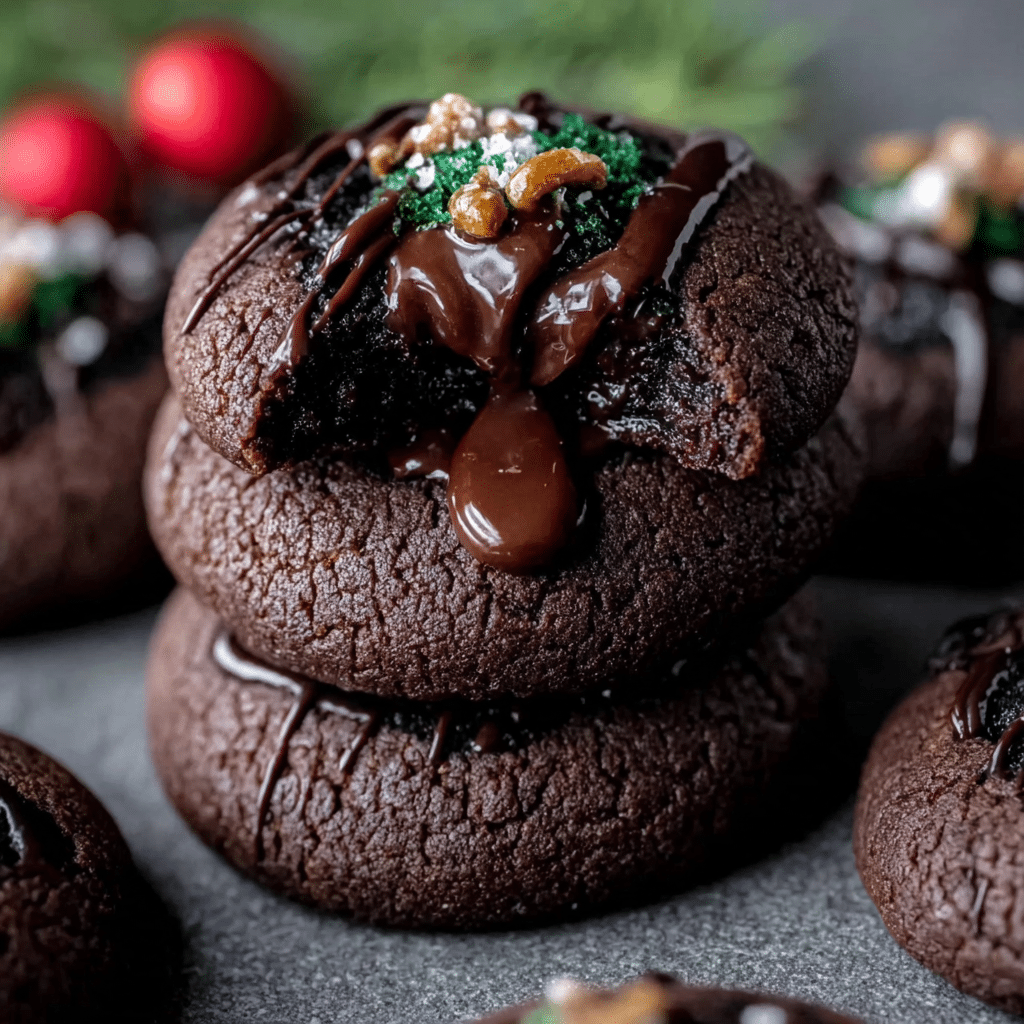
These cookies also shine during the holiday season. They are not only a hit at family gatherings but also make delightful gifts for neighbors and friends. The festive nature of chocolate thumbprint cookies, adorned with colorful sprinkles or drizzled with white chocolate, adds a touch of joy to any celebration. My family often makes them during the holidays, sharing the joy of baking and the warmth of togetherness that comes with it.
Every time I bake chocolate thumbprint cookies, I am transported back to my grandmother’s kitchen, surrounded by laughter and the sweet scent of chocolate. It is an emotional connection that goes beyond the mere act of baking; it is a celebration of heritage, family, and the simple pleasures of life. I promise that by the end of this guide, you will not only learn how to make the best chocolate thumbprint cookies but also appreciate the stories and traditions that make them a cherished part of many families’ histories.
The Rich History and Cultural Significance of chocolate thumbprint cookies
The rich history and cultural significance of chocolate thumbprint cookies are as layered as their flavor. While many people enjoy these cookies today, few are aware of their origins and evolution. Chocolate thumbprint cookies share a lineage with a broader category of thumbprint cookies found in various cultures, where the concept of pressing a thumb into the dough to create a well for a filling is common. This technique is thought to have originated in Scandinavia, particularly in countries like Sweden and Denmark, where cookies were filled with fruit preserves or nuts.
Origins and History
As the years progressed, the thumbprint cookie concept was embraced across Europe, with each region adding its unique twist. In Germany, for instance, one finds a version known as “Heidesand,” which is a spiced cookie that is often filled with jam. The evolution into chocolate thumbprint cookies likely occurred in the 20th century, as chocolate became more widely accessible and beloved. The introduction of cocoa powder and chocolate chips into baking transformed many traditional recipes, leading to the delicious chocolate thumbprint cookies we know today.
Interestingly, the thumbprint technique is not limited to cookies; it has been used in various culinary applications around the globe. From savory pastries to sweet tarts, the idea of creating a well for filling is a universal concept that transcends cultures. However, it is the chocolate thumbprint cookie that has captured hearts and palates, becoming a staple in many homes and a favorite during the holidays.
Cultural Significance
Chocolate thumbprint cookies have become synonymous with celebrations and gatherings. In many families, they are a staple during festive times such as Christmas and Easter, where the act of baking together fosters a sense of community and belonging. These cookies are often shared as gifts, symbolizing love and friendship. The thumbprint itself is a mark of individuality; no two thumbprints are alike, just as no two families have the same recipe or filling. This uniqueness contributes to the emotional connection many have with this cookie, as it embodies personal stories and traditions.
In recent years, chefs and bakers have begun to elevate the humble chocolate thumbprint cookie, showcasing them in gourmet settings. Some restaurants have even put their unique spin on them, pairing them with artisanal chocolates or exotic fillings like chili-infused ganache. This trend highlights the cookie’s versatility and adaptability to modern palates while maintaining its traditional roots. Yet, no matter how sophisticated the rendition, the heart of chocolate thumbprint cookies remains the same: they are a reminder of home, comfort, and the joy of baking.
Nutritional Benefits
While chocolate thumbprint cookies are a treat to indulge in, they can also offer some surprising nutritional benefits. Made primarily from ingredients like flour, sugar, butter, and chocolate, these cookies contain essential nutrients that can contribute to a balanced diet when enjoyed in moderation. The use of high-quality dark chocolate for filling can provide antioxidants, which are known for their health benefits, such as improved heart health and reduced inflammation.
Additionally, many bakers have begun to explore healthier alternatives in their chocolate thumbprint cookie recipes, substituting refined sugars with natural sweeteners or incorporating whole grains like oat flour. These adaptations allow for a more health-conscious approach while still delivering the same delightful flavor and texture. For families looking to enjoy these cookies without the guilt, experimenting with healthier ingredients can create a delicious compromise that everyone can enjoy.
In conclusion, the history and cultural significance of chocolate thumbprint cookies are as rich as the cookies themselves. From their Scandinavian origins to their modern interpretations, these cookies have stood the test of time, bringing people together and creating cherished memories. Whether baked during the holidays or shared among friends, chocolate thumbprint cookies are a delightful reminder of the joy that comes from baking and sharing food with loved ones. As you embark on your own baking journey, take a moment to appreciate the history and love that has gone into each batch of chocolate thumbprint cookies.
Essential Ingredients for Perfect chocolate thumbprint cookies
When it comes to baking, especially for delightful treats like chocolate thumbprint cookies, the quality and selection of ingredients can significantly impact the final product. Each ingredient plays a unique role, contributing to the texture, flavor, and overall success of the cookies. Let’s dive into the essential ingredients you’ll need to create these delectable cookies, along with tips on selecting the best options for your baking endeavors.
Essential Ingredients
- 1 ½ cups (188 g) all-purpose flour, spooned and leveled
- ½ cup (40 g) cocoa powder, Dutch process
- ½ tsp salt
- ½ tsp baking powder
- ¾ cup (168 g) unsalted butter, softened
- ¾ cup (165 g) light brown sugar, packed
- ¼ cup (50 g) granulated white sugar
- 2 egg yolks, at room temperature
- 1 ½ tsp vanilla bean paste or extract
- For the Chocolate Ganache:
- 1 cup (200 g) semi-sweet chocolate chips
- ½ cup (120 ml) heavy whipping cream
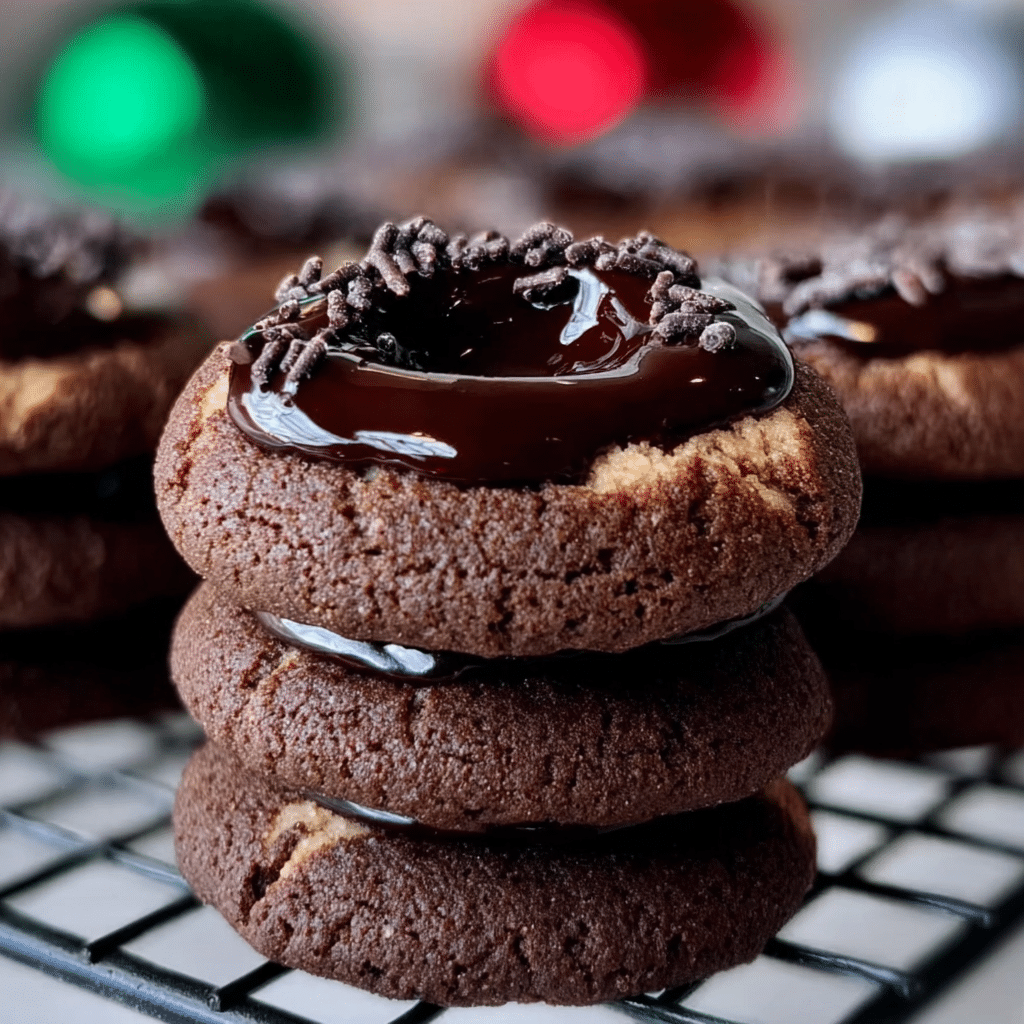
- Nonpareils for sprinkling on top (optional)

Chocolate Thumbprint Cookies
Ingredients
For the Chocolate Thumbprint Cookies
- 1 1/2 cups (188 g) all-purpose flour, spooned and leveled, see notes
- 1/2 cup (40 g) cocoa powder, Dutch process
- 1/2 tsp salt
- 1/2 tsp baking powder
- 3/4 cup (168 g) unsalted butter, softened
- 3/4 cup (165 g) light brown sugar, packed
- 1/4 cup (50 g) granulated white sugar
- 2 egg yolks, at room temperature
- 1 1/2 tsp vanilla bean paste or extract
For the Chocolate Ganache
- 1 cup (200 g) semi-sweet chocolate chips
- 1/2 cup (120 ml) heavy whipping cream
- nonpareils for sprinkling on top, optional
Instructions
For the Chocolate Thumbprint Cookies
- Line two baking sheets with parchment paper and set aside.
- Add flour, cocoa powder, salt and baking powder to a medium sized bowl. Whisk to combine, then set aside.
- Add butter, brown sugar and granulated white sugar to a large bowl. Cream together with an electric mixer for two minutes.
- Add the egg yolks and vanilla to the butter/sugar mixture and mix until pale in color and fluffy, 1-2 minutes.
- Add in the dry ingredients and mix just until combined.
- Scoop the dough into 34 portions, then roll into balls. (About 1 tablespoon of dough.)
- Transfer the dough to the baking sheets.
- Using a 1/4 tsp, press down on the dough balls to create an indent.
- Chill the prepared indented dough balls for at least one hour. (You can chill all the dough together on one baking sheet and then separate it out on multiple baking sheets when ready to bake.)
Baking the Cookies
- Preheat the oven to 350 degrees.
- Arrange the prepared dough about 1 1/2 inches apart on the baking sheets.
- Bake the cookies for 9-11 minutes. (I think 10 minutes is perfect.)
- When the cookies are done baking, lightly press down on the centers again with a 1/4 tsp. (They may have lost their indent a little as they baked.) Go around them in a circular motion with a circular cookie cutter/biscuit cutter while they are still hot to give them a perfect circular shape, and to get them back to their original smaller size.
- Then let the cookies cool on the baking sheet for 5 minutes. Transfer them to a cooling rack to completely cool.
For the Chocolate Ganache
- Add the chocolate chips to a small bowl.
- Heat the heavy cream in the microwave, or on the stove, until just about boiling.
- Pour the heavy cream over the chocolate chips and let sit for 1 minute.
- Stir to combine the cream and chocolate together.
Assembling the Cookies
- Fill each well of the cookies with about 1 tsp of ganache, more if it’ll fit.
- Sprinkle sprinkles over the cookies if you wish.
- Chill the cookies in the fridge for 10-15 minutes to allow the ganache to set.
- Store left overs in an air tight container for up to three days.
Let’s break down each ingredient:
All-Purpose Flour
All-purpose flour is the backbone of most cookie recipes, including chocolate thumbprint cookies. It provides the structure needed for the cookies to hold their shape while baking. When measuring flour, it’s crucial to spoon it into your measuring cup and level it off with a knife to avoid packing it down, which can lead to dense cookies. Look for high-quality flour with a protein content around 10-12% for the best results.
Cocoa Powder
Cocoa powder adds the rich chocolate flavor that defines chocolate thumbprint cookies. Dutch process cocoa powder is treated with an alkalizing agent, resulting in a smoother flavor and darker color. When purchasing cocoa powder, check the label for the Dutch process designation, and opt for brands that are sustainably sourced for a better environmental impact.
Salt
Salt enhances the flavors in baked goods, balancing the sweetness and intensifying the chocolate. Always use fine sea salt for better distribution throughout the dough. Keep in mind that the saltiness of your cookies can vary based on the type of butter you use, so adjust accordingly.
Baking Powder
Baking powder is a leavening agent that helps the cookies rise and maintain a tender texture. Make sure your baking powder is fresh, as expired leavening agents can lead to flat cookies. Check the expiration date and store it in a cool, dry place to prolong its shelf life.
Unsalted Butter
Using unsalted butter allows you to control the amount of salt in your cookies. Softened butter is essential for creaming with sugars, incorporating air into the mixture for a light and fluffy texture. Look for high-fat butter for a richer flavor and better texture. If you’re in a pinch, you can microwave butter for a few seconds to soften it, but avoid melting it, as that will affect the cookies’ structure.
Light Brown Sugar and Granulated Sugar
These sugars contribute moisture and sweetness to chocolate thumbprint cookies. Brown sugar, with its molasses content, adds a subtle caramel flavor and chewiness. When measuring brown sugar, pack it firmly into the cup. The combination of granulated and brown sugar helps achieve the ideal balance of crisp edges and chewy centers.
Egg Yolks
Egg yolks add richness and moisture to the dough, resulting in a tender cookie. Using egg yolks instead of whole eggs ensures a denser texture, perfect for the thumbprint cookie style. Make sure the egg yolks are at room temperature for better emulsification into the dough.
Vanilla Bean Paste or Extract
Vanilla brings warmth and depth to the flavor profile. Vanilla bean paste is a great choice if you want those lovely little specks of vanilla seeds in your cookies. If you can’t find vanilla bean paste, pure vanilla extract is a suitable substitute. Look for organic options for the best flavor.
Chocolate Ganache Ingredients
The ganache is the crowning glory of chocolate thumbprint cookies. Semi-sweet chocolate chips melt beautifully with heavy cream to create a luscious filling. When selecting chocolate chips, opt for high-quality brands with minimal additives for the best flavor. Heavy whipping cream contributes to the smooth, rich texture of the ganache, so choose a product with at least 36% fat content for optimal results.
Nonpareils
While optional, nonpareils add a delightful crunch and visual appeal to your cookies. Choose vibrant colors to make your cookie presentation pop. Store them in a cool, dry place to maintain their texture.
Shopping Tips
When grocery shopping for chocolate thumbprint cookies, consider visiting local farmers’ markets or specialty stores for fresher ingredients. Organic options may be pricier but can offer better flavor and fewer pesticides. For budget-friendly alternatives, look for store brands or buy in bulk when possible.
Substitutions and Alternatives
If you have dietary restrictions, there are several substitutions you can consider. For a gluten-free option, use a gluten-free flour blend. For dairy-free cookies, try coconut oil or vegan butter along with dairy-free chocolate chips. You can also replace granulated sugar with coconut sugar or maple syrup, but be mindful of adjusting the liquid content accordingly.
In conclusion, the ingredients for chocolate thumbprint cookies are fundamental to achieving the best texture and flavor. By selecting high-quality items and considering your dietary needs, you can create delicious cookies that everyone will love. Happy baking!
Detailed Step-by-Step chocolate thumbprint cookies Cooking Instructions
Creating the perfect batch of chocolate thumbprint cookies is not just about having the right ingredients—it’s also about mastering the technique. Follow these detailed step-by-step instructions to ensure your cookies come out perfectly every time. With a little patience and practice, you’ll be able to impress your family and friends with your baking skills!
Preparation Steps
- Gather Your Ingredients: Before you begin, make sure all your ingredients are at room temperature. This ensures that they mix together more smoothly. Gather your flour, cocoa powder, butter, sugars, egg yolks, and vanilla.
- Preheat the Oven: Preheat your oven to 350°F (175°C). This is crucial as it allows your cookies to bake evenly and achieve the right texture.
- Prepare Baking Sheets: Line two baking sheets with parchment paper. This prevents the cookies from sticking and makes cleanup a breeze. If you have a silicone baking mat, that works wonderfully too!
- Mix Dry Ingredients: In a medium bowl, sift together the all-purpose flour, cocoa powder, salt, and baking powder. Sifting not only combines the ingredients but also aerates the flour, which helps the cookies rise better.
- Cream Butter and Sugars: In a large mixing bowl, use a hand mixer or a stand mixer fitted with a paddle attachment to cream the softened unsalted butter with the light brown sugar and granulated sugar until the mixture is light and fluffy. This usually takes about 3-5 minutes.
- Add Egg Yolks and Vanilla: Add the egg yolks and vanilla bean paste (or extract) to the butter-sugar mixture. Mix until fully combined. The mixture should appear smooth and creamy, signaling that the ingredients are well incorporated.
- Combine Dry and Wet Ingredients: Gradually add the dry ingredient mixture to the wet ingredients, mixing on low speed until just combined. Avoid over-mixing, as this can lead to tough cookies. You want a soft dough that holds together well.
- Chill the Dough: For best results, cover the dough with plastic wrap and refrigerate it for about 30 minutes. Chilling the dough helps prevent the cookies from spreading too much during baking.
Cooking Process
- Shape the Cookies: Once the dough is chilled, use a cookie scoop or your hands to form small balls, about 1 inch in diameter. Place them on the prepared baking sheets, spacing them about 2 inches apart.
- Create Thumbprints: Using your thumb or the back of a measuring spoon, gently press down in the center of each dough ball to create an indentation. This is where the chocolate ganache will go later.
- Bake the Cookies: Place the baking sheets in the preheated oven and bake for 10-12 minutes. Keep an eye on them—the cookies should be set but still slightly soft in the center. If you notice the edges starting to crack, they are likely done.
- Cool the Cookies: Once baked, remove the cookies from the oven and allow them to cool on the baking sheets for 5 minutes. Then, carefully transfer them to a wire rack to cool completely. This step is essential; cooling them helps them firm up.
Final Assembly
- Prepare the Ganache: While the cookies are cooling, prepare the chocolate ganache. In a small saucepan over low heat, combine the semi-sweet chocolate chips and heavy whipping cream. Stir continuously until the chocolate is melted and the mixture is smooth. Remove from heat and let it cool slightly.
- Fill the Thumbprints: Once the cookies are completely cool, use a small spoon or piping bag to fill each thumbprint with the chocolate ganache. Don’t be shy—fill them generously for a deliciously chocolatey experience!
- Add Nonpareils: If desired, sprinkle nonpareils over the ganache while it’s still soft. This adds a festive touch and a bit of crunch to each bite.
- Let the Ganache Set: Allow the ganache to set at room temperature for about 30 minutes. If you’re in a hurry, you can refrigerate the cookies to speed up the process, but be cautious to avoid chilling them for too long, which can affect the texture.
- Enjoy: Your chocolate thumbprint cookies are now ready to be enjoyed! Serve them at room temperature, and watch as they disappear at gatherings, or keep them in an airtight container for up to a week for a sweet treat to savor at home.
Now that you’ve mastered the art of making chocolate thumbprint cookies, you can experiment with different fillings, such as fruit preserves or flavored ganaches, to make them your own. Happy baking!
Professional Tips and Techniques for chocolate thumbprint cookies
When it comes to baking chocolate thumbprint cookies, mastering the craft can elevate this delightful treat from a simple dessert to a show-stopping masterpiece. The rich chocolate flavor, combined with the gooey filling of your choice, can be a crowd-pleaser, but achieving that perfect texture and appearance requires some insider knowledge. Here, I’ll share professional tips and techniques that can help you create the best chocolate thumbprint cookies while avoiding common pitfalls.
Professional Techniques
First and foremost, it’s essential to understand the science behind the ingredients. Chocolate thumbprint cookies typically feature a base of butter, sugar, flour, and cocoa powder. The key to achieving that melt-in-your-mouth texture lies in the creaming method. When you cream together the butter and sugar, you’re incorporating air, which helps to create a light and tender cookie. Aim for a pale and fluffy mixture before adding eggs and vanilla extract. This step is crucial for achieving the desired texture of your chocolate thumbprint cookies.
Next, let’s talk about the chocolate. While semi-sweet chocolate chips are a popular filling, consider using high-quality chocolate for a richer flavor. A bittersweet chocolate ganache can be an excellent filling option that adds sophistication to your cookies. To make ganache, simply heat equal parts cream and chocolate until melted and combined, then allow it to cool slightly before filling the indentations in your cookies.
Another technique to enhance your cookies is chilling the dough. After mixing, refrigerate the dough for at least an hour. This not only makes the dough easier to handle but also prevents the cookies from spreading too much during baking. Chilling allows the flavors to meld and results in a firmer texture, which is particularly important for chocolate thumbprint cookies that will hold their shape when you create those signature indents.
Troubleshooting Guide
Even the most seasoned bakers encounter issues, so here are some troubleshooting tips for common problems you may face while making chocolate thumbprint cookies:
- Cookies are too crumbly: If your cookies crumble easily, it’s likely due to too much flour. Make sure to measure your flour correctly, preferably using the spoon-and-level method to avoid overpacking it.
- Indentations are disappearing: If your thumbprints are flattening out during baking, try chilling the dough longer before baking. Alternatively, you can create the indents just after removing the cookies from the oven while they are still soft.
- Too soft or undercooked: If your cookies are too soft upon cooling, they may not have baked long enough. Keep an eye on them during the last few minutes of baking—once the edges are set and slightly firm, they are likely ready to come out of the oven.
Equipment Recommendations
Having the right tools can make all the difference in your baking experience. Here are some recommended tools for baking chocolate thumbprint cookies:
- Stand Mixer: A stand mixer is invaluable for creaming butter and sugar. If you don’t have one, a hand mixer will suffice, but a stand mixer allows you to multitask while mixing.
- Silicone Baking Mat: Using a silicone mat can help prevent sticking and provides an even baking surface for your cookies.
- Cookie Scoop: To keep your cookies uniform in size, a cookie scoop is a great investment. It ensures even baking and makes the process quicker.
- Baking Sheets: Use heavy-duty, rimmed baking sheets for even heat distribution. Lining them with parchment paper can also help with easy removal.
Presentation Tips
Presentation is key, especially when you want to impress your guests. Here are some creative ways to plate your chocolate thumbprint cookies:
- Dust with Powdered Sugar: A light dusting of powdered sugar adds a lovely contrast to your chocolate cookies and gives them an elegant touch.
- Chocolate Drizzle: For an extra wow factor, drizzle melted chocolate over the cooled cookies. This not only enhances the chocolate flavor but also adds visual appeal.
- Cookie Stands or Platters: Arrange your cookies on a beautiful cake stand or platter. Layering them with parchment paper in between can create an inviting display that’s perfect for gatherings.
Make-Ahead and Meal Prep Strategies
Chocolate thumbprint cookies can be made ahead of time, which is a lifesaver for busy bakers. After preparing the dough, you can refrigerate it for up to 48 hours or freeze it for up to three months. When you’re ready to bake, simply thaw the dough in the refrigerator overnight, scoop, and bake as directed.
If you have leftover cookies, they can be stored in an airtight container at room temperature for about a week. For longer storage, consider freezing the baked cookies. Just ensure they’re in a single layer in a freezer-safe container, and you can enjoy them at a later date without losing flavor or texture.
Wine and Beverage Pairings
To elevate your chocolate thumbprint cookie experience, consider pairing them with the right beverages. A glass of red wine, such as a robust Cabernet Sauvignon or a smooth Merlot, complements the richness of chocolate beautifully. For a non-alcoholic option, a creamy chai latte or a rich hot chocolate can enhance the chocolatey goodness while adding warmth to your dessert experience.
In conclusion, with these professional tips and techniques, you’re well on your way to mastering chocolate thumbprint cookies. From understanding the importance of each ingredient to troubleshooting common issues and enhancing your presentation, these insights will help you create delicious cookies that are sure to impress.
Creative Variations and Adaptations of chocolate thumbprint cookies
Chocolate thumbprint cookies are a versatile base that can be adapted in countless ways to suit different tastes and occasions. Whether you want to switch up the flavors, cater to dietary restrictions, or simply get creative, there are plenty of variations to explore. In this section, we’ll dive into some exciting adaptations, seasonal twists, and creative ideas that will keep your chocolate thumbprint cookie game strong.
Seasonal Variations
One of the joys of baking is incorporating seasonal ingredients into your recipes. Chocolate thumbprint cookies can easily be adapted to reflect the flavors of each season:
- Spring: Try incorporating fresh fruit jams like strawberry or raspberry into the centers of your cookies. The tartness of the fruit complements the rich chocolate beautifully and adds a pop of color.
- Summer: Experiment with tropical fillings such as coconut cream or mango curd. These bright flavors can transform your chocolate thumbprint cookies into a refreshing treat perfect for summer gatherings.
- Fall: As the leaves change, consider using pumpkin spice or maple syrup in your cookie dough and filling. A pumpkin spice chocolate thumbprint cookie can become a holiday favorite!
- Winter: For a festive touch, use peppermint extract in the dough or as a topping. A chocolate thumbprint cookie filled with peppermint ganache is perfect for holiday celebrations.
Dietary Adaptations
Many people today are looking for desserts that fit their dietary needs, and chocolate thumbprint cookies can be modified to suit various diets:
- Keto: To create a keto-friendly version, use almond flour instead of all-purpose flour and a sugar substitute like erythritol. For the filling, consider using sugar-free chocolate ganache.
- Vegan: Replace the butter with coconut oil or vegan butter and use flax eggs in place of regular eggs. There are plenty of vegan chocolate chips available that can be used for filling.
- Gluten-Free: For gluten-free chocolate thumbprint cookies, substitute regular flour with a gluten-free blend or almond flour. Ensure that all other ingredients are gluten-free, especially any jams or chocolates.
Creative Twists
If you’re feeling adventurous, here are some innovative twists on the classic chocolate thumbprint cookie:
- Spice Level Adjustments: Add a pinch of cayenne pepper or chili powder to the dough for a kick of heat that complements the chocolate. This spicy-sweet combination can be surprising and delightful!
- Different Cooking Methods: While baking is the traditional method, you can try making no-bake chocolate thumbprint cookies using oats, nut butter, and cocoa powder. These can be set in the refrigerator for a quick and easy treat.
- Leftover Transformation Ideas: If you have leftover cookies, consider crumbling them over ice cream or mixing them into a chocolate mousse for added texture and flavor. You can also turn them into a pie crust for a decadent dessert.
In conclusion, the potential for creativity with chocolate thumbprint cookies is limitless. Whether you’re adapting them for dietary needs, getting inspired by seasonal flavors, or simply experimenting with new fillings, these cookies can transform into something new and exciting each time you make them. So, unleash your inner baker and have fun with these variations!
Storage, Reheating, and Meal Prep for chocolate thumbprint cookies
When it comes to enjoying chocolate thumbprint cookies, knowing how to properly store them is essential to maintaining their delightful texture and rich flavor. These cookies are not only a crowd-pleaser at gatherings, but they also make a wonderful treat to enjoy at home, and with the right storage techniques, you can keep them fresh for days or even weeks. Let’s delve into some essential guidelines for storing, reheating, and meal prepping these delectable cookies!
Short-term Storage
Once your batch of chocolate thumbprint cookies has cooled completely, it’s time to think about storage. For short-term storage, you can keep your cookies at room temperature, which is ideal for maintaining their soft texture. To do this, place the cookies in an airtight container. You can use a cookie jar or any resealable plastic container you have on hand. Just make sure to layer parchment paper between the cookies to prevent them from sticking together.
Room temperature storage is best for up to 5 days. If you live in a particularly humid climate, consider putting a small piece of bread inside the container. The bread will help absorb moisture and keep your cookies from becoming too soft or soggy. Also, avoid storing them in direct sunlight or near heat sources, as these can alter their texture and taste.
Freezing and Long-term Storage
If you find yourself with an abundance of chocolate thumbprint cookies or want to prepare them in advance for a special occasion, freezing is the way to go. Freezing can extend their shelf life for up to 3 months without sacrificing flavor. Start by placing your cookies in a single layer on a baking sheet lined with parchment paper. This step is crucial as it prevents them from sticking together. Once they are frozen solid (about 2-3 hours), transfer them to a freezer-safe bag or container.
When packaging, make sure to remove as much air as possible from the bag to prevent freezer burn. Label the bags with the date so you can keep track of how long they’ve been stored. If you want to maintain the quality of the chocolate filling, consider wrapping each cookie individually in plastic wrap before placing them in a larger container.
To thaw your chocolate thumbprint cookies, simply remove the desired number from the freezer and let them sit at room temperature for about 30-60 minutes. This gentle thawing will help maintain their texture and flavor. If you’re in a hurry, you can also pop them in the microwave for about 10-15 seconds; just be careful not to overdo it, as they can become too soft.
Reheating Best Practices
Reheating your chocolate thumbprint cookies is an excellent way to revive their fresh-baked appeal. If you prefer a warm cookie experience, preheat your oven to 350°F (175°C). Place the cookies on a baking sheet lined with parchment paper and reheat them for about 5-7 minutes. This method not only warms them up but also crisps up the edges, making them even more enjoyable.
Alternatively, you can also use a microwave. However, it’s important to use a lower power setting to avoid making the cookies too chewy. A mere 10-15 seconds should do the trick. If desired, you can add a small dollop of additional chocolate or a sprinkle of sea salt for a gourmet touch!
Meal Prep and Batch Cooking Strategies
Meal prepping with chocolate thumbprint cookies can be a fun and rewarding process. If you know you’ll have a busy week ahead, consider making these cookies on a day when you have more time. You can prepare the dough ahead of time and store it in the refrigerator for up to 3 days before baking. This way, you’ll have freshly baked cookies ready to go whenever you need a sweet treat.
Another great strategy is to make a double batch. Not only will this save you time in the kitchen, but it also ensures you have plenty to share with family and friends or to save for later. Just remember to freeze any extras using the techniques mentioned earlier!
Food Safety Considerations and Guidelines
Food safety is crucial when it comes to storing chocolate thumbprint cookies. Always ensure that the cookies are completely cooled before storing them in any container to prevent moisture build-up, which can lead to spoilage. When using containers, make sure they are clean and dry to avoid any contamination.
It’s also essential to check for any signs of spoilage before consuming stored cookies. If you notice any off smells, discoloration, or mold, it’s best to discard them. Always err on the side of caution when it comes to food safety!
Shelf Life Expectations
When stored properly, chocolate thumbprint cookies can last quite a while. At room temperature, they are best enjoyed within 5 days, while frozen cookies can last up to 3 months. The key is to keep them in airtight containers to maintain their freshness. If you’re ever unsure, a quick taste test can help determine if they are still good!
Portioning and Packaging Tips
If you plan on gifting your chocolate thumbprint cookies or taking them to a potluck, consider portioning them out into single servings. This not only makes for easy sharing but also keeps the cookies from becoming stale too quickly. Use decorative boxes or tins for an appealing presentation, and include a note with storage instructions for the recipients.
In conclusion, taking the time to properly store your chocolate thumbprint cookies will ensure that they remain as delightful as they were the day they were baked. Whether enjoyed fresh or frozen, these cookies are sure to bring joy to any occasion!
Nutritional Benefits and Health Information
When indulging in chocolate thumbprint cookies, it’s easy to overlook their nutritional profile amidst the rich flavors and delightful textures. However, understanding the health benefits and nutritional content of these cookies can help you enjoy them mindfully. Let’s explore the various aspects of their nutritional value and how they can fit into a balanced diet.
Nutritional Profile
At the heart of every chocolate thumbprint cookie lies a rich blend of ingredients that contribute to their unique taste and texture. Common ingredients include all-purpose flour, unsweetened cocoa powder, butter, sugar, eggs, and chocolate for the thumbprint filling. On average, one cookie contains approximately 100 to 150 calories, depending on the size and the amount of filling used.
Here’s a rough breakdown of the macronutrient content per cookie:
- Calories: 100-150
- Carbohydrates: 15-20 grams
- Protein: 1-2 grams
- Fat: 5-8 grams
- Sugar: 6-10 grams
While they are undoubtedly a treat, chocolate thumbprint cookies can provide some nutritional benefits when enjoyed in moderation.
Health Benefits
One of the key ingredients in chocolate thumbprint cookies is cocoa powder, which is known for its numerous health benefits. Cocoa is rich in flavonoids, which are compounds that have been shown to improve heart health by reducing blood pressure and improving blood flow. Additionally, the presence of antioxidants in cocoa can help combat oxidative stress in the body.
Butter, while often viewed as an indulgent ingredient, also contains fat-soluble vitamins like A, D, and E, which are essential for maintaining overall health. However, it’s essential to balance your intake of these cookies with a diet rich in fruits, vegetables, and whole grains to ensure you’re getting all the necessary nutrients.
Dietary Considerations
For those with dietary restrictions, it’s important to note that traditional chocolate thumbprint cookies are not gluten-free due to the use of all-purpose flour. However, there are many gluten-free alternatives available, such as almond flour or gluten-free all-purpose flour blends. By substituting these ingredients, you can enjoy the cookies without compromising your dietary needs.
Furthermore, if you are vegan or dairy-free, you can replace butter with plant-based alternatives like coconut oil or vegan butter, and use flaxseed meal mixed with water as an egg substitute. These modifications allow a wider range of people to enjoy the delightful taste of chocolate thumbprint cookies.
As for allergens, be cautious with the chocolate filling, as it may contain dairy or nuts, depending on the type of chocolate used. Always read labels carefully and consider making your own chocolate filling if you’re concerned about allergens.
Healthy Modification Suggestions
If you’re looking to make chocolate thumbprint cookies a little healthier without sacrificing taste, there are several modifications you can try. For example, consider reducing the sugar content slightly or using natural sweeteners like honey or maple syrup. You can also experiment with adding oats or nuts to the cookie base for added fiber and protein.
Another option is to incorporate whole wheat flour instead of all-purpose flour. This simple swap can increase the fiber content and provide a nuttier flavor that pairs beautifully with the chocolate. Additionally, using dark chocolate instead of milk chocolate for the thumbprint filling can enhance the antioxidant content and provide a more intense chocolate flavor.
Comparison with Similar Dishes
When comparing chocolate thumbprint cookies to similar desserts, such as chocolate chip cookies or brownies, you might find that they offer a unique combination of flavors and textures. While chocolate chip cookies are often chewier and denser, chocolate thumbprint cookies present a delightful contrast with their soft centers and rich chocolate filling. Brownies, on the other hand, tend to be more fudgy and dense, lacking the playful thumbprint feature that adds both charm and a layer of chocolatey goodness.
Ultimately, while chocolate thumbprint cookies are a treat to indulge in, they do carry their own nutritional benefits. By enjoying them in moderation and making mindful ingredient choices, you can savor these delightful cookies while still maintaining a balanced diet. So go ahead—treat yourself to a cookie (or two) and enjoy the sweet moments they bring!
Frequently Asked Questions About Chocolate Thumbprint Cookies
What is the significance of using 2 large egg whites at room temperature in chocolate thumbprint cookies?
Using egg whites at room temperature is crucial for achieving the perfect texture in your chocolate thumbprint cookies. When egg whites are at room temperature, they whip up more easily and incorporate more air, resulting in a lighter and fluffier cookie. To bring your eggs to room temperature quickly, you can place them in a bowl of warm water for about 10-15 minutes. Additionally, be sure to avoid any yolk in the whites, as even a small amount can hinder the whipping process.
Why is cream of tartar important in this recipe, and how does it affect the outcome?
Cream of tartar is used to stabilize the egg whites during whipping, which is essential for achieving the desired meringue-like texture in your cookies. It helps to maintain the structure and prevents the egg whites from collapsing after they have been whipped. When adding cream of tartar, use about 1/8 teaspoon as specified in the recipe for the best results. If you don’t have cream of tartar, you can substitute it with an equal amount of lemon juice or white vinegar, though the flavor may slightly differ.
What role does vanilla extract play in chocolate thumbprint cookies?
Vanilla extract enhances the overall flavor profile of your chocolate thumbprint cookies, adding depth and warmth to the sweetness of the sugar and chocolate. When using 1/2 teaspoon of vanilla extract, opt for pure vanilla over imitation for a richer taste. Additionally, consider adding the vanilla extract after the egg whites have been whipped to ensure the flavor is evenly distributed without compromising the aeration of the egg whites. This simple addition can elevate your cookies from good to extraordinary.
How does adding salt benefit the flavor of chocolate thumbprint cookies?
Salt is a critical ingredient that enhances the sweetness and overall flavor of your chocolate thumbprint cookies. By adding 1/8 teaspoon of salt, you create a balance that allows the chocolate and sugar to shine without becoming overly sweet. Additionally, salt can help to intensify the chocolate flavor, making each bite more enjoyable. Make sure to mix the salt evenly into your dry ingredients to ensure a consistent flavor throughout the cookies.
What is the purpose of using 3/4 cup sugar in this recipe?
Sugar not only sweetens chocolate thumbprint cookies but also contributes to their texture and structure. Using 3/4 cup of sugar provides the necessary sweetness while also helping to create a crisp exterior and a chewy interior. For a different flavor profile, consider using brown sugar instead of white sugar; it will add a slight molasses flavor and enhance the moisture of the cookies. Ensure that you mix the sugar well with the other ingredients to achieve a uniform consistency in the dough.
Why are white chocolate chips used, and can they be substituted?
White chocolate chips are a fantastic addition to chocolate thumbprint cookies, offering a creamy sweetness that complements the chocolate base. They melt beautifully in the center of the thumbprint, creating a delightful surprise when you bite into the cookie. If you don’t have white chocolate chips on hand, you can substitute them with dark chocolate or semi-sweet chocolate chips for a more intense flavor. Just keep in mind that this will alter the overall sweetness of the cookies.
What is the significance of using crushed peppermint candies in this recipe?
Crushed peppermint candies not only add a festive touch to chocolate thumbprint cookies but also provide a refreshing flavor contrast to the rich chocolate. Using 1/3 cup plus 2 tablespoons of coarsely crushed peppermint candies will give your cookies a delightful crunch and a burst of minty goodness. To achieve the perfect texture, place the candies in a ziplock bag and crush them with a rolling pin. For a more subtle peppermint flavor, consider using less or substituting with peppermint extract, adjusting the quantity to taste.


