Crispy Japanese katsu has a way of capturing the hearts and palates of those who encounter it. My first experience with this delectable dish was at a small, family-run restaurant tucked away in a quiet corner of Tokyo. I remember walking in on a rainy afternoon, the sound of sizzling oil and the rich, savory aroma enveloping me like a warm hug. As I took a seat at the counter, I watched the chef meticulously prepare each katsu, the sound of crunching panko breadcrumbs resonating like a promise of deliciousness. The moment I took my first bite, it was as if I had stumbled upon a culinary treasure—crispy, tender, and bursting with flavor. It was a revelation that would change my cooking forever.
As I began to delve deeper into the world of Japanese cuisine, I discovered that the origins of crispy Japanese katsu can be traced back to the late 19th century, during the Meiji Restoration. This period marked a significant cultural shift in Japan, as the country opened up to Western influences. The introduction of breaded cutlets, known as katsu, was inspired by Western dishes like the German schnitzel. Over time, the Japanese adapted this dish, incorporating local ingredients and flavors, which led to the creation of what we now lovingly refer to as crispy Japanese katsu.
The Story Behind This Recipe
What makes my version of crispy Japanese katsu special is the personal touch I’ve added over the years. After that unforgettable first encounter, I was determined to recreate the magic in my own kitchen. I experimented with different cuts of meat, from pork to chicken, and played around with the seasoning in the breadcrumbs. Each trial brought me closer to the authentic taste I remembered, and I found joy in perfecting the technique of frying until golden brown. The crunch of the panko, the juiciness of the meat, and the rich flavor of the homemade tonkatsu sauce became a staple in my home, especially on busy weeknights when dinner needed to be both quick and satisfying.
This recipe is not just a meal; it’s a canvas for creativity and connection. It’s a dish that brings my family together, encouraging us to share stories and laughter around the dinner table, even on the most hectic of days. The beauty of crispy Japanese katsu lies in its versatility; it can be served over rice, in a sandwich, or alongside a fresh salad, making it a perfect solution for varied tastes and preferences. As someone who juggles work, family, and a passion for cooking, having a reliable and delicious recipe like this one has been a game changer.
Moreover, this dish is not limited to any specific season. Whether it’s the warmth of summer or the chill of winter, crispy Japanese katsu can be enjoyed year-round. In the fall, I love to pair it with roasted vegetables, while in the spring, a light cucumber salad complements the richness perfectly. The dish can easily accommodate the freshest ingredients available, making it relevant and delightful no matter the time of year.
Through this guide, I promise you’ll learn not only how to make crispy Japanese katsu, but also the cultural significance behind it, the techniques that will elevate your cooking, and how to adapt it to your family’s preferences. I hope that, like me, you will find an emotional connection to this dish that goes beyond taste—a connection that evokes memories, sparks creativity, and brings loved ones together.
The Rich History and Cultural Significance of crispy japanese katsu
The rich history and cultural significance of crispy Japanese katsu are as layered as the dish itself. To truly appreciate this beloved meal, we must journey back to its origins, tracing its evolution through the lens of Japanese culinary history. As mentioned earlier, crispy Japanese katsu is a product of the Meiji Restoration when Japan began embracing Western influences. The term katsu is derived from the word katsuretsu, which means “cutlet” in Japanese, and it reflects the integration of Western cooking techniques into Japanese cuisine.
Origins and History
Initially, crispy Japanese katsu was made using beef or pork, but as the dish gained popularity, chicken began to feature prominently as well. The first recorded instance of a breaded and fried cutlet in Japan dates back to the late 1800s, and it quickly became a favorite among the general populace. Over the years, variations of katsu have emerged across different regions of Japan, each with unique ingredients and preparation methods. For instance, in Hokkaido, you might find katsu served with a side of rich curry sauce, while in Osaka, it is common to find a katsu sandwich, known as katsu sando, that is crispy on the outside and soft on the inside.
As the years passed, crispy Japanese katsu transcended its humble beginnings to become a beloved comfort food, often served at family gatherings, celebrations, and even in high-end restaurants. Its adaptability and ease of preparation have also contributed to its status as a staple in Japanese households. The dish is frequently accompanied by tonkatsu sauce, a savory and tangy condiment that enhances the flavors and adds depth to each bite. This sauce, made from a blend of fruits, vegetables, and spices, is an integral part of the experience and varies in recipes from region to region.
Cultural Significance
In Japan, food is often more than just sustenance; it is intertwined with cultural identity and social customs. Crispy Japanese katsu is traditionally enjoyed during special occasions, such as birthdays or family reunions, where it serves as a symbol of happiness and celebration. The act of preparing and sharing this dish fosters a sense of togetherness, making it a cherished ritual in many families. For many Japanese, the crunch of the panko and the savory meat evoke feelings of nostalgia, reminding them of childhood memories spent around the dinner table.
Famous chefs, such as Masaharu Morimoto and Nobu Matsuhisa, have elevated crispy Japanese katsu into the realm of gourmet cuisine, showcasing the dish in creative ways that honor its traditional roots while adding contemporary flair. Their interpretations have introduced the dish to an international audience, helping to solidify its place in the global culinary landscape.
Nutritional Benefits
Beyond its rich cultural history, crispy Japanese katsu also boasts nutritional benefits. When prepared with lean cuts of meat and served alongside fresh vegetables, it can be a balanced meal packed with protein and essential nutrients. The use of panko breadcrumbs, which are lighter and airier than traditional breadcrumbs, contributes to the dish’s signature crunch without overwhelming the meat’s flavor. Furthermore, serving crispy Japanese katsu with a side of salad or steamed vegetables adds a nutritious element, creating a well-rounded dining experience.
In conclusion, understanding the history and cultural significance of crispy Japanese katsu enriches our appreciation of this dish. It’s more than just a meal; it’s a celebration of tradition, family, and the beautiful melding of culinary influences that define Japanese cuisine. As you embark on your journey to create this beloved dish, may you find joy and connection in every crispy bite.
Essential Ingredients for Perfect crispy japanese katsu
When it comes to creating a mouthwatering dish like crispy Japanese katsu, the secret lies in the quality and selection of ingredients. Each component plays a vital role in achieving that perfect blend of flavors and textures that we adore in this beloved Japanese cuisine. Let’s dive into the essential ingredients you’ll need to whip up your own delicious katsu bowl at home.
Essential Ingredients
- 2/3 cup, plus 2 tablespoons tamari or soy sauce: This is the backbone of your katsu marinade. Tamari is a gluten-free option that provides a rich, umami flavor, while traditional soy sauce adds a savory depth. Both options will help tenderize the chicken while infusing it with flavor.
- 1 tablespoon toasted sesame oil: This ingredient adds a nutty aroma and flavor that is quintessential in Asian cooking. The toasted version is crucial as it delivers a richer taste compared to regular sesame oil.
- 1 tablespoon honey: A touch of sweetness from honey balances the savory elements of the dish. It also aids in achieving a beautifully golden crust when frying the chicken.
- 2 teaspoons grated ginger: Fresh ginger adds a zesty kick that brightens the dish. Its warming flavor complements the chicken and enhances the overall taste profile.
- 2 tablespoons chopped green onions: These provide a fresh, crisp element that adds brightness and a mild onion flavor to the dish.
- 1 teaspoon, plus 3 tablespoons sesame seeds: Sesame seeds contribute a delightful crunch and nutty flavor. They also add visual appeal, making your katsu bowl look even more appetizing.
- 4 chicken cutlets, or 2 boneless chicken breasts, sliced in half horizontally: Chicken is the star of this dish. Using cutlets or thinly sliced breasts ensures even cooking and a tender bite. Look for organic chicken if possible for better flavor and quality.
- 1 cup Panko: This Japanese breadcrumb is essential for achieving that signature crispy texture. Panko is lighter and flakier than regular breadcrumbs, giving your katsu a delightful crunch.
- Chili flakes: A pinch of chili flakes adds a subtle heat that contrasts beautifully with the savory and sweet notes of the dish. Adjust to your spice preference!
- 1 bag frozen shelled edamame: These vibrant green soybeans not only provide a pop of color but also a boost of protein, making your katsu bowl even more nutritious.
- 3-4 cups rice, cooked: Rice serves as the perfect base for your katsu bowl, absorbing all the delicious flavors from the chicken and sauce. Jasmine or short-grain rice works wonderfully.
- Cucumber, avocado, pickled ginger, and nori sheets – for serving: These garnishes add freshness and texture to your dish, creating a balanced meal.
- 1/3 cup olive oil mayo: This creamy element brings richness to the dish. Mixing it with sriracha and soy sauce creates a delightful dipping or drizzling sauce.
- 1 to 2 tablespoons sriracha: For those who enjoy some heat, sriracha adds a spicy kick that elevates the entire experience.
- 2 teaspoons soy sauce or tamari: This is used in the dipping sauce for an extra layer of flavor.
- 1 teaspoon honey: Just like in the marinade, honey in the sauce helps to balance flavors.

Crispy Japanese Katsu Bowls
Ingredients
- 2/3 cup, plus 2 tablespoons tamari or soy sauce
- 1 tablespoon toasted sesame oil
- 1 tablespoon honey
- 2 teaspoons grated ginger
- 2 tablespoons chopped green onions
- 1 teaspoon, plus 3 tablespoons sesame seeds
- 4 chicken cutlets, or 2 boneless chicken breasts, sliced in half horizontally
- 1 cup Panko
- chili flakes
- 1 bag frozen shelled edamame
- 3–4 cups rice, cooked
- cucumber, avocado, pickled ginger, and nori sheets – for serving
Spicy Mayo
- 1/3 cup olive oil mayo
- 1 to 2 tablespoons sriracha
- 2 teaspoons soy sauce or tamari
- 1 teaspoon honey
Instructions
- In a medium bowl, combine 2/3 cup tamari/soy sauce, sesame oil, honey, ginger, green onion, 1 teaspoon sesame seeds, and chili flakes.
- Place the chicken in a bowl and pour over 3-4 tablespoons of the sauce, save the rest for serving. Let the chicken sit 10 minutes.
- Place the Panko and 3 tablespoons sesame seeds in a shallow bowl. Dredge both sides of the chicken through the Panko, pressing to adhere by using your fist to pound the crumbs in. Place the chicken on a plate.
- Heat a few tablespoons of oil in a large skillet over medium-high. Add the chicken and cook until golden brown, 3-4 minutes. Flip the chicken and cook until golden brown on the other side, about 3-4 minutes. Transfer to a cutting board.
- Add the edamame to the skillet, cook until thawed, then add 2 tablespoons tamari/soy sauce. Cook another minute, then remove from the heat.
- To make the Spicy Mayo, combine all ingredients in a small bowl.
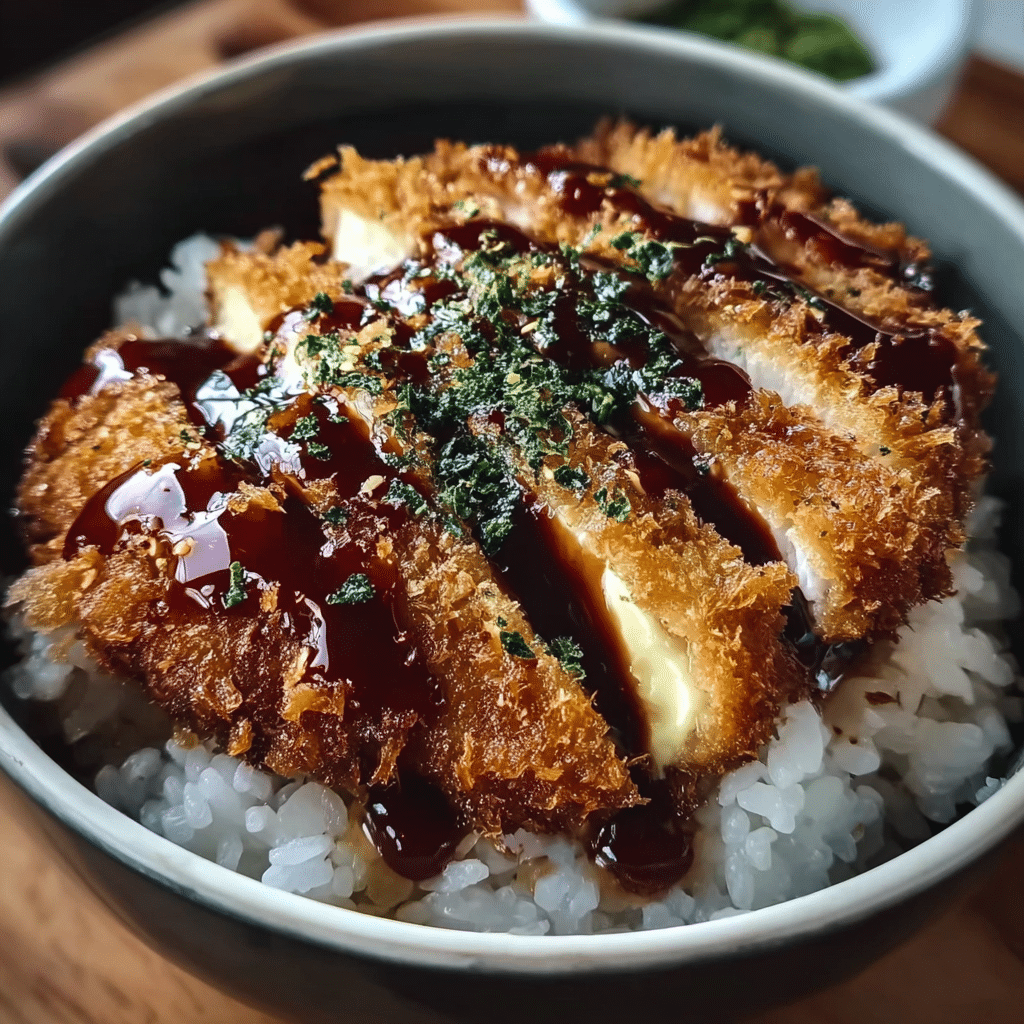
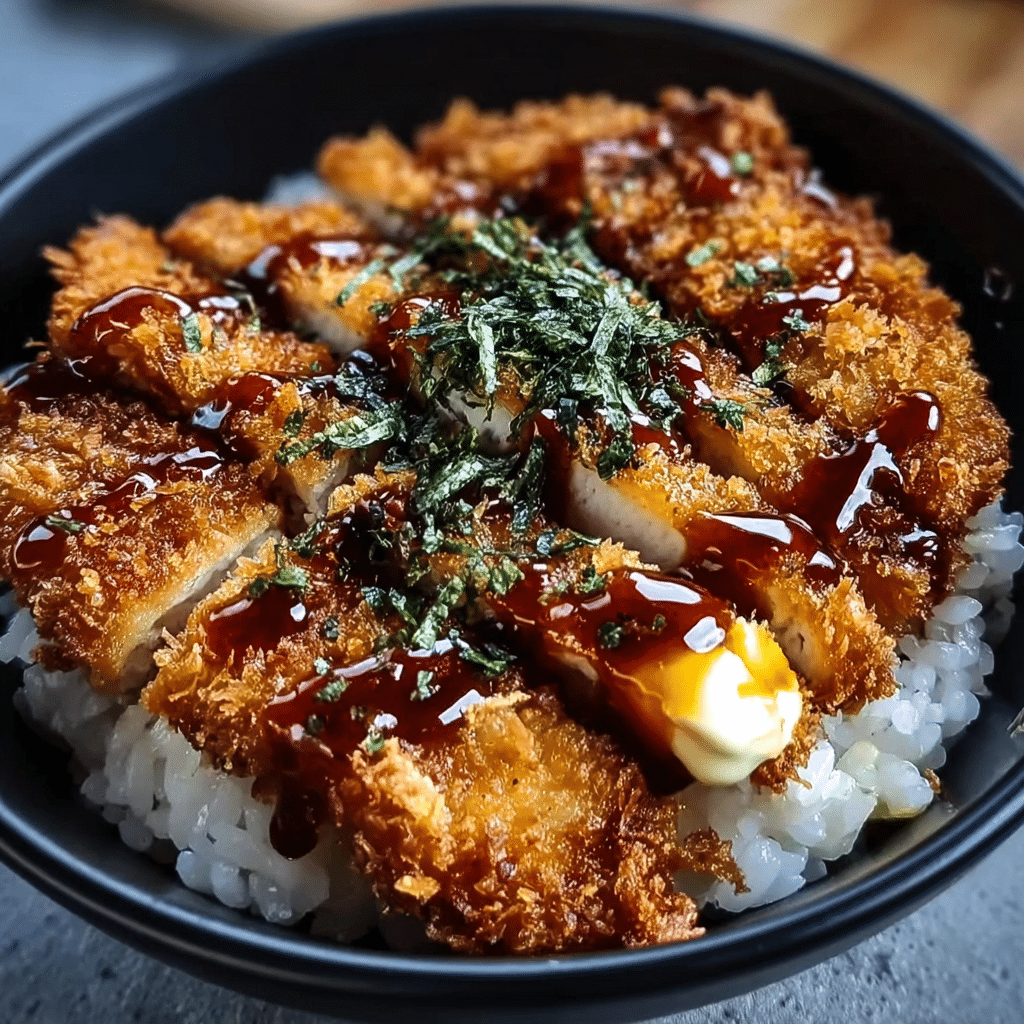
- To assemble, slice the chicken into thin strips. Add the rice to bowls, top with cucumber, avocado, chicken, pickled ginger, green onions, and nori. Spoon over the spicy mayo and the reserved tamari/soy sauce.
Shopping Tips
When shopping for ingredients to create your crispy Japanese katsu, quality is key. Look for fresh, high-quality chicken that is free from antibiotics and hormones. For your sauces, organic tamari or soy sauce can elevate your dish’s flavor profile. When it comes to Panko, choose brands that are made from white bread without any artificial preservatives.
While fresh ingredients are ideal, frozen versions can also work well. For instance, frozen edamame is often picked at peak ripeness and flash-frozen, locking in flavor and nutrients. Additionally, sourcing seasonal veggies like cucumbers and avocados can enhance your dish and support local farmers.
Substitutions and Alternatives
If you have dietary restrictions or preferences, don’t worry! There are plenty of substitutions for your crispy Japanese katsu ingredients. For a gluten-free option, ensure you choose gluten-free tamari and Panko. If you’re vegan, you can substitute chicken with firm tofu or eggplant, and use a plant-based mayo instead of olive oil mayo.
For those avoiding sugar, agave syrup can replace honey, and for an additional crunch, you can incorporate crushed nuts or seeds instead of sesame seeds. Always remember to taste as you go and adjust according to your personal preferences.
In terms of storage, keep your Panko in a cool, dry place to maintain its crispiness. Fresh ingredients like cucumber and avocados are best used within a few days of purchase, while edamame can be stored in the freezer until needed. This way, you can enjoy your homemade crispy Japanese katsu at any time!
Detailed Step-by-Step crispy japanese katsu Cooking Instructions
Now that we have gathered all the essential ingredients for our crispy Japanese katsu, it’s time to roll up our sleeves and get cooking! This step-by-step guide will take you through the process, ensuring that every bite of your katsu bowl is full of flavor and texture.
Preparation Steps
- Marinate the Chicken: Start by combining 2/3 cup of tamari or soy sauce, 1 tablespoon of toasted sesame oil, 1 tablespoon of honey, 2 teaspoons of grated ginger, and 2 tablespoons of chopped green onions in a bowl. Mix well to create a marinade. Place your chicken cutlets or sliced chicken breasts into a zip-top bag and pour the marinade over them. Seal the bag and give it a good massage to ensure the chicken is well-coated. Allow it to marinate for at least 30 minutes, or up to overnight in the refrigerator for deeper flavor.
- Prepare the Panko Coating: In a shallow dish, spread out 1 cup of Panko and mix in 1 teaspoon of sesame seeds. This blend will create that delightful crunch we crave in our crispy Japanese katsu. Set it aside.
- Cook the Rice: If you haven’t already, cook your rice according to package instructions. For a fluffy texture, rinse the rice under cold water until the water runs clear before cooking. This removes excess starch and prevents it from becoming sticky.
- Prep the Vegetables: While the chicken is marinating, slice your cucumber and avocado. Have your pickled ginger and nori sheets ready for serving. These fresh ingredients will add vibrant color and flavor to your katsu bowl.
- Prepare the Sauce: In a small bowl, mix together 1/3 cup of olive oil mayo, 1 to 2 tablespoons of sriracha, 2 teaspoons of soy sauce or tamari, and 1 teaspoon of honey. Adjust the amount of sriracha based on your spice preference. Set aside for a zesty drizzle over your katsu.
Cooking Process
- Heat the Oil: In a large skillet, heat 1/3 cup of olive oil over medium-high heat. You want the oil hot enough to fry without burning the Panko. A good test is to drop a few breadcrumbs in; if they sizzle immediately, the oil is ready.
- Coat the Chicken: Take the marinated chicken out of the zip-top bag and let the excess marinade drip off. Dredge each piece of chicken in the Panko mixture, pressing gently to ensure an even coating. This step is crucial, as it creates that signature crunch we love in crispy Japanese katsu.
- Fry the Chicken: Place the coated chicken pieces into the hot oil, being careful not to overcrowd the skillet. Fry for about 3-4 minutes on each side, or until golden brown and cooked through. You can check for doneness by cutting into the thickest part of the chicken; the juices should run clear. If you have a meat thermometer, aim for an internal temperature of 165°F.
- Drain the Chicken: Once cooked, remove the chicken from the skillet and place it on a paper towel-lined plate to absorb any excess oil. This will help maintain the crispiness of the crust.
Final Assembly
- Assemble the Bowls: In a serving bowl, layer 3-4 cups of cooked rice as the base. Slice the fried chicken into strips and arrange them over the rice.
- Add Fresh Ingredients: Top the rice and chicken with your sliced cucumber, avocado, and a handful of frozen shelled edamame (which can be thawed quickly in warm water). Don’t forget to add a few pieces of pickled ginger and torn nori sheets for that authentic touch!
- Drizzle with Sauce: Finish the dish by drizzling your prepared sauce over the top. The creamy, spicy sauce will complement the crispy chicken perfectly!
- Garnish and Serve: Sprinkle some extra sesame seeds and chopped green onions over the finished bowls for garnish. Serve immediately and enjoy the delightful crunch of your crispy Japanese katsu alongside the freshness of the vegetables and the comforting rice.
In just about 30 minutes, you’ve created a stunning and flavorful katsu bowl that not only tastes amazing but also looks impressive! This dish is perfect for a weeknight dinner or a special occasion when you want to impress your family and friends. Enjoy every bite of your homemade crispy Japanese katsu, and don’t forget to share your culinary masterpiece!
Professional Tips and Techniques for crispy japanese katsu
When it comes to making crispy Japanese katsu, mastering the technique is key! There’s something truly magical about biting into a piece of katsu and experiencing that satisfying crunch, followed by the tender, juicy meat inside. Whether you’re just starting out or looking to refine your skills, these professional tips and techniques will elevate your katsu game. Let’s dive in!
Professional Techniques
First, let’s talk about the basics of achieving that perfect crunch. The secret lies in the breading process. You’ll want to use panko breadcrumbs, which are lighter and flakier than traditional breadcrumbs. This is crucial for giving your crispy Japanese katsu its signature texture. Here’s a step-by-step guide:
- Choose Your Protein: Typically, katsu is made with pork (tonkatsu) or chicken (chicken katsu), but you can also use tofu for a vegetarian option. Whatever you choose, make sure to pound the meat to an even thickness for uniform cooking.
- Seasoning: Season your protein generously with salt and pepper. You can also add a dash of soy sauce or a sprinkle of garlic powder for additional flavor.
- Breading Station: Set up a three-part breading station: one plate with flour, another with beaten eggs, and a third with panko breadcrumbs. Coat the meat in flour first, then dip it in egg, and finally coat it with panko. Press the breadcrumbs onto the meat to ensure they stick well.
- Double Breading (Optional): For an even crispier result, consider double breading. After the first round of panko, dip the meat back in the egg and coat it with panko again.
- Rest the Breaded Katsu: Allow the breaded katsu to rest for about 10-15 minutes before frying. This helps the coating adhere better and enhances the crunch.
- Frying: Heat oil in a deep skillet or wok to 350°F (175°C). To test if the oil is ready, drop a few breadcrumbs in; they should sizzle immediately. Fry the katsu in batches, being careful not to overcrowd the pan. Fry until golden brown, about 4-5 minutes per side.
These techniques will help ensure that your crispy Japanese katsu turns out perfectly every time. But what if something goes wrong? Let’s take a look at some common issues and how to troubleshoot them.
Troubleshooting Guide
Even the best chefs encounter hiccups along the way. Here are some common problems you might face while making your crispy Japanese katsu and how to solve them:
- Not Enough Crispiness: If your katsu isn’t crispy enough, it could be due to the breadcrumbs not being fresh or the oil not being hot enough. Always use fresh panko and ensure your oil is properly heated.
- Oil Absorption: If your katsu absorbs too much oil, it might be because you’re overcrowding the pan. Fry in batches, and make sure your oil temperature stays consistent.
- Uneven Cooking: This can happen if the meat isn’t pounded evenly. Use a meat mallet and ensure that the thickness is uniform for even cooking.
- Burnt Breading: If the breadcrumbs burn before the meat is cooked through, lower the heat. It’s better to cook slowly than to rush and risk burning.
Presentation Tips
Once you’ve mastered the technique, it’s time to think about presentation. A beautifully plated crispy Japanese katsu not only looks appealing but also enhances the dining experience. Here are some ideas:
- Serve with Rice: A classic way to serve katsu is over a bed of fluffy white rice. Consider drizzling a bit of tonkatsu sauce over the top for an added burst of flavor.
- Garnish: Fresh herbs, such as cilantro or green onions, can add a pop of color. You might also include a slice of lemon or lime for a fresh, zesty touch.
- Accompaniments: Serve your katsu with a side of shredded cabbage, pickled vegetables, or a small bowl of miso soup to create a well-rounded meal.
- Beverage Pairings: A light beer or a crisp white wine, such as Sauvignon Blanc, complements the flavors of katsu beautifully. If you prefer non-alcoholic options, consider a refreshing iced green tea.
With these professional tips and techniques, you’re well on your way to mastering the art of crispy Japanese katsu. Remember, practice makes perfect, so don’t be discouraged if it takes a few tries to get it just right. Enjoy the process, and most importantly, savor every bite!
Creative Variations and Adaptations of crispy japanese katsu
While the classic crispy Japanese katsu is undeniably delicious, there’s a whole world of creativity waiting to be explored. From seasonal ingredient swaps to international fusion ideas, this section will inspire you to adapt and innovate your katsu recipes. Let’s take a look at some exciting variations!
Seasonal Variations
One of the joys of cooking is adapting recipes to reflect the seasons. For your crispy Japanese katsu, consider incorporating seasonal ingredients:
- Spring: Asparagus or zucchini can be sliced thin and added to your katsu for a fresh, vibrant twist. You could even create a katsu sandwich with spring greens and a tangy dressing.
- Summer: Peaches or tomatoes can make an excellent salsa to serve on the side. The sweetness of the fruit contrasts beautifully with the savory katsu.
- Fall: Sweet potatoes or pumpkin can be used for a heartier katsu. Simply slice them thin, coat them in your usual batter, and fry until golden brown.
- Winter: Root vegetables like carrots or parsnips can be turned into katsu. Their natural sweetness, when fried, pairs wonderfully with traditional dipping sauces.
Dietary Adaptations
Food should be inclusive, and with a few tweaks, your crispy Japanese katsu can cater to various dietary needs. Here are some ideas:
- Keto: Instead of panko, use crushed pork rinds or almond flour for breading. This will give you that desired crunch without the carbs.
- Vegan: For a plant-based version, use tofu or eggplant. Simply marinate the tofu in soy sauce and coat it with flour, plant-based milk, and panko.
- Gluten-Free: Substitute panko with gluten-free breadcrumbs or crushed rice crackers. Ensure your sauces are also gluten-free.
Creative Twists
Feeling adventurous? Try these fun variations on your crispy Japanese katsu:
- Spicy Katsu: Add some chili flakes to your flour mixture or prepare a spicy dipping sauce with sriracha or wasabi to bring heat to your dish.
- Cheesy Katsu: For cheese lovers, you can stuff your katsu with cheese before breading. When fried, the cheese will melt and ooze out, adding an indulgent touch.
- Fusion Styles: Think outside the box! How about a katsu taco? Use small tortillas, fill them with katsu, and top with fresh salsa, avocado, and cilantro.
Another area to explore is cooking methods. If you’re not keen on frying, consider these alternatives:
- Oven-Baked Katsu: For a healthier option, bake your katsu in the oven. Preheat it to 400°F (200°C), place the breaded katsu on a baking sheet, and bake for about 20-25 minutes, flipping halfway through.
- Air Fryer Katsu: The air fryer is a fantastic way to achieve that crispy texture with less oil. Set it to 375°F (190°C) and cook for about 15-20 minutes.
- Slow Cooker Katsu: For a unique twist, try slow cooking chicken katsu with a savory sauce. The meat will be tender and flavorful, perfect for a hearty bowl.
Finally, let’s not forget about leftovers! If you find yourself with extra katsu, consider these delicious transformations:
- Katsu Curry: Slice leftover katsu and serve it over rice with a rich Japanese curry sauce.
- Katsu Salad: Chop the katsu into bite-sized pieces and toss it with fresh greens, vegetables, and a tangy dressing for a satisfying salad.
- Katsu Sandwich: Layer slices of katsu between bread with lettuce, tomato, and tonkatsu sauce for a delightful sandwich.
With these creative variations and adaptations, your crispy Japanese katsu can be a versatile dish that suits any occasion or dietary requirement. Embrace the creativity in your kitchen, and don’t be afraid to experiment. After all, cooking is about enjoyment and expressing your unique culinary style!
Storage, Reheating, and Meal Prep for crispy japanese katsu
When it comes to enjoying crispy Japanese katsu, knowing how to store and reheat it properly can make all the difference between a delightful meal and a soggy disappointment. Whether you’re enjoying a delicious katsu bowl for dinner or prepping a batch for later, understanding the best storage techniques can help you savor that crispy goodness at its best, even days later.
Short-term Storage
If you find yourself with leftover crispy Japanese katsu, storing it in the refrigerator is your best option for short-term preservation. Ideally, you should place the katsu in an airtight container to minimize air exposure, which can lead to sogginess. I’ve had my fair share of mistakes where I used regular plastic wrap, only to find that my beloved katsu had lost its crunch by the next day. Trust me, investing in a good quality, airtight container is worth it.
Before placing the katsu in the container, allow it to cool to room temperature. This is crucial as placing hot food directly into the fridge can create condensation, leading to that dreaded sogginess. Once cooled, layer the katsu in the container, separating each piece with parchment paper to ensure they don’t stick together. You’ll want to consume the leftovers within 3 to 4 days for optimal quality and safety.
Freezing and Long-term Storage
If you’ve made a large batch of crispy Japanese katsu or simply want to save some for a rainy day, freezing is a fantastic option. When freezing, it’s essential to ensure that the katsu maintains its quality when reheated. The first step is to let the katsu cool completely. Once cooled, wrap each piece tightly in plastic wrap, ensuring there is no air trapped inside. Then, place the wrapped pieces into a freezer-safe zip-top bag or container. This double layer of protection helps prevent freezer burn.
One of my favorite tips for freezing katsu is to portion them out. By wrapping individual servings, you won’t have to defrost an entire batch when you just want a quick meal. Just remember to label the bag with the date, as crispy Japanese katsu can be stored in the freezer for up to 3 months without losing flavor or texture. After that, while it may still be safe to eat, the quality may diminish.
Reheating Best Practices
Reheating crispy Japanese katsu can be tricky, but with the right techniques, you can restore that satisfying crunch. One of the best methods is to use a skillet or frying pan. Heat a small amount of oil over medium heat, then add the katsu. Cook for a few minutes on each side until heated through and crispy again. This method allows the katsu to regain its original texture, unlike a microwave, which tends to make it soggy.
If you do opt for the microwave, use a microwave-safe plate and cover the katsu with a damp paper towel. This will help keep the meat moist while preventing it from drying out. Microwave on low power for short intervals, checking frequently. However, I recommend saving the microwave for when you’re really in a pinch and want to preserve as much crunch as possible.
For those who love the oven, preheating it to 375°F (190°C) and placing the katsu on a wire rack over a baking sheet also works wonders. This allows air to circulate around the katsu, helping it crisp up while it warms. Bake for about 10-15 minutes, or until heated through. This method is perfect for reheating a larger batch without sacrificing texture.
When it comes to food safety, always remember the two-hour rule. If your katsu has been sitting out at room temperature for more than two hours, it’s best to discard it to avoid any risk of foodborne illness. Additionally, ensure that the internal temperature of reheated katsu reaches 165°F (74°C) for safe consumption.
In terms of meal prep, crispy Japanese katsu lends itself beautifully to batch cooking. Preparing a large quantity on a Sunday can set you up for delicious lunches throughout the week. Pair it with rice, veggies, or a fresh salad, and you’ve got yourself a meal that’s quick to assemble. Just remember to store each component separately to maintain their individual textures and flavors.
In conclusion, knowing how to properly store and reheat your crispy Japanese katsu can extend its shelf life and ensure you enjoy it at its best. With the right techniques, you can easily transform leftover katsu into a delightful meal, making every bite just as enjoyable as the first.
Nutritional Benefits and Health Information
When diving into the world of crispy Japanese katsu, it’s easy to focus solely on its delightful crunch and savory flavor. However, understanding the nutritional benefits and health information of this dish can enhance your culinary experience and help you enjoy it mindfully. With a little exploration into its ingredients and their health implications, you may just find that your crispy Japanese katsu is not only delicious but also a beneficial addition to your diet.
Nutritional Profile
Crispy Japanese katsu is primarily made from pork or chicken, coated in panko breadcrumbs and fried to perfection. A typical serving of katsu (about 4 ounces) contains approximately 350-450 calories, depending on the meat and cooking method used. This calorie range includes protein, fats, and carbohydrates, making it a well-rounded dish.

Protein is one of the standout nutrients in crispy katsu. A serving of chicken katsu can yield around 25-30 grams of protein, while pork katsu can provide a similar amount. This high protein content supports muscle repair and growth, making katsu a great post-workout meal. The use of panko breadcrumbs also adds a unique texture and flavor profile, as these breadcrumbs are lighter and crispier than regular breadcrumbs.
On the flip side, the frying process means that katsu does contain a significant amount of fat, particularly saturated fat. A typical serving can have around 15-20 grams of fat, depending on how much oil is absorbed during frying. While fats are essential for hormone production and nutrient absorption, moderation is key. Pairing katsu with vegetables or a light salad can help balance out the meal.
Health Benefits
One of the significant health benefits of crispy Japanese katsu lies in its protein content. Protein plays an essential role in building and repairing tissues, and it is particularly important for those who lead active lifestyles. Additionally, the use of chicken or lean pork can provide a source of B vitamins, such as niacin and B6, which are vital for energy production and metabolism.
The panko breadcrumbs used in katsu can also offer a bit of dietary fiber, albeit in small amounts. While katsu isn’t the most fiber-rich option out there, serving it with a side of vegetables or a salad can elevate its fiber content, promoting digestive health and helping you feel satiated longer.
Dietary Considerations
As with any dish, crispy Japanese katsu can present certain dietary considerations. For those with gluten sensitivities or celiac disease, traditional panko breadcrumbs may pose a problem as they are typically wheat-based. However, gluten-free panko options are available, allowing those with dietary restrictions to enjoy this dish. Additionally, for individuals who are watching their calorie intake or fat consumption, opting for an air fryer or baking the katsu instead of frying can significantly reduce the fat content.
Vegetarians and vegans can also partake in the katsu experience by substituting meat with plant-based protein options such as tofu, tempeh, or even eggplant. Coating these alternatives in panko and frying or baking them can create a delightful crispy texture while still embracing the essence of katsu.
In conclusion, crispy Japanese katsu is more than just a delicious dish; it also offers a range of nutritional benefits that can complement a balanced diet. By understanding its nutritional profile, health benefits, and dietary considerations, you can enjoy katsu while being mindful of your health. So whether you’re indulging in a hearty katsu bowl or trying out a healthier variation, there’s no denying the deliciousness and versatility of this beloved dish.