Crispy Thanksgiving turkey is more than just a dish; it’s an experience that transforms the ambiance of any gathering into a cherished memory. I can still remember the first time I ventured into the kitchen on Thanksgiving morning, determined to create the perfect turkey for my family. Armed with a recipe I had stumbled upon in a dog-eared cookbook, I felt both excitement and anxiety. As I opened the oven door to reveal a golden-brown masterpiece, the aroma filling the air made all my efforts worthwhile. The crunchy skin, tender meat, and a medley of spices turned that Thanksgiving into a delightful feast, and my crispy Thanksgiving turkey became a family tradition that continues to bring joy to our table every year.
The journey of discovering this particular recipe was more than just a culinary challenge; it was a rite of passage. My grandmother, a woman of extraordinary culinary prowess, always emphasized the importance of the turkey on Thanksgiving Day. She would often say that the turkey is the centerpiece, the star of the show. But for her, it wasn’t just about flavor; it was about how the turkey brought the family together. Reflecting on those memories makes me appreciate the emotional connection we all have with this dish.
The Story Behind This Recipe
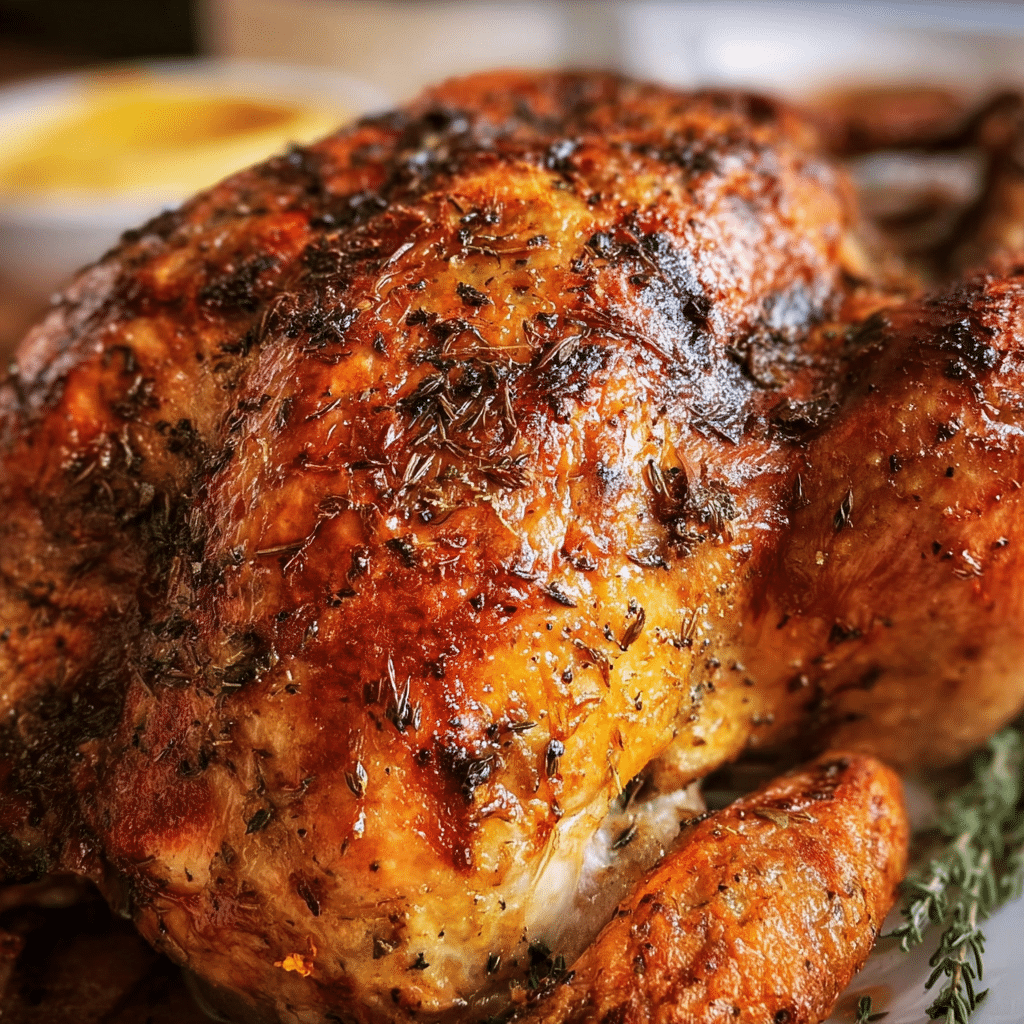
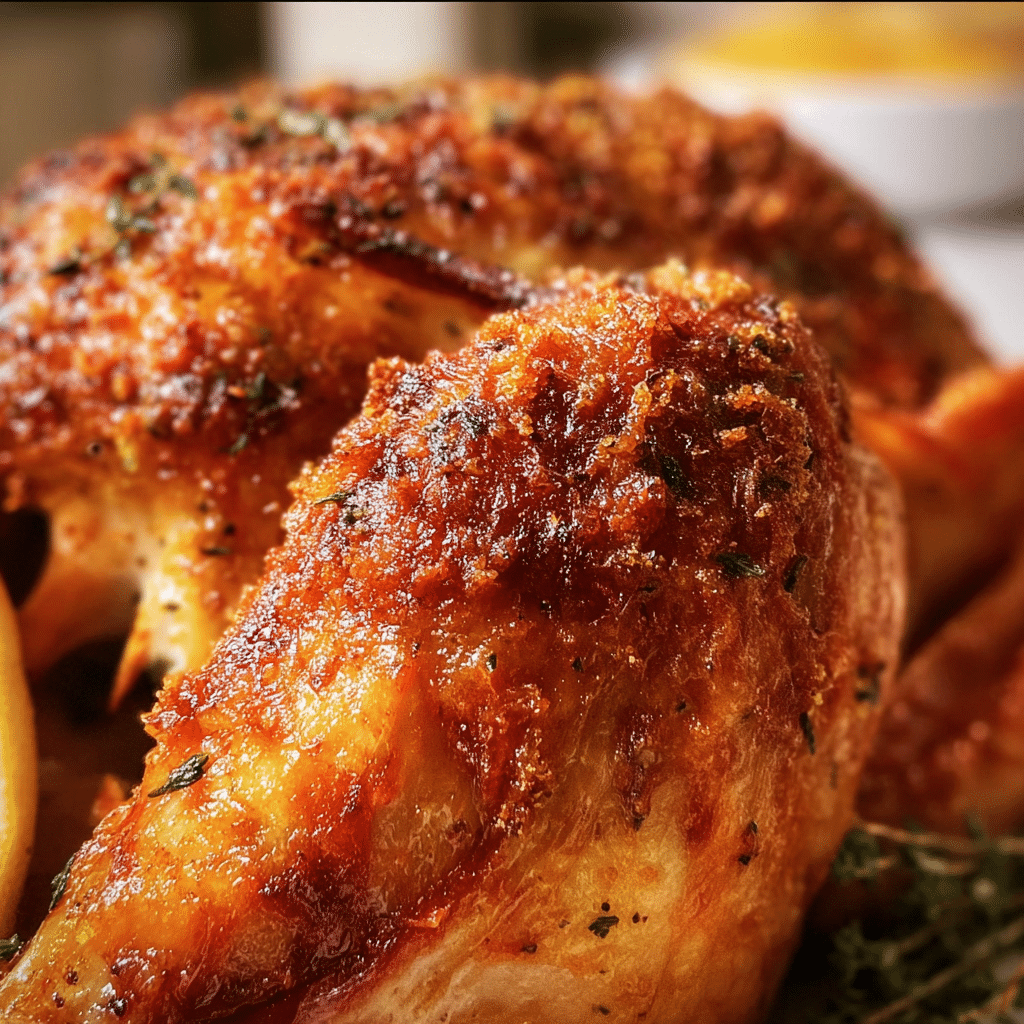
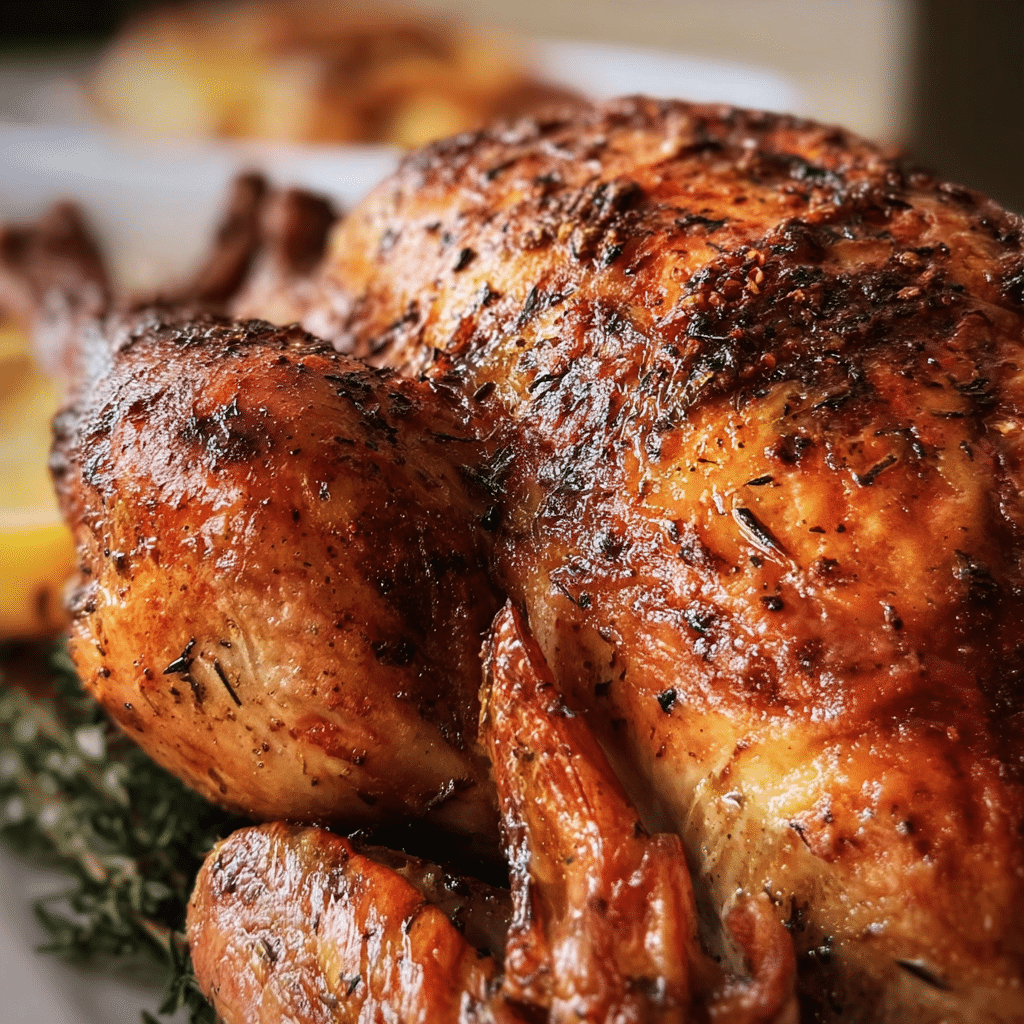
When I first tasted my grandmother’s crispy Thanksgiving turkey, I was captivated by the blend of flavors and textures. The skin was so crispy that it crackled with every bite, while the meat beneath was succulent and infused with the essence of herbs and spices. Over the years, I experimented with various techniques—brining, dry rubbing, and even deep-frying—until I arrived at the method that best encapsulated the spirit of a traditional Thanksgiving feast. What makes this recipe special is not just the crispy skin but also the rich flavor that permeates the turkey, making each bite an explosion of taste.
This recipe shines for busy families looking for quick dinner solutions, especially during the holiday season when time is of the essence. With a few simple steps and a bit of preparation, you can create a crispy Thanksgiving turkey that will impress your guests without keeping you in the kitchen all day. Plus, the leftovers are just as delightful, making the effort well worth it.
Why You’ll Love This Dish
Seasonal relevance is another reason why crispy Thanksgiving turkey holds a special place in our hearts. As the air turns crisp and the leaves start to fall, the anticipation of gathering with loved ones around a beautifully set table becomes palpable. Thanksgiving is about more than just the food; it’s a time for reflection, gratitude, and reconnecting with family traditions.
For me, the emotional connection to this dish runs deep. Each year, as I prepare the turkey, I think of my grandmother’s hands working in the kitchen, and I feel her spirit guiding me. This recipe is not merely about following a set of instructions; it’s about honoring traditions, creating new memories, and celebrating the bonds that hold us together.
In this guide, you will learn everything you need to know to create your own crispy Thanksgiving turkey—from selecting the perfect bird to mastering the cooking techniques that will ensure a delicious result. You’ll find tips for seasoning, cooking times, and even creative ways to use leftovers, making your Thanksgiving not just a meal but an event to cherish. So, roll up your sleeves, gather your family, and let’s embark on this culinary adventure together!
The Rich History and Cultural Significance of crispy thanksgiving turkey
The journey of the crispy Thanksgiving turkey is steeped in rich history and cultural significance, reflecting the evolution of this beloved dish over centuries. To truly appreciate the depth of this recipe, we must take a step back in time and explore its origins, traditional preparations, and the variations that have emerged in different regions.
Origins and History
The origins of Thanksgiving turkey can be traced back to the early 17th century when the Pilgrims and Native Americans came together to celebrate the harvest. While turkey was not the sole dish served during the first Thanksgiving in 1621, it quickly became a symbol of the holiday. The wild turkeys that roamed the New England forests were plentiful, making them a practical choice for feasting. Over the years, turkey became synonymous with Thanksgiving, solidifying its position as an iconic dish.
As the years progressed, the methods of cooking turkey evolved. By the 19th century, Victorian influence brought about elaborate preparation techniques, and the turkey began to be roasted, stuffed, and presented as the centerpiece of holiday feasts. The advent of convenience, such as the introduction of frozen turkeys in the mid-20th century, made it easier for families to enjoy this dish without the challenges of sourcing fresh birds, thus cementing its status in Thanksgiving traditions.
Cultural Significance
Crispy Thanksgiving turkey holds profound cultural significance across the United States. It serves as a reminder of gratitude and communal celebration, bringing families and friends together. In various regions, you’ll find unique twists on the classic recipe. For example, in the Southern states, deep-fried turkey has become a popular alternative, while in the Northeast, you might encounter turkeys brined in apple cider for a sweet and tangy flavor profile. Each variation tells a story, showcasing the local ingredients and cooking techniques that make it special.
Many famous chefs have contributed to the evolution of the crispy Thanksgiving turkey. Chefs like Martha Stewart and Alton Brown have popularized various techniques, from dry-brining to herb-infused butter, elevating this dish to new culinary heights. Their recipes often inspire home cooks to experiment with flavors and techniques, ensuring that the turkey remains a dynamic part of the Thanksgiving experience.
Nutritional Benefits
Beyond its cultural significance, the crispy Thanksgiving turkey also offers numerous nutritional benefits. Turkey is a lean source of protein, low in saturated fat and calories, making it a healthier choice compared to many traditional holiday dishes. It is rich in essential nutrients, including vitamins B6 and B12, niacin, and selenium, which contribute to overall health and wellness. Incorporating turkey into your diet can help support muscle growth, immune function, and metabolism.
As we embrace the rich history and cultural significance of crispy Thanksgiving turkey, we recognize its role in uniting families and celebrating the spirit of gratitude. Whether it’s the traditional recipes passed down through generations or the innovative twists introduced by modern chefs, this dish remains a beloved staple on Thanksgiving tables across the nation.
Essential Ingredients for Perfect crispy thanksgiving turkey
When it comes to crafting the ultimate crispy Thanksgiving turkey, the choice of ingredients is paramount. Each component plays a significant role in ensuring that your turkey is not only flavorful but also achieves that coveted crispy skin. This section delves into the essential ingredients that will elevate your Thanksgiving feast.
Essential Ingredients
- 10 lb whole Turkey
- Dry Rub & Brine
- 4 Tbsp salt
- ½ Tbsp sugar
- 1 Tbsp baking powder
- 1 tsp ground black pepper
- 1 sweet onion
- 1 lemon
- 2 apples
- 4 cloves garlic
- 1 stalk celery
- ½ bunch rosemary
- ½ bunch thyme
- ½ bunch sage
- 6 Tbsp unsalted butter, melted
- 5 cloves garlic, crushed
- 4 Tbsp maple syrup
- 1 Tbsp dried rosemary, thyme, and sage combined
- Turkey juice
The star of the show is, of course, the 10 lb whole turkey. When selecting your turkey, consider choosing a fresh turkey over a frozen one for better flavor and texture. Look for a turkey with a clean, unblemished skin and an even layer of fat beneath. If you’re trying to eat healthier, opt for a natural, free-range turkey, which tends to provide a richer flavor.
Next, we have the dry rub and brine components. The combination of 4 Tbsp salt and ½ Tbsp sugar is essential for drawing out moisture and enhancing the turkey’s natural flavors. The sugar also aids in achieving that beautiful golden-brown color when roasting. Baking powder, at 1 Tbsp, plays a critical role in creating that crispy skin. It helps to break down the proteins in the turkey’s skin, allowing for maximum crispiness.
1 tsp ground black pepper adds a hint of warmth and spice, while the addition of aromatics like 1 sweet onion, 1 lemon, 2 apples, 4 cloves garlic, and 1 stalk celery contributes depth of flavor to the turkey. The onion and garlic will infuse the meat as it roasts, creating a delicious aroma that fills your kitchen.
Fresh herbs—½ bunch rosemary, ½ bunch thyme, and ½ bunch sage—not only enhance the flavor but also add a festive touch. These herbs are typically available in the fall, making them perfect for your Thanksgiving feast. If you’re unable to find fresh herbs, dried versions can be substituted, but fresh is always preferred for their vibrant flavors.
Now, let’s not forget about the 6 Tbsp unsalted butter, melted. This ingredient is crucial for basting, keeping the turkey moist while also contributing to that crispy skin. Additionally, 5 cloves garlic, crushed and 4 Tbsp maple syrup provide a sweet and savory balance that enhances the overall flavor profile.
Lastly, the turkey juice is vital for basting and keeping the turkey moist throughout the cooking process. It’s a rich, flavorful liquid that helps create a delicious gravy post-roast.
Print
Crispy Thanksgiving Turkey Recipe
Ingredients
- 10 lb whole Turkey
Dry Rub & Brine
- 4 Tbsp salt
- ½ Tbsp sugar
- 1 Tbsp baking powder
- 1 tsp ground black pepper
Cavity Seasoning
- 1 sweet onion
- 1 lemon
- 2 apples
- 4 cloves garlic
- 1 stalk celery
- ½ bunch rosemary
- ½ bunch thyme
- ½ bunch sage
Basting
- 6 Tbsp unsalted butter melt
- 5 cloves garlic crush
- 4 Tbsp maple syrup
- 1 Tbsp dried rosemary, thyme, and sage combined
(optional) Turkey Gravy
- turkey juice
- 1 cup unsalted chicken/turkey stock or water
- ¼ cup flour adjust to desired thickness
- 1 Tbsp unsalted butter
- giblet & liver from the turkey
(optional) No Turkey Roasting Pan option – additional seasoning turkey stock
- 1–2 apple
- 1 sweet onion
- 1 lemon
- 1 bay leaf
Instructions
Prep & Dry Brine Turkey
- Make sure the turkey is defrosted according to the label.
- Remove giblet & liver (usually in the neck cavity) and the neck bone in the main cavity. Save these for turkey gravy later if desired.
- Use a paper towel to blot dry both the outside skin and inside cavity.
- Combine salt, baking powder, sugar, and ground black pepper.
- Rub the above mixture all over the outside of the Turkey. Work your finger into the area underneath the skin in the neck cavity as well. Do it slow and carefully.
- Once done covering the turkey in salt/pepper mixture, pour the remaining into the main cavity, shake and use your hand to make sure all the inside cavity area is rubbed well with salt.
- Now chop and cut all the sweet onion, apple, and lemon into quarters, celery into 2-inch sticks, peel garlic, etc.
- Stuff all the above into the turkey main cavity as well as rosemary/thyme/sage.
- Use a piece of turkey tie or kitchen twine to tie turkey legs together.
- Tuck the wings to the back.
- Situate turkey with its breast facing up and chill in the refrigerator, uncover to brine and dry over night.
Before Roasting
- Let the turkey out of the refrigerator to let it come back up to room’s temperature.
- Flip the turkey over so its back is facing upward, if there any leftover water precipiated it will be mostly dripping out now.
- Right before roasting, prepare the roasting pan & rack or if you don’t have one, create an elevated planar in your pan by arranging quarters of apple, onion, and lemon. These fruits & vegetables will add flavor to turkey gravy, so add a bay leaf to the pan as well.
- Melt butter, stir in crushed garlic as well as 1 tablespoon of dried rosemary/thyme/sage combined.
- Add Maple syrup in and stir really well, the mixture will become a bit thicker and ready to be used for basting.
- Baste this garlic butter mixture all over the turkey backside.
- Now flip the turkey over (breast side upward) and situate it onto the roasting pan or the prepared elevated fruits & onion.
- Baste the breast side with the remaining garlic butter mixture, go over each area carefully. Make sure to work into all crevice, under the wings/thigh area, etc. Cover them all.
Oven-Roast
- Adjust the oven’s shelf to the lowest level.
- Preheat oven to 325F.
- Place the ready turkey in the middle area and start baking.
- Bake for approximately 3 hours on a regular oven or 2 hours on Convectional oven or as label’s suggestion by the bird’s weight.
- When baking halfway through, turn the roasting pan 180 degrees, opposite to what you originally placed it. Then fold a piece of foil and place it to cover the turkey breast.
- Bake till the approximate total time, and check for doneness with a thermometer. Turkey’s meat internally should reach 165F minimum.
- Once done, take the turkey out of the oven and let it rest for 30 minutes before any cutting.
(optional) Turkey Gravy
- Once the turkey is finished roasting/baking and rest, you can take the dripping for gravy.
- Slice and chop turkey giblet, liver and heart.
- In a sauce pan over medium heat, add 1 Tbsp butter or turkey fat from dripping.
- Stir in the sliced giblet, saute till it’s almost done then add the heart and liver.
- Stir till the liver pieces are brown on the outside then add flour.
- Keep stirring until all piece are cooked and the roux (flour) is golden and cover all the piece well.
- Now pour in turkey dripping, taste test and and adjust with unsalted stock or water to dilute if the dripping liquid is too salty. Add more dripping if you want it saltier and so on.
- Remove from heat. Gravy will be thicker when cooling down, so just heat and stir till it lightly thicken enough.
Shopping Tips
When you’re out shopping for these ingredients, try to purchase them from local farms or markets if possible. Not only will you find fresher produce, but you’ll also be supporting local agriculture. For the turkey, Thanksgiving is the peak season, so it’s wise to order ahead if you have your heart set on a specific type or size.
Look for organic options wherever possible, especially for herbs and vegetables, as they often have more robust flavors and are free from pesticides. If you’re on a budget, consider purchasing larger quantities of herbs and turkey, as they tend to be cheaper in bulk. Plus, you can always freeze leftover herbs for future recipes.
Substitutions and Alternatives
Dietary restrictions may arise during holiday gatherings. If you have guests who are gluten-sensitive, you can easily substitute the baking powder with a gluten-free version. Similarly, if someone prefers not to consume butter, olive oil or coconut oil can work as excellent alternatives for basting and keeping your turkey moist.
For a lower-sodium option, you can reduce the amount of salt in the brine or use a salt substitute. If someone is allergic to apples, you can swap them out for pears or even cranberries, which will still provide a lovely flavor infusion when roasted.
Finally, if you’re looking to save on costs, consider using dried herbs instead of fresh, as they often last longer and are less expensive. Just remember to adjust the quantity, as dried herbs are more potent than fresh.
In conclusion, selecting the right ingredients for your crispy Thanksgiving turkey is a matter of quality and understanding the roles each component plays in the final dish. By choosing fresh, seasonal ingredients and considering substitutions, you can craft a turkey that is not only delicious but also accommodates the needs of all your guests.
Detailed Step-by-Step crispy thanksgiving turkey Cooking Instructions
Cooking a crispy Thanksgiving turkey is an art form that requires attention to detail, patience, and a touch of love. The process is rewarding, and once you master the steps, you’ll be a centerpiece superstar at every Thanksgiving gathering. Let’s break down the detailed step-by-step instructions to ensure your turkey turns out perfectly crispy and flavorful.
Preparation Steps
- Thaw the Turkey: If your turkey is frozen, start by ensuring it is completely thawed. This can take several days in the refrigerator. As a rule of thumb, allow 24 hours of thawing time for every 4-5 pounds of turkey.
- Brine the Turkey: The day before cooking, prepare a simple brine with water, salt, and sugar. Submerge the turkey in the brine solution, ensuring it is fully covered. Brining helps to keep the turkey juicy and enhances the flavor.
- Prepare the Dry Rub: In a mixing bowl, combine 4 Tbsp salt, ½ Tbsp sugar, 1 Tbsp baking powder, and 1 tsp ground black pepper. This mixture will be used to season the skin of the turkey for that crispy finish.
- Mise en Place: Gather your ingredients and tools. Chop the onions, garlic, and celery, and slice the apples and lemon. Having everything ready will make the cooking process smoother and more enjoyable.
Cooking Process
- Preheat Your Oven: Preheat your oven to 450°F (232°C). A high initial temperature will help crisp the skin.
- Season the Turkey: Once the turkey has brined, remove it from the brine and pat it dry with paper towels. This helps achieve that crispy texture. Rub the dry rub mixture all over the turkey, ensuring you get under the skin as well.
- Add Aromatics: Stuff the cavity of the turkey with the chopped sweet onion, crushed garlic, lemon slices, apples, and celery. This will impart flavor and moisture to the turkey as it cooks.
- Baste with Butter: Melt 6 Tbsp of unsalted butter, and use a brush to coat the outside of the turkey. This not only adds flavor but also helps the skin crisp up beautifully.
- Roasting the Turkey: Place the turkey breast side up on a roasting rack in a large roasting pan. Roast the turkey in the preheated oven for 30 minutes. This initial high heat will start to crisp the skin.
- Lower the Temperature: After 30 minutes, reduce the oven temperature to 325°F (163°C). Continue roasting, basting with the melted butter and turkey juices every 30 minutes.
- Check Internal Temperature: Use a meat thermometer to check the internal temperature of the turkey. It should reach 165°F (74°C) in the thickest part of the thigh and breast. This ensures the turkey is safely cooked.
- Rest the Turkey: Once the turkey is cooked, remove it from the oven and let it rest for at least 20-30 minutes. Resting allows the juices to redistribute, ensuring a moist turkey.
Final Assembly
- Carve the Turkey: After resting, carve the turkey carefully. Start with the legs and thighs, then move to the breast. Use a sharp knife for clean cuts.
- Make Gravy: Use the drippings from the roasting pan to create a delicious gravy. Simply add some flour to the drippings to thicken it and season to taste.
- Serve: Arrange the carved turkey on a platter. Pour some gravy over the turkey and garnish with fresh herbs if desired. Serve it alongside your favorite Thanksgiving sides.
Throughout this process, pay attention to visual cues and sensory indicators. The turkey should have a beautiful golden-brown color, and the aroma should be mouthwatering. Common mistakes to avoid include not allowing the turkey to rest (which can lead to dry meat) and not checking the internal temperature early enough.
One professional technique to ensure maximum crispiness is to dry the turkey skin thoroughly before applying the rub and butter. You can even leave it uncovered in the refrigerator for a few hours. This helps to dry out the skin, leading to a crispy texture.
By following these detailed instructions, you will not only create a crispy Thanksgiving turkey but also an unforgettable holiday experience for you and your loved ones. Enjoy the process, and happy cooking!
Professional Tips and Techniques for crispy thanksgiving turkey
When it comes to creating the perfect crispy Thanksgiving turkey, there is an art and science that goes hand in hand. The quest for a turkey that boasts a golden-brown, crunchy skin while remaining juicy and flavorful on the inside has been a culinary pursuit for generations. Here, I will share some professional tips and techniques that have not only worked for me but have been passed down through family gatherings and cooking classes. Whether you’re a seasoned chef or a novice in the kitchen, these insights will elevate your turkey game.
Professional Techniques
First things first, let’s talk about brining. This technique is crucial for achieving a succulent and flavorful turkey. There are two main types of brining: wet and dry. Wet brining involves submerging your turkey in a saltwater solution, often with added herbs and spices, for several hours or overnight. This not only imparts flavor but also helps the turkey retain moisture during cooking. On the other hand, dry brining, which I prefer for crispy Thanksgiving turkey, involves rubbing salt directly onto the skin and allowing it to rest in the refrigerator for 24 to 48 hours. This method helps to draw out moisture and creates a dryer skin, which is essential for achieving that coveted crispiness.
Another professional technique is the use of high heat. Many home cooks are cautious about cooking turkey at high temperatures, but this is key to creating a crispy exterior. Preheat your oven to 450°F (232°C) for the first hour of cooking. This intense heat will help to render the fat in the skin, leading to that beautiful golden-brown finish. After the initial blast of heat, you can lower the temperature to 325°F (163°C) to continue cooking the turkey through, ensuring that the breast meat remains juicy.
Troubleshooting Guide
No matter how prepared you are, things can sometimes go awry. One common problem is the turkey not browning properly. If this happens, try using a higher oven temperature or placing the turkey on a higher rack in the oven. Additionally, basting your turkey with the drippings every 30 minutes can help with browning. However, be careful not to open the oven too often, as it will lower the temperature and prolong cooking time.
Another issue that might arise is a turkey that is dry or overcooked. To avoid this, always use a meat thermometer to check for doneness. The internal temperature of the turkey should reach 165°F (74°C) in the thickest part of the breast. If your turkey is nearing this temperature but the skin isn’t as crispy as you’d like, you can finish it off under the broiler for a few minutes, keeping a close eye to prevent burning.
Presentation Tips
Once you’ve mastered the art of cooking the perfect crispy Thanksgiving turkey, it’s time to think about presentation. A beautifully presented turkey can be the centerpiece of your Thanksgiving table. Start by placing the turkey on a large, attractive platter. Surround it with fresh herbs like rosemary and thyme for a pop of color and aroma. You can also add roasted vegetables, cranberries, or citrus fruits to enhance the visual appeal.
For plating, consider carving the turkey in front of your guests for a dramatic effect. Use a sharp carving knife and a sturdy carving fork to slice the turkey into even pieces. Serve the slices with a ladle of homemade gravy on the side, allowing guests to customize their servings. This not only looks beautiful but also adds to the interactive element of the meal.
Finally, don’t forget about wine pairings. A crisp white wine such as Sauvignon Blanc or a light-bodied red like Pinot Noir pairs wonderfully with turkey. The acidity in these wines complements the rich flavors of the turkey and cuts through the fat, enhancing the overall dining experience. You can also consider serving a seasonal cocktail, such as a spiced apple cider, to bring warmth and festivity to your table.
In conclusion, mastering the crispy Thanksgiving turkey is a combination of technique, troubleshooting, and presentation. By employing these professional tips, you will not only impress your family and friends but create lasting memories around the Thanksgiving table.
Creative Variations and Adaptations of crispy thanksgiving turkey
Thanksgiving is a time for tradition, but it’s also a wonderful opportunity to explore creativity in the kitchen. While the classic crispy Thanksgiving turkey recipe has its charm, there’s no reason you can’t experiment with variations that reflect your personality and taste preferences. Let’s dive into some creative adaptations that will make your turkey the talk of the table.
Seasonal Variations
One of the best ways to elevate your turkey is by incorporating seasonal ingredients. Think about adding a stuffing made with cornbread, cranberries, and pecans for a sweet and nutty flavor profile. You could also consider a savory stuffing with mushrooms, sage, and sausage that complements the turkey beautifully. These additions not only enhance the flavor but also add a seasonal touch that your guests will appreciate.
Another method to infuse seasonal flavors is to marinate your turkey with a blend of maple syrup, apple cider, and fresh herbs. This will create a sweet and savory glaze that caramelizes beautifully in the oven, resulting in a turkey that is both crispy and bursting with flavor. If you’re feeling adventurous, consider a spice rub that features pumpkin spice or smoked paprika for a unique twist that pays homage to the fall season.
Dietary Adaptations
In today’s diverse culinary landscape, it’s crucial to cater to various dietary needs. If you’re hosting guests who are following keto or gluten-free diets, there are plenty of ways to adapt your crispy Thanksgiving turkey. For a keto-friendly option, you can skip the traditional stuffing and instead prepare a flavorful herb butter that can be slathered under the skin. This adds richness without the carbs.
For those who are gluten-free, you can use cornbread or gluten-free breadcrumbs in your stuffing. Additionally, consider serving the turkey with gluten-free gravy made from the pan drippings, thickened with cornstarch instead of flour. It’s all about ensuring that everyone at the table feels included and satisfied.
Creative Twists
Why not take your turkey to the next level with an international twist? Consider preparing a Mediterranean-style crispy Thanksgiving turkey by marinating it in olive oil, garlic, lemon juice, and fresh herbs such as oregano and thyme. This will impart a fresh, zesty flavor that is different from the traditional American style.
Another exciting option is to create a fusion turkey by incorporating flavors from Asian cuisine. A soy sauce and ginger marinade can work wonders, giving your turkey an unexpected yet delightful flavor. You could even roast the turkey on a bed of sliced oranges and star anise for a beautiful presentation and an aromatic experience.
Don’t forget about cooking methods! While roasting is the traditional method for turkey, consider using a deep fryer for an ultra-crispy skin or a slow cooker for a hands-off approach that yields incredibly tender meat. Each method offers a unique flavor and texture, allowing you to customize the cooking technique based on your preferences and available equipment.
Finally, let’s not overlook the leftovers. After the feast, transform your leftover turkey into a delicious turkey pot pie, tacos, or sandwiches. The possibilities are endless, and they provide a fun way to enjoy the fruits of your labor long after the holiday is over.
In essence, the variations and adaptations of crispy Thanksgiving turkey are limited only by your imagination. By incorporating seasonal ingredients, accommodating dietary needs, and exploring creative twists, you can craft a turkey that not only satisfies but also sparks joy and conversation around your Thanksgiving table.
Storage, Reheating, and Meal Prep for crispy thanksgiving turkey
Thanksgiving is a time for family, friends, and of course, a beautifully cooked turkey that can be the centerpiece of your holiday feast. But what happens after the last bite? Proper storage, reheating, and meal prep for your crispy Thanksgiving turkey can help you enjoy those delicious flavors long after the holiday has passed. In this section, we’ll delve into detailed instructions for storage, freezing, reheating, and meal prep strategies to ensure you make the most of your Thanksgiving turkey.
Short-term Storage
Once you’ve savored your crispy Thanksgiving turkey, you might be wondering about the best way to store the leftovers. The key to keeping your turkey juicy and flavorful is to cool it down quickly and store it in the right containers. Ideally, you want to refrigerate your turkey within two hours of cooking to prevent any bacterial growth.
To begin, carve the turkey into smaller portions. Whole birds take longer to cool, and cutting them up helps them chill faster. Store the turkey in airtight containers or wrap it tightly in aluminum foil or plastic wrap. I personally prefer using glass containers with tight-fitting lids because they’re reusable and don’t retain odors. You can also use freezer bags, making sure to press out as much air as possible before sealing them to extend freshness.
In the refrigerator, your crispy Thanksgiving turkey can last for about three to four days. If you find yourself with more turkey than you can eat within that timeframe, it’s time to consider freezing.
Freezing and Long-term Storage
Freezing is a fantastic option for extending the shelf life of your turkey. When properly stored, your crispy Thanksgiving turkey can be kept in the freezer for up to six months. To freeze, make sure the turkey is completely cooled, then portion it into meal-sized servings. This not only makes it easier to thaw but also helps prevent waste.
Use freezer-safe containers or heavy-duty aluminum foil to wrap your turkey tightly. If you’re using freezer bags, label them with the date and contents. This is a simple way to keep track of what you have in your freezer and avoid freezer burn. A tip I’ve learned over the years is to place a paper towel in the container or bag to help absorb any excess moisture, which can help maintain the quality of the turkey.
When you’re ready to enjoy your frozen turkey, the best method is to thaw it in the refrigerator overnight. This ensures it remains at a safe temperature. Avoid thawing at room temperature, as it can lead to bacterial growth. If you’re in a hurry, you can use the cold water method by sealing the turkey in a leak-proof bag and submerging it in cold water, changing the water every 30 minutes. However, this method requires more attention and care.
Reheating Best Practices
Reheating your crispy Thanksgiving turkey can be a bit tricky if you want to preserve that delightful crunch! The best way to reheat turkey is in the oven. Preheat your oven to 325°F (165°C) and place the turkey in an oven-safe dish. To keep the meat moist, add a splash of broth or water to the bottom of the dish and cover it with foil. This traps steam and prevents the turkey from drying out.
Reheat for about 20-30 minutes, depending on the portion size. If you have a meat thermometer, aim for an internal temperature of 165°F (74°C) to ensure it’s safe to eat. If you want to recreate that crispy skin, remove the foil during the last 10 minutes of reheating to allow the skin to crisp back up. I often set a timer to check on it, as I’ve had my fair share of dried turkey mishaps!
For smaller portions, you can use the microwave. However, this method can lead to uneven heating. Place the turkey on a microwave-safe plate and cover it with a microwave-safe lid or wrap it in a damp paper towel to keep it moist. Heat in short intervals, checking frequently to avoid overcooking.
Finally, let’s talk about meal prep and batch cooking strategies. If you know you’ll have leftover turkey, consider planning meals around it. You can make turkey sandwiches, soups, or even turkey pot pies. Portioning your turkey into meal-sized containers can save time throughout the week, making it easy to grab a quick lunch or dinner without compromising on flavor.
When it comes to food safety, always remember to follow the two-hour rule for cooling and the three to four-day guideline for refrigerated turkey. The USDA recommends that cooked turkey should not be left out at room temperature for more than two hours, especially during the holiday season when temperatures can vary. Always trust your senses; if it smells off or looks questionable, it’s better to err on the side of caution.
By following these storage, freezing, and reheating tips, you can enjoy your crispy Thanksgiving turkey well beyond the holiday itself. Properly stored leftovers not only reduce food waste but also allow you to savor those festive flavors long after the turkey day festivities have ended!
Nutritional Benefits and Health Information
As we gather around the table for Thanksgiving, the grand centerpiece is often a crispy Thanksgiving turkey. While it’s easy to focus solely on the delicious taste and the aroma wafting through the house, it’s also important to consider the nutritional benefits of this beloved dish. In this section, we’ll explore the nutritional breakdown, health benefits, and dietary considerations of turkey, ensuring you feel good about what you serve and eat.
Nutritional Profile
Turkey is often lauded for being a lean protein source, making it a healthy choice for many. A typical serving size of cooked turkey (about 3.5 ounces or 100 grams) contains approximately 165 calories, 30 grams of protein, 1 gram of carbohydrates, and about 3.5 grams of fat. This makes turkey an excellent option for those looking to increase their protein intake without adding excessive calories.
One of the standout features of turkey is its rich protein content, which is essential for muscle repair and growth. Protein also helps keep you feeling full longer, which can be beneficial during the indulgent holiday season. Beyond protein, turkey is a good source of several essential vitamins and minerals, including B vitamins (like niacin, B6, and B12), selenium, phosphorus, and zinc. These nutrients play crucial roles in energy metabolism, immune function, and overall health.
In terms of macronutrient distribution, turkey is primarily composed of protein, with a lower fat content compared to other meats. This makes it a versatile option for various diet plans, from low-carb to Mediterranean diets. If you’re counting macros or calories, turkey fits well into most dietary frameworks, providing substantial nutrition without excess fat.
Health Benefits
The health benefits of turkey extend beyond just its macronutrient profile. The meat is a great source of tryptophan, an amino acid that is a precursor to serotonin, which can help improve mood and promote relaxation. This is particularly relevant during the holiday season when stress levels can run high. In fact, many people joke about feeling sleepy after a big Thanksgiving meal, and while the tryptophan plays a role, it’s often the combination of a large meal and a warm, cozy environment that contributes to that feeling.
Moreover, turkey is beneficial for heart health due to its low saturated fat content. Choosing lean cuts, such as turkey breast, can significantly reduce your intake of unhealthy fats while still providing the flavor and satisfaction you crave during the holidays. Additionally, the presence of B vitamins supports heart health by helping to reduce homocysteine levels, an amino acid that, at high levels, can increase the risk of heart disease.
Dietary Considerations
When it comes to dietary considerations, turkey is generally considered a safe protein choice for most individuals, including those following gluten-free, dairy-free, or paleo diets. However, it’s essential to be mindful of added ingredients, especially if you’re using pre-marinated or processed turkey products, which may contain allergens or preservatives. For those with allergies, make sure to read labels carefully.
For individuals who are watching their sodium intake, be cautious with seasoned or brined turkeys, as these can contain higher levels of salt. While turkey is naturally low in sodium, the method of preparation can significantly impact its overall sodium content. Homemade seasoning blends using herbs and spices can enhance the flavor without the need for excess salt.
In terms of calorie content, a traditional Thanksgiving turkey meal can vary widely depending on cooking methods and side dishes. Pairing your crispy Thanksgiving turkey with healthier sides, such as roasted vegetables or whole grains, can create a balanced meal that’s not only delicious but nutritious.
As we reflect on our holiday traditions, it’s clear that turkey holds a special place not only in our kitchens but also in our hearts. Whether you enjoy it roasted, smoked, or fried, turkey offers a world of flavor and nutrition. By understanding its nutritional benefits and health implications, you can make informed choices that support your overall health and well-being while still indulging in the flavors you love. So this Thanksgiving, as you prepare to serve your crispy Thanksgiving turkey, remember that you’re not just serving a meal; you’re sharing a tradition steeped in history and rich with nutritional benefits.
Frequently Asked Questions About Crispy Thanksgiving Turkey
Crispy thanksgiving turkey recipes
To achieve a perfectly crispy Thanksgiving turkey, start by brining the turkey for at least 12 hours in a solution of water, salt, and any desired herbs or spices. This process not only enhances flavor but also helps to keep the meat juicy. After brining, pat the turkey dry thoroughly with paper towels; moisture on the skin can prevent it from crisping up. For maximum crispiness, apply a layer of melted butter or oil to the skin before roasting, and consider roasting at a high temperature for the first 30 minutes to get that golden, crunchy skin. Finally, allow the turkey to rest after cooking to ensure the juices redistribute throughout the meat.
Crispy thanksgiving turkey breast
When cooking a turkey breast for a crispy finish, begin by ensuring the skin is dry. You can achieve this by air-drying the breast in the refrigerator for several hours before cooking. Season the skin generously with salt and your choice of spices, and then rub a mixture of butter and herbs over the skin for added flavor and moisture. Roast the turkey breast at a high temperature initially—around 425°F (220°C)—for about 20-30 minutes, then reduce to 350°F (175°C) until fully cooked. This method helps the skin to crisp while keeping the meat tender and juicy.
Crispy thanksgiving turkey in oven
Roasting a turkey in the oven for a crispy skin requires some strategic preparation. First, ensure that your turkey is completely thawed and patted dry to minimize moisture. Preheat your oven to a high temperature of 450°F (232°C) for the initial roasting phase, which helps render the fat in the skin and create a crispy exterior. After about 30 minutes, reduce the temperature to 325°F (163°C) to finish cooking the turkey evenly. Basting the turkey with its own juices and using a roasting pan that allows air circulation can also contribute to a wonderfully crispy skin.
Easy crispy thanksgiving turkey
For an easy crispy Thanksgiving turkey, start with a pre-brined or pre-seasoned bird to save time. A simple rub of olive oil or melted butter combined with salt and pepper can do wonders for flavor and crispiness. Roast the turkey breast side up on a rack in a shallow pan to allow hot air to circulate around it, promoting even cooking and skin crispiness. To simplify the process further, consider spatchcocking the turkey, which involves removing the backbone so it cooks faster and more evenly, resulting in a crispier skin. Don’t forget to let the turkey rest before carving to lock in the juices!
Crispy thanksgiving turkey butterball
Cooking a Butterball turkey can yield a deliciously crispy skin if approached correctly. First, ensure the turkey is completely thawed and dry; you can use paper towels to pat it down. A key tip is to apply a mixture of melted butter and herbs directly under the skin before roasting, which infuses moisture and flavor while promoting a crispy exterior. Roast your Butterball turkey at 400°F (204°C) for the first hour and then reduce the temperature to 325°F (163°C) until the internal temperature reaches 165°F (74°C). This two-temperature method helps achieve that sought-after crispy skin while ensuring the meat remains juicy.
Best oil for crispy turkey skin
The best oils for achieving crispy turkey skin include canola oil, peanut oil, and olive oil, each offering its unique flavor and smoke point. Canola oil is favored for its neutral flavor and high smoke point, making it ideal for high-heat roasting. Peanut oil can also produce a wonderfully crispy skin due to its high smoke point and slightly nutty flavor. If you prefer a richer taste, high-quality extra virgin olive oil can be a great choice, but be sure to monitor the roasting temperature to prevent burning. Regardless of the oil you choose, applying it generously to the turkey skin before roasting is essential for achieving that desired crunch.
Juicy Thanksgiving turkey
To ensure your Thanksgiving turkey is juicy, start with a good brining process. A simple brine of water and salt, with optional aromatics like garlic and herbs, can significantly enhance moisture retention during cooking. Additionally, roasting at a consistent temperature and avoiding overcooking is crucial; using a meat thermometer to check for doneness (165°F or 74°C) can help. Another tip is to let the turkey rest for at least 20-30 minutes after cooking before carving; this allows juices to redistribute throughout the meat, resulting in a tender and flavorful turkey.
Best Thanksgiving turkey recipe
The best Thanksgiving turkey recipe balances flavor, moisture, and crispy skin. A tried-and-true method involves brining the turkey overnight for enhanced flavor and moisture, followed by seasoning the skin with a mixture of butter, herbs, and spices. Roasting the turkey at high temperatures initially helps achieve that crispy skin, with a subsequent temperature reduction for even cooking. Many cooks also recommend using aromatics such as onions, garlic, and citrus fruits in the cavity for added flavor. Finally, allowing the turkey to rest before carving is essential to lock in those delicious juices.


