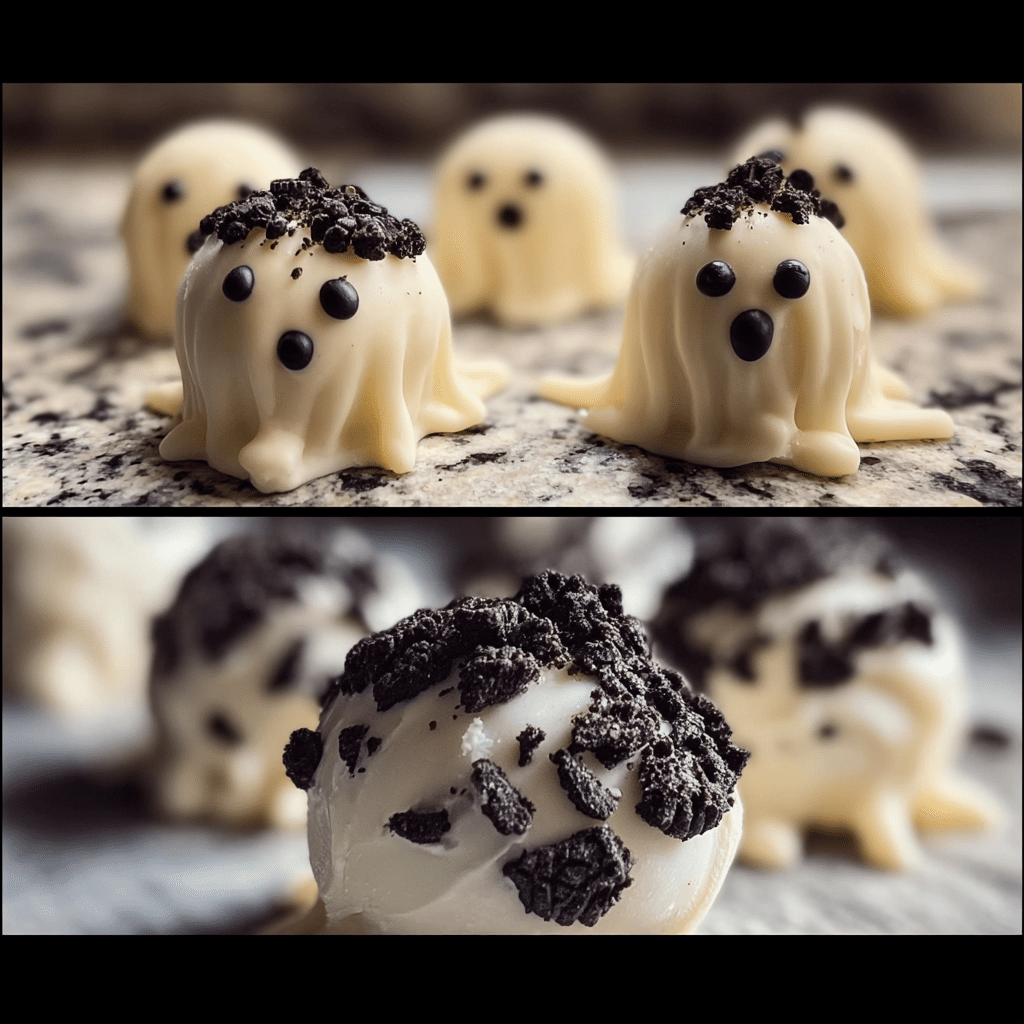
Ghost Oreo balls are the delightful, spooky treats that have taken the dessert world by storm, especially during the Halloween season. I can still remember the first time I laid eyes on these adorable little confections at a friend’s Halloween party. They were perched enticingly on a festive dessert table, their white chocolate coating shimmering under the dim lights, adorned with little chocolate chip eyes that made them look like cheerful ghosts. I was instantly drawn to them, not just for their appearance but for the aroma that wafted through the air, promising a delightful mix of flavors. That night, I made it my mission to find out how to make these ghostly wonders myself, and what followed was a journey into the world of baking that I had never imagined.

As I began to experiment with the recipe, I discovered that ghost Oreo balls are incredibly simple to whip up, requiring just a handful of ingredients: Oreo cookies, cream cheese, and white chocolate. Each step was filled with joy as I crushed the cookies and mixed them with cream cheese, creating a rich, decadent filling. Dipping them in melted white chocolate felt like an art form, and I couldn’t help but let my creativity flow as I decorated them with tiny chocolate chips for eyes. The process of crafting these treats became a bonding experience with my kids, who eagerly joined in, their laughter filling the kitchen as we transformed ordinary ingredients into spooky delights.
The Story Behind This Recipe
Ghost Oreo balls have become a staple in many households, especially around Halloween, but their origin is a little less defined. The concept of combining cookies with cream cheese isn’t new; it has roots in various dessert recipes that aim to create rich, no-bake treats. The use of Oreo cookies, however, has become synonymous with this dish, providing a unique flavor that pairs perfectly with the creamy filling. This recipe has evolved into a Halloween favorite, but it’s not just about the taste; it’s about the memories created while making them.
What makes ghost Oreo balls particularly special is their versatility. They can be made in advance, stored in the fridge, and served at parties or family gatherings without any hassle. For busy families, this recipe is a lifesaver. You can whip them up in about 30 minutes, and they require minimal ingredients. It’s the perfect solution for last-minute dessert needs or when you want to impress guests without spending hours in the kitchen. Plus, the excitement of decorating them with your kids makes it a fun family activity.
Seasonal relevance is another reason why ghost Oreo balls are so beloved. With Halloween just around the corner, these treats are not only a delicious indulgence but also a fun way to celebrate the holiday. They can easily become a part of your family’s Halloween traditions, creating lasting memories year after year. Each bite evokes a sense of nostalgia for many, reminding us of the joy of dressing up in costumes and collecting candy as children.
As we dive deeper into this article, you’ll discover everything you need to know about making ghost Oreo balls, from tips and tricks for perfecting the recipe to creative variations that will keep your family coming back for more. I promise that by the end of this guide, you’ll not only have a delicious treat to serve at your next gathering but also a heartwarming story to share about how these little ghostly delights came to be part of your culinary repertoire.
The Rich History and Cultural Significance of ghost oreo balls
The rich history and cultural significance of ghost Oreo balls are often overshadowed by their delightful appearance and taste. However, understanding where this recipe fits into the broader context of dessert traditions can enhance our appreciation for these spooky treats. Let’s take a journey through the origins and evolution of ghost Oreo balls, their cultural relevance, and even the nutritional aspects that come into play.
Origins and History
While ghost Oreo balls may seem like a modern creation, they actually stem from a long-standing tradition of combining cookies and cream cheese to create luscious dessert bites. The concept of using crushed cookies as a base for desserts can be traced back to various early American recipes, where ingenuity in the kitchen led to the creation of quick and easy sweet treats. The Oreo cookie, introduced in 1912, quickly became a favorite in American households, leading bakers to experiment with it in a multitude of recipes, including cake pops and truffles.
The specific adaptation of ghost Oreo balls likely emerged in the early 2000s, coinciding with the rise of social media and food blogs that celebrated creative baking. The combination of the iconic Oreo cookie with the creamy texture of cream cheese and a whimsical ghostly appearance made it an instant hit for Halloween celebrations. Over the years, the recipe has been simplified and popularized, making it accessible for cooks of all skill levels.
Cultural Significance
In many cultures, food plays a crucial role in celebrations, and desserts like ghost Oreo balls are no exception. In the United States, Halloween is a time for families to come together, whether it’s through costume parties, trick-or-treating, or festive gatherings. Ghost Oreo balls have become emblematic of this festive spirit, providing a fun and engaging way for families to celebrate the holiday. The act of making these treats can foster a sense of community, allowing friends and families to bond over shared experiences in the kitchen.
Moreover, ghost Oreo balls are not limited to Halloween. Their versatility allows them to be adapted for various occasions, from birthday parties to school functions. The creative potential in decorating these treats opens up a world of possibilities, allowing bakers to tailor them to fit any theme or color scheme, making them a year-round favorite.
Nutritional Benefits
While ghost Oreo balls are undoubtedly a treat, they do offer some nutritional aspects worth considering. Oreos, while high in sugar and fat, can be enjoyed in moderation, and the addition of cream cheese provides some protein and calcium. When made at home, you have the flexibility to control ingredients and portion sizes, making them a more mindful choice compared to many store-bought desserts.
Additionally, there’s something to be said for the emotional benefits of baking. Engaging in the process of creating these ghostly delights can be incredibly therapeutic. The act of baking can reduce stress, foster creativity, and create lasting memories with loved ones. So, while we indulge in the sweetness of ghost Oreo balls, we’re also nurturing our well-being and connections with family and friends.
In conclusion, ghost Oreo balls may appear to be a simple seasonal treat, but their history, cultural significance, and nutritional aspects reveal a deeper narrative. As we embrace the tradition of making these fun bites, we’re not just enjoying a delicious dessert; we’re also participating in a larger story of family, community, and creativity in the kitchen.
Essential Ingredients for Perfect ghost oreo balls
When it comes to making delicious Ghost Oreo Balls, the quality and selection of your ingredients can make all the difference. The right ingredients not only enhance the flavor but also ensure a smooth and successful preparation process. Let’s dive deep into the essential ingredients for creating these spooky treats that are perfect for Halloween or any festive occasion!
Essential Ingredients
Here’s a complete list of the ingredients you’ll need to whip up a batch of Ghost Oreo Balls:
- 36 Oreo Cookies
- 8 oz cream cheese, softened
- 2 cups white chocolate melting wafers
- 1/2 cup black melting wafers or icing
Now, let’s explore the role and importance of each ingredient in the recipe:
Oreo Cookies
Oreo cookies are the star of the show in Ghost Oreo Balls. Their rich chocolate flavor and creamy filling provide a perfect base for the dessert. When crushed, they create a crumbly texture that blends beautifully with the cream cheese. It’s essential to use fresh Oreos for the best flavor; stale cookies won’t provide the same delightful crunch. Look for seasonal limited-edition flavors, as they can add a unique twist to your Ghost Oreo Balls. However, if you’re feeling adventurous, feel free to experiment with other sandwich cookies that may suit your taste preferences.
Cream Cheese
Cream cheese is the binding agent in this recipe. It not only adds creaminess but also helps create a rich, decadent filling that complements the Oreos. Ensure your cream cheese is at room temperature for easy mixing; this will prevent lumps and create a smoother texture. When selecting cream cheese, opt for high-quality brands to avoid any artificial flavors or additives. Organic cream cheese can be a great choice if you’re looking to avoid preservatives. If you’re dairy-free, consider using vegan cream cheese alternatives, which work surprisingly well in this recipe.
White Chocolate Melting Wafers
2 cups of white chocolate melting wafers are essential for coating your Ghost Oreo Balls. They provide a sweet, creamy exterior that contrasts beautifully with the chocolatey interior. Melting wafers are preferred for their ease of use and smoother melting properties compared to standard chocolate chips. When choosing melting wafers, look for high-quality brands that use real cocoa butter for a richer taste. You can find these in craft stores, baking aisles, or online. If you want to keep it budget-friendly, store-brand options are often just as good.
Black Melting Wafers or Icing
The black melting wafers or icing are used for decorating the Ghost Oreo Balls, giving them their spooky appearance. These can be found in most baking aisles or craft stores. If you’re using icing, ensure it’s thick enough to hold its shape when piped onto the balls. Dark chocolate can also be used as a substitute for a more intense flavor. If black melting wafers aren’t available, you can always use food coloring to tint white chocolate to your desired shade of creepy black.
Print
Ghost Oreo Balls
Ingredients
- 36 Oreos I used the “Halloween” edition with orange filling
- 8 oz. cream cheese softened
- 10 oz. white vanilla melting wafers I use Ghirardelli
- chocolate chips melted, to draw faces
- black decorating gel for the eyes/faces
- candy eye balls optional
Instructions
- Line a cookie sheet with wax paper/parchment paper/a silicone mat and set aside.
- Add your Oreos to a food processor and pulse until you have fine crumbs – it should be sand-like in appearance. (or you can use a zip top bag & a rolling pin)
- 36 Oreos
- Pour the crumbs into a large mixing bowl, or the bowl of a stand mixer, and add the softened cream cheese. Mix well until fully combined.
- 8 oz. cream cheese
- Use a cookie scoop to scoop out balls of the mixture (use your hands to roll them, if necessary) and line them up on your prepared cookie sheet. Mine made 40 balls.
- Place the entire cookie sheet in the freezer for at least 30 minutes to firm them up.
- Put the white chocolate melting wafers in a microwave safe bowl and heat for about 30 seconds then stir. Continue heating at 15 second intervals and stirring until fully melted.
- 10 oz. white vanilla melting wafers
- Remove the balls from the freezer, stick them with a toothpick to use as a handle and swirl into the melted white chocolate. I used a spatula to help coat all the sides. Work quickly as it’s easier with frozen balls and warm chocolate. As the balls start to warm up, they’ll slide off the toothpick. Pop them back into the freezer if they get too warm as you’re working on them.
- Once finished dipping, let the chocolate coating harden.
- In a small microwave safe bowl, add a small handful of chocolate chips and microwave for 30 seconds, stir, then do another 15 seconds, if necessary. Let the chocolate slightly cool then spoon it into a small plastic baggie and snip off the very tip of the bag so you can draw on the faces.
- chocolate chips,black decorating gel
- Add eye balls, if desired.
- candy eye balls
Shopping Tips
When grocery shopping, consider visiting local markets or specialty stores for fresher ingredients. Many times, local bakeries will also sell quality baking supplies, including chocolate wafers. If you have a busy schedule, consider ordering ingredients online. Just make sure to check the expiration dates on products, especially on cream cheese and melting wafers, to ensure freshness.
Substitutions and Alternatives
If you have any dietary restrictions or preferences, there are plenty of substitutions you can make:
- For a gluten-free version, use gluten-free Oreo cookies or similar sandwich cookies.
- Dairy-free cream cheese alternatives are widely available and work well in this recipe.
- For a lower sugar option, look for sugar-free or reduced-sugar versions of the cookies and melting wafers.
Storage tips are crucial as well. Keep your ingredients in a cool, dry place. Cream cheese should be refrigerated and used by its expiration date. Melting wafers can be stored in an airtight container in a cool environment for several months.
In conclusion, each ingredient plays a vital role in creating the delightful Ghost Oreo Balls. By selecting high-quality ingredients and considering potential substitutions, you can ensure a delicious outcome that will impress your friends and family. So, gather your ingredients and get ready to create these spooky treats!
Detailed Step-by-Step ghost oreo balls Cooking Instructions
Now that we’ve gathered all the necessary ingredients, let’s move on to the exciting part: creating your Ghost Oreo Balls! This step-by-step guide will walk you through the entire process, ensuring you achieve the perfect spooky treat for your next gathering.
Preparation Steps
- Gather Your Ingredients: Start by gathering all your ingredients and equipment. You’ll need a mixing bowl, a food processor, a baking sheet lined with parchment paper, and a microwave-safe bowl for melting chocolate. This mise en place will make the process smoother and more enjoyable.
- Crush the Oreos: Place the 36 Oreo cookies in a food processor and pulse until they turn into fine crumbs. If you don’t have a food processor, you can place the cookies in a sealed plastic bag and crush them with a rolling pin. The finer the crumbs, the smoother your mixture will be.
- Mix with Cream Cheese: In a mixing bowl, combine the crushed Oreos with the 8 oz of softened cream cheese. Use a spatula or your hands to mix until fully combined. The mixture should be sticky and hold together well. If it’s too dry, add a little more cream cheese.
Cooking Process
- Shape the Mixture: Using your hands, scoop out small portions of the Oreo mixture (about 1 tablespoon each) and roll them into balls. Place them on the lined baking sheet. You should end up with around 24-30 balls, depending on the size.
- Chill the Balls: Once all the balls are shaped, place the baking sheet in the refrigerator for at least 30 minutes. This chilling step is crucial as it helps the balls hold their shape when coated with chocolate.
- Melt the White Chocolate: In a microwave-safe bowl, melt the 2 cups of white chocolate melting wafers. Heat them in 30-second intervals, stirring in between until completely melted and smooth. Be careful not to overheat, as this can cause the chocolate to seize.
- Coat the Oreo Balls: Remove the chilled Oreo balls from the fridge. Using a fork, dip each ball into the melted white chocolate, making sure it’s fully coated. Tap off any excess chocolate and return the coated ball to the baking sheet.
- Decorate with Black Melting Wafers or Icing: After coating, it’s time to make your ghosts come to life! Melt the black melting wafers or prepare your icing. Use a piping bag or a fork to drizzle the black chocolate over each ball, creating ghostly eyes and mouths. Alternatively, you can use edible eyes for a fun touch.
Final Assembly
- Chill Again: After decorating, place the baking sheet back in the refrigerator for about 15-20 minutes to allow the chocolate to set completely.
- Serve and Enjoy: Once the chocolate has hardened, your Ghost Oreo Balls are ready to be served! Arrange them on a spooky platter for a fantastic presentation. They can be kept in the fridge for up to a week, but I guarantee they won’t last that long!
Throughout this process, keep an eye on the temperature of your ingredients and equipment. If the chocolate starts to thicken too much, simply reheat it briefly in the microwave. One common mistake is not chilling the Oreo balls long enough; skipping this step can lead to messy results when coating them with chocolate. Remember, patience is key!
Cooking time for this recipe is approximately 30 minutes, not including chilling time. With a little planning, you can multitask by preparing other snacks or treats while the Oreo balls chill. Enjoy the process, and don’t be afraid to make it your own—whether through different decorations or flavor variations. Happy ghost ball making!

Professional Tips and Techniques for ghost oreo balls
When it comes to making ghost Oreo balls, there’s a delightful combination of simplicity and creativity that makes them a perfect treat for any occasion, especially Halloween! These little bites of joy are not only delicious but also incredibly fun to make. Whether you’re a novice in the kitchen or a seasoned pro, there are always some professional tips and techniques that can elevate your ghost Oreo balls to the next level. Let’s get into the nitty-gritty of creating these spooky sweets.
Professional Techniques
To start with, the foundation of ghost Oreo balls lies in their base ingredients: Oreo cookies and cream cheese. It’s essential to choose high-quality ingredients to ensure the best taste. When mixing the crushed Oreos with cream cheese, use a food processor for a smooth consistency. This technique prevents any chunky bits from ruining the texture of your ghost Oreo balls. If you don’t have a food processor, a sturdy zip-top bag and a rolling pin can work just as well for crushing the cookies. Just make sure to crush them finely to integrate well with the cream cheese.
In terms of chocolate coating, white chocolate is the traditional choice, providing a ghostly appearance. However, it’s crucial to melt the chocolate properly. Use a double boiler or microwave in short bursts, stirring in between to avoid overheating. If the chocolate seizes, you can add a teaspoon of coconut oil or vegetable shortening to help smooth it out. For an even more professional finish, temper the chocolate before coating your ghost Oreo balls; this gives a glossy finish and prevents the chocolate from melting too easily at room temperature.
Troubleshooting Guide
Even the best chefs can run into some hiccups while making ghost Oreo balls. One common problem is the mixture being too crumbly. If this happens, simply add a bit more cream cheese until you reach a dough-like consistency. On the other hand, if your mixture is too sticky, you can chill it in the refrigerator for about 30 minutes to make it easier to roll into balls.
Another common issue is the chocolate coating cracking or not adhering properly. If you find this happening, ensure that your Oreo balls are completely chilled before dipping them in the melted chocolate. A quick chill in the freezer for about 10 minutes can help solidify them. If you’re working with the chocolate and it thickens too much while you dip, try adding a bit of coconut oil to thin it out.
Presentation Tips
Presentation is key, especially for desserts that are as fun as ghost Oreo balls! To make them more festive, consider using cupcake liners or a decorative platter. You can also sprinkle edible glitter or Halloween-themed sprinkles on top before the chocolate sets for added flair. For a spooky touch, use mini chocolate chips for the eyes; they create a playful yet eerie effect. Alternatively, you can use melted chocolate to pipe on little eyes and mouths for a more personalized approach.
If you’re planning to serve these at a gathering, consider creating a “ghost” theme by surrounding your ghost Oreo balls with cotton candy or spider webs made from spun sugar. This not only enhances the overall presentation but also adds an element of fun to the dessert table.
Make-Ahead and Meal Prep Strategies
Ghost Oreo balls are perfect for meal prep! You can make them ahead of time and store them in the refrigerator for up to a week. For longer storage, consider freezing them. They freeze beautifully, allowing you to pull them out for unexpected guests or last-minute parties. Just make sure to wrap them well in plastic wrap or place them in an airtight container to prevent freezer burn.
When scaling the recipe up or down, simply adjust the number of Oreo cookies and cream cheese accordingly. This recipe is easily adaptable; for instance, if you want to make a smaller batch for a cozy night in, you can halve the ingredients without compromising the taste.
Lastly, when it comes to pairing beverages with your ghost Oreo balls, think of something sweet! A dessert wine, like a Riesling or Moscato, complements the sweetness of the chocolate and cream cheese beautifully. For a non-alcoholic option, a spiced apple cider can bring in a seasonal touch that pairs perfectly with the flavors of your spooky treats.
In conclusion, with these professional tips and techniques in mind, you’re well-equipped to create stunning ghost Oreo balls that will impress your friends and family. Remember, the joy of cooking lies not just in the final product but in the process itself. Have fun, experiment, and enjoy the delicious outcome!
Creative Variations and Adaptations of ghost oreo balls
As much as I adore the classic ghost Oreo balls, the beauty of baking lies in creativity! There’s an endless array of variations and adaptations that can breathe new life into this simple recipe. Whether you’re looking to cater to dietary restrictions, seasonal flavors, or simply want to experiment, there’s a variation of ghost Oreo balls waiting for you to discover. Let’s dive into some creative twists that will make your treats stand out!
Seasonal Variations
One of the most exciting aspects of ghost Oreo balls is their versatility throughout the seasons. For example, during the fall, you can incorporate pumpkin spice into the cream cheese mixture. Just add a teaspoon of pumpkin pie spice and a couple of tablespoons of pumpkin puree to the mix for a festive autumn twist. The result? Ghost Oreo balls that taste like a cozy fall treat!
As winter approaches, consider adding peppermint extract to the cream cheese mixture, and then coating the balls with white chocolate mixed with crushed candy canes. This creates a delightful minty experience that’s perfect for the holiday season. The contrast of flavors and textures will surprise and delight anyone who takes a bite.
Dietary Adaptations
In today’s world, catering to various dietary needs is essential. Luckily, ghost Oreo balls can easily be modified for different dietary preferences. For a vegan version, swap out the cream cheese for a vegan alternative and use dairy-free Oreo cookies. This way, everyone can enjoy these spooky treats without compromising their dietary choices.
If you’re looking to make ghost Oreo balls keto-friendly, consider using almond flour and sugar-free cream cheese. Instead of regular Oreos, there are low-carb cookies available that can serve as a base. Just keep in mind that the flavor might be slightly different, but the joy of creating something sweet remains!
Creative Twists
Feeling adventurous? You can add a variety of flavorings to your ghost Oreo balls. For instance, try mixing in a tablespoon of almond extract or a splash of orange zest to give your treats a unique flavor profile. You can even experiment with different coatings! Instead of white chocolate, consider using dark chocolate, or even colored candy melts to match your party theme.
Another fun twist is to turn your ghost Oreo balls into a layered dessert. Create a base of crushed Oreos mixed with melted butter in a small cup, then layer the cream cheese mixture on top and finish with a chocolate coating. This not only looks stunning but also offers a different texture experience with every bite.
If you have leftover ghost Oreo balls (which is unlikely because they’re so delicious!), consider transforming them into a milkshake. Blend them with vanilla ice cream and milk for a spooky dessert drink that’s sure to impress at any gathering.
In conclusion, the possibilities are endless when it comes to ghost Oreo balls! Whether you’re embracing seasonal ingredients, making dietary adaptations, or simply putting a creative spin on the classic recipe, these variations will keep your taste buds excited and your gatherings festive. The key is to have fun and let your creativity shine through. Happy baking!
Storage, Reheating, and Meal Prep for ghost oreo balls
When it comes to enjoying delightful treats like ghost Oreo balls, having a solid understanding of their storage, reheating, and meal prep methods can make all the difference. These little bites of joy not only shine during Halloween but are also perfect for any festive occasion. So let’s delve into the ins and outs of storing, reheating, and prepping these ghostly delights!
Short-term Storage
First things first, let’s talk about short-term storage. Once you’ve made your ghost Oreo balls, you might be wondering how to store them to keep them fresh and tasty. Ideally, these delicious morsels should be stored in an airtight container. This helps to prevent them from drying out and keeps them tasting as delightful as the moment they were made.
For refrigerator storage, place your ghost Oreo balls in a single layer within the container, making sure they are not touching each other. If you’re making a larger batch, you can use parchment paper or wax paper between layers to prevent them from sticking together. Stored this way, they can last in the refrigerator for up to one week. However, I can assure you that they rarely last that long in my house!
One of my favorite things about these ghost Oreo balls is how easy they are to whip up, so I often make a double batch. This allows me to indulge in them over several days without worrying about them going stale. If I know I won’t finish them in a week, I usually opt to freeze a portion right away. But I’m getting ahead of myself—let’s tackle freezing next.
Freezing and Long-term Storage
If you’re looking to store your ghost Oreo balls for a more extended period, freezing is the way to go. The key to successful freezing is to ensure that they are well-protected from freezer burn, which can ruin their texture and flavor. To freeze your ghost Oreo balls, start by placing them on a baking sheet lined with parchment paper. This prevents them from sticking together while they freeze. I usually pop the baking sheet into the freezer for about an hour, just until the balls are firm. This step helps maintain their shape and makes it easier to store them in bulk.
Once frozen, transfer the ghost Oreo balls to a freezer-safe airtight container or a zip-top bag. Make sure to remove as much air as possible from the bag before sealing it. Label the container or bag with the date made so you can keep track of how long they’ve been in there. Properly stored, they can last in the freezer for up to three months. I love having a stash of these on hand for unexpected guests or a late-night snack attack!
Reheating Best Practices
While ghost Oreo balls are typically enjoyed cold or at room temperature, you can also soften them up a bit if they’ve been in the freezer. The best way to do this is by transferring them from the freezer to the refrigerator for a few hours before serving. This gradual thawing helps maintain their texture and flavor. If you’re in a hurry, you can leave them out at room temperature for about 30 minutes to an hour before indulging.
It’s essential to avoid using a microwave to reheat them, as this can cause the chocolate coating to become too soft and lose its delightful crunch. Instead, think about serving them slightly chilled — many of my friends actually prefer them this way! It’s a fun little twist that adds to the overall experience of enjoying these ghostly treats.
Meal Prep and Batch Cooking Strategies
Meal prepping with ghost Oreo balls is a fantastic way to ensure you always have a sweet treat on hand. I often prepare a large batch at the beginning of the week, especially around Halloween when they’re in high demand. When prepping, I like to make several variations of the recipe to keep things interesting. You can switch up the flavors by using different types of Oreos or adding a splash of flavored extract to the cream cheese mixture.
For effective meal prep, portion out the ghost Oreo balls into snack-sized bags or containers. This way, when my kids (and let’s be honest, I too!) are craving something sweet, we can grab a pre-portioned treat without overindulging. It also makes sharing easy for school lunches or parties. Just be sure to note the serving sizes so everyone knows a little goes a long way!
Food Safety Considerations and Guidelines
Food safety is crucial when it comes to storing and enjoying treats like ghost Oreo balls. Always start with clean hands and utensils to prevent contamination. After preparing your ghost Oreo balls, ensure they are cooled completely before storing them to prevent condensation, which can lead to sogginess.
As for shelf life, I recommend keeping a close eye on any ingredients with shorter expiry dates, such as cream cheese or whipped cream. If you notice any off smells or textures, it’s best to err on the side of caution and discard them. Remember, while these treats are delicious, your health and safety come first!
In conclusion, ghost Oreo balls are a delightful treat that can be stored, frozen, and prepped with ease. With a few simple steps, you can ensure they stay fresh, delicious, and ready to enjoy whenever the craving strikes. Whether you’re planning a Halloween party or just want a sweet snack at home, proper storage and meal prep can help you savor every last bite!
Nutritional Benefits and Health Information
When indulging in sweet treats like ghost Oreo balls, it’s essential to consider their nutritional aspects. While these delightful desserts are undeniably delicious, understanding their nutritional benefits can help you enjoy them mindfully. So let’s dive into the world of nutrition and discover what makes these ghostly delights tick!
Nutritional Profile
At first glance, ghost Oreo balls may not seem like the healthiest option. However, when made with care, they can be enjoyed within a balanced diet. A typical ghost Oreo ball consists of crushed Oreos, cream cheese, and chocolate coating. Here’s a breakdown of key ingredients:
- Oreos: A standard serving of two Oreo cookies equals about 140 calories, 7 grams of fat, and 25 grams of carbohydrates. The sugar content is significant, which is something to consider if you’re watching your sugar intake.
- Cream Cheese: This adds richness and creaminess to the ghost Oreo balls. A tablespoon of cream cheese contains about 50 calories and 5 grams of fat. Choosing low-fat or reduced-calorie cream cheese can help lower the overall calorie count.
- Chocolate Coating: Depending on whether you use milk, dark, or white chocolate, the calorie content can vary. A typical serving of melted chocolate can add around 50-100 calories to each ball.
Considering these factors, each ghost Oreo ball may contain approximately 100-150 calories, depending on your portion size and the products used. While this isn’t exactly a low-calorie treat, it’s all about moderation and enjoyment!
Health Benefits
While we often think of sweets in terms of indulgence, there are some benefits to be aware of. For one, the joy that comes from enjoying a sweet treat can have psychological benefits. Sharing these ghost Oreo balls with friends and family creates memorable moments and fosters connection, which is crucial for mental well-being.
Moreover, if you decide to make a healthier version by incorporating alternatives like whole grain cookies or using natural sweeteners, you can enhance the nutritional profile. For example, whole grain Oreos may provide additional fiber, which can aid digestion and keep you feeling fuller for longer. Additionally, dark chocolate, when used as a coating, has been associated with various health benefits, including improved heart health due to its antioxidant properties.
Dietary Considerations
When it comes to dietary considerations, ghost Oreo balls can present some challenges. They are not suitable for those with gluten intolerance or celiac disease due to the traditional Oreos used. However, many brands now offer gluten-free cookies that can be substituted seamlessly in the recipe.
In terms of allergens, the standard ingredients include dairy (cream cheese) and may include nuts or soy depending on the chocolate used. It’s vital to be mindful of any allergies when preparing these treats for gatherings. Always check labels and consider alternatives like vegan cream cheese or dairy-free chocolate for those with dietary restrictions.
For those watching their sugar intake, consider making a version using sugar-free cookies and cream cheese. While the texture and taste may vary slightly, it’s a great way to enjoy ghost Oreo balls without the added sugar. They can still be a fun treat that fits into a low-sugar lifestyle.
In conclusion, ghost Oreo balls are a delicious indulgence that can be enjoyed with a little mindfulness regarding nutrition. Understanding their nutritional profile, health benefits, and dietary considerations allows you to savor these treats while maintaining balance in your diet. So go ahead, whip up a batch, and enjoy these sweet little bites of joy!
Frequently Asked Questions About Ghost Oreo Balls
What is a ghost oreo balls recipe?
A ghost Oreo balls recipe typically involves crushing Oreo cookies and mixing them with cream cheese to form a dough-like consistency. Once combined, the mixture is rolled into small balls and then dipped in white chocolate to create a ghostly appearance. To enhance the spooky effect, you can use mini chocolate chips or black icing to add eyes on the ghostly treats. For an even richer flavor, consider using double-stuffed Oreos, and don’t forget to chill the balls in the refrigerator for at least 30 minutes before dipping to ensure they hold their shape.
What are Oreo monster balls?
Oreo monster balls are a fun variation of the classic Oreo balls, designed to resemble playful monsters. To make them, you follow the same basic recipe of crushing Oreos and mixing with cream cheese, but you can get creative with the decoration. After dipping the balls in colored chocolate or candy melts, use assorted candies like gummy worms, candy eyes, or edible glitter to give them a quirky monster look. Adding a splash of food coloring to the melted chocolate can also help achieve a vibrant monster hue, making them perfect for Halloween parties.
How can I make spider Oreo balls?
Spider Oreo balls are a spooky twist on the traditional Oreo treat that are perfect for Halloween. Start by preparing the classic Oreo ball mixture of crushed Oreos and cream cheese, then roll them into balls and chill as usual. For the spider effect, dip the chilled balls in dark chocolate and allow the excess to drip off. Use thin pretzel sticks to create spider legs by inserting four sticks on each side, and add candy eyes for the finishing touch. To make it even spookier, consider adding a drizzle of white chocolate to mimic spider webs on top of the spider Oreo balls.


