Grandma Dot’s stuffing is more than just a side dish; it’s a cherished family recipe that has been passed down through generations, each batch infused with love, laughter, and the delightful aromas of home. I remember the first time I had it; it was during a bustling family gathering at my grandmother’s house. The air was thick with the savory scent of roasted turkey and spices, but it was the stuffing that caught my attention. As I took my first bite, I was enveloped in a warm, comforting embrace that only a home-cooked meal can provide. Little did I know that this delicious concoction of bread, herbs, and secret ingredients would become my go-to recipe for every holiday and family dinner, marking special moments with its unmistakable flavor.
The Story Behind This Recipe
Growing up, my family had a tradition of gathering around the table every Sunday for a big dinner, and grandma dot’s stuffing was always the centerpiece. My grandmother, Dot, was a master in the kitchen, and she loved to share her cooking secrets with anyone willing to listen. I remember sitting on a stool, wide-eyed and full of curiosity, as she meticulously explained each step of her stuffing process. She would say, “Cooking is like storytelling; each ingredient adds a new chapter.” Her stuffing was unique; it combined day-old bread, freshly chopped herbs, and a hint of something special that I later discovered was a secret family spice mix. It was her way of connecting with us, teaching us the importance of family and tradition one meal at a time.
What makes grandma dot’s stuffing particularly special is its adaptability. It’s not just a recipe; it’s a canvas for creativity. Whether you’re adding dried cranberries for a touch of sweetness or swapping out traditional herbs for something a bit more adventurous, the foundation of the stuffing remains comforting and familiar. This flexibility is what makes it perfect for busy families looking for quick dinner solutions. You can prepare it ahead of time, pop it in the oven, and enjoy a delicious meal without the stress of last-minute cooking. There’s nothing quite like the satisfaction of serving a homemade dish that not only tastes great but also carries a legacy of love and togetherness.
Why You’ll Love This Dish
As the seasons change, so does our desire for comforting meals. Grandma dot’s stuffing is particularly relevant during the fall and winter months. The holidays are a time for families to come together, and what better way to celebrate than with a dish that embodies warmth and nostalgia? Whether you’re serving it alongside Thanksgiving turkey or a cozy winter roast, this stuffing will elevate any meal to a celebration. It’s a dish that sparks conversation and invites memories to be shared over the dinner table.
There’s an emotional connection to grandma dot’s stuffing that goes beyond just food. It represents family gatherings, laughter echoing through the house, and the joy of sharing stories with loved ones. Each time I make it, I am reminded of my grandmother’s gentle spirit and her love for family. It’s a reminder that food is not just about sustenance; it’s about connection, tradition, and the bonds we share. This recipe is a promise of warmth and comfort, a dish that brings people together no matter the occasion.
In this guide, you’ll discover not only the recipe for grandma dot’s stuffing but also the rich history behind it, tips for making it your own, and ways to incorporate it into your family meals. Whether you’re a seasoned cook or just starting, you’ll find that this stuffing is accessible, delicious, and a beautiful way to create memories with those you love. So, let’s dive into the heartwarming world of grandma dot’s stuffing and uncover its secrets together!
The Rich History and Cultural Significance of grandma dot’s stuffing
The culinary landscape of America is a mosaic of flavors, traditions, and stories, none more comforting than grandma dot’s stuffing. This dish has its roots deeply embedded in the rich soil of family traditions and regional variations, making it a beloved staple during festive occasions and family gatherings. The history of stuffing can be traced back to ancient times when cooks would fill the cavities of meats with various ingredients to enhance flavor and texture. Over the years, this practice evolved into the delicious stuffing we know today, often served as a side dish accompanying poultry during holiday feasts.
Origins and History
Stuffing, as a culinary practice, can be found in many cultures, often referred to as “filling” or “dressing.” In fact, the term “stuffing” is believed to have originated in the 14th century, deriving from the French word “farcir,” meaning to fill. As settlers brought their culinary traditions to the New World, stuffing began to take on a distinctly American flavor, incorporating locally available ingredients such as cornbread, sage, and even fruits. Grandma dot’s stuffing reflects these historical influences while adding a personal touch that makes it unique.
In my family, the recipe has been adapted through generations, each adding their own spin while maintaining the essence of Grandma Dot’s original creation. The traditional base of day-old bread, combined with fresh herbs, onion, and celery, serves as a canvas for creativity. My grandmother often experimented with various add-ins like sausage, nuts, or dried fruits, making the stuffing a reflection of seasonal ingredients and family preferences. This evolution showcases how food is a living tradition that grows and changes with each generation.
Cultural Significance
Grandma dot’s stuffing holds a special place in our hearts, particularly during the holidays. Thanksgiving, Christmas, and other family celebrations are incomplete without it. It serves as a reminder of family gatherings, where people come together to share not only food but also stories, laughter, and love. In many cultures, stuffing is often associated with abundance and gratitude, making it a fitting dish for celebrations that honor togetherness.
Nutritional Benefits
When it comes to nutrition, grandma dot’s stuffing can be surprisingly wholesome, especially when made with whole grain bread and plenty of vegetables. The base of bread provides carbohydrates for energy, while the addition of onions, celery, and herbs contributes vitamins and minerals essential for a balanced diet. Additionally, incorporating protein-rich ingredients like sausage or nuts can enhance the nutritional profile, making it a more satisfying dish.
One of the best things about making stuffing at home is the ability to control the ingredients. You can easily adjust the recipe to cater to dietary restrictions or preferences, swapping out gluten-containing bread for gluten-free varieties or using vegetable broth instead of chicken broth for a vegan option. This adaptability not only makes it a dish for everyone but also allows families to create their own traditions around it, ensuring that grandma dot’s stuffing remains a beloved part of their holiday celebrations for years to come.
In conclusion, grandma dot’s stuffing is not just a recipe; it’s a testament to the power of food in bringing people together. Its rich history, cultural significance, and versatility make it a cherished dish that continues to evolve while retaining its comforting essence. As you dive into making this stuffing, remember that you are participating in a long-standing tradition that celebrates family, love, and the joy of sharing a meal together.
Essential Ingredients for Perfect grandma dot’s stuffing
When it comes to creating the perfect grandma dot’s stuffing, the foundation lies in the ingredients. Each component plays a crucial role in building flavor, texture, and the overall experience of this beloved dish. Whether you’re making it for the holidays or just a cozy family dinner, understanding these ingredients is key to mastering grandma dot’s stuffing.
Essential Ingredients
Here’s a complete list of the essential ingredients you’ll need to craft your own delicious grandma dot’s stuffing:
- ¾ cup butter
- ½ cup diced onion
- ½ cup diced celery
- 1 ½ teaspoons salt
- 1 teaspoon poultry seasoning
- ½ teaspoon ground black pepper
- ½ cup chicken broth
- 2 large eggs
- 10 cups cubed whole wheat bread
- ½ cup chopped fresh parsley
Now, let’s dive deeper into the role of each ingredient in grandma dot’s stuffing.
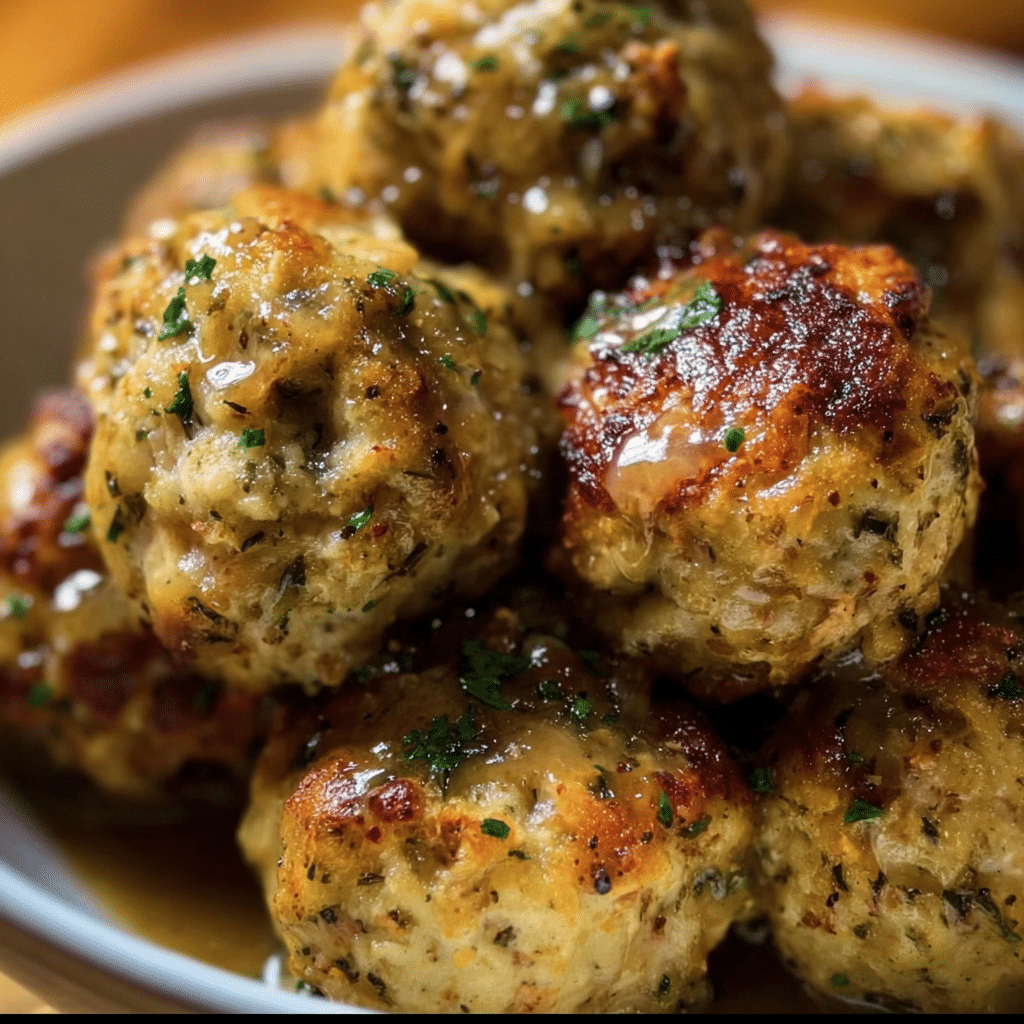
Print
Grandma Dot’s Stuffing Balls Categories
Ingredients
- ¾ cup butter
- ½ cup diced onion
- ½ cup diced celery
- 1 ½ teaspoons salt
- 1 teaspoon poultry seasoning
- ½ teaspoon ground black pepper
- ½ cup chicken broth
- 2 large eggs
- 10 cups cubed whole wheat bread
- ½ cup chopped fresh parsley
Instructions
- Gather all ingredients. Preheat the oven to 375 degrees F (190 degrees C). Line a baking sheet with aluminum foil; grease the foil.
- Melt butter in a large skillet over medium heat. Add onion and celery; cook and stir until softened, about 5 minutes. Stir in salt, poultry seasoning, and pepper; cook and stir until fragrant, about 1 minute.
- Meanwhile, whisk chicken broth and eggs together in a large bowl. Fold in bread cubes and parsley.
- Add onion mixture to bread cubes; mix until combined.
- Use your hands to shape mixture into 24 (2-inch) balls; arrange on the prepared baking sheet.
- Bake in the preheated oven until golden and crisp, about 20 minutes.
- Serve and enjoy!
Butter
Butter serves as the base of flavor in grandma dot’s stuffing. It adds richness and helps to sauté the vegetables, which brings out their natural sweetness. When selecting butter, opt for unsalted to control the salt levels in your dish. Look for high-quality brands that use cream from grass-fed cows for the best flavor. Remember, butter can be stored in the fridge for several months or frozen for longer periods.
Onion and Celery
These aromatic vegetables are essential for creating a flavor base. Diced onion provides sweetness and depth, while celery contributes a crunchy texture. Fresh is best; look for firm, unblemished vegetables. Seasonal availability means you can find these year-round, but they are freshest in late summer and fall. Store them in a cool, dark place; onions can last for weeks, while celery should be kept in the fridge.
Salt and Seasonings
Salt is crucial for enhancing flavors in grandma dot’s stuffing. The 1 ½ teaspoons in the recipe will help marry all the flavors together. The poultry seasoning adds a quintessential holiday flavor, combining herbs like sage, thyme, and rosemary. Always choose high-quality sea salt and organic seasonings when possible to avoid additives. Salt can be stored indefinitely, while spices should be kept in a cool, dark place.
Ground Black Pepper
This spice adds warmth and subtle heat to grandma dot’s stuffing. Freshly ground black pepper is always preferable as it provides a more robust flavor. Store your pepper in a sealed container away from light to maintain its potency.
Chicken Broth
This ingredient adds moisture and savory flavor. You can use homemade or store-bought broth; just ensure it’s low-sodium if you’re watching your salt intake. When buying, look for brands that use organic chicken and natural ingredients. Store broth in the fridge for a week or freeze it for longer preservation.
Eggs
Eggs act as a binder in grandma dot’s stuffing, helping to hold the mixture together. Always choose fresh, organic eggs, which not only taste better but are also free from harmful additives. Store eggs in their original carton in the fridge for optimal freshness.
Whole Wheat Bread
Using cubed whole wheat bread adds a nutty flavor and hearty texture to your stuffing. Choose a good-quality bread without preservatives for the best results. You can even make your own bread a day or two before making the stuffing. Store bread in a cool, dry place, and it can last for several days.
Fresh Parsley
This herb adds a pop of color and a fresh, vibrant taste to grandma dot’s stuffing. Opt for bright green leaves and avoid any with wilting or browning. Fresh parsley can last up to a week in the fridge, and you can also freeze it for longer storage.
Shopping Tips
When preparing to shop for grandma dot’s stuffing, consider visiting local farmers’ markets for the freshest produce. For pantry staples like butter, broth, and spices, check the local grocery store’s organic section for quality options. Don’t hesitate to ask store employees for the freshest items; they often know their stock better than anyone.

Substitutions and Alternatives
If you’re catering to dietary restrictions, there are plenty of substitutions. For a dairy-free version, use olive oil instead of butter and a vegetable broth in place of chicken broth. Gluten-free bread can replace whole wheat bread, ensuring everyone can enjoy grandma dot’s stuffing. Always taste as you go to adjust seasoning and flavors to your liking.
With all these ingredients gathered and understood, you’re well on your way to creating a delicious batch of grandma dot’s stuffing. It’s a dish that not only fills the belly but also warms the heart, evoking memories of family gatherings and holiday cheer.
Detailed Step-by-Step grandma dot’s stuffing Cooking Instructions
Now that you have all the essential ingredients for grandma dot’s stuffing, it’s time to delve into the step-by-step cooking process. Creating this dish is a labor of love that requires attention to detail, but with my detailed guide, you’ll be able to make it like a pro.
Preparation Steps
- Gather Your Ingredients: Start by assembling all your ingredients. This mise en place approach ensures you have everything at your fingertips, making the cooking process smoother.
- Cube the Bread: Take your whole wheat bread and cut it into ½ inch cubes. Spread them out on a baking sheet and let them dry out overnight. If you’re short on time, you can toast them in the oven at 300°F for 15-20 minutes, stirring occasionally until they’re slightly golden.
- Prepare the Vegetables: Dice your onion and celery finely. The smaller the pieces, the better they’ll integrate into the stuffing. A sharp knife and a stable cutting board are essential for safety and efficiency.
- Chop the Parsley: Wash and finely chop the fresh parsley. This adds a vibrant color and fresh taste to the stuffing.
- Beat the Eggs: In a separate bowl, crack the two large eggs and beat them until fully mixed. This will help bind your stuffing together.
Cooking Process
- Sauté the Vegetables: In a large skillet, melt ¾ cup of butter over medium heat. Once melted, add the diced onion and celery. Sauté for about 5-7 minutes or until the onion is translucent and the celery is tender. This step is crucial as it builds the flavor base for grandma dot’s stuffing.
- Add Seasonings: Once the vegetables are softened, stir in 1 ½ teaspoons of salt, 1 teaspoon of poultry seasoning, and ½ teaspoon of ground black pepper. Let these cook for another minute to bloom the spices.
- Combine with Bread: In a large mixing bowl, combine the sautéed vegetable mixture with the cubed bread. Toss gently to combine, allowing the bread to soak up those delicious flavors.
- Add Liquid: Pour in ½ cup of chicken broth, ensuring the bread is moistened but not soggy. Then, add the beaten eggs and chopped parsley. Mix everything together until well combined.
- Check Consistency: The stuffing should be moist but not overly wet. If it seems too dry, add a bit more broth. If it’s too wet, add more bread cubes, adjusting as needed.
Final Assembly
- Preheat Your Oven: Preheat your oven to 350°F (175°C). This temperature allows for even cooking and crisping on top.
- Transfer to Baking Dish: Grease a 9×13 inch baking dish with a bit of butter or cooking spray. Transfer the stuffing mixture into the dish, spreading it out evenly.
- Bake: Place your dish in the preheated oven and bake for about 30 minutes. Look for a golden-brown top and a fragrant aroma that fills your kitchen, signaling that your grandma dot’s stuffing is nearly ready.
- Cool and Serve: Once done, remove the stuffing from the oven and let it cool for a few minutes before serving. This resting time allows the flavors to meld beautifully.
Throughout the cooking process, pay attention to visual cues like color and texture. If you notice the top browning too quickly, you can cover it with aluminum foil. Common mistakes include overcooking the vegetables or not allowing the bread to dry out properly, leading to a mushy stuffing, so keep these tips in mind.
For equipment, a large skillet for sautéing and a solid mixing bowl for combining ingredients are essential. You may also want a spatula and a baking dish for the final bake. Timing is key; multitask by preparing your ingredients while the vegetables sauté to save time.
Cooking grandma dot’s stuffing is not just a culinary task; it’s a celebration of family traditions and comforting flavors. With these detailed instructions, you’re sure to create a memorable dish that will be cherished for years to come.
Professional Tips and Techniques for grandma dot’s stuffing
When it comes to creating the perfect grandma dot’s stuffing, there’s so much more that goes into it than just following a recipe. It’s an art, a science, and a cherished tradition. Here, I’ll share some professional tips and techniques that can elevate your stuffing game, ensuring that each bite is packed with flavor and nostalgia.
Professional Techniques
First and foremost, let’s talk about the foundational elements of grandma dot’s stuffing. The choice of bread is crucial. While traditionalists may opt for white bread, consider using a mix of sourdough, whole grain, and even cornbread for a more complex flavor profile. Day-old bread is best because it’s drier, allowing it to absorb the broth without becoming mushy.
When you’re ready to get started, tearing the bread into chunks instead of cutting it is essential. This method allows for more surface area, which will soak up the delicious broth and seasonings you’ll be adding later. For a rich flavor base, sauté onions, celery, and garlic in butter until they are soft and slightly caramelized. This step is crucial as it builds a depth of flavor that is the hallmark of grandma dot’s stuffing.
Herbs are another key player. Fresh herbs like sage, thyme, and parsley can elevate the stuffing from ordinary to extraordinary. If you’re using dried herbs, remember that they are more potent, so adjust accordingly. A general rule of thumb is to use one-third the amount of dried herbs as you would fresh.
Don’t forget about the broth! Using homemade broth can make all the difference. If you don’t have the time, opt for a high-quality store-bought version. Remember to season it well; the broth should be flavorful enough to infuse the stuffing with taste.
One insider secret is to allow your stuffing to sit for a bit after mixing before you cook it. This resting period allows the flavors to meld beautifully. If you’re using eggs for binding, make sure they’re well-beaten and incorporated evenly into the mixture.
Troubleshooting Guide
Even the best cooks can run into problems when making grandma dot’s stuffing. One common issue is dryness. If your stuffing turns out dry, try adding a bit more broth or melted butter. It’s crucial to taste your mixture before baking; it should be moist but not soggy.
Another common problem is a stuffing that is too mushy. This might occur if you don’t use enough bread or if your broth is overly salty. To remedy this, you can add more bread or even some cooked rice to balance out the texture.
If you find that your stuffing lacks flavor, consider the seasonings. A pinch of salt can often enhance the overall taste. Additionally, consider adding a splash of apple cider or a drizzle of honey for a hint of sweetness that complements savory notes beautifully.
Presentation Tips
Presentation is key, especially for a dish as beloved as grandma dot’s stuffing. After baking, consider serving it in a hollowed-out pumpkin or squash for a seasonal touch. You can also garnish with fresh herbs like parsley or thyme to add a pop of color.
For individual servings, consider using ramekins. This not only looks elegant but also allows everyone to have their own serving, making it a great option for holiday gatherings.
Pairing your grandma dot’s stuffing with the right beverages can enhance the dining experience. A light white wine, such as a Sauvignon Blanc, can complement the flavors beautifully. Alternatively, a refreshing cider can add a nice touch, especially in the fall. If you prefer non-alcoholic options, consider a sparkling apple cider or a ginger ale with a splash of cranberry juice.
Lastly, don’t forget about the power of the aroma. When you pull your stuffing from the oven, let it rest for a few minutes. This will help the flavors settle and allow the steam to escape, ensuring your stuffing retains its texture. The smell will draw everyone in, creating an inviting atmosphere that’s perfect for sharing a meal.
Creative Variations and Adaptations of grandma dot’s stuffing
As much as we love the classic grandma dot’s stuffing, there’s a world of creativity waiting to be explored. Whether you’re looking to cater to dietary preferences, embrace seasonal ingredients, or just want to try something new, these variations will inspire your next stuffing adventure.
Seasonal Variations
One of the joys of cooking is adjusting your recipes based on the seasons. In the fall, consider adding roasted butternut squash or pumpkin to your grandma dot’s stuffing. These ingredients not only add flavor but also a beautiful color contrast. In winter, try incorporating dried cranberries or figs for a touch of sweetness that contrasts nicely with savory flavors.
Spring brings an abundance of fresh herbs and vegetables. Adding asparagus or peas can create a vibrant and fresh stuffing, while summer is perfect for tossing in some grilled corn or zucchini. Don’t be afraid to experiment with flavors; mixing in seasonal ingredients can create a stuffing that’s uniquely yours.
Dietary Adaptations
As dietary preferences evolve, so too can grandma dot’s stuffing. For those following a keto lifestyle, consider using cauliflower rice instead of bread. This swap keeps the dish low-carb while still providing a filling side. For a gluten-free option, there are many gluten-free breads available that can work beautifully in this recipe.
If you’re cooking for vegans, you can easily adapt the stuffing by omitting eggs and using vegetable broth instead of chicken or turkey broth. Adding nuts or seeds can provide a satisfying crunch, while mushrooms can add a hearty texture that’s often missed in vegan dishes.
Creative Twists
Why not add a fusion twist to your grandma dot’s stuffing? Think about incorporating ingredients from different cuisines. For a Mexican-inspired twist, add chorizo, black beans, and spices like cumin and coriander. For an Italian take, consider adding sausage, sun-dried tomatoes, and plenty of garlic and basil.
Don’t forget about cooking methods! While the classic oven-baked stuffing is always a hit, consider trying stovetop stuffing for a quicker option. A slow cooker can also be a game-changer, allowing for a hands-off approach that’s perfect for busy holiday gatherings. Just be sure to keep an eye on the moisture levels, as slow cookers can sometimes dry out the stuffing if not enough liquid is added.
Leftovers can also be transformed into something new. Turn leftover grandma dot’s stuffing into stuffing muffins by mixing it with some eggs and cheese, then baking it in a muffin tin for a delightful breakfast treat. Or, use it as a filling for stuffed peppers or mushrooms, creating a whole new dish that’s just as comforting.
In conclusion, the world of grandma dot’s stuffing is as vast as it is delicious. Whether you stick with the classic recipe or venture into creative variations, this dish holds the power to bring family and friends together, making it a cherished part of any meal.
Storage, Reheating, and Meal Prep for grandma dot’s stuffing
When it comes to Grandma Dot’s stuffing, the love and tradition that go into each batch are just as important as the recipe itself. But just like any cherished family dish, knowing how to store, reheat, and prepare it for future meals can make a world of difference. In this section, we’ll dive deep into the best practices for storing Grandma Dot’s stuffing, ensuring that its flavors and textures remain as delightful as the day it was made.
Short-term Storage
After you’ve whipped up a delicious batch of Grandma Dot’s stuffing, you may find yourself with more than you can eat in one sitting. No worries! Proper short-term storage is crucial for maintaining its freshness. First and foremost, allow the stuffing to cool completely at room temperature for about an hour. This step is vital as it prevents condensation from forming in your storage container, which can lead to sogginess.

Once cooled, transfer the stuffing into an airtight container. Glass containers with tight-fitting lids are excellent for this purpose, as they don’t retain odors and are easy to clean. If you’re in a pinch, high-quality plastic containers will suffice, but make sure they are BPA-free to avoid any health concerns.
Stored in the refrigerator, Grandma Dot’s stuffing can last for about 3 to 4 days. I always recommend labeling your container with the date it was made to keep track of freshness. If you find yourself unsure about its safety, a quick sniff test should help—if it smells off, it’s better to err on the side of caution and toss it.
Freezing and Long-term Storage
For those who want to enjoy Grandma Dot’s stuffing long after Thanksgiving, freezing is an excellent option. Not only does it extend the shelf life, but it also allows you to savor this delicious dish whenever the craving strikes. To freeze, start by portioning the stuffing into meal-sized servings. This not only makes reheating easier but also prevents you from defrosting more than you need.
Use freezer-safe bags or containers for storage. If you opt for bags, remove as much air as possible before sealing to prevent freezer burn. This is a technique I’ve learned the hard way over the years! Label each bag or container with the date and contents to keep your freezer organized.
When stored correctly, Grandma Dot’s stuffing can last for up to 3 months in the freezer without losing its quality. However, for the best taste and texture, it’s ideal to consume it within the first month. Remember, while freezing preserves the stuffing, some of the delicate herbs and spices might lose potency over time.
Reheating Best Practices
Reheating Grandma Dot’s stuffing is an art in itself. The goal is to bring it back to its original glory without drying it out. For best results, I recommend using the oven. Preheat your oven to 350°F (175°C) and place the stuffing in an oven-safe dish. Add a splash of chicken or vegetable broth to keep it moist, then cover the dish with aluminum foil to trap steam. Heat for about 20-30 minutes, or until warmed through.
If you’re short on time, the microwave is a quick alternative for reheating. Transfer a portion of the stuffing to a microwave-safe bowl, add a bit of broth, and cover it with a microwave-safe lid or plastic wrap, leaving a small vent to allow steam to escape. Heat in short intervals, stirring in between, until heated throughout. Just be cautious: microwaving for too long can result in dry stuffing.
As you prepare to enjoy the leftovers, it’s essential to keep food safety in mind. Never leave cooked stuffing at room temperature for longer than two hours. If you’re unsure about how long it has been sitting out, it’s always best to play it safe and throw it away.
When planning for future meals, consider meal prep as a way to make life easier. Make a double batch of Grandma Dot’s stuffing and store half in the freezer for a quick side dish later on. This not only saves you cooking time but also allows you to enjoy a taste of home anytime you want!
In conclusion, whether you’re storing Grandma Dot’s stuffing for a few days or saving it for a cold winter evening, these storage methods and reheating tips will help you maintain its delightful taste and texture. With proper care, you can keep the memories and flavors of Grandma Dot’s stuffing alive for days to come.
Nutritional Benefits and Health Information
When we think of Grandma Dot’s stuffing, it’s easy to get swept away by the nostalgia of family gatherings and holiday feasts. However, understanding the nutritional benefits and health information about this beloved dish is equally important. In this section, we’ll explore the ingredients that make up Grandma Dot’s stuffing, highlighting the nutritional profiles, health benefits, and dietary considerations.
Nutritional Profile
Typically, Grandma Dot’s stuffing is made with a blend of bread, vegetables, herbs, and broth, making it a delightful medley of flavors and nutrients. The primary ingredient, bread, serves as the base and can vary from white to whole grain, with whole grain options providing more fiber and nutrients.
On average, a serving of stuffing (about 1 cup) can contain around 200-300 calories, depending on the ingredients used. The calorie count may fluctuate based on the type of bread, the amount of broth, and any added ingredients like sausage or nuts. In terms of macronutrient distribution, stuffing generally contains:
- Carbohydrates: 30-40g
- Protein: 5-10g
- Fat: 5-15g
One of the standout features of Grandma Dot’s stuffing is its rich flavor profile, thanks to the seasoning and the addition of vegetables like celery and onions. These ingredients not only enhance taste but also contribute vitamins and minerals, making the dish a well-rounded option.
Health Benefits
Let’s take a closer look at some of the key ingredients in Grandma Dot’s stuffing and their health benefits. For instance, whole grain bread is an excellent source of complex carbohydrates, providing sustained energy and dietary fiber, which aids in digestion. Fiber is essential for maintaining a healthy gut and can help reduce cholesterol levels, making it beneficial for heart health.
Vegetables like celery and onions offer additional vitamins and minerals, including vitamin K, vitamin C, and various antioxidants. These nutrients are known for their health-promoting properties, such as supporting the immune system and reducing inflammation. Additionally, herbs like sage and thyme not only add flavor but also come with their own set of health benefits, including antimicrobial properties and digestive support.
Moreover, if you choose to add nuts or seeds to your stuffing, you’ll be incorporating healthy fats, protein, and additional fiber. Nuts like walnuts or pecans are high in omega-3 fatty acids, which are beneficial for brain health and reducing inflammation.
Dietary Considerations
While Grandma Dot’s stuffing is a delicious addition to any meal, it’s essential to consider dietary restrictions and allergens. Traditional recipes may use ingredients such as bread that contains gluten, making it unsuitable for individuals with celiac disease or gluten intolerance. Fortunately, there are gluten-free bread options available that can be substituted without sacrificing flavor.
For those watching their sodium intake, it’s crucial to keep an eye on the broth used in the recipe. Many store-bought broths can be high in sodium, so opting for low-sodium versions or making your own broth can help manage salt levels.
As we navigate various diet plans, Grandma Dot’s stuffing can fit into many lifestyles with a few modifications. For example, if you’re following a vegetarian or vegan diet, simply use vegetable broth and skip any meat additions. Furthermore, you can lighten the dish by using less bread and incorporating more vegetables or using whole grain bread for added nutrients.
In conclusion, understanding the nutritional benefits and health information surrounding Grandma Dot’s stuffing can enhance our appreciation for this cherished dish. By knowing its components and making mindful choices, we can enjoy Grandma Dot’s stuffing while aligning it with our dietary needs and health goals. After all, food is not only about nourishment but also about connection, tradition, and a whole lot of love.
Frequently Asked Questions About Grandma Dot’S Stuffing
Grandma dot’s stuffing balls categories chicken
Grandma Dot’s stuffing balls are a delightful twist on traditional stuffing, designed to complement chicken dishes perfectly. To categorize them, think of them as a savory accompaniment that enhances the flavor of roasted or grilled chicken. For the best results, consider using a mixture of herbs like thyme and sage, which pair beautifully with poultry. Additionally, you can add ingredients like diced celery or onions for added texture and flavor, ensuring that each bite is a burst of savory goodness. Remember to bake them until golden brown for an appetizing crunch on the outside while remaining soft inside.
Old fashioned stuffing balls with boxed stuffing pioneer
Old-fashioned stuffing balls made with boxed stuffing are a convenient yet delicious option for busy cooks. Start with your favorite boxed stuffing mix, and enhance it by adding sautéed onions, celery, and fresh herbs to elevate the flavor profile. To create stuffing balls, simply combine the prepared stuffing mix with an egg and a bit of broth to bind the ingredients together. Form the mixture into balls and bake them until they’re golden and crispy on the outside. This method is not only time-saving but also allows for creativity by customizing the stuffing with your preferred ingredients.
What are stuffing balls
Stuffing balls are bite-sized portions of stuffing that are often baked separately from the main dish, offering a delightful texture and flavor. They are typically made from bread crumbs or stuffing mix, combined with ingredients like broth, herbs, and vegetables. The advantage of stuffing balls is that they can be easily customized with various ingredients, such as sausage or nuts, to suit different tastes. Moreover, they provide a crispy exterior while retaining a moist and flavorful interior, making them a favorite at holiday meals and family gatherings.
Simple stuffing balls recipe
For a simple stuffing balls recipe, start with a base of 4 cups of dry stuffing mix, which you can find in stores. Mix in 1 cup of chicken or vegetable broth, 1 beaten egg, and your choice of chopped vegetables like onions and celery for added flavor. Season the mixture with herbs like sage, thyme, and parsley to enhance taste. Once mixed, form the mixture into small balls and place them on a baking sheet. Bake at 375°F (190°C) for about 20-25 minutes until they are golden brown and crispy.
Leftover stuffing balls recipe
Transform your leftover stuffing into delicious stuffing balls by mixing in a few additional ingredients. Start with about 2 cups of leftover stuffing and add a beaten egg to help bind the mixture. If the stuffing feels dry, incorporate a splash of broth to achieve the right consistency. Form the mixture into balls and place them on a baking sheet; you can even sprinkle some cheese on top for extra flavor. Bake at 350°F (175°C) for 15-20 minutes until they are heated through and golden, creating a delightful new dish from your leftovers.
Turkey stuffing balls recipe
To create turkey stuffing balls, begin with 4 cups of cooked turkey stuffing as your base. Enhance the mixture by adding chopped cooked turkey for a hearty boost of flavor. Incorporate a beaten egg and some broth to ensure the stuffing binds well and doesn’t crumble. Shape the mixture into balls and bake them at 375°F (190°C) for about 20 minutes, or until they are crispy on the outside. This recipe is perfect for utilizing leftover turkey from your holiday feast while providing a delicious and fun way to serve it.
Taste of Home stuffing balls
Taste of Home offers a variety of stuffing ball recipes that focus on heartwarming, home-cooked flavors. A typical recipe might include a blend of bread cubes, seasonings, and add-ins like sausage or dried fruits for a unique twist. To make them, combine the ingredients with broth and an egg, which helps to bind everything together. Form into balls and bake until golden, ensuring you check for doneness to achieve that perfect crunchy exterior. Exploring variations in their recipes can inspire you to try new ingredients, making your stuffing balls a standout dish at any meal.
Paxo stuffing balls
Paxo stuffing balls are a popular choice for those looking for convenience without sacrificing flavor, especially in the UK. To make them, start with Paxo stuffing mix, which is well-seasoned and easy to prepare. Simply follow the package instructions for hydration, then mix in an egg and any additional ingredients like herbs or vegetables to enhance the flavor. Form the mixture into balls and bake until golden brown, creating a delightful side dish that pairs well with meats and poultry. This method provides a quick and reliable way to serve stuffing balls that are both delicious and satisfying.


