grandma’s apple crisp is more than just a dessert; it’s a nostalgic embrace, a warm hug on a chilly day, and a sweet reminder of simpler times in the kitchen. The first time I encountered this delightful dish was at my grandmother’s house during one of those golden autumn afternoons when the leaves crunched underfoot and the air was crisp with the promise of winter. She welcomed me with open arms, the aroma of baked apples and cinnamon wafting through the air, wrapping around me like a favorite old sweater. As I entered her quaint kitchen, I was immediately drawn to the bubbling dish in the oven, its golden-brown topping beckoning me closer. I couldn’t help but ask, “What’s that delicious smell, Grandma?” With a twinkle in her eye, she replied, “Oh, honey, that’s grandma’s apple crisp!”
This recipe has become a cherished family tradition, passed down through generations, and a staple at family gatherings, especially during the fall. The beauty of grandma’s apple crisp lies in its simplicity: fresh apples, a hint of cinnamon, and a buttery crumb topping that creates a perfect balance of flavors and textures. Unlike other apple desserts, which can often be overly complicated or fussy, this dish is straightforward and forgiving—ideal for busy families who want to whip up something special without spending hours in the kitchen. It’s the perfect solution when you need a quick dinner dessert, as it can be prepared in under an hour, giving you more time to enjoy with loved ones.
The Story Behind This Recipe
The story of grandma’s apple crisp is rooted deeply in the traditions of American home cooking. This delightful dessert is believed to have originated in the United States during the 19th century, drawing inspiration from classic British desserts like apple crumble. Early American settlers, with their bountiful apple orchards, used what they had on hand to create comforting desserts that showcased their harvest. Over time, the apple crisp evolved into a beloved dish that found its way into countless homes across the country, each family adding their own unique twist.
For me, it wasn’t just about the delicious flavors; it was the memories associated with it. Sitting at the kitchen table, I would watch my grandma slice apples with care, her hands deftly peeling the skins away, and her laughter filling the room as she shared stories from her own childhood. I learned that cooking is not just a means to an end, but an art form steeped in love and connection. The warm, gooey apples and crunchy topping became a metaphor for family unity—a reminder that no matter how busy life gets, there’s always time to gather around the table and share something special.
Why You’ll Love This Dish
grandma’s apple crisp is not just another dessert; it’s a heartwarming dish that brings people together. There’s something magical about the way the sweet and tart apples meld with the buttery topping, creating a symphony of flavors that dance on your taste buds. This dessert is incredibly versatile. You can serve it warm with a scoop of vanilla ice cream melting on top, or enjoy it cold for breakfast with a dollop of yogurt. It’s equally delightful at holiday gatherings, potlucks, or cozy family dinners.
Seasonally, grandma’s apple crisp shines brightest in the fall, when apples are at their peak. It’s the perfect dish to celebrate the harvest season and make use of the abundant apples that fill our orchards. However, it’s a year-round treat; you can use frozen apples or even try it with other fruits like peaches or berries in the summer, showcasing the adaptability of the recipe.
As we prepare to dive into this guide, I promise you’ll learn not just how to make grandma’s apple crisp, but also the stories behind it—cooking tips passed down through generations, and ways to create your own version that pays homage to your family traditions. Let’s honor the legacy of this dish together, one delicious bite at a time!
The Rich History and Cultural Significance of grandma’s apple crisp
The rich tapestry of grandma’s apple crisp is woven with threads of history, culture, and love, making it a dish that resonates deeply with many families across the globe. To truly appreciate this beloved dessert, we must journey back through time to explore its origins and the cultural significance that has allowed it to endure through the ages. This recipe has evolved alongside the apple itself, reflecting the agricultural practices, regional tastes, and culinary innovations that define American cooking.
Origins and History
Regional variations began to develop, with families incorporating their own local flavors and ingredients. In New England, for instance, tart varieties like Granny Smith were favored, while Southern families often sweetened their crisps with brown sugar and added a dash of nutmeg or vanilla. Each family’s twist on the classic recipe added layers to its history, turning grandma’s apple crisp into a canvas for personal expression.
Cultural Significance
grandma’s apple crisp holds a special place in the heart of American culture, often associated with family gatherings, holidays, and community events. It symbolizes comfort and togetherness, serving as a reminder of the importance of sharing meals with loved ones. In many households, it is a tradition to bake a crisp on crisp autumn days, filling the home with an irresistible aroma that beckons family members to gather around the dining table.
Throughout the years, this dish has graced tables during Thanksgiving, potlucks, and birthday celebrations, showcasing its versatility as a dessert that can be enjoyed year-round. The act of baking grandma’s apple crisp often becomes a family affair, with children and grandchildren eagerly joining in to help peel apples, measure ingredients, and sprinkle the topping. This collaborative effort fosters connections and creates lasting memories, reinforcing the idea that food is not just sustenance, but a way to bond with one another.
Nutritional Benefits
While grandma’s apple crisp is undoubtedly a treat, it also offers nutritional benefits that make it a wholesome choice for dessert. Apples are a key ingredient, providing dietary fiber, vitamin C, and antioxidants that contribute to overall health. The fiber found in apples aids digestion and helps maintain a healthy weight, while vitamin C supports the immune system.
Moreover, the simplicity of grandma’s apple crisp allows for healthy modifications. You can swap out refined sugars for natural sweeteners like honey or maple syrup, and use whole-grain oats in the topping for added nutrition. By making these small adjustments, you can enjoy this cherished dessert while keeping your health in mind.
In conclusion, grandma’s apple crisp is more than just a recipe; it embodies a rich history, cultural significance, and a deep emotional connection for many families. As we explore the art of making this classic dish, we honor the generations of home cooks who have lovingly crafted it in their kitchens, transforming simple ingredients into a beloved family tradition.
Essential Ingredients for Perfect grandma’s apple crisp
When it comes to baking, the foundation of any great recipe lies in its ingredients. For grandma’s apple crisp, each component plays a vital role in creating that perfect balance of sweet and tart, soft and crunchy. This classic dessert is cherished by many, often evoking memories of family gatherings and cozy kitchens. Let’s delve into the essential ingredients that make grandma’s apple crisp not just a treat, but a comforting experience.
Essential Ingredients
Here’s a comprehensive list of the ingredients you’ll need to create a delicious grandma’s apple crisp:
- Apples: 6 to 8 medium-sized tart apples (like Granny Smith or Honeycrisp)
- Granulated Sugar: ¾ cup
- Brown Sugar: ½ cup, packed
- All-Purpose Flour: 1 cup
- Quick Oats: 1 cup
- Ground Cinnamon: 1 teaspoon
- Salt: ½ teaspoon
- Unsalted Butter: ½ cup (1 stick), melted
- Lemon Juice: 1 tablespoon (freshly squeezed)
Let’s break down the importance of each ingredient:
- Apples: The star of the show! Tart apples are preferred as they balance the sweetness from the sugars. The texture of the apples should be firm, as softer varieties may turn mushy when baked. Look for apples that are free from blemishes and feel heavy for their size. Seasonal apples are best in the fall, but you can often find quality ones year-round in grocery stores.
- Granulated Sugar: This sugar enhances the natural sweetness of the apples. You can adjust the quantity based on the tartness of your apples.
- Brown Sugar: Packed brown sugar adds depth and a slight molasses flavor, which complements the apples beautifully. Make sure it’s fresh and soft for easy mixing.
- All-Purpose Flour: This is used to bind the topping and gives it structure. High-quality flour will yield a better texture.
- Quick Oats: Oats add a delightful chewiness and help create that signature crisp topping. Make sure to use quick oats as they cook faster and integrate better into the topping.
- Ground Cinnamon: A classic spice that enhances the flavor profile of the apples, giving a warm, cozy essence. Freshly ground cinnamon provides a more robust flavor.
- Salt: A pinch of salt balances the sweetness and enhances the overall flavor of the dish.
- Unsalted Butter: Butter adds richness and moisture to the crumb topping. It’s best to use unsalted so that you can control the saltiness of the dish.
- Lemon Juice: A splash of lemon juice brightens the flavors and prevents the apples from browning before baking.
Grandma’S Apple Crisp Recipe
Ingredients
Filling:
- 6 medium Granny Smith apples – peeled, cored and sliced
- ½ cup white sugar
- 1 teaspoon ground cinnamon
- ¼ teaspoon ground nutmeg
Topping:
- 1 cup brown sugar
- 1 cup all-purpose flour
- 1 cup quick-cooking oats
- ½ cup unsalted butter, diced
- 1 teaspoon ground cinnamon
Instructions
-
Preheat the oven to 300 degrees F (150 degrees C). Grease a 9×13-inch baking dish.
-
Combine apples, sugar, cinnamon, and nutmeg for filling in a bowl; transfer to the prepared baking dish.
-
Combine brown sugar, flour, oats, butter, and cinnamon for topping in a large bowl. Sprinkle on top of filling.
-
Bake in the preheated oven until golden and bubbly, about 1 hour.
Shopping Tips
When selecting your ingredients for grandma’s apple crisp, consider the following:
- For apples, visit local farmers’ markets during the fall harvest for the freshest selection. If shopping at a supermarket, look for organic options if possible, as they tend to have better flavor profiles.
- Check for sugar and flour in bulk bins to save costs, especially if you plan to bake frequently.
- When buying butter, opt for high-quality brands that are known for their rich flavor. Avoid margarine, as it doesn’t provide the same taste and texture.
Substitutions and Alternatives
Are you looking to make grandma’s apple crisp healthier or accommodate dietary restrictions? Here are some substitution options:
- For a gluten-free version, substitute all-purpose flour with almond flour or a gluten-free baking mix.
- If you’re cutting down on sugar, consider using natural sweeteners like maple syrup or agave nectar. Adjust to taste, as these alternatives can be sweeter than granulated sugar.
- For a dairy-free option, use coconut oil or a dairy-free butter substitute in place of regular butter.
- To increase fiber content, whole oats can be used instead of quick oats.
Each ingredient in grandma’s apple crisp contributes to the overall harmony of flavors and textures. By selecting quality ingredients and understanding their roles, you’re not only honoring the recipe but also elevating your baking skills. Remember, the heart of this dish lies in the love and care you put into each step. Happy baking!
Detailed Step-by-Step grandma’s apple crisp Cooking Instructions
Now that we’ve gathered our ingredients, it’s time to dive into the heart of making grandma’s apple crisp. This step-by-step guide will walk you through the preparation and cooking process, ensuring that your dessert turns out perfectly every time.
Preparation Steps
- Preheat Your Oven: Start by preheating your oven to 350°F (175°C). This ensures that your apple crisp will bake evenly and develop a golden-brown topping.
- Prepare the Apples: Begin by washing and peeling your apples. Use a good quality peeler to make this task easier. Core and slice the apples into thin wedges, approximately ¼ inch thick, to ensure they cook evenly. As you slice, toss the apples in a large mixing bowl with 1 tablespoon of lemon juice to prevent browning and enhance flavor.
- Add Sugar and Spices: Sprinkle ¾ cup of granulated sugar and 1 teaspoon of ground cinnamon over the sliced apples. Toss until the apples are evenly coated. This will help release the juices and create a sweet, caramelized layer as they bake.
- Prepare the Topping: In another mixing bowl, combine 1 cup of all-purpose flour, ½ cup of brown sugar, 1 cup of quick oats, and ½ teaspoon of salt. Mix these dry ingredients well. Then, pour in ½ cup of melted unsalted butter and mix until the mixture resembles coarse crumbs. This is where the crispy topping magic happens!
Cooking Process
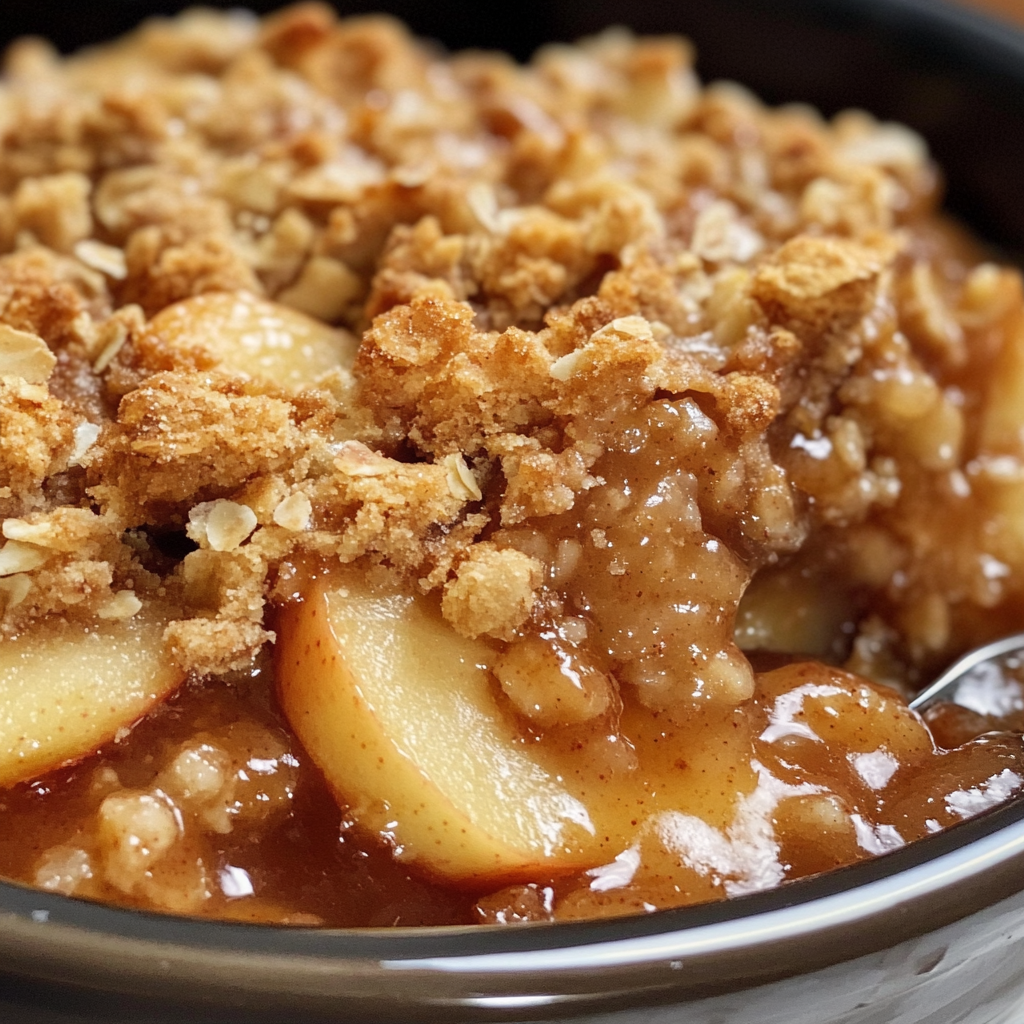
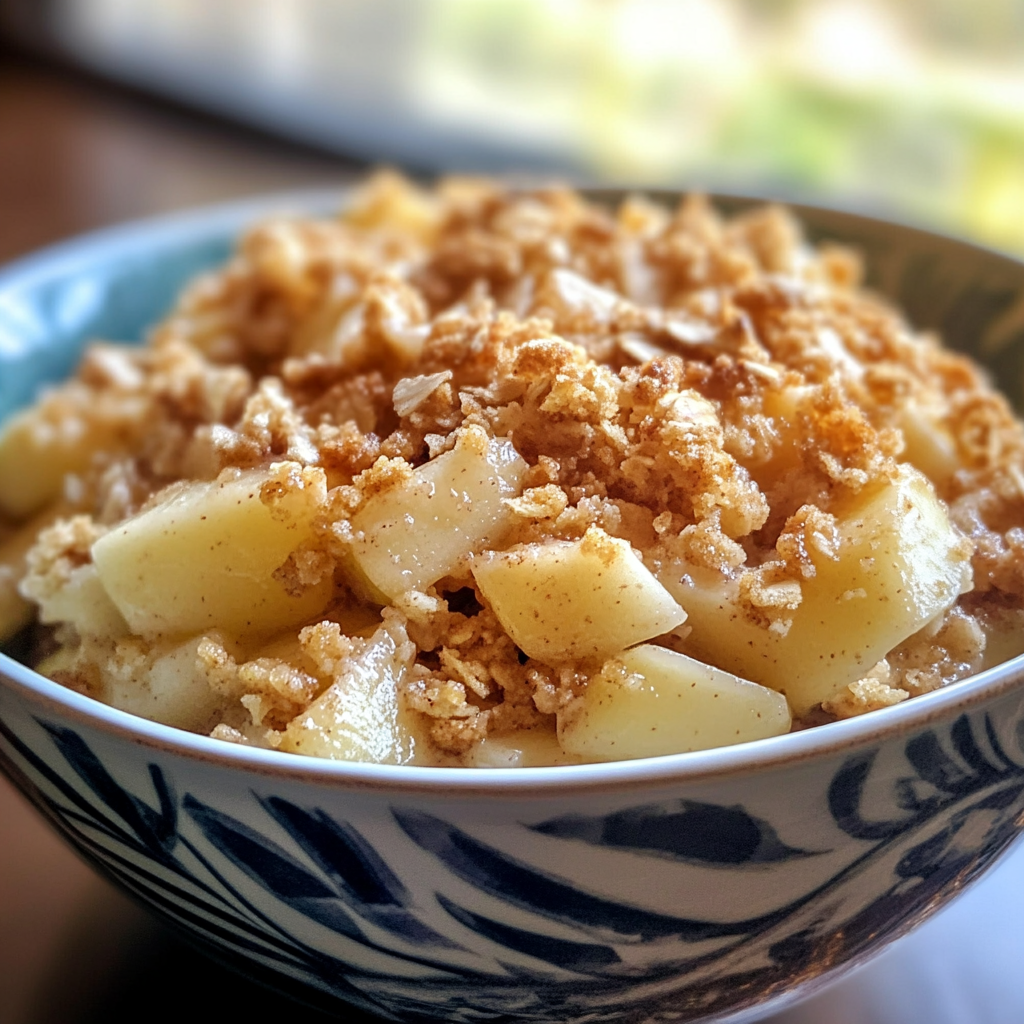
- Layer the Apples: In a greased 9×13 inch baking dish, spread the apple mixture evenly across the bottom. This layer is the foundation of your grandma’s apple crisp, so make sure the apples are distributed well.
- Top with Crumb Mixture: Evenly sprinkle the crumb topping over the apples. Use your hands to crumble it if necessary, ensuring that the topping is generous and covers the apples completely.
- Bake: Place the baking dish in the preheated oven and bake for about 30 minutes. You’ll know it’s done when the topping is golden brown and the apples are bubbling. The aroma will fill your kitchen, creating an irresistible atmosphere.
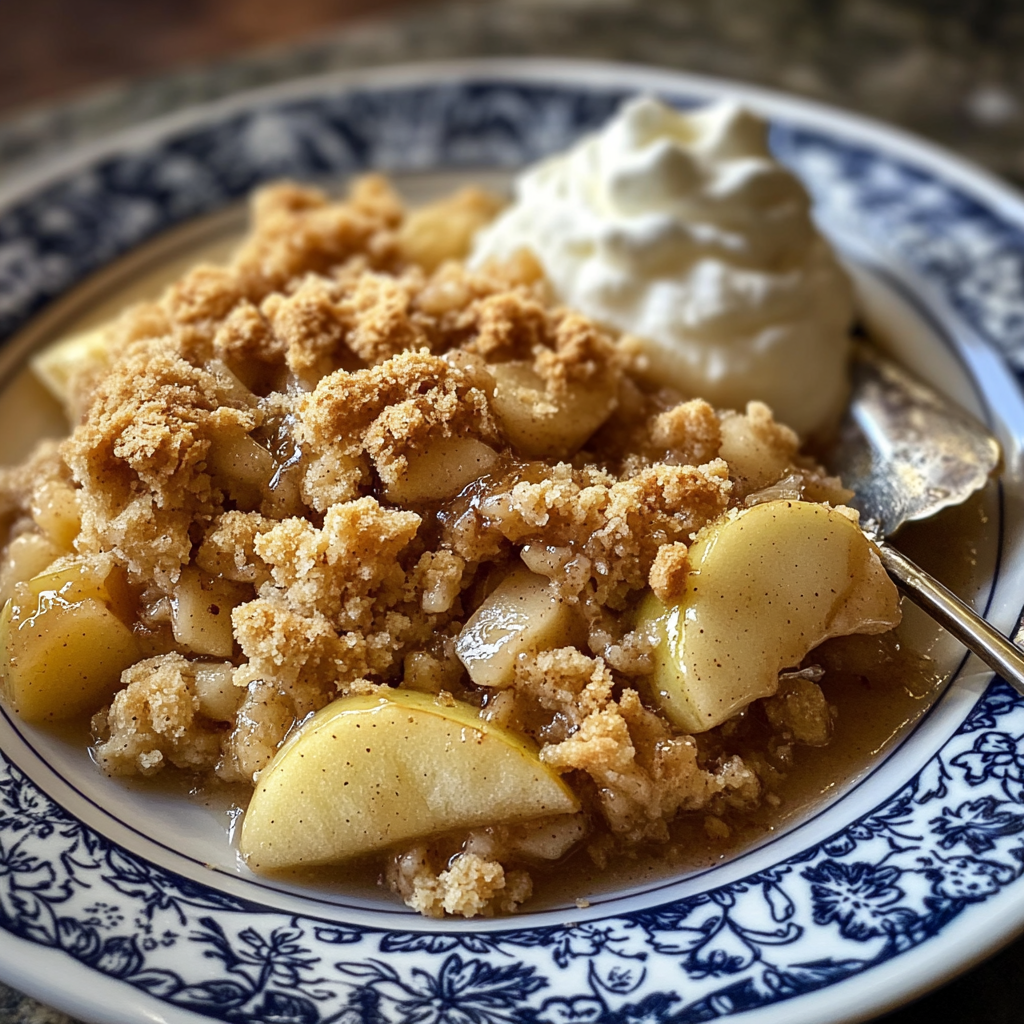
- Cool and Serve: Once baked, remove the apple crisp from the oven and let it cool for at least 10 minutes. This will help the juices settle. Serve warm, perhaps with a scoop of vanilla ice cream on top for that classic comfort food experience.
Final Assembly
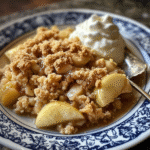
As you plate your grandma’s apple crisp, remember that presentation can elevate the experience. Use a spatula to scoop out generous portions, and don’t be shy about adding a drizzle of caramel sauce or a sprinkle of cinnamon on top. If you have fresh whipped cream or ice cream, this is the time to add it!
Throughout the cooking process, keep an eye out for visual cues. The apples should be tender, and the topping should have a beautiful golden hue. Avoid the common mistake of over-baking, which can lead to a dry topping. Instead, aim for that perfect crisp—golden, crunchy, and slightly chewy in texture.
For equipment, a good quality peeler, mixing bowls, and a sturdy baking dish are essential. Don’t forget a sharp knife for cutting those apples! Timing is key; multitask by preparing your topping while the apples soak in sugar and lemon juice. This will save you time and keep your workflow efficient.
Cooking is as much about the experience as it is about the final product. As you bake grandma’s apple crisp, take a moment to appreciate the aromas, the sounds of the bubbling apples, and the memories that come flooding back. This recipe is a labor of love, and every bite will remind you of the warmth and comfort that only a homemade dessert can provide. Enjoy your culinary adventure!
Professional Tips and Techniques for grandma’s apple crisp
When it comes to making grandma’s apple crisp, there are countless tips and techniques that can elevate your dish from good to unforgettable. Every family has their own way of preparing this beloved dessert, and over the years, I’ve gathered a treasure trove of professional tips that I’m excited to share. Whether you’re a novice in the kitchen or an experienced cook seeking to refine your skills, these insights will guide you through the process of creating the perfect grandma’s apple crisp.
Professional Techniques
To begin, let’s talk about the apples themselves. Choosing the right variety is crucial for achieving that perfect balance of sweet and tart. Granny Smith apples are a popular choice due to their firm texture and tart flavor, but you can also mix in Honeycrisp or Fuji for added sweetness. The key is to use a blend of apples to create a depth of flavor that will make your grandma’s apple crisp truly stand out.
Once you’ve selected your apples, peel and slice them evenly. This will ensure that they cook uniformly. I recommend using a sharp paring knife or a mandolin slicer for precision. Toss the sliced apples in a mixture of sugar and spices (like cinnamon and nutmeg), which not only adds flavor but also draws out the juices from the apples, creating a delightful syrup that will soak into the crisp topping.
Speaking of the topping, achieving the perfect crumble is an art form. A common mistake is overworking the butter into the dry ingredients. Instead of mixing until completely combined, aim for a crumbly texture that resembles coarse sand. This will yield a light and crispy topping that contrasts beautifully with the tender apples beneath. For added richness, consider substituting some of the butter with cold coconut oil or even adding a splash of vanilla extract into the topping mixture.
Troubleshooting Guide
Even with the best intentions, things can go awry while making grandma’s apple crisp. One common issue is a soggy bottom. To combat this, ensure that your apple mixture isn’t overly wet before adding the topping. If you notice excess liquid, you can toss the apples with a tablespoon of flour or cornstarch to help thicken the juices. Additionally, baking your crisp in a preheated oven will help create a crispy bottom right from the start.
If your topping is browning too quickly while the apples are still firm, consider covering your crisp with aluminum foil for part of the baking time. This will allow the apples to cook through without burning the topping, and you can remove the foil in the last 10-15 minutes to achieve that golden brown finish.
Presentation Tips
Presentation is key when it comes to serving grandma’s apple crisp. A rustic dish like this deserves to be showcased! Once it’s out of the oven and cooled slightly, serve it warm in individual ramekins or a large, beautiful pie dish. A scoop of vanilla ice cream melting on top, drizzled with caramel sauce, can take your presentation to the next level. For an added touch, sprinkle some chopped nuts or a dash of cinnamon on top for a pop of color and texture.
Wine and beverage pairings can enhance the experience of enjoying your dessert. A sweet Riesling or a sparkling cider can complement the flavors of the apples beautifully. If you prefer something more complex, consider a lightly oaked Chardonnay, which can add an elegant touch to your dessert table. For non-alcoholic options, a warm spiced apple cider or a fresh ginger ale can be delightful companions to your grandma’s apple crisp.
Lastly, let’s talk about meal prep strategies. Grandma’s apple crisp can be assembled ahead of time and stored in the refrigerator unbaked for up to 24 hours. When you’re ready to serve, simply pop it into the oven—a perfect solution for busy weeknights or hosting gatherings. You can also scale the recipe up or down depending on the size of your gathering. Doubling the ingredients is straightforward, but remember to use a larger baking dish to accommodate the increased volume.
With these professional tips and techniques in your arsenal, you’re well on your way to mastering grandma’s apple crisp. Each step of the process is an opportunity to infuse your personality and creativity into the dish, making it truly your own while still honoring that cherished family recipe.
Creative Variations and Adaptations of grandma’s apple crisp
Grandma’s apple crisp is a beloved classic, but that doesn’t mean it has to be made the same way every time. The beauty of this recipe is its versatility, allowing for creative variations and adaptations that can cater to different tastes, dietary needs, and seasonal ingredients. Let’s dive into some exciting ways to remix this comforting dessert!
Seasonal Variations
One of the joys of making grandma’s apple crisp is its adaptability to seasonal ingredients. In the fall, mix in some pears or cranberries for a delightful twist. The tartness of cranberries can provide a nice contrast to the sweetness of the apples, creating a flavor explosion in every bite. In the summer, consider using fresh berries—blueberries, raspberries, or strawberries can all be delightful additions or even substitutes. The vibrant colors and fresh flavors will make your crisp a standout at any barbecue or picnic.
As the seasons change, so can your spices. In the winter, a hint of cardamom or cloves can enhance the warmth of the dish, while in the spring, you might opt for a lighter touch with lemon zest or even a dash of fresh mint. Experimenting with these flavors not only keeps grandma’s apple crisp fresh but also allows you to celebrate the bounty of each season.
Dietary Adaptations
In today’s world, dietary restrictions are more common than ever, but that shouldn’t stop you from enjoying a delicious apple crisp! For a gluten-free version, simply swap out regular flour for a gluten-free blend. Almond flour or oat flour can also provide a nutty flavor that pairs beautifully with apples.
If you’re looking for a lower-carb option, consider making a keto-friendly apple crisp. You can use erythritol or another sugar substitute for sweetness and almond flour for the topping. For a vegan adaptation, replace the butter with coconut oil or vegan butter. Additionally, you can use maple syrup or agave nectar as a sweetener to keep the dish plant-based.
Creative Twists
For those who love to experiment in the kitchen, there are endless possibilities for creative twists on grandma’s apple crisp. Consider adding nuts to the topping for an extra crunch—pecans, walnuts, or almonds can provide a lovely texture and flavor contrast. You might also try incorporating spices like ginger or allspice for an added dimension of flavor.
Furthermore, think about the cooking methods. While the traditional oven-baking method is wonderful, you can also prepare apple crisp in a slow cooker for a set-it-and-forget-it approach. This method allows the flavors to meld beautifully over time, resulting in a rich and delicious dessert. If you’re short on time, a stovetop version can also be made by sautéing the apples with spices and sugar, then topping with a quick crumble and cooking it covered until everything is warm and bubbly.
Leftover transformations can be a fun way to enjoy your grandma’s apple crisp in new ways. Consider using leftover crisp as a topping for yogurt or oatmeal for breakfast, or mix it into pancake batter for a delicious twist on a classic. You could even use it as a filling for crepes or combine it with whipped cream for a decadent dessert parfait.
In summary, while grandma’s apple crisp is undeniably delicious in its traditional form, it’s also a canvas for creativity and adaptation. Whether you’re looking to cater to dietary needs, embrace seasonal ingredients, or simply experiment with flavors, this classic dessert is ready for a refresh. So roll up your sleeves, gather your ingredients, and let your imagination run wild in the kitchen!
Storage, Reheating, and Meal Prep for grandma’s apple crisp
When it comes to preserving the warm, comforting taste of grandma’s apple crisp, understanding how to store, reheat, and even meal prep this beloved dessert is essential. Whether you’re preparing a batch for a family gathering or just want to savor the sweet memories of your grandma’s kitchen, knowing the best storage techniques will help you maintain that delightful flavor and texture.
Short-term Storage
After baking a delicious dish of grandma’s apple crisp, you might find yourself wondering how to store the leftovers effectively. The first step is to let the apple crisp cool completely at room temperature, which usually takes about an hour. Once it’s cooled, store it in an airtight container or cover it tightly with plastic wrap or aluminum foil. If you’re using a glass or ceramic baking dish, you can cover it directly with its lid if it has one. This helps to keep the crisp fresh while also preventing any odors from the refrigerator from seeping in.
In the refrigerator, grandma’s apple crisp can stay fresh for about 3 to 5 days. However, it’s best to consume it within the first couple of days for optimal taste and texture. The longer it sits, the more the topping may lose its crispy texture. One trick I’ve learned is to put a piece of parchment paper between the crisp and the plastic wrap. This can help to absorb moisture and keep the topping from becoming too soggy.
Freezing and Long-term Storage
If you want to extend the life of grandma’s apple crisp beyond a few days, freezing is a fantastic option. To freeze your apple crisp, make sure it’s completely cooled, then portion it into smaller servings. This not only allows for easy reheating but also helps to prevent waste. Use freezer-safe, airtight containers or heavy-duty freezer bags for storage. When using bags, try to remove as much air as possible before sealing to prevent freezer burn.
Grandma’s apple crisp can last in the freezer for up to 3 months without losing too much flavor or texture. When you’re ready to enjoy it again, simply take out the portion you want and let it thaw in the refrigerator overnight. If you’re in a hurry, you could also reheat it from frozen; just be aware that it may take longer to warm through. To keep the topping crispy, consider baking it in the oven at 350°F (175°C) for about 20-30 minutes or until heated through. This method not only warms the filling but also refreshes the topping, making it taste almost as good as fresh-baked.
Reheating Best Practices
Reheating grandma’s apple crisp can be a delicate process. If you want to maintain that delightful, crispy texture, the oven is your best friend. Preheat your oven to 350°F (175°C), then place the apple crisp in an oven-safe dish. Cover it loosely with aluminum foil to prevent over-browning, and heat for about 15-20 minutes. If you like your topping extra crispy, remove the foil during the last few minutes of reheating.
For those who prefer the microwave, you can reheat individual portions. Place your slice on a microwave-safe plate and cover it with a damp paper towel. Heat it in 30-second intervals, checking frequently, until warmed through. Be cautious, though; the microwave may soften the topping more than the oven, so keep an eye on it to preserve that delightful crunch.
Meal prep can also be a great strategy for enjoying grandma’s apple crisp throughout the week without the hassle of constantly baking. Consider making a double batch and portioning out individual servings into freezer-safe containers. That way, you’ll have a homemade dessert ready at a moment’s notice. You can also prepare the apple filling separately and store it in the fridge for a couple of days, then make the topping fresh when you’re ready to bake, ensuring that you get that freshly-baked goodness each time.
Food safety is paramount when it comes to storing foods like grandma’s apple crisp. Always ensure your crisp is cooled before refrigerating or freezing to avoid condensation that can lead to sogginess. When reheating, make sure it’s heated thoroughly to an internal temperature of 165°F (74°C) to kill any potential bacteria. If you notice any off smells or changes in texture, it’s best to err on the side of caution and discard it.
Lastly, consider how you plan to portion and package your apple crisp. For gatherings, a large dish may be perfect, but for individual servings, smaller containers work wonders. You can even surprise a friend with a homemade treat by gifting them a portion in a cute, reusable container — a lovely way to share those sweet memories of grandma’s apple crisp and keep the tradition alive!
Nutritional Benefits and Health Information
Grandma’s apple crisp is not just a delightful dessert; it also carries a wealth of nutritional benefits, making it a comforting yet relatively wholesome treat. Understanding the nutritional content of this classic dish can enhance your appreciation for it, as well as help you make informed choices while enjoying it. Let’s dig into the details!
Nutritional Profile
At its core, grandma’s apple crisp consists of three main components: the apple filling, the crisp topping, and any spices or flavorings used in the recipe. The base of this dish, apples, is packed with vitamins and minerals. A medium apple typically contains around 95 calories, and is a good source of fiber, vitamin C, and various antioxidants. The addition of whole grains in the crisp topping — often through oats or whole wheat flour — contributes to the fiber content, making it a heartier option.
The typical recipe for grandma’s apple crisp might include oats, brown sugar, flour, butter, and spices like cinnamon and nutmeg. Each of these ingredients plays a role in the overall nutritional value. For example, oats are a fantastic source of soluble fiber, which can aid in lowering cholesterol levels. On average, a serving of apple crisp might contain around 200-300 calories, depending on the portion size and specific recipe variations.
Health Benefits
The health benefits of grandma’s apple crisp primarily stem from its key ingredient: apples. Apples are known for their high antioxidant content, particularly quercetin, which has been linked to reducing inflammation and boosting heart health. They also provide dietary fiber, which promotes digestive health and helps you feel fuller longer, making it a satisfying dessert choice.
Moreover, spices like cinnamon not only add warmth and flavor but also come with health benefits. Cinnamon has been shown to help regulate blood sugar levels and has anti-inflammatory properties. When combined with the natural sweetness of apples, it creates a delicious balance that is as comforting as it is beneficial.
Dietary Considerations
When considering dietary restrictions, grandma’s apple crisp can be easily modified to accommodate various needs. For those who are gluten-sensitive, a gluten-free flour blend can replace regular flour, and certified gluten-free oats can be used in the topping. If you’re looking to reduce sugar, you could substitute part of the brown sugar with natural sweeteners like maple syrup or honey, though be mindful of how these changes might affect the texture and flavor.
For those following a vegan diet, you can make grandma’s apple crisp without butter by using coconut oil or a vegan butter substitute. Not only will this keep the dish plant-based, but it can also add a unique flavor twist to the topping. Additionally, you can incorporate nuts or seeds into the topping for added crunch and healthy fats, making this dessert not only delicious but also nutritious.
Comparatively, when we look at grandma’s apple crisp alongside other desserts like traditional pies or cakes, it often comes out as a more wholesome option. While cakes may be dense with sugars and fats, the fruit base of apple crisp provides natural sweetness and moisture, often requiring less added sugar. A slice of pie, on the other hand, generally has a heavier crust and more calorie-dense filling.
In conclusion, while grandma’s apple crisp is undoubtedly a treat, it can also fit into a balanced diet when enjoyed in moderation. The key is to savor each bite and perhaps enjoy it as a part of a meal that includes protein and healthy fats, creating a satisfying end to your dining experience while still being mindful of your nutritional intake. By understanding its components and health benefits, you can enjoy this comforting dessert without guilt, knowing that you’re indulging in a dish that’s rooted in love and tradition.
Frequently Asked Questions About Grandma’S Apple Crisp
Award winning apple crisp recipe
To create an award-winning apple crisp, start with a mix of tart and sweet apples like Granny Smith and Honeycrisp for a balanced flavor. Ensure your apples are sliced uniformly to guarantee even cooking. For the topping, combine rolled oats, brown sugar, and a pinch of cinnamon with melted butter, allowing it to achieve a crumbly texture that bakes to a golden perfection. Adding chopped nuts, like pecans or walnuts, can introduce a delightful crunch, while a splash of vanilla extract enhances the overall flavor. Finally, bake the crisp at a high temperature, around 350°F, until the topping is bubbly and golden, and serve it warm with a scoop of vanilla ice cream for a truly memorable dessert.
Old fashioned apple crisp recipe
An old-fashioned apple crisp recipe typically calls for simple, wholesome ingredients that highlight the natural sweetness of the apples. Use a combination of tart apples, such as Jonathan or McIntosh, which break down beautifully during baking. For the topping, mix together flour, oats, brown sugar, and cold butter, working it until crumbly; this classic method ensures a rustic texture. A dash of nutmeg or allspice can add depth to the flavor profile, while a squeeze of lemon juice brightens the apple mixture. Bake the crisp until the topping is golden brown, and serve it with a drizzle of heavy cream or a scoop of ice cream for an authentic, nostalgic experience.
Apple crisp recipe Pioneer Woman
The Pioneer Woman’s apple crisp recipe is beloved for its straightforward approach and rich flavors. Start by peeling and slicing tart apples like Granny Smith and layering them in a baking dish, then sprinkle with sugar and cinnamon for added sweetness and spice. For the crisp topping, combine flour, oats, brown sugar, and softened butter, mixing until crumbly. The key is to let the topping clump together slightly, as this creates a beautifully textured crust. Bake at 350°F until the apples are tender and the topping is golden brown, and enjoy it warm with a scoop of vanilla ice cream or whipped cream for a delightful treat that embodies comfort food.
Apple crumble recipe
An apple crumble recipe is similar to apple crisp but typically has a topping made with more flour and less oat content, resulting in a different texture. Start by choosing a mix of sweet and tart apples, such as Fuji and Granny Smith, for a well-rounded flavor. For the crumble topping, use flour, sugar, and cold butter, mixing it into a sandy texture; you can also add spices like cinnamon or ginger for an aromatic touch. Bake the crumble until the topping is crisp and the apples are bubbling, usually around 30 to 40 minutes at 350°F. Serve it warm with custard or ice cream to create a comforting dessert that’s perfect for any occasion.


