Halloween dirt cups are a delightful and imaginative dessert that captures the spirit of the spooky season while satisfying your sweet tooth. I remember the first time I encountered these charming little cups of chocolate goodness; it was a chilly October evening, and my best friend’s mother had prepared them for our annual Halloween party. As I sat there, surrounded by jack-o’-lanterns and the faint sound of ghostly tales, I was struck by the creativity of this dessert. The idea of combining chocolate pudding, crushed cookies, and gummy worms to create a “dirt” effect was not only visually appealing but also incredibly fun to eat. Little did I know that this simple treat would become a staple in my own kitchen, particularly during the Halloween season.
The Story Behind This Recipe
My journey with Halloween dirt cups began when I decided to host my own Halloween gathering a few years ago. With a busy schedule and a house full of excited children, I needed a recipe that was not only easy and quick but also one that would impress and delight my guests. Recalling the dirt cups from that memorable party, I decided to recreate them. As I prepared the layers of chocolate pudding and crushed Oreos, I found myself reminiscing about the joy and laughter that came with sharing food. The excitement in the children’s eyes as they devoured their cups of “dirt” reminded me of my own childhood and the simple pleasures that come with celebrating Halloween.
Halloween dirt cups are special because they embody the playful spirit of the holiday. They are not just a dessert; they are a canvas for creativity. You can dress them up with various toppings—like candy corn, spiders, or edible glitter—to enhance the spooky theme. This flexibility allows families to engage in fun, hands-on activities, making cooking a shared experience that fosters connection. For busy families, this dessert is a lifesaver. It can be prepared in advance, allowing parents to focus on other Halloween festivities without sacrificing the joy of serving a homemade treat.
Seasonally, Halloween dirt cups fit perfectly into the autumn landscape. As the leaves turn and the days grow shorter, this dessert serves as a sweet reminder of the warmth and joy of celebrations. Whether you’re hosting a Halloween party, attending a school event, or just enjoying a cozy night at home, these cups can bring a touch of magic to any occasion. The emotional connection to this dish extends beyond its taste; it’s about the memories created while preparing and sharing it with loved ones.
In this article, readers can expect to learn everything they need to know about Halloween dirt cups—from their intriguing history and cultural significance to tips on how to customize and elevate this beloved dessert. Whether you’re a seasoned baker or a novice in the kitchen, you’ll discover how to make this treat your own and create lasting memories during the Halloween season.
The Rich History and Cultural Significance of halloween dirt cups
The rich history and cultural significance of Halloween dirt cups provide a fascinating backdrop to this playful dessert. Though the origins of dirt cups may not be explicitly documented, they are widely believed to have emerged in the United States during the late 20th century, coinciding with a rising trend in fun, interactive desserts aimed at children. The concept of layering ingredients to create a visually appealing dish has deep roots in culinary traditions around the world, making dirt cups a delightful fusion of creativity and nostalgia.
Origins and History
While Halloween dirt cups may seem like a modern invention, the idea of creating layered desserts has been a part of culinary history for centuries. In many cultures, desserts with layered textures and flavors are common, often serving as a way to showcase seasonal ingredients. In the case of dirt cups, the combination of chocolate pudding and crushed cookies mimics the layers of soil and leaves found in nature during the fall. This visual representation resonates with the themes of Halloween, where nature transforms into a canvas of vibrant colors and eerie silhouettes.
Over the years, dirt cups have evolved from a simple treat to an imaginative dessert that can be tailored to various themes and occasions. As Halloween gained prominence in American culture, dirt cups became a staple at Halloween parties and school events. They are easily adaptable, allowing for personalized twists that reflect regional ingredients or family traditions. For instance, in some areas, you might find variations that incorporate pumpkin spice pudding or even candy apples as toppings, adding local flair to the classic recipe.
Cultural Significance
Halloween dirt cups are often associated with childhood celebrations and festivities, making them a symbol of joy and creativity. They are commonly served at Halloween parties, school functions, and family gatherings, where children and adults alike can indulge in their playful nature. The act of layering the ingredients can also serve as a bonding experience for families, creating opportunities for children to help in the kitchen and express their creativity. In a world where cooking can sometimes feel like a chore, these fun treats remind us of the joy of making and enjoying food together.
In terms of cultural significance, dirt cups have become a go-to dessert for many families across the United States. They symbolize not only the playful spirit of Halloween but also the bond between generations. Many parents fondly recall making these treats with their own parents or engaging in friendly decorating competitions with friends, passing down the tradition to their children. This cycle of sharing experiences through food is what makes Halloween dirt cups a beloved dish in many households.
Nutritional Benefits
While Halloween dirt cups are primarily a dessert, it’s worth noting that they can also offer some nutritional benefits. The primary ingredients—chocolate pudding, crushed cookies, and gummy worms—are rich in flavor and texture, providing a delightful treat without requiring extensive preparation. You can easily modify the recipe to incorporate healthier options, such as using low-fat pudding or whole-grain cookies, making it a more balanced treat.
Additionally, dirt cups can be a great way to introduce children to different flavors and textures. The creamy pudding contrasts beautifully with the crunchy cookies, and the addition of gummy worms adds an element of surprise and delight. By encouraging kids to participate in the preparation process, you can also foster a sense of ownership and pride in their culinary creations.
In conclusion, Halloween dirt cups are more than just a fun dessert; they carry a rich history and cultural significance that make them a cherished part of many Halloween celebrations. Their adaptability, playful nature, and emotional connections make them a perfect choice for families looking to create memories while enjoying the spirit of the season. As we dive deeper into the world of Halloween dirt cups, you’ll discover the endless possibilities for customization and creativity that await you!
Essential Ingredients for Perfect halloween dirt cups
Halloween is a time for creativity, and what better way to unleash your inner artist than with delicious and spooky Halloween dirt cups? These delightful desserts are not only fun to make but also a treat for the taste buds. To create the perfect Halloween dirt cups, you’ll need a selection of essential ingredients that come together to create a creamy, chocolaty, and crunchy masterpiece. Let’s dive into the specifics of each ingredient and learn why they are crucial for this festive treat!
Essential Ingredients
- 12 Oreo Cookies: These classic cookies serve as the base for the “dirt” layer of your Halloween dirt cups. Their chocolatey flavor and crunchy texture add depth to the dessert. You can crush them into fine crumbs, which not only provides a delightful texture but also gives the appearance of dirt. Opt for regular Oreos for the authentic taste that everyone loves.
- 16 oz Cool Whip: This whipped topping is essential for adding a light, airy texture to your dirt cups. Cool Whip is easy to work with and helps balance the richness of the chocolate pudding. If you’re looking for a more natural option, consider making your own whipped cream using heavy cream and sugar, but Cool Whip is a time-saver for busy cooks.
- 1 box of Instant Chocolate Pudding Mix (3.3 oz): The star of the show! This mix provides the chocolatey goodness that pairs beautifully with the crushed Oreos. The instant version is perfect for this recipe because it sets quickly and requires minimal effort. If you prefer a homemade pudding, you can substitute it with a recipe that uses cocoa powder, sugar, cornstarch, and milk.
- 2 cups Milk: Milk is the binding agent that helps the pudding mix come to life. Whole milk gives a creamy consistency, but you can opt for low-fat or non-dairy alternatives such as almond or oat milk if desired. Ensure your milk is fresh for the best results.
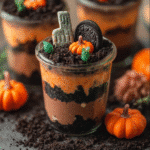
- 8 Milano Cookies: These cookies are optional, but they add an elegant touch to your Halloween dirt cups. Use them to create grave markers or spooky decorations on top of your dessert. They are crumbly and buttery, providing a nice contrast to the other components.
- Gummy Worms and Candy Pumpkins (optional): These fun candies are what truly elevate your Halloween dirt cups to a whole new level. They not only add a pop of color but also embody the spirit of Halloween. You can find a variety of gummy candies that fit the theme, so get creative!
- Wilton Black Writing Icing: This icing is perfect for writing spooky messages or decorating your dirt cups. It adds a personal touch and can also be used to create spider webs or other Halloween-themed designs. If you don’t have this, you can use melted chocolate or even a simple black icing made from powdered sugar and cocoa.
Halloween Dirt Cups
Ingredients
- 12 Oreo Cookies
- 16 oz Cool Whip
- 1 boxes of Instant Chocolate Pudding Mix 3.3 oz
- 2 cups Milk
- 8 Milano Cookies
- Gummy Worms and Candy Pumpkins optional
- Wilton Black Writing Icing
Instructions
- Whisk together the pudding mix and the milk in a medium size bowl. Refrigerate for about 10 minutes or until set.
- Then fold in the cool whip until well combined. The refrigerate for about 20 minutes to chill the mixture.
- While the pudding is chilling, place the Oreos in a food processor or blender until the cookies are crushed until fine.
- Then assemble the cups!
- Fill up small cups with the pudding mixture until their approximately ⅓ of the way full.
- Top with a small amount of the crushed Oreos. Repeat these layers in all fo the cups.
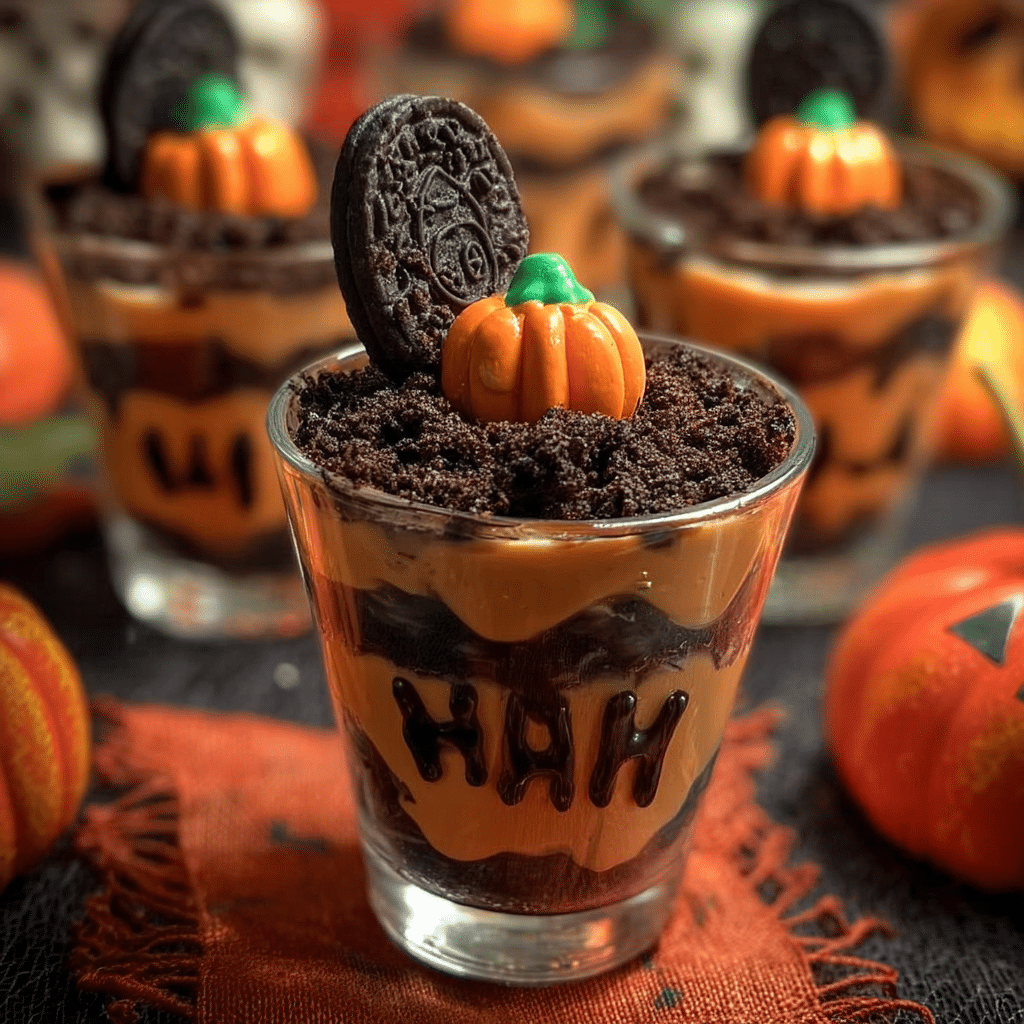
- Write RIP on the top of the Milano cookies with the black icing. Place them into each cup to resemble tombstones and then decorate with the gummy worms and candy pumpkins.
- Enjoy!
Shopping Tips
When shopping for ingredients for your Halloween dirt cups, quality is key. Look for fresh Oreos and Cool Whip, as well as high-quality chocolate pudding mix. For the best flavor, consider purchasing organic versions of your ingredients, as they often have a richer taste and fewer preservatives.
Seasonal availability should also be taken into account. As Halloween approaches, many grocery stores will stock themed candies and decorations, so keep an eye out for special editions of gummy worms and candy pumpkins. This is the perfect time to grab these items as they will be more prevalent in stores.
Substitutions and Alternatives
Dietary restrictions shouldn’t hold you back from enjoying Halloween dirt cups. If you have allergies or dietary needs, here are some substitutions:
- Gluten-Free: Use gluten-free Oreo cookies and check the pudding mix for gluten-free labeling.
- Dairy-Free: Substitute Cool Whip with coconut whipped cream or a dairy-free whipped topping. Use almond or oat milk instead of regular milk.
- Lower Sugar Options: Look for sugar-free pudding mix and use a light whipped topping to cut down on sugar content.
When it comes to storage, be sure to keep the Cool Whip and any leftover ingredients in the refrigerator. Oreo cookies should be stored in a cool, dry place to maintain their crispiness. If you prepare your dirt cups in advance, they can be stored in the refrigerator for up to 24 hours, making them a convenient make-ahead dessert for your Halloween festivities.
As you embark on your Halloween dirt cups adventure, remember that the fun lies not only in the making but also in the sharing. So gather your loved ones, unleash your creativity, and enjoy this spooktacular treat!
Detailed Step-by-Step halloween dirt cups Cooking Instructions
Now that we’ve gathered our ingredients, it’s time to bring our Halloween dirt cups to life! This dessert is not only visually appealing, but it’s also incredibly simple to make—perfect for bakers of all skill levels. Let’s break down the process step by step, ensuring that your Halloween dirt cups turn out perfectly every time.
Preparation Steps
- Gather Your Ingredients and Tools: Before you start, make sure you have all your ingredients ready to go. This is often referred to as “mise en place” in the culinary world, which means having everything in its place. You’ll need a mixing bowl, a whisk, and a set of clear cups or jars to serve your dirt cups.
- Crush the Oreos: Place the 12 Oreo cookies in a resealable plastic bag. Using a rolling pin or your hands, crush the cookies until you achieve a fine crumb consistency, resembling dirt. This step is not only fun but also a great way to release some stress! Transfer the crumbs to a bowl and set aside.
- Prepare the Pudding Mixture: In a medium mixing bowl, combine the 2 cups of milk with the 1 box of instant chocolate pudding mix. Use a whisk to mix them together until fully combined. The pudding will start to thicken quickly, so make sure to whisk for about 2 minutes. You’ll know it’s ready when it coats the back of a spoon. Set aside.
- Fold in the Cool Whip: Once your pudding mixture is ready, take the 16 oz of Cool Whip and gently fold it into the pudding. This technique is essential to keep the mixture light and airy. Use a spatula to gently combine the two until no streaks remain. Be careful not to overmix; you want to maintain that fluffy texture!
Cooking Process
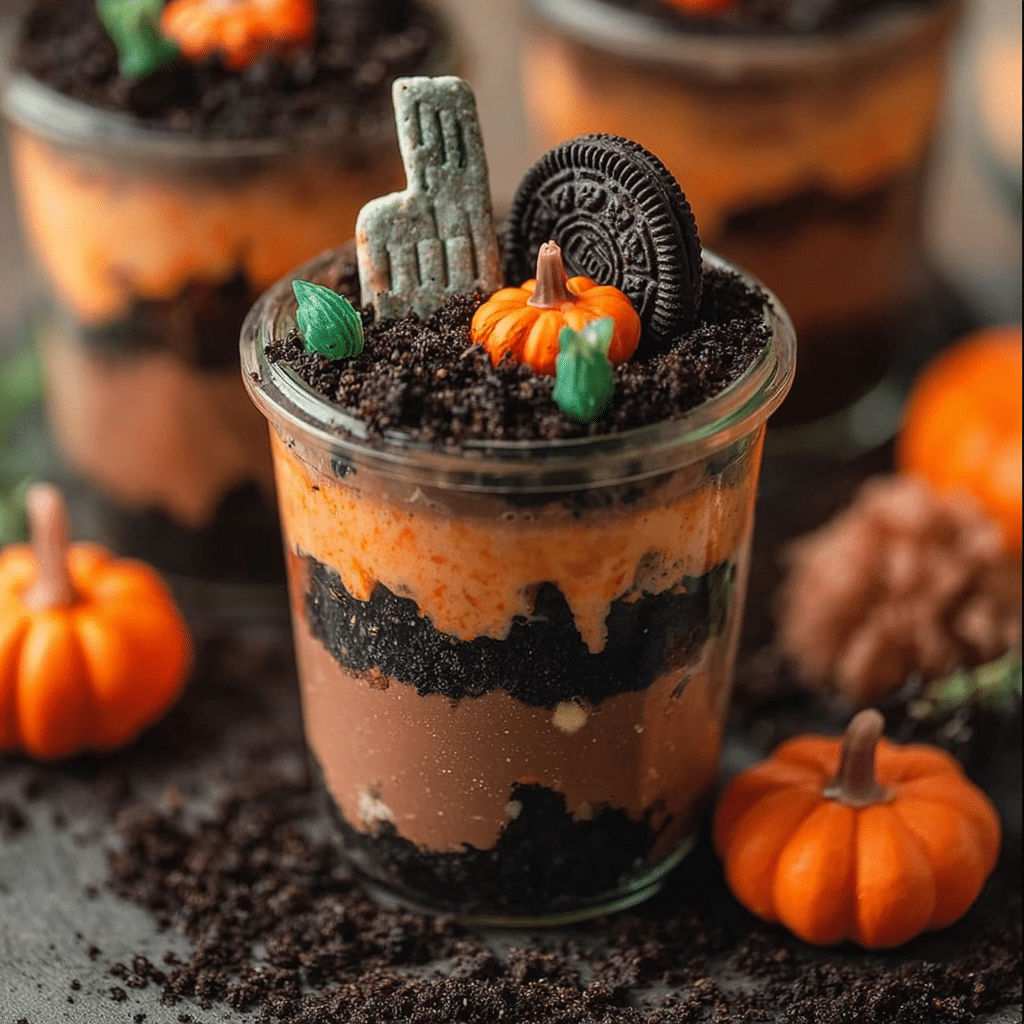
- Layering the Cups: Now comes the fun part—layering! Start by adding a spoonful of the chocolate pudding mixture to the bottom of each cup. Follow this with a layer of crushed Oreos, then another layer of pudding. Repeat this process until your cups are filled, leaving some crushed Oreos for the final topping.
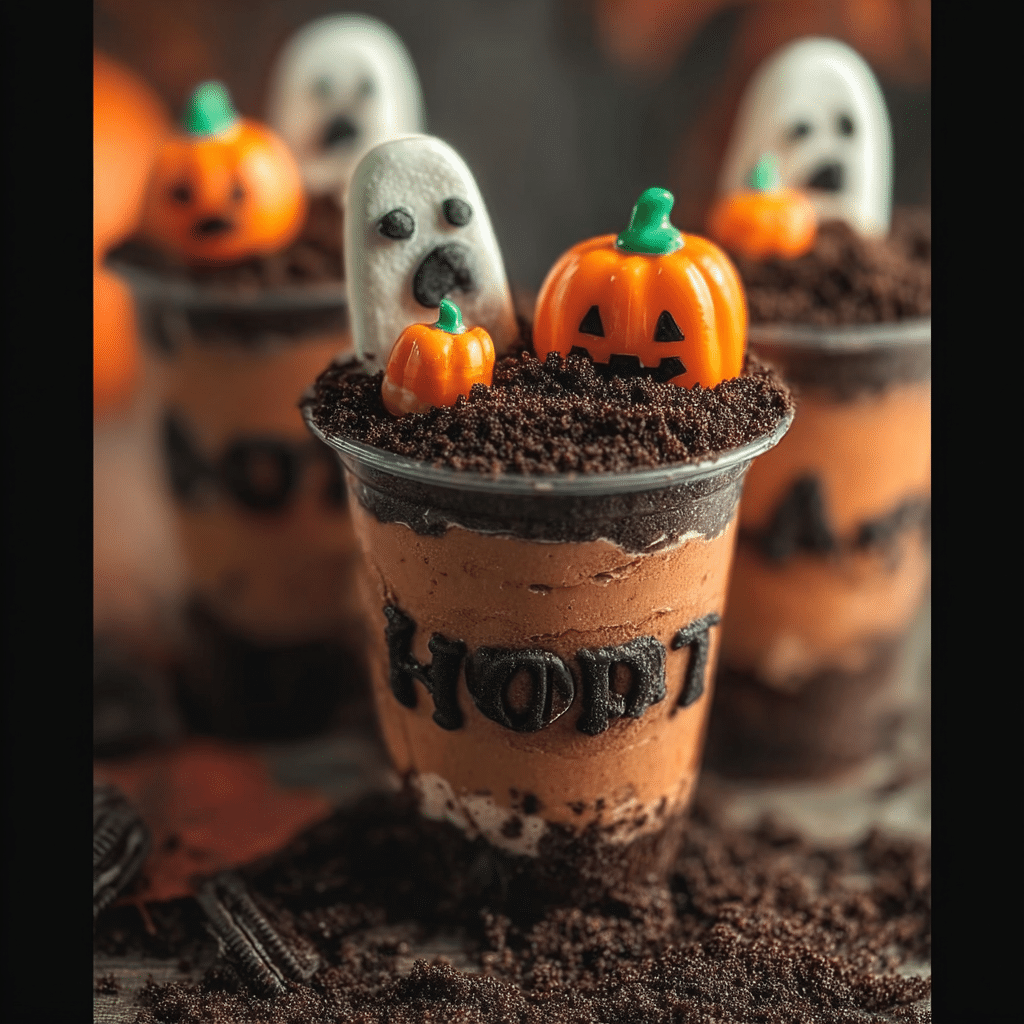
- Decorate with Candies: Once your cups are filled, it’s time to get creative. Sprinkle the remaining Oreo crumbs on top to mimic dirt. You can then place a few gummy worms and candy pumpkins on the top for that Halloween flair. Use the Wilton black writing icing to add any spooky decorations or messages—get artistic!
- Chill and Set: Cover your cups with plastic wrap and place them in the refrigerator for at least 30 minutes. This allows the flavors to meld together and the pudding to set properly. The chilling process is crucial for achieving that perfect texture.
Final Assembly
- Serve and Enjoy: After about 30 minutes of chilling, your Halloween dirt cups are ready to be served! Remove them from the refrigerator, and if you want, add a few more decorations right before serving. This dessert is best enjoyed chilled, especially during the spooky season!
- Common Mistakes to Avoid: One common mistake is overmixing the Cool Whip and pudding, which can lead to a dense texture. Also, don’t skip the chilling step—without it, your dirt cups won’t set properly and may become too runny.
- Clean Up: Don’t forget to clean your workspace as you go. This makes the process more enjoyable and less stressful, allowing you to focus on the fun part—decorating and enjoying your Halloween dirt cups!
Creating Halloween dirt cups is a delightful experience that combines creativity with culinary skills. As you layer the ingredients, think about the stories you’ll share over these treats. Whether it’s a family gathering or a spooky party with friends, these dirt cups are sure to be a hit. Happy Halloween baking!
Professional Tips and Techniques for halloween dirt cups
Halloween is that magical time of year when the air grows crisp, leaves change color, and the scent of pumpkins fills the air. It’s also a time for delicious and whimsical treats, like Halloween Dirt Cups. These delightful desserts are not only a feast for the eyes but also a treat for the taste buds, combining layers of creamy pudding, crushed cookies, and fun toppings. But to make your Halloween Dirt Cups truly stand out, there are some professional tips and techniques that can elevate your creation from good to unforgettable.
Professional Techniques
To start creating your Halloween Dirt Cups, one of the key elements is choosing the right pudding. While store-bought pudding can be convenient, making your own from scratch can add a depth of flavor that pre-packaged versions often lack. A simple vanilla pudding can be enhanced with a touch of vanilla bean or a splash of almond extract for a unique twist. Remember to let it chill in the refrigerator until it’s set; this step is crucial for the perfect texture.
When it comes to the layering process, using a piping bag can give you a professional finish. This technique allows you to create even layers and intricate designs that will impress your guests. If you don’t have a piping bag, a resealable plastic bag with the corner snipped off can work just as well. Fill the bag with your pudding and let your creativity flow as you layer it with the crushed cookies.
Don’t shy away from garnishing your Halloween Dirt Cups. Use edible decorations like gummy worms, candy eyes, or even crumbled candy bars to add that extra festive touch. You could also consider using themed cookie cutters to create spooky shapes from fruit or marshmallows to place on top of your cups. Remember, the goal is to make your dessert visually appealing and fun!
Troubleshooting Guide
Even with the best intentions, sometimes things don’t go according to plan. If your pudding ends up too runny, it might not have set long enough. In this case, you can whisk in a bit of cornstarch slurry (cornstarch mixed with a little cold milk) and then gently heat the mixture until it thickens. If your dirt cups seem too sweet, consider balancing the flavors with a pinch of salt or a dollop of unsweetened whipped cream on top.
Another common issue is when the cookie crumbs become soggy. To avoid this, layer your crushed cookies closer to the top of the cup. This way, they maintain their crunchiness and add that delightful texture contrast with the creamy pudding. If you’re preparing your cups in advance, consider keeping the cookie layer separate until you’re ready to serve. This will keep them fresh and crunchy, ensuring that every bite is as satisfying as the first.
Presentation Tips
Presentation can make or break your Halloween Dirt Cups. Opt for clear cups or jars to showcase the beautiful layers of pudding and cookie. Use cups that vary in height or shape for an interesting visual effect. You can also decorate the outside of the cups with themed stickers or washi tape to enhance the Halloween spirit.
Another fun idea is to serve your Halloween Dirt Cups on a tray filled with fake spider webs or autumn leaves for a spooky touch. For added flair, consider using dry ice or colored lights to create a dramatic, foggy effect. With a bit of creativity, your dessert can be the star of the Halloween party.
Wine and beverage pairings can also enhance your Halloween celebration. A sweet dessert wine, like a Moscato or a fruity Riesling, complements the sweetness of your Halloween Dirt Cups perfectly. If you’re looking for something non-alcoholic, consider a spiced apple cider or a pumpkin-flavored latte to match the season’s flavors.
Finally, don’t forget about make-ahead strategies! Halloween is busy enough without worrying about last-minute desserts. You can prepare your pudding and cookie layers a day or two in advance. Just assemble the cups right before serving for the best texture and taste. This way, you’ll have more time to enjoy the festivities and less time in the kitchen!
Creative Variations and Adaptations of halloween dirt cups
Halloween Dirt Cups are a versatile treat that can be adapted in countless ways to suit different tastes and dietary needs. While the traditional version with chocolate pudding and Oreo crumbs is a classic, there are plenty of creative variations and adaptations that can make your Halloween celebration even more special. Let’s dive into some of the most exciting ways to reinvent these delightful desserts.
Seasonal Variations
As the seasons change, so too can the ingredients you use in your Halloween Dirt Cups. For a twist on the classic, consider using pumpkin spice pudding instead of vanilla or chocolate. This will give your cups a seasonal flavor that’s perfect for fall. You can also incorporate real pumpkin puree into your pudding for added richness and a healthy boost. Pair it with crushed ginger snap cookies for a flavor profile that screams autumn.
Additionally, consider swapping out the cookies for other seasonal treats. Crushed graham crackers can mimic a sandy beach look, which is perfect for a Halloween-themed beach party. Or, for a festive twist, use crushed candy corn-flavored cookies or even spooky-themed cookies shaped like ghosts and bats. The possibilities are endless!
Dietary Adaptations
In today’s world, accommodating dietary restrictions is more important than ever. Luckily, Halloween Dirt Cups can easily be modified for different dietary needs. For a vegan version, substitute the pudding with a plant-based alternative made from almond or coconut milk and use dairy-free whipped cream. You can find many recipes online that will guide you to create a rich and creamy vegan pudding.
If you need to make your Halloween Dirt Cups gluten-free, simply use gluten-free cookies to create the “dirt.” There are many delicious gluten-free options available nowadays, including gluten-free Oreos, which taste just as good as the original! For a keto-friendly option, you can use sugar-free pudding and crushed nuts in lieu of cookies to keep the carb count low while still enjoying a satisfying dessert.
Creative Twists
For those who love to think outside the box, consider international fusion variations of Halloween Dirt Cups. For instance, you could take inspiration from the Mexican dessert called “tres leches” and create a tres leches dirt cup using the traditional sponge cake soaked in a mix of three milks, layered with whipped cream and chocolate crumbs. The creamy texture and sweet flavor profile would make for an exciting twist on the classic dirt cup.
For a spicy variation, consider adding a hint of cayenne pepper or chili powder to the pudding for an unexpected kick. This contrast of sweet and spicy can be a delightful surprise for your guests, making your Halloween Dirt Cups memorable.
Lastly, don’t forget about leftover transformations! If you have any excess pudding or cookie crumbs, consider using them to create a layered parfait with yogurt and fresh fruit. This not only reduces waste but also offers a healthier option for a quick snack or breakfast the next day.
In conclusion, Halloween Dirt Cups are a fun and playful dessert that can be tailored to suit a variety of tastes, dietary needs, and seasonal ingredients. With a little creativity and some professional techniques, you can make this treat a showstopper at your Halloween gathering. So gather your ingredients, roll up your sleeves, and let your imagination run wild with this festive dessert!
Storage, Reheating, and Meal Prep for halloween dirt cups
When it comes to preparing festive treats like Halloween dirt cups, knowing how to store them properly can make all the difference between a delicious dessert and a soggy mess. These delightful cups, made with layers of chocolate pudding, crushed cookies, and gummy worms, are not only a hit during Halloween but can also be enjoyed long after the spooky season ends. In this section, we’ll cover everything you need to know about storage, reheating, and meal prep for your Halloween dirt cups.
Short-term Storage
For short-term storage of your Halloween dirt cups, refrigeration is your best friend. After preparing your dirt cups, you should allow them to set in the refrigerator for at least 30 minutes to an hour. This helps the flavors meld together and ensures that the pudding is nice and chilled. Once they’re ready, you can cover them with plastic wrap or a lid if you’re using containers. If you’re using jars or cups, consider placing a piece of wax paper between the lid and the dessert to prevent condensation from dripping onto your delicious layers.
It’s crucial to use airtight containers to maintain the quality of your Halloween dirt cups. If you’ve made a large batch, I recommend portioning them into smaller containers. This not only makes for easy grab-and-go treats but also minimizes exposure to air each time you open the main container. Remember that the creaminess of the pudding and the crunchiness of the cookies can be affected by how well you store them, so airtight is the way to go!
Freezing and Long-term Storage
If you want to enjoy your Halloween dirt cups over a longer period, freezing is an option, but with some important considerations. You can freeze the pudding and the cookie mixture separately to maintain texture. When freezing, make sure to use freezer-safe containers or heavy-duty freezer bags. If you choose to freeze the cups already assembled, be aware that the cookies may lose their crunch and become soggy upon thawing.
To freeze your dirt cups, place them in the freezer for up to three months. When you’re ready to enjoy them, transfer the cups to the refrigerator to thaw overnight. If you want them to retain some of their original texture, consider adding fresh crushed cookies on top after thawing. This simple touch can bring back that delightful crunch and make your Halloween dirt cups taste fresh!
Reheating Best Practices
In general, there’s no need to reheat Halloween dirt cups since they are served chilled. However, if you find yourself with leftovers that need a little refreshing, you can give the pudding a quick stir to reintroduce some creaminess. If you have stored your cups in the refrigerator and they seem to have thickened too much, you can add a splash of milk to the pudding and mix gently until it reaches your desired consistency.
Always remember that when it comes to desserts like these, presentation is key. If your cups have been in the fridge for a few days and look a bit sad, consider adding a fresh layer of gummy worms or a sprinkle of crushed cookies to give them a new life. Your guests won’t have to know they were leftovers!
Meal Prep and Batch Cooking Strategies
Meal prepping your Halloween dirt cups can save you a lot of time, especially during the busy Halloween season. You can prepare the pudding and crushed cookie layers ahead of time and store them separately in the fridge. This allows you to assemble the cups right before your event. It’s a fun activity to include the kids in as well! They can help layer the pudding and cookies, and even design their own spooky creations.
Batch cooking is also a great strategy. If you know you’ll have a party or gathering, making a double batch of Halloween dirt cups ensures that you have enough for everyone. You can even create a mini “dirt cup bar” where guests can customize their cups with different toppings like sprinkles, gummy candies, or even a drizzle of chocolate sauce. This interactive approach helps make your dessert table the highlight of the night!
Food Safety Considerations
When storing and preparing Halloween dirt cups, food safety should always be a priority. Keep in mind that any ingredients containing dairy, like pudding and whipped cream, should be stored at appropriate temperatures to prevent spoilage. Always refrigerate the cups within two hours of preparation to avoid bacteria growth.
Additionally, ensure that your workspace and utensils are clean while preparing these treats. This is especially important if you’re working with children, as they may be more prone to cross-contamination. With some simple precautions, you can keep your Halloween dirt cups safe and delicious.
Shelf Life Expectations
When stored properly in the refrigerator, Halloween dirt cups can last up to 3-5 days. However, the texture of the cookies may begin to change after that point, potentially becoming soggy. If you decide to freeze them, remember that they can last up to three months, but for the best flavor and texture, consuming them within a month is ideal.
By following these storage guidelines and tips, you can ensure that your Halloween dirt cups remain fresh and delicious, ready to impress your family and friends at any Halloween gathering!
Nutritional Benefits and Health Information
While Halloween dirt cups are often thought of as a fun and festive treat, you might be surprised to learn that they can also offer some nutritional benefits. In this section, we’ll dive into the nutritional breakdown of this delightful dessert, explore the health benefits of its key ingredients, and discuss dietary considerations to help you make informed choices while indulging in this seasonal favorite.
Nutritional Profile
The typical Halloween dirt cups consist of chocolate pudding, crushed cookies (usually Oreos), and gummy worms. A standard serving can vary based on the proportions used, but let’s break down a general cup:
- Calories: Approximately 250-300 calories per serving
- Fat: 10-15 grams (depending on the type of pudding and whipped cream used)
- Carbohydrates: 35-45 grams
- Protein: 3-5 grams
While these figures can fluctuate based on specific brands and additional toppings, it’s clear that Halloween dirt cups are a calorie-dense treat primarily due to the sugars and fats found in pudding and cookies.
Health Benefits
Despite their reputation as a sugary dessert, there are some redeeming qualities in Halloween dirt cups when made with mindful ingredients. For instance, chocolate pudding can provide some antioxidants from cocoa, which may offer heart health benefits. Additionally, if you opt for whole grain cookies, you can increase the fiber content, which aids in digestion.
Moreover, if you decide to add fruit as a topping, such as berries or banana slices, you can enhance the vitamin content. Berries are rich in antioxidants, vitamin C, and fiber, while bananas provide potassium and additional vitamins. These simple swaps can transform your Halloween dirt cups into a more nutritionally balanced treat.
Dietary Considerations
When preparing Halloween dirt cups, it’s essential to consider dietary restrictions and allergies. Common allergens in this dessert include dairy (from the pudding and whipped cream) and gluten (from the cookies). If you are catering to a gluten-free audience, consider using gluten-free cookies or even creating a base with crushed nuts or gluten-free granola.
For those who are lactose intolerant or vegan, there are numerous alternatives available. You can find plant-based puddings made from almond, coconut, or soy milk that are dairy-free. Additionally, using whipped coconut cream instead of traditional whipped cream can provide the same texture without the dairy. Making these substitutions allows everyone to enjoy Halloween dirt cups without compromising their dietary needs.
Finally, if you’re watching your sugar intake, consider reducing the amount of added sugars in your pudding or opting for sugar-free versions. This way, you can still indulge in the fun of Halloween dirt cups without overdoing it on sugar.
In conclusion, while Halloween dirt cups may seem like a simple dessert, they can be modified to fit various dietary needs and preferences. By making a few thoughtful ingredient swaps, you can enjoy this festive treat while still being mindful of your health. Embrace the fun of Halloween while savoring a dessert that can be both delicious and nutritious!
Frequently Asked Questions About Halloween Dirt Cups
Halloween dirt cups recipe
The classic Halloween dirt cups recipe typically consists of chocolate pudding, crushed Oreo cookies, and gummy worms for a spooky touch. Start by preparing instant chocolate pudding according to package instructions, then layer it in cups with crushed Oreos to resemble “dirt.” For an extra festive layer, consider adding whipped cream or Cool Whip on top before sprinkling more crushed Oreos for texture. To make it even more thematic, you can garnish with Halloween-themed candies or edible decorations. These cups are not only visually appealing but also incredibly easy to assemble, making them perfect for parties or gatherings.
Halloween dirt cups for adults
To elevate Halloween dirt cups for adults, consider adding a splash of liqueur to your pudding mix, such as coffee liqueur or hazelnut liqueur, for an adult twist. You can also incorporate layers of rich chocolate mousse or cheesecake filling instead of standard pudding for a more decadent dessert. Use high-quality dark chocolate cookies for the “dirt” layer to enhance the flavor profile, and consider topping with dark chocolate shavings or a drizzle of chocolate sauce for an elegant finish. Additionally, you might want to serve these in sophisticated glassware to add a touch of class to your Halloween festivities. Don’t forget to garnish with adult-friendly treats like chocolate-covered pretzels shaped like bones!
Oreo dirt cup recipe
The Oreo dirt cup recipe is a simple yet delightful treat that combines crushed Oreos with layers of chocolate pudding and whipped cream. Start by mixing together the pudding according to the package directions, then alternate layers of pudding and crushed Oreos in clear cups or jars for a visually appealing presentation. For added flavor, consider folding in some peanut butter or cream cheese into the whipped cream for a unique twist. Finish with a generous topping of gummy worms or spooky candy decorations to bring out the Halloween theme. This recipe is versatile, so feel free to customize the layers with your favorite flavors or toppings!
Halloween dirt cake
Halloween dirt cake is a delightful variation of the dirt cup concept, typically made in a larger dish for sharing. The base usually consists of a rich chocolate cake, layered with chocolate pudding and topped with crushed Oreos to mimic dirt. To make it festive, you can add layers of orange and black frosting or use Halloween-themed sprinkles throughout the layers. For decoration, place gummy worms and candy pumpkins on top for a playful touch. This cake is not only a showstopper at any Halloween party but also allows for easy serving and sharing among guests.
Dirt cups for adults
Dirt cups for adults can be made more sophisticated by adding layers of rich flavors and textures. Begin with a base of chocolate mousse or a coffee-flavored pudding, then layer with crushed chocolate cookies or even graham crackers for added crunch. For a visually striking presentation, serve in elegant glasses and top with whipped cream, chocolate shavings, or edible flowers. You can also infuse the dessert with liqueurs like Baileys or Kahlua for an adult-only version. This dessert is perfect for a Halloween gathering, combining indulgence with a playful twist!
Dirt cups Christmas
Transforming dirt cups for Christmas can be a fun and creative way to celebrate the holiday season. You can use red and green colored pudding or even peppermint-flavored pudding to match the festive theme. Layer crushed chocolate cookies with the pudding and top with whipped cream, then garnish with crushed candy canes or holiday-themed sprinkles for a festive touch. Using clear cups allows the layers to be seen, creating a visually appealing dessert that fits the holiday vibe. This festive treat is not only easy to make but also offers a playful and delicious alternative to traditional Christmas desserts!


