Ingredients
Levain (1:1:1 ratio, 3-4 hours peak at 78-80ºF)
- 45 grams sourdough starter ripe, bubbly and active , about 3 Tablespoons
- 45 grams all-purpose or bread flour , about 6 Tablespoons
- 45 grams water , about 3 Tablespoons
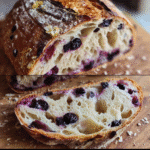
Blueberry Lemon Sourdough Bread
- 120 grams levain ripe, bubbly and active, about ½ cup, see recipe notes
- 330 grams water, 1 cup plus 6 Tablespoons
- 55 grams granulated sugar, about 1/4 cup
- 12 grams lemon zest, about 2 Tablespoons from 2 medium-sized lemons
- 10 grams salt, about 1.5 teaspoons
- 500 grams bread flour, about 3.5 cups
- 150 grams fresh blueberries, about 1 cup
Instructions
Levain (1:1:1 ratio, 3-4 hours peak at 78-80ºF)
- Mix together ripe/active sourdough starter with all-purpose or bread flour and water. Cover loosely and let sit 3-4 hours at 78-80°F until doubled, bubbly & peaked.
Note: If you have a ripe, bubbly, active sourdough starter that is fed equal parts flour and water – you can substitute 120 grams of it for the levain in this recipe.
Blueberry Lemon Sourdough Bread (78-80ºF dough temperature throughout the bulk fermentation)
- Mix Dough: To a large bowl, mix together ripe levain with water, granulated sugar and lemon zest. Whisk together. Then add salt and bread flour. Mix together using a dough whisk or spoon until a wet and sticky dough forms and the ingredients are fully combined. Cover and let rest for 30 minutes.
- Stretch and Folds: After the dough has rested, you will perform a series of “stretch and folds” over the next 1 ½ hours. The goal is to strengthen the dough through a gentle kneading process. You will also add the blueberries into the dough during this process which will evenly disperse them throughout the dough.
- To “stretch and fold,” wet your hand (so it doesn’t stick to the dough). Reach around the dough down to the bottom of the bowl, pull the dough up and over and place it on top of the dough. Turn the bowl a quarter turn and repeat the stretch and fold. Turn another quarter turn and repeat. Perform one more quarter turn, stretching and folding the dough. Cover and set aside. Take note of how the dough feels through this process. It will go from feeling a little shaggy to smooth and elastic. Cover the bowl and wait about 30 minutes between stretch and folds.
- Stretch and fold #1: 30 minutes into bulk fermentation
- Stretch and fold #2: 30 minutes later, the dough will spread out. Add the fresh blueberries. Stretch and fold again, beginning to incorporate the blueberries into the dough.
- Stretch and fold #3: 30 minutes later, stretch and fold again. The blueberries will continue dispersing throughout the dough. Be gentle so you don’t squash the berries, releasing their juices. We want the blueberries to stay as whole as possible.
- Stretch and fold #4: 30 minutes later, stretch and fold again. You should notice the dough feeling more cohesive and strong during this stretch and fold and not needing very much folding to come together. If your dough still feels loose, add in another couple stretch and folds to help strengthen and tighten the gluten strands.
- Rest: Cover the dough and let rise for 2-2.5 more hours at 78ºF. You’ll know the dough is ready to shape when the dough is puffed up about 40%, jiggles when you shake the bowl, and has scattered bubbles visible on the sides and top.
- If your dough is cooler, this will take longer and you will want to look for a larger percentage rise before shaping the dough.
- Pre-shape: Tip the bowl upside down, allowing the dough to fall onto a clean counter surface. Be gentle to avoid degassing the dough as much as possible. Wet your hands and the bench knife if needed and push the bench knife under the dough on one side and your free hand on the other side to tuck the dough under itself. The goal is to introduce some tension into the dough. Repeat this process, going around in a circle until you have a ball of dough. Do your best not to break any of the blueberries open.
- Bench Rest: Let the dough rest uncovered for about 30 minutes at room temperature. The dough will flatten a little as it sits. This allows the gluten in the dough to relax and prepares the dough to be shaped.
- Shaping: Prepare a bowl or banneton. Place a kitchen towel or hair net in the bowl and liberally flour as needed. Sprinkle a little flour on top of the dough if desired. Using a bench knife, lift the dough up off the counter and place it on top of the countertop – floured side down. This ensures that the flour is staying mainly on the outside of the dough.
Going around in a circle, pull the dough sideways towards you and then fold up to the top of the round. Move 90 degrees and repeat the same process pulling the dough sideways and then folding up to the top. As you continue this process around the dough, increase the tension as you pull. Gather the bread into a circle and place into a lined bowl. If any of the blueberries pop out of the bread, remove them or stick them on the bottom side of the bread dough.
Note: It is possible to shape the dough without any extra flour. The dough can stick to the kitchen towel but doesn’t stick to the hair nets if cold proofed.
- Cold Fermentation: Cover the dough with the tea towel/shower cap/plastic wrap and refrigerate overnight or up to 14-20 hours. If you want to bake the same day, you can let the dough rise for about 2-3 hours until puffed up and risen. Then bake according to recipe directions.
- Preheat the oven: Put a Dutch oven (top and all) into the oven and preheat to 450°F for 20 minutes. You are working with very high temperatures, so make sure you have some good hot pads. Once preheated for 20 minutes, pull the loaf out of the refrigerator. Remove the covering. Place a piece of parchment paper on top of the dough. Flip the dough over so it is now sitting on the parchment paper. Take off the bowl/banneton and the kitchen towel.
- Scoring: Use a very sharp knife or bread lame to score the dough. Take the bread lame and score on one side of the dough, at a shallow angle about 30º and 1 inch deep. Score straight from the refrigerator on the cold dough for best results. This is not a loaf for intricate scoring – the blueberries will burst during baking which will be the focal point of your loaf.
- Baking: Carefully remove the Dutch oven from the 450°F oven. Take the lid off and place your bread into the Dutch oven (including parchment paper – this helps with the transfer). Put the lid on and put it back in the oven. Lower the temperature to 425°F and bake for 25 minutes. After 25 minutes, take the lid off the Dutch oven and lower the temperature again to 400ºF for the remainder of the bake. The sugar in the dough can lead to a crispier crust, so I like to decrease the temperature for the last 20 minutes of baking. Once the loaf reaches 200-210ºF, remove the bread from the Dutch oven to a cooling rack and let the bread cool completely before slicing. Enjoy!