Peanut butter jelly cookies are not just a delightful treat; they are a nostalgic journey back to childhood for many of us. The first time I encountered this recipe, I was rummaging through my grandmother’s old recipe box, searching for a sweet pick-me-up after a rough day at school. As I stumbled upon a handwritten card that read “Peanut Butter Jelly Cookies,” I felt a rush of excitement. What could be better than combining two childhood favorites into one delicious cookie? It was a moment of discovery that changed my baking adventures forever.
The Story Behind This Recipe
As I pulled together the ingredients—creamy peanut butter, sweet jelly, and a sprinkle of sugar—I couldn’t help but think of all the peanut butter and jelly sandwiches I had devoured over the years. Each bite was a reminder of lazy summer afternoons spent playing in the backyard, with the sun on my face and the laughter of friends echoing in the background. This recipe transformed that childhood memory into something even more magical. The first batch was a little crumbly, but with each attempt, I learned the nuances of baking, adjusting the ingredients until I found the perfect balance between the rich, nutty flavor of peanut butter and the sweet, fruity essence of jelly.
This dish is special because it takes a simple concept—peanut butter and jelly—and elevates it into a delightful cookie that can be enjoyed at any time of the day. While traditional peanut butter cookies have their own charm, the addition of jelly makes each bite a burst of flavor that is both comforting and exciting. This cookie is a perfect example of how a classic can be reinvented to bring joy to busy families looking for quick dessert solutions. With just a handful of ingredients and minimal prep time, you can whip up a batch of these cookies in less than an hour, making them an ideal treat for those hectic weeknights or casual gatherings.
Why You’ll Love This Dish
Seasonal relevance plays a crucial role in when to make these cookies. While they are delightful year-round, they feel especially nostalgic during the back-to-school season when kids are settling into their routines. Imagine packing these cookies in lunchboxes, offering a sweet surprise that is sure to brighten any child’s day. They also make a great addition to holiday cookie trays, providing a unique twist that stands out amongst the more traditional offerings.
On an emotional level, peanut butter jelly cookies connect us to our past. They remind us of simpler times, of family gatherings where laughter and food intertwined, creating bonds that last a lifetime. Baking these cookies is not just about the end result; it’s about the experience of creating something that brings joy to your loved ones. The smell of cookies baking in the oven can evoke memories of my grandmother’s kitchen, filled with love and warmth. It’s a reminder that food has the power to connect us, to create cherished moments.
In this guide, you will learn everything you need to know about making peanut butter jelly cookies—from the ingredients and techniques to creative variations that will keep this recipe fresh and exciting. You’ll also discover tips to make these cookies even more special, whether it’s through the use of unique jellies or by adding a twist of your own. So, grab your apron, and let’s dive into the world of peanut butter jelly!
The Rich History and Cultural Significance of peanut butter jelly
The rich history and cultural significance of peanut butter jelly cookies are deeply intertwined with the popular peanut butter and jelly sandwich that has become a staple in American households. The origins of peanut butter can be traced back to the ancient Incas and Aztecs, who ground peanuts into a paste. However, the modern version we know today began to take shape in the late 19th century. In 1884, Marcellus Gilmore Edson patented a process of making peanut butter, which quickly gained popularity as a nutritious and affordable food source.
Origins and History
The combination of peanut butter and jelly as a sandwich is believed to have emerged during the 1940s, particularly during World War II when rations included peanut butter and jelly. Soldiers would combine the two to create a delicious meal that was easy to prepare and transport. As these soldiers returned home, they brought the sandwich with them, leading to its rise in popularity among families. Over the years, the sandwich evolved, and so did the idea of using these flavors in baked goods. The peanut butter jelly cookie was born out of a desire to capture the essence of that beloved sandwich in a new and exciting way.
Regional variations of peanut butter jelly cookies can be found throughout the United States. Some families prefer to use chunky peanut butter for added texture, while others opt for flavored jellies like raspberry or strawberry to enhance the flavor profile. In some areas, you might even find recipes that include oats or chocolate chips to create a more decadent treat. This adaptability has allowed the cookie to grow and evolve, incorporating local tastes and preferences.
Cultural Significance
Peanut butter jelly cookies are not only a nostalgic treat; they also hold cultural significance as a symbol of American childhood. They represent the carefree days of youth, when the biggest concern was getting to the playground on time. Traditionally, these cookies have been served at family gatherings, bake sales, and school events, making them a beloved addition to any celebration. Their simplicity and familiarity make them a comforting choice for both kids and adults alike.
Famous chefs and bakers have also put their unique spins on peanut butter jelly cookies. Some have experimented with gourmet ingredients, like artisanal peanut butter or homemade preserves, while others have created gluten-free or vegan versions to cater to modern dietary needs. This evolution keeps the cookie alive in the culinary world and allows it to be appreciated by new generations.
Nutritional Benefits
In addition to their emotional and cultural significance, peanut butter jelly cookies offer some nutritional benefits as well. Peanut butter is a good source of protein and healthy fats, making it a filling ingredient that can help sustain energy levels. When combined with whole grain flours, these cookies can be a more nutritious option compared to other sugary treats. Additionally, the jelly adds a hint of fruitiness, providing a touch of vitamins and antioxidants.
As we explore the world of peanut butter jelly cookies, it becomes clear that they are more than just a sweet indulgence; they are a celebration of childhood, creativity, and family traditions. Whether you’re baking them for a special occasion or simply to enjoy as a treat, these cookies carry with them the warmth and love of those who have come before us. Join me as we continue to uncover the secrets behind this delightful recipe and learn how to make the perfect batch of peanut butter jelly cookies!
Essential Ingredients for Perfect peanut butter jelly
When it comes to baking, the ingredients you choose can make or break your creation, especially when it involves a delightful treat like peanut butter jelly cookies. These cookies are not just a nostalgic nod to childhood snacks; they are a celebration of flavors and textures that come together in a magical way. To achieve the perfect balance of sweetness, nuttiness, and that irresistible jelly center, it’s essential to understand each ingredient’s role and how to select the best ones. Let’s dive into the essential ingredients for perfect peanut butter jelly cookies.
Essential Ingredients
- 1 stick (113 grams) unsalted butter: Butter is the foundation of many baked goods, imparting richness and flavor. Unsalted butter allows you to control the salt levels in your cookies. Always choose high-quality butter for the best taste; organic varieties are often creamier and more flavorful.
- 1 cup (270 grams) creamy natural peanut butter, very well stirred: Peanut butter is the star of this cookie! Choosing natural peanut butter means opting for a product without added sugars or preservatives. The texture should be creamy, and a well-stirred version ensures that the oils are evenly incorporated, leading to a consistent batter.
- 1 cup (200 grams) packed light brown sugar: Brown sugar adds moisture and a slight chewiness to cookies. Its molasses content provides a rich flavor that pairs beautifully with peanut butter. When using brown sugar, make sure it’s packed tightly in the measuring cup to get the right amount.
- 3/4 cup (150 grams) granulated sugar: This sugar contributes to the cookie’s sweetness and helps create that delightful crunchy exterior. Opt for organic granulated sugar if possible, as it is less processed.
- 2 3/4 cups (349 grams) bleached all-purpose flour: Flour is the backbone of any cookie. Bleached flour has been treated to achieve a finer texture and lighter color, which can lead to a more tender cookie. However, if you prefer whole grain, you can substitute a portion with whole wheat flour.
- 3/4 teaspoon baking soda: This leavening agent helps cookies rise and gives them a soft, chewy texture. Make sure your baking soda is fresh for maximum effectiveness.
- 1/2 teaspoon baking powder: Similar to baking soda, baking powder also aids in leavening, ensuring your cookies are light and airy. It contains both an acid and a base, which react when moisture is added.
- 1/2 teaspoon fine sea salt: Salt enhances the flavors of all the other ingredients. Using fine sea salt allows for better distribution throughout the batter, ensuring an even flavor in every bite.
- 2 large eggs, at room temperature: Eggs are crucial for binding the ingredients together and adding moisture. At room temperature, eggs blend more easily into the batter, which can result in a smoother dough.
- 1 tablespoon milk: A splash of milk helps achieve the right consistency in the dough. It adds moisture without making the batter too wet.
- 2 teaspoons vanilla extract: Vanilla extract adds depth and warmth to the flavor profile of the cookies. Opt for pure vanilla extract over imitation for the best taste.
- 3/4 cup (240 grams) strawberry jam or jelly, chilled: This is the delightful surprise in the center of each cookie! The choice between jam and jelly can depend on your personal preference. Jam tends to have more fruit bits, while jelly has a smoother texture. Whichever you choose, ensure it’s chilled for the best results.

Peanut Butter and Jelly Cookies
Ingredients
- 1 stick (113 grams) unsalted butter
- 1 cup (270 grams) creamy natural peanut butter, very well stirred
- 1 cup (200 grams) packed light brown sugar
- 3/4 cup (150 grams) granulated sugar
- 2 ¾ cups (349 grams) bleached all-purpose flour
- ¾ teaspoon baking soda
- ½ teaspoon baking powder
- ½ teaspoon fine sea salt
- 2 large eggs, at room temperature
- 1 tablespoon milk
- 2 teaspoons vanilla extract
- ¾ cup (240 grams) strawberry jam or jelly, chilled
Instructions
- Preheat the oven to 350°F. Line large rimmed baking sheets with parchment paper.
- In a large microwave-safe bowl, microwave butter in 20-second bursts until melted. Add the peanut butter and stir until well combined. Add in the sugars and whisk together. Set aside to cool until just warm.
- In a medium bowl, whisk together the flour, baking soda, baking powder, and salt. Set aside.
- To the butter mixture, add the eggs, milk, and vanilla and whisk very well until thoroughly combined. Add the flour mixture and stir with a sturdy spatula until combined.
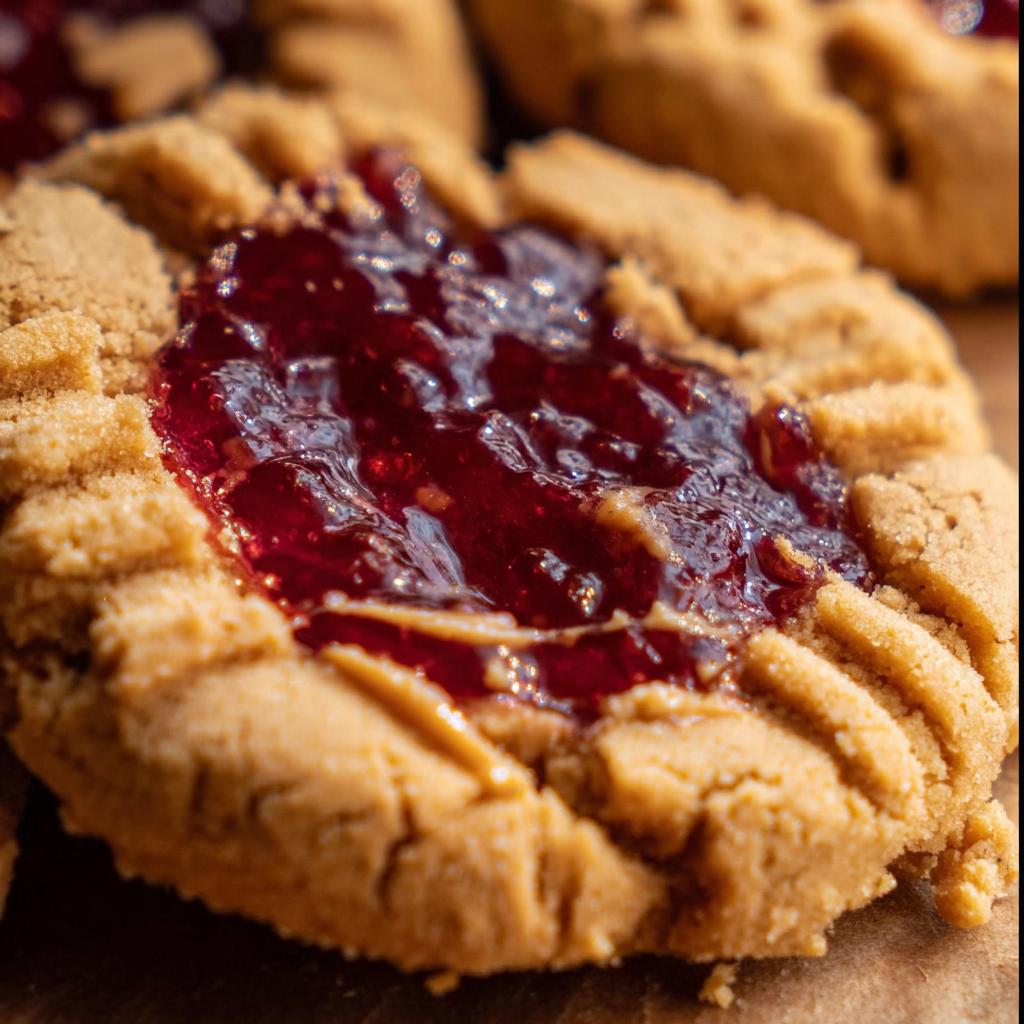
- Using a large spring-loaded cookie scoop, form the dough into 3-tablespoon rounds. Roll between your palms to smooth. Using your thumb, create a well in the center. Add 1 heaping teaspoon of preserves and partially seal it with dough. Keep some of the jam peeking out as you lightly roll it back into a ball between your palms. This process is a bit messy, but have fun with it! Place on baking sheet with the visible jam facing up. Repeat with remaining dough balls, spacing about 3 inches apart.
- Bake for about 14 minutes, or until puffed up and lightly brown at the edges.
- Let cookies cool for 5 minutes on the baking sheet before removing them to a cooling rack to cool completely.
- Store cookies in an airtight container for up to two days. The longer they sit, the softer they’ll become.
Shopping Tips
When shopping for these ingredients, quality matters. For the butter, seek out brands that are known for their rich flavor, often found in organic sections of your local grocery store. For peanut butter, look for options that list only peanuts (and perhaps salt) on the label—this guarantees you’re getting a pure product. The sugars can usually be found in any baking aisle, but checking for organic options can enhance the flavor of your cookies.
Flour is another ingredient where quality can significantly affect your baking. Try to buy bleached all-purpose flour from reputable brands, as they tend to have consistent protein content. When it comes to eggs, local farms or organic brands can provide fresher options that contribute to better flavor and texture.
Substitutions and Alternatives
Dietary restrictions should never hold you back from enjoying peanut butter jelly cookies! For those with nut allergies, sunflower seed butter is a fantastic alternative to peanut butter, providing a similar creaminess and flavor without the nuts. If you’re looking for a gluten-free version, consider using a one-to-one gluten-free flour blend instead of regular flour. Just ensure your baking soda and powder are gluten-free as well.
For vegans, you can replace eggs with flaxseed meal or applesauce, while using coconut oil instead of butter will keep the richness intact. And if you want to minimize refined sugars, try using natural sweeteners like maple syrup or coconut sugar, adjusting the amounts accordingly since these have different sweetness levels.
Lastly, for storage tips, keep your flour in an airtight container to maintain freshness, and make sure your peanut butter is stored in a cool, dry place. Jam can be stored in the refrigerator once opened, but make sure to check the expiration date for freshness. By choosing the right ingredients and understanding their roles, you can create mouthwatering peanut butter jelly cookies that will delight everyone!
Detailed Step-by-Step peanut butter jelly Cooking Instructions
Now that we’ve gathered all the essential ingredients for our peanut butter jelly cookies, it’s time to dive into the heart of the recipe: the cooking instructions! Baking is not just about following a set of directions; it’s an experience that engages all your senses. From the rich aromas wafting through your kitchen to the excitement of watching your cookies rise, this step-by-step guide will ensure that your baking experience is as delightful as the final product.
Preparation Steps
- Gather Your Ingredients: Start by assembling all your ingredients on the countertop. It’s essential to have everything ready for a smooth baking process. This is known as mise en place, a French term meaning “everything in its place.” It makes the baking experience more enjoyable and efficient!
- Preheat Your Oven: Preheat your oven to 350°F (175°C). This is a crucial step as it ensures that the cookies bake evenly. An oven thermometer can be handy if you want to check that your oven is at the right temperature.
- Prepare Your Baking Sheets: Line two baking sheets with parchment paper. This prevents the cookies from sticking and makes cleanup a breeze. If you don’t have parchment paper, a silicone baking mat will work just as well.
- Cream the Butter and Sugars: In a large mixing bowl, beat the unsalted butter, brown sugar, and granulated sugar together using an electric mixer on medium speed. Creaming these ingredients until they are light and fluffy (about 2-3 minutes) is essential for creating a light texture in your cookies. You want to see a pale color and a fluffy consistency.
- Add Peanut Butter: Next, add the creamy natural peanut butter to the mixture. Beat it in until it’s completely incorporated and smooth. The combination of peanut butter and butter will create a rich, creamy base that’s full of flavor.
- Incorporate Eggs and Vanilla: Add the eggs (make sure they are at room temperature) one at a time, mixing well after each addition. Then, add the vanilla extract. This is where you’ll begin to smell that deliciously nutty aroma as the batter comes together.
- Combine Dry Ingredients: In a separate bowl, whisk together the flour, baking soda, baking powder, and fine sea salt. This step is crucial because it evenly distributes the leavening agents and salt throughout the flour, ensuring that your cookies rise properly.
- Mix Dry and Wet Ingredients: Gradually add the dry ingredients to the wet mixture, mixing on low speed until just combined. Be careful not to overmix; this can lead to tough cookies. You want a soft dough that holds together well.
- Add Milk: Add the tablespoon of milk to the dough and mix until just incorporated. This will help soften the dough slightly, making it easier to scoop.
- Chill the Dough: For best results, cover the dough with plastic wrap and chill it in the refrigerator for at least 30 minutes. Chilling helps the flavors meld and prevents the cookies from spreading too much while baking.
Cooking Process
- Scoop the Dough: Once the dough is chilled, use a cookie scoop or tablespoon to portion out even balls of dough onto the prepared baking sheets, leaving about 2 inches between each ball. This allows room for spreading.
- Make an Indentation: Using your thumb or the back of a teaspoon, gently press down in the center of each cookie dough ball to create a small well. This is where the jelly will go, so make sure it’s deep enough to hold a generous amount!
- Add the Jelly: Spoon about a teaspoon of chilled strawberry jam or jelly into each indentation. The jelly will melt slightly during baking, creating a deliciously gooey center.
- Bake: Place the baking sheets in the preheated oven and bake for 10-12 minutes, or until the edges are lightly golden. The centers may look slightly underbaked, but they will continue to cook on the baking sheet after being removed from the oven, giving you that perfect chewy texture.
- Cool the Cookies: Once baked, remove the cookies from the oven and let them cool on the baking sheets for about 5 minutes before transferring them to a wire rack to cool completely. This cooling time is essential for the cookies to set properly.
Final Assembly
- Check for Doneness: The cookies should be soft to the touch but not doughy in the center. They will firm up as they cool, so don’t worry if they appear a bit soft when you first take them out of the oven.
- Serve and Enjoy: Once cooled, these peanut butter jelly cookies are ready to be devoured! They are delightful on their own, but you can also pair them with a glass of milk or a scoop of vanilla ice cream for an extra special treat.
- Storage: Store any leftover cookies in an airtight container at room temperature for up to a week. If you want to keep them longer, consider freezing them. Just make sure to separate layers with parchment paper to prevent sticking.
Throughout this baking process, remember to enjoy the journey! Baking is as much about the experience as it is about the final product. From the joy of mixing the ingredients to the aroma of cookies baking in the oven, peanut butter jelly cookies are a delicious way to bring a bit of warmth and nostalgia into your home. Happy baking!
Professional Tips and Techniques for peanut butter jelly
When it comes to baking peanut butter jelly cookies, having a few professional tips and techniques under your belt can elevate your cookie game from ordinary to extraordinary. Whether you’re a novice baker or someone with a bit of experience, understanding the nuances of this delightful treat can make all the difference. So, let’s dive into some insider secrets that will help you create the perfect peanut butter jelly cookies.
Professional Techniques
First things first, let’s talk about the dough. The foundation of any great cookie is the dough, and for peanut butter jelly cookies, using room-temperature ingredients is crucial. This means pulling out your butter and eggs ahead of time. Room temperature ingredients blend more evenly, creating a smoother dough that results in a tender cookie. When you combine the peanut butter and butter, mix them until they are creamy and well combined. This step is key to achieving that rich, flavorful taste.
Another professional tip is to not overmix your dough once you add the flour. Overmixing can lead to tough cookies, which is not what we want. Mix just until the ingredients are combined; a few flour streaks are okay! This is where you can also fold in your choice of jelly or jam. I recommend using a fruit preserve with chunks of fruit for added texture and flavor. Don’t be afraid to get a little adventurous with your jelly selection; raspberry and strawberry are classics, but blackberry or peach can add a unique twist to your peanut butter jelly cookies.
As for baking, it’s essential to use parchment paper on your baking sheets. Not only does this make for easy cleanup, but it also helps to ensure that your cookies bake evenly without sticking. Preheating your oven is another vital step. It allows your cookies to start baking at the right temperature, promoting that perfectly chewy texture we all crave. I often find that a little experimentation with baking time can yield different textures; if you want a softer cookie, take them out a minute or two earlier than the recipe states.
Troubleshooting Guide
Even the most seasoned bakers run into hiccups from time to time. One common issue with peanut butter jelly cookies is that they can spread too much during baking. This can happen if your butter is too soft or your dough is too warm. To combat this, chill your cookie dough for about 30 minutes before scooping it onto the baking sheet. This simple step can help maintain the shape of your cookies, resulting in that perfect, soft center and slightly crisp edges.
If you find that your cookies are too dry, it could be due to the ratio of flour to peanut butter. Always measure your ingredients carefully, and consider adding a tablespoon of milk or an extra egg yolk to provide moisture. On the other hand, if your cookies are too gooey or undercooked, it could be a matter of underbaking or using too much jelly. If you’re adding jelly, be mindful of the amount; it should complement the cookie, not overwhelm it.
Presentation Tips
Let’s not forget about the presentation! Peanut butter jelly cookies can be dressed up in a variety of ways. A light dusting of powdered sugar can give them a charming finish, making them perfect for special occasions. Alternatively, you can drizzle melted chocolate over the top for a decadent touch. If you’re feeling particularly creative, try making sandwich cookies by spreading jelly between two peanut butter cookies. This not only looks impressive but also offers a deliciously gooey center that everyone will love.
For serving, consider pairing your cookies with a glass of milk or even a scoop of vanilla ice cream for an indulgent treat. If you’re looking to impress guests, arrange your cookies on a beautiful platter, perhaps alongside fresh fruits or a selection of artisanal jams. Not only will this enhance the overall presentation, but it will also invite everyone to get creative with their cookie pairings!
To wrap up this section, remember that baking is as much about the process as it is about the final product. Enjoy the journey of making peanut butter jelly cookies, and don’t hesitate to put your own spin on things. With these tips in hand, you’ll be well on your way to creating cookies that are not only delicious but also uniquely yours!
Creative Variations and Adaptations of peanut butter jelly
Peanut butter jelly cookies are a beloved classic, but that doesn’t mean they have to be one-dimensional. There are countless ways to get creative with this recipe, allowing you to tailor it to your tastes, dietary needs, or even seasonal ingredients. Let’s explore some exciting variations and adaptations that will keep your cookie jar overflowing with deliciousness!
Seasonal Variations
One of the best things about peanut butter jelly cookies is their adaptability to seasonal ingredients. In the fall, for example, you can swap out traditional jelly for homemade apple butter or pumpkin butter, giving your cookies a cozy, autumnal twist. The spices in these spreads will complement the nutty flavor of the peanut butter beautifully.
Winter is the perfect time to incorporate flavors like ginger or cinnamon. Consider adding a pinch of ground nutmeg or a splash of vanilla extract to your dough for a warm, inviting aroma. You could even use a cranberry jelly or a spiced fruit preserve for a festive touch. Spring offers a plethora of fresh fruits, so consider making a strawberry or raspberry jam from scratch for a fresh, vibrant filling that bursts with flavor.
As summer rolls around, you can experiment with tropical flavors. Mango or passion fruit jelly would add a sweet, exotic flair to your cookies. Imagine enjoying a peanut butter jelly cookie on a warm summer afternoon—pure bliss!
Dietary Adaptations
With the rise in dietary restrictions and lifestyle choices, it’s essential to consider adaptations for those who are gluten-free, vegan, or on a keto diet. For gluten-free peanut butter jelly cookies, you can easily substitute all-purpose flour with almond flour or a gluten-free flour blend. Just be sure to check that your peanut butter and jelly are also gluten-free. They should be, but it’s always good to double-check the labels!
If you want to go vegan, consider using flaxseed meal mixed with water as an egg substitute—about one tablespoon of flaxseed meal mixed with three tablespoons of water equals one egg. Additionally, choose a vegan butter or coconut oil to substitute for regular butter. Many jellies are naturally vegan, but as with gluten-free, always check the labels to be sure.
For those following a keto diet, you can make peanut butter jelly cookies with almond flour and a sugar substitute like erythritol or stevia. Look for sugar-free jelly options or make your own using fresh fruit and a low-carb sweetener. These adaptations ensure that everyone can enjoy the deliciousness of peanut butter jelly cookies, regardless of their dietary preferences.
Creative Twists
If you’re feeling particularly adventurous, consider some international fusion variations of peanut butter jelly cookies. For instance, you could incorporate Asian flavors by adding a hint of sesame oil or using a sweet red bean paste as the filling. The combination of peanut butter and red bean is a delightful nod to Asian desserts and will surprise your palate in the best way possible.
Another creative twist could be inspired by the beloved s’mores. Imagine peanut butter cookies with a layer of jelly, topped with mini marshmallows and a drizzle of chocolate. You can even toast the marshmallows slightly for that campfire effect. The combination of flavors will take you back to summer nights spent roasting marshmallows over a fire!
Lastly, don’t forget about leftovers! If you find yourself with extra cookies, consider transforming them into a delicious ice cream sandwich. Just take two cookies, add a scoop of your favorite ice cream in between, and you have a delightful treat that’s perfect for any occasion. You could even roll the edges in crushed nuts or chocolate chips for an extra special touch.
In conclusion, peanut butter jelly cookies are not just a treat; they’re a canvas for creativity and culinary exploration. With the right variations and adaptations, you can enjoy these cookies throughout the year and ensure that everyone can join in on the deliciousness. So, roll up your sleeves and get ready to mix things up in the kitchen!
Storage, Reheating, and Meal Prep for peanut butter jelly
When it comes to enjoying peanut butter jelly cookies, understanding how to store, reheat, and prep them can enhance your baking experience and ensure that every bite remains delicious. Whether you’re baking a batch for a special occasion or just for a cozy night in, proper storage and meal prep techniques are essential.
Short-term Storage
After you’ve baked your peanut butter jelly cookies and they’ve cooled to room temperature, the first step is to think about how to store them for short-term enjoyment. Ideally, you want to keep them fresh while maintaining that delightful texture and flavor. Place them in an airtight container. This prevents them from absorbing moisture from the air and helps to keep them chewy and soft. If you’re using a plastic container, layer the cookies with parchment paper to keep them from sticking together.
For short-term storage, a cookie jar is also a great option, but make sure it’s sealed properly. If you plan to eat your cookies within a week, they can be kept at room temperature. However, if you think you might take a little longer to get through them, I recommend placing them in the refrigerator. This can extend their freshness up to two weeks. Just remember to take them out about 15-20 minutes before enjoying them to allow them to soften up again.
Freezing and Long-term Storage
For those who love to bake in batches or want to prepare their peanut butter jelly cookies for future enjoyment, freezing is an excellent option. To freeze your cookies, first ensure they are completely cooled. You can freeze them either baked or as dough. If you opt for the dough method, scoop out the cookie dough using a cookie scoop and place the balls onto a baking sheet lined with parchment paper. Freeze them until solid, then transfer them to a freezer-safe bag or container. This way, you can bake fresh cookies anytime without having to start from scratch.
When freezing baked cookies, it’s best to stack them with sheets of parchment paper in between to avoid sticking. They can last in the freezer for up to three months. Just make sure to label the container with the date for easy tracking. When you’re ready to enjoy them, simply thaw at room temperature or pop them in the microwave for a few seconds. Alternatively, you can reheat them in the oven at 350°F (175°C) for about 5-7 minutes to restore their original texture.
Reheating Best Practices
Reheating your peanut butter jelly cookies can be a delightful experience if done correctly. The goal is to bring back that just-baked warmth and texture without drying them out. If you’re reheating in the microwave, place the cookie on a microwave-safe plate and cover it with a damp paper towel. This will help to retain moisture. Heat it in 10-15 second intervals until warmed through.
For oven reheating, preheat your oven to 350°F (175°C). Place the cookies on a baking sheet and cover them loosely with aluminum foil to prevent them from becoming too crispy. Bake for about 5-7 minutes, and you’ll be rewarded with a warm, gooey treat that’s reminiscent of fresh-baked cookies.
Meal prep is another fantastic strategy when it comes to peanut butter jelly cookies. If you know you’ll have a busy week ahead, consider baking a large batch during your free time and storing them appropriately. Portioning them into individual servings can also help. Using small containers or zip-top bags, you can prepare grab-and-go snacks for lunch boxes or afternoon treats.
Food safety is also crucial when storing and reheating cookies. Always ensure that your cookies are cooled before sealing them in containers, as trapping heat can lead to condensation and sogginess. Additionally, if you’re baking with children or for a gathering, make sure to check for any allergies related to the ingredients in your cookies, such as peanuts or gluten.
In terms of shelf life, when stored properly at room temperature, cookies can last about a week. In the refrigerator, they can last up to two weeks, and in the freezer, they can maintain their quality for three months. Keeping track of your cookies’ freshness will ensure that you enjoy them at their best.
In conclusion, mastering the art of storage, reheating, and meal prep for peanut butter jelly cookies allows you to indulge in this delightful treat whenever the craving strikes. With the right techniques, you can savor the soft, chewy goodness of these cookies long after they’ve come out of the oven!
Nutritional Benefits and Health Information
As you dive into the world of peanut butter jelly cookies, it’s essential to appreciate not just the delightful taste but also the nutritional benefits they offer. Each ingredient plays a pivotal role in creating not just a flavorful treat but also one that can be part of a balanced diet. Let’s take a closer look at the nutritional breakdown and health information surrounding these beloved cookies.
Nutritional Profile
The primary ingredients in peanut butter jelly cookies are peanut butter, jelly (or jam), sugar, flour, and eggs. A typical cookie can have around 100-150 calories, depending on the size and specific ingredients used. Here’s a basic breakdown of the macronutrient content:
- Calories: Approximately 100-150 per cookie
- Carbohydrates: 15-20 grams, primarily from the flour and jelly
- Protein: 3-5 grams, mainly from the peanut butter and egg
- Fat: 5-8 grams, primarily from the peanut butter
Peanut butter is rich in healthy fats, primarily monounsaturated fats, which are beneficial for heart health. It also provides a decent amount of protein, making these cookies more filling than your average sweet treat. The jelly adds a touch of sweetness and provides simple carbohydrates, which can give a quick energy boost.
Health Benefits
One of the standout ingredients in peanut butter jelly cookies is, of course, peanut butter. Beyond its creamy texture and rich flavor, peanut butter offers numerous health benefits. It’s a good source of vitamin E, magnesium, and potassium. The healthy fats in peanut butter can help lower bad cholesterol levels, reducing the risk of heart disease.
Moreover, the fiber content in peanut butter aids digestion and promotes a feeling of fullness, which can be helpful if you’re watching your weight. Additionally, some studies suggest that nuts, including peanuts, may help with weight management and reducing the risk of chronic diseases.
While jelly isn’t the healthiest ingredient on its own—often containing added sugars—it does provide some vitamins if you choose varieties made from real fruit. Opting for natural or low-sugar jellies can enhance the health benefits of your cookies.
Dietary Considerations
When it comes to dietary considerations, peanut butter jelly cookies can fit into various eating plans. However, it’s essential to consider allergies, especially to peanuts. For those with nut allergies, alternative butters such as sunflower seed butter or soy nut butter can create a similar flavor profile without the allergens.
Individuals following a gluten-free diet can easily modify the recipe by using gluten-free flour. There are also vegan options available; substituting the egg with flaxseed meal or a commercial egg replacer can cater to plant-based diets.
The calorie content of these cookies can be adjusted based on your dietary needs. If you want to reduce the sugar content, consider using natural sweeteners like honey or maple syrup. You can also experiment with reducing the amount of sugar in the recipe, which can still yield delicious results while making your cookies a bit healthier.
In comparing peanut butter jelly cookies to similar desserts, they often stand out for their unique flavor combination. While chocolate chip cookies are a classic favorite, they tend to be higher in sugar and calories. Peanut butter cookies, on the other hand, can offer a more balanced nutritional profile while still satisfying that sweet tooth.
In conclusion, the nutritional benefits of peanut butter jelly cookies make them a delightful treat that can be enjoyed as part of a balanced diet. By understanding their nutritional profile and making simple modifications, you can indulge without the guilt, all while savoring the rich, comforting flavors that these cookies provide. So the next time you take a bite, remember that you’re enjoying more than just a cookie—you’re treating yourself to something that can be both tasty and nourishing!
Frequently Asked Questions About Peanut Butter Jelly
Best peanut butter and jelly cookies
The best peanut butter and jelly cookies are those that strike the perfect balance between chewy and crunchy, with a delightful burst of flavor from the jelly. To achieve this, use high-quality, creamy peanut butter for a smooth texture and pair it with your favorite jelly or jam—strawberry and raspberry are particularly popular. Consider adding a pinch of sea salt to the cookie dough to enhance the peanut butter flavor. For an extra twist, try mixing in chopped nuts or chocolate chips for added texture and richness. Finally, bake them until they are lightly golden to ensure they remain moist inside.
Peanut butter and jelly cookies recipe
A classic peanut butter and jelly cookie recipe typically consists of peanut butter, sugar, flour, and an egg, with a dollop of jelly added in the center. Start by preheating your oven to 350°F (175°C) and mixing together 1 cup of peanut butter, 1 cup of sugar, and 1 egg until smooth. Roll the dough into balls and place them on a baking sheet, then use your thumb to make an indentation in each ball. Fill the indentations with your choice of jelly and bake for 10-12 minutes or until the edges are golden. Allow them to cool on a wire rack to enhance the flavors.
3 ingredient peanut butter and jelly cookies
To make delicious 3-ingredient peanut butter and jelly cookies, you will only need peanut butter, sugar, and an egg. Start by mixing 1 cup of peanut butter, 1 cup of sugar, and 1 egg in a bowl until well combined. Roll the mixture into balls and place them on a baking sheet lined with parchment paper. Use your thumb to create an indentation in each ball and fill it with your favorite jelly. Bake at 350°F (175°C) for about 10 minutes, allowing them to cool before serving for an easy yet satisfying treat.
Old fashioned peanut butter and jelly cookies
Old-fashioned peanut butter and jelly cookies are characterized by their rustic flavors and nostalgic appeal. For a traditional recipe, use a combination of creamy peanut butter, granulated sugar, brown sugar, vanilla extract, and all-purpose flour. A key tip is to mix the dough thoroughly to achieve the right consistency, and for added depth, consider incorporating a pinch of baking soda. Once shaped, create a thumbprint in the center for the jelly, and use homemade jelly for a truly authentic flavor. Bake until golden brown and enjoy the delightful blend of peanut butter and jelly flavors.
4 Ingredient peanut butter and jelly cookies
For a simple and tasty 4-ingredient peanut butter and jelly cookie recipe, combine 1 cup of peanut butter, 1 cup of sugar, 1 egg, and 1/2 cup of your favorite jelly. Start by preheating your oven to 350°F (175°C) and mixing the peanut butter, sugar, and egg until smooth. Scoop the dough onto a baking sheet, then use your thumb to create an indentation in the center of each cookie. Fill the indentation with jelly and bake for about 10-12 minutes. This straightforward recipe yields cookies that are both chewy and flavorful, perfect for any occasion!
Easy peanut butter and jelly cookies
Easy peanut butter and jelly cookies can be made with just a few simple ingredients, making them a quick and delightful treat. Combine 1 cup of creamy peanut butter, 1 cup of sugar, and 1 egg in a bowl, mixing until well blended. Roll the dough into balls and place them on a lined baking sheet, then press down slightly and create an indentation for the jelly. Bake at 350°F (175°C) for about 10 minutes, and once they cool, fill the centers with your favorite jelly. These cookies are not only easy to prepare but also a fun recipe for kids to help with!
Peanut Butter and jelly cookies near me
If you’re looking for peanut butter and jelly cookies near you, consider checking local bakeries, coffee shops, or specialty dessert stores that may offer this classic treat. Many cafes nowadays have diversified their menus to include nostalgic items like peanut butter and jelly cookies. Additionally, use apps like Yelp or Google Maps to search for bakeries with positive reviews specifically mentioning these cookies. If you’re up for it, you could also organize a bake sale or cookie swap in your community to share homemade peanut butter and jelly cookies with friends and neighbors!


