Peppermint meltaways are a delightful confection that beautifully combines the richness of creamy chocolate with the refreshing zing of peppermint. I still remember the first time I stumbled across a recipe for these little gems. It was during a bustling holiday season, and the scent of peppermint wafted through the kitchen as I was frantically preparing for a family gathering. With a few simple ingredients—chocolate, butter, and crushed peppermint—I was able to whip up a batch that turned out to be the star of the dessert table. The way my family devoured these meltaways, their faces lighting up with each bite, was a moment of pure joy that I cherish to this day.
The origins of peppermint meltaways can be traced back to the classic combination of chocolate and peppermint that has delighted taste buds for generations. While the exact beginnings of this treat are somewhat murky, the pairing can be linked to the broader history of confections that utilize mint as a flavor enhancer. In many cultures, peppermint has long been celebrated not just for its refreshing taste but also for its medicinal properties. From ancient Egypt to modern kitchens, peppermint has carved a niche in culinary traditions worldwide.
The Story Behind This Recipe
This particular recipe for peppermint meltaways stands out in a sea of holiday desserts. Unlike the more traditional cookies or cakes that can often be time-consuming, peppermint meltaways are surprisingly simple to prepare, making them a perfect addition to busy family schedules. They require minimal ingredients and can be made in a matter of minutes, allowing families to enjoy sweet treats without the stress of elaborate baking sessions.
One of the reasons this dish is special to me is its versatility. While peppermint meltaways are often associated with winter holidays, they can be enjoyed year-round. The refreshing mint flavor is not just for Christmas; it’s a delightful way to cool off during hot summer months, too. Imagine biting into a cool, creamy meltaway after a long day in the sun! The emotional connection I have with this recipe is deeply rooted in memories of family gatherings, laughter, and the simple pleasure of sharing food with loved ones. Each batch I make evokes those cherished moments, reminding me of the importance of family, tradition, and the joy of creating something delicious.
Why You’ll Love This Dish
As you dive into this guide, you’ll discover how to make your own peppermint meltaways, along with tips and tricks to elevate your recipe to new heights. You’ll learn about the best types of chocolate to use, how to achieve the perfect texture, and creative variations to suit your family’s tastes. Plus, I’ll share some of my personal anecdotes and lessons learned along the way—because what’s cooking without a little bit of trial and error?
In addition to their delicious flavor, peppermint meltaways are a fantastic treat for any busy family. They can be made ahead of time and stored in the fridge, making them a quick grab-and-go dessert for busy weeknights or an easy way to impress unexpected guests. The seasonal relevance of peppermint meltaways cannot be overstated, especially during the winter months when peppermint-flavored treats are all the rage. But don’t let that limit you; once you master this recipe, you’ll find yourself making them throughout the year, adapting the flavors to celebrate different occasions.
So, pull out your mixing bowls and prepare for a culinary adventure! Whether you are making peppermint meltaways for a holiday gathering, a summer picnic, or simply to enjoy at home, this guide promises to equip you with all the knowledge you need to create this delightful treat. Get ready to impress your family and friends with your newfound skills and share in the joy that comes from making and enjoying these meltaways together.
The Rich History and Cultural Significance of peppermint meltaways
The history and cultural significance of peppermint meltaways are as rich and layered as the flavors they embody. While the exact origins of these delightful treats remain a bit elusive, they undoubtedly draw inspiration from the longstanding love affair between chocolate and mint—a pairing that has tantalized taste buds for centuries. To understand peppermint meltaways, we must look back to how this iconic flavor duo emerged and flourished in various cultures.
Origins and History
The use of peppermint in confections can be traced back to ancient civilizations. The Egyptians were among the first to cultivate mint for its aromatic properties, using it in both culinary delights and medicinal remedies. Over time, as trade routes expanded, the popularity of mint spread across Europe and beyond. By the time the 19th century rolled around, peppermint candies became a staple in American households, especially during the holiday season.
Peppermint meltaways, as we know them today, likely gained popularity in the mid-20th century as home cooking began to evolve. With the rise of convenience foods and quick recipes, the meltaway concept—a silky, chocolate-based treat that melts in your mouth—captured the hearts of home bakers. Unlike traditional candies that often require precise temperatures and techniques, peppermint meltaways offered a simpler approach, making them accessible to families looking to whip up a delicious dessert in no time.
Cultural Significance
Peppermint meltaways hold a special place in many cultural celebrations. In the United States, they are often associated with the Christmas season, where the vibrant green and red colors of peppermint are synonymous with holiday cheer. Families across the nation bake and share these meltaways, creating a sense of community and connection through the act of sharing food. The tradition has even extended to include peppermint meltaways in gift baskets and as party favors during festive gatherings.
However, the appeal of these treats is not limited to any one culture or season. In various forms, peppermint-flavored desserts can be found in culinary traditions around the world. In Italy, for instance, peppermint-infused chocolate is often enjoyed as a post-dinner treat, while in other regions, similar confections serve as a refreshing palate cleanser during festive feasts. The versatility of peppermint meltaways allows them to transcend seasonal boundaries, making them a delightful option for any occasion.
Nutritional Benefits
While peppermint meltaways are undoubtedly a treat to enjoy in moderation, they do offer some interesting nutritional insights. Peppermint, the key flavor component, is known for its digestive benefits. It can help soothe an upset stomach and reduce feelings of nausea, making it a popular addition to various culinary creations. Additionally, dark chocolate, often used in peppermint meltaway recipes, comes with its own set of health benefits. Rich in antioxidants, dark chocolate may contribute to heart health and improve mood—factors that make these meltaways not just a delicious indulgence but potentially beneficial as well.
In conclusion, peppermint meltaways encapsulate a history rich in culture and flavor. From their ancient origins to modern-day variations, these delightful treats have adapted and evolved, becoming a beloved dessert in many households. Whether you’re enjoying them during the holidays or savoring them as a year-round treat, peppermint meltaways offer a unique blend of history, culture, and health benefits that make them truly special. So, get ready to embrace the joy of making your own peppermint meltaways and delight in the memories they will create for you and your loved ones.
Essential Ingredients for Perfect peppermint meltaways
When it comes to creating the perfect peppermint meltaways, the ingredients you choose play a crucial role in the final outcome. These delightful treats are not just your average cookies; they are a harmonious blend of flavors and textures that come together beautifully. Let’s dive deep into the essential ingredients that will ensure your peppermint meltaways are nothing short of spectacular.
Essential Ingredients
- 1 cup (16 Tbsp / 226g) unsalted butter – softened to room temperature: Butter is the backbone of any cookie recipe. For peppermint meltaways, using unsalted butter allows you to control the saltiness of your cookies. The fat in the butter contributes to the melt-in-your-mouth texture that these cookies are famous for. It’s vital to have the butter at room temperature to ensure it creams well with the sugar, creating a light and airy batter.
- 2 3 cup (80g) confectioners sugar: This finely powdered sugar dissolves quickly, providing sweetness without the graininess of granulated sugar. It’s perfect for achieving that smooth texture. A tip here is to sift the confectioners sugar before measuring; this helps to avoid clumps and guarantees a smoother batter.
- 1 egg yolk – at room temperature: The egg yolk adds richness and moisture to the peppermint meltaways. It helps bind the ingredients together, ensuring the cookies hold their shape while baking. Room temperature yolks incorporate more easily into the mixture, leading to a better consistency.
- 1 teaspoon pure vanilla extract: Vanilla extract enhances the flavor profile of your cookies, adding warmth and depth to the overall taste. Always opt for pure vanilla over imitation for the best flavor.
- 1 2 teaspoon peppermint extract: This is where the magic happens! Peppermint extract gives the meltaways their signature minty flavor. Make sure you use a high-quality peppermint extract to truly capture that refreshing taste.
- 2 cups (250g) all-purpose flour – spooned and leveled: Flour provides the structure for your cookies. Spoon and level your flour to avoid packing it too tightly, which can lead to dense cookies. For a lighter texture, you can also consider using cake flour, which has a lower protein content.
- 1 4 cup (30g) cornstarch: Cornstarch is a secret ingredient that helps create a tender and delicate texture in the cookies. It reduces gluten formation, giving the meltaways that characteristic “melt in your mouth” feel.
- 1 teaspoon baking powder: This leavening agent helps the cookies rise, making them light and fluffy. Be cautious not to use too much, as it can alter the flavor.
- 1 4 teaspoon salt: A pinch of salt enhances the flavors and balances the sweetness in your peppermint meltaways. It’s a crucial ingredient that should never be overlooked.
Buttercream Ingredients
- 6 Tablespoons (85g) unsalted butter – softened: Similar to the cookie base, this butter provides the foundation for your buttercream. Ensure it’s softened for easy mixing.
- 1 and 1 2 cups (180g) confectioners sugar: This sugar will sweeten your buttercream and create that smooth, velvety texture. Sifting it before use can help achieve the best results.
- 1 2 Tablespoons milk – at room temperature: Milk adds moisture and creaminess to the frosting, making it spreadable. Room temperature milk incorporates better into the butter.
- 1 2 teaspoon pure vanilla extract: Just like in the cookies, vanilla enhances the flavor of your buttercream.
- 1 4 teaspoon peppermint extract: This will tie the frosting flavor to the cookies, ensuring a cohesive taste experience.
- Optional: 1 drop red or pink food coloring: If you want to add a festive touch, a drop of food coloring can create a lovely visual appeal.
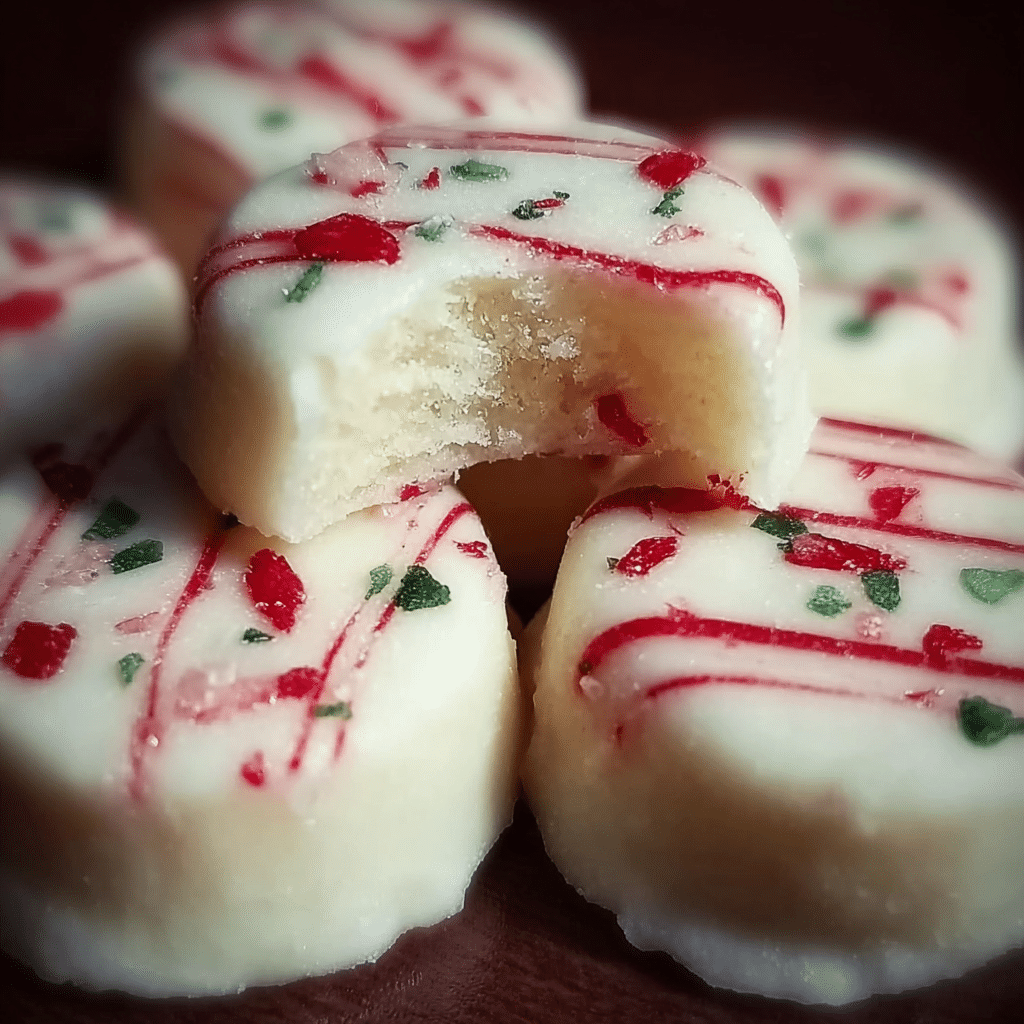
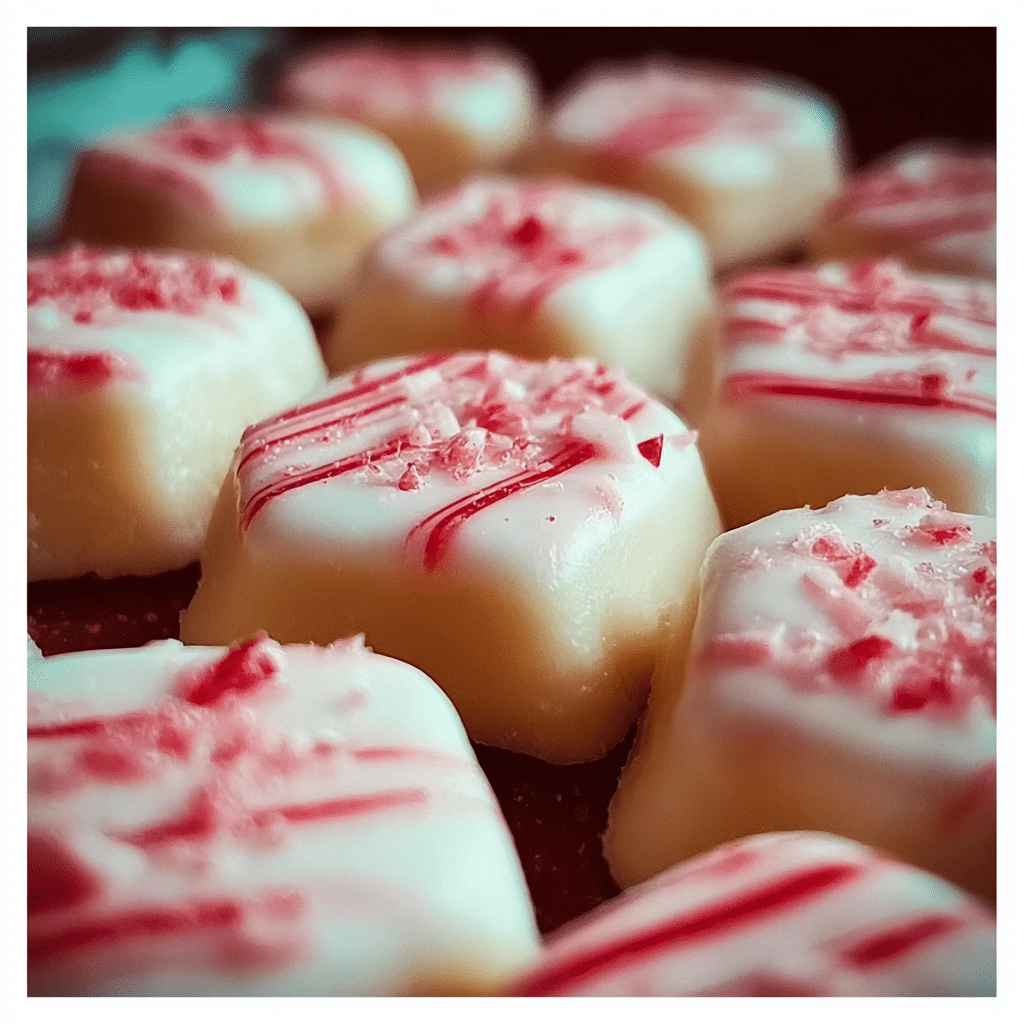
- 1 4 cup (40g) crushed candy canes: About 2-3 large candy canes: These will be used to garnish your cookies, adding a crunchy texture and visual appeal, along with an extra punch of peppermint flavor.
Peppermint Meltaways
Ingredients
Cookies
- 1 cup (16 Tbsp; 226g) unsalted butter, softened to room temperature
- 2/3 cup (80g) confectioners’ sugar
- 1 egg yolk, at room temperature
- 1 teaspoon pure vanilla extract
- 1/2 teaspoon peppermint extract
- 2 cups (250g) all-purpose flour (spooned & leveled)
- 1/4 cup (30g) cornstarch
- 1 teaspoon baking powder
- 1/4 teaspoon salt
Buttercream
- 6 Tablespoons (85g) unsalted butter, softened
- 1 and 1/2 cups (180g) confectioners’ sugar
- 1–2 Tablespoons milk, at room temperature (dairy or nondairy)
- 1/2 teaspoon pure vanilla extract
- 1/4 teaspoon peppermint extract
- optional: 1 drop red or pink food coloring
- 1/4 cup (40g) crushed candy canes (about 2–3 large candy canes)
Instructions
- Make the cookie dough: In a large bowl using a handheld or stand mixer fitted with a paddle attachment, beat the butter on medium speed until creamy, about 1 minute. Add the confectioners’ sugar and beat on low speed for 30 seconds, then increase to medium-high speed and beat for 2 full minutes, until light and fluffy. Scrape down the sides and bottom of the bowl as needed. Add the egg yolk, vanilla extract, and peppermint extract and beat on high speed until combined. Scrape down the sides and bottom of the bowl as needed.
- Add the flour, cornstarch, baking powder, and salt. Beat on low speed until combined. The cookie dough will be thick and creamy. Cover dough tightly and chill in the refrigerator for at least 30 minutes and up to 3 days. Chilling is mandatory for this creamy cookie dough.
- Preheat oven to 350°F (177°C). Line large baking sheets with parchment paper or silicone baking mats. Set aside.
- Scoop and roll dough into balls, about 1 Tablespoon or 20–22g each. Place dough balls 3 inches apart on the baking sheets, and then flatten each slightly with the palm of your hand; they should be just under 2 inches in diameter.
- Bake the cookies for 13–14 minutes or until the edges appear set. The cookies won’t darken/brown, so be careful not to over-bake them.
- Remove from the oven and allow cookies to cool on the baking sheet for 10 minutes, then transfer to a cooling rack to cool completely before frosting.
- Make the buttercream: With a handheld or stand mixer fitted with a paddle attachment, beat the butter on medium speed until creamy, about 1 minute. Add the confectioners’ sugar, milk, vanilla extract, and peppermint extract. Beat on low speed for 30 seconds, then increase to medium-high speed and beat for 2 full minutes. Taste. To thicken the buttercream, beat in more confectioners’ sugar. To thin out the buttercream, beat in more milk. To help offset more sweetness, beat in a pinch of salt.
- If you’d like to tint the frosting, beat in 1 tiny drop of food coloring. Add more to deepen the color, if desired. Using a knife or icing spatula, spread frosting onto the cooled cookies. Sprinkle each lightly with crushed candy canes.
- Cover and store frosted cookies at room temperature for up to 1 day, or in the refrigerator for up to 5 days. Frosting “soft-sets” on the cookies after a few hours, meaning it will slightly dry on top.
Shopping Tips
When shopping for these ingredients, quality matters. For butter, look for brands that use high-quality dairy. The same goes for extracts; pure extracts will always yield better results than imitation ones. For flour, consider using a brand that specifies its protein content; lower-protein flour can lead to softer cookies. Seasonal ingredients, like candy canes, are typically abundant during the holiday season, so stock up when you see them!
Substitutions and Alternatives
If you have dietary restrictions, there are several substitutions you can consider. For a dairy-free version, use vegan butter and plant-based milk. Instead of egg yolk, you can use a flaxseed egg (1 tablespoon ground flaxseed mixed with 2.5 tablespoons water, let sit for 5 minutes). For gluten-free options, you can use a gluten-free all-purpose flour blend, ensuring it includes xanthan gum for structure. Remember, experimentation can lead to delightful surprises!
In conclusion, the ingredients of peppermint meltaways are integral to their success. Choosing high-quality ingredients and understanding their roles will make a significant difference in your baking experience. As you gather your ingredients, think about the warmth of the kitchen, the scents that will soon fill the air, and the joy these cookies will bring to your loved ones. Happy baking!
Detailed Step-by-Step peppermint meltaways Cooking Instructions
Creating the perfect peppermint meltaways is as much about technique as it is about the ingredients. These delightful cookies require a series of steps that, when followed carefully, result in a delicious treat that’s sure to impress. Let’s walk through the detailed cooking instructions to ensure your peppermint meltaways are a resounding success.
Preparation Steps
- Start by gathering all your ingredients. This concept known as mise en place (everything in its place) is crucial in baking. It ensures you have everything at hand and helps prevent any last-minute scrambling when you’re deep into the process.
- Preheat your oven to 350°F (175°C). It’s essential to have your oven preheated before you start baking so that the cookies can bake evenly. A good tip is to use an oven thermometer to ensure your oven is at the correct temperature, as many ovens can be off by quite a bit.
- In a large mixing bowl, cream together the softened unsalted butter and confectioners sugar. Use an electric mixer on medium speed for about 2-3 minutes until the mixture is light and fluffy. This step is essential as it incorporates air into the butter, leading to a lighter texture in your cookies.
- Add the egg yolk, vanilla extract, and peppermint extract to the creamed mixture. Beat until completely combined. You should smell the refreshing scent of peppermint coming through at this stage—delightful!
- In a separate bowl, whisk together the all-purpose flour, cornstarch, baking powder, and salt. This step ensures that the dry ingredients are evenly distributed, which is crucial for consistent texture and flavor. Gradually add this dry mixture to the wet mixture, mixing on low speed until just combined. Be careful not to overmix, as this can lead to tough cookies.
- Once your dough is formed, it should be soft but not sticky. If it’s too sticky, you can chill the dough in the refrigerator for about 30 minutes, which makes it easier to handle.
Cooking Process
- Line two baking sheets with parchment paper or silicone baking mats to prevent sticking. Using parchment paper also helps with even baking.
- Using a small cookie scoop or a spoon, portion out the dough into small balls (about 1 inch in diameter) and place them on the prepared baking sheets, spacing them about 2 inches apart. As they bake, they will spread slightly, so give them room to grow.
- Bake in the preheated oven for about 12-15 minutes or until the edges are just starting to turn golden. The centers may look slightly underbaked, but they will continue to set as they cool. This is crucial for that meltaway texture!
- Once baked, remove the sheets from the oven and let the cookies cool on the baking sheets for about 5 minutes before transferring them to a wire rack to cool completely. This step is important; if you move them too quickly, they may crumble.
Final Assembly
- While the cookies are cooling, prepare the buttercream frosting. In a medium bowl, beat the softened unsalted butter until creamy, about 2 minutes. Gradually add in the confectioners sugar, mixing on low speed until combined, then increase the speed to medium and beat until light and fluffy.
- Add the room temperature milk, vanilla extract, and peppermint extract, and mix until well combined. If the frosting is too thick, add a bit more milk; if it’s too thin, add a bit more confectioners sugar.
- If you choose to add food coloring, now is the time to do so. Just a drop will suffice! Mix until the color is evenly distributed.
- Once the cookies are completely cool, spread a generous layer of buttercream on the bottom of half of the cookies. Top with the remaining cookies to create delightful cookie sandwiches.
- Finally, sprinkle crushed candy canes over the buttercream before placing the top cookie on, pressing gently to help them stick. This adds a festive touch and a delightful crunch!
- Store your peppermint meltaways in an airtight container at room temperature for up to a week. They may also be frozen for longer storage; just be sure to separate layers with parchment paper to prevent sticking.
As you embark on this peppermint meltaway journey, remember that baking is as much about the process as it is about the final product. Take your time, enjoy the scents filling your kitchen, and savor the moments spent creating these delightful treats. With each meltaway, you’ll be met with smiles and compliments, making every effort worth it. Happy baking!
Professional Tips and Techniques for peppermint meltaways
When it comes to creating the perfect peppermint meltaways, a few professional tips and techniques can elevate your baking game from ordinary to extraordinary. As someone who has spent countless hours experimenting in the kitchen, I’ve gathered a treasure trove of insider secrets that I’m excited to share with you. Whether you are a novice baker or a seasoned professional, these insights will help you achieve melt-in-your-mouth peppermint meltaways that your friends and family will rave about.

Professional Techniques
To start, let’s talk about the foundational elements of peppermint meltaways. The key to achieving that signature melt-in-your-mouth texture lies in the balance of butter and sugar. It’s crucial to use high-quality unsalted butter, which should be at room temperature for easy creaming with sugar. I often recommend using a stand mixer for this part, as it can incorporate air into the mixture more effectively than hand mixing. This step is vital; it creates a light and fluffy base that allows the peppermint flavor to shine through.
Another professional tip is to incorporate the peppermint extract in moderation. Too much can overpower the delicate sweetness of the meltaways. Start with a teaspoon, taste the dough, and adjust as necessary. Remember, you can always add more, but you can’t take it out once it’s in! Additionally, consider using peppermint oil for a more intense flavor; just a few drops can go a long way.
For an advanced technique, consider tempering your chocolate coating. This process involves heating and cooling chocolate to stabilize it, giving your peppermint meltaways a glossy finish and a satisfying snap when bitten into. To temper chocolate, melt two-thirds of your chocolate over a double boiler, stirring constantly until it reaches about 110°F. Remove it from the heat and add the remaining third, stirring until melted and cooled to about 90°F. This will yield a perfectly tempered finish that not only looks beautiful but also enhances the overall eating experience.
Troubleshooting Guide
Even the most experienced bakers encounter hiccups along the way, and understanding how to troubleshoot can save your peppermint meltaways from being a complete disaster. One common problem is the meltaways spreading too much during baking. This often happens if the dough is too warm or if there isn’t enough flour in the mixture. To combat this, chill your dough for at least 30 minutes before baking. This cooling period helps solidify the butter, resulting in cookies that hold their shape.
Another issue could be the texture not being as melt-in-your-mouth as expected. If your meltaways are too crumbly, it might be a sign that you’ve added too much flour. Always spoon your flour into the measuring cup instead of scooping directly from the bag, as scooping can compact the flour and lead to over-measuring. For those meltaways that seem too soft, a quick fix is to add a tablespoon of cornstarch to the mixture, which can help achieve that desirable meltaway consistency.
Presentation Tips
Now that you’ve mastered the art of making peppermint meltaways, let’s talk about how to present them beautifully. Presentation can greatly enhance the overall enjoyment of your treat. For a festive touch, consider dusting your peppermint meltaways with powdered sugar right before serving. This not only adds a beautiful snowy appearance but also enhances the sweetness without overwhelming the palate.
Another fun idea is to serve your meltaways on a decorative platter, perhaps garnished with fresh mint leaves or a drizzle of chocolate. For a more rustic vibe, use a wooden board lined with parchment paper. The contrast of colors and textures will make your peppermint meltaways stand out.
Wine and beverage pairings can elevate your dessert experience further. A sweet dessert wine like Moscato complements the minty freshness beautifully, while a rich hot chocolate can create a cozy winter vibe. If you’re serving these at a holiday gathering, consider a peppermint martini for a delightful pairing that echoes the flavors of your meltaways.
For those looking to make their peppermint meltaways ahead of time, they store wonderfully in an airtight container at room temperature for up to a week. You can also freeze them for longer storage; simply layer them with parchment paper in an airtight container, and they will keep well for up to three months. Just thaw them at room temperature before serving, and they’ll taste as fresh as the day you made them.
In conclusion, whether you are perfecting your technique or looking for ways to troubleshoot common issues, these professional tips will surely set you on a path to peppermint meltaway perfection. Remember, baking is both a science and an art, so don’t be afraid to experiment and make these meltaways your own!
Creative Variations and Adaptations of peppermint meltaways
While the classic peppermint meltaways are delightful on their own, exploring creative variations and adaptations can open up a world of flavor and excitement. As a home baker, I’ve always enjoyed playing with traditional recipes, and peppermint meltaways are no exception. This section will dive into some innovative twists, seasonal swaps, and dietary adaptations that will cater to any palate or occasion.
Seasonal Variations
One of the most enjoyable aspects of baking is adapting recipes to fit seasonal ingredients. For peppermint meltaways, think about incorporating flavors that evoke the spirit of the season. During the fall, for example, you might consider adding crushed candy corn for a festive touch, or even incorporating pumpkin spice into the dough for a tantalizing twist. The combination of peppermint and pumpkin is surprisingly harmonious and can delight your taste buds.
In the summer months, consider using fresh herbs such as basil or even lavender to complement the peppermint. A hint of lavender can add a sophisticated floral note that pairs beautifully with the sweetness of the meltaways. To achieve this, finely chop the herbs and fold them into the dough, balancing them carefully with the peppermint extract.
Winter holidays are, of course, the prime time for peppermint meltaways. Consider rolling the finished cookies in crushed peppermint candies or drizzling them with white chocolate for a festive touch. You could even create a layered effect by alternating between chocolate and peppermint meltaways, creating a visual delight that’s perfect for holiday gatherings.
Dietary Adaptations
As dietary preferences evolve, it’s essential to have adaptable recipes that everyone can enjoy. For those following a keto lifestyle, you can easily substitute the granulated sugar with a keto-friendly sweetener like erythritol or stevia. Just be mindful of the conversion ratios, as some sweeteners are sweeter than sugar. The texture may differ slightly, but the peppermint flavor will still shine through.
If you’re catering to vegan friends or family members, you can replace the butter with coconut oil or a vegan butter alternative. Ensure that your chocolate coating is dairy-free as well. Additionally, use a plant-based milk such as almond or oat milk in any frosting or glaze you decide to add. These adaptations maintain the spirit of peppermint meltaways while ensuring that everyone can indulge.
Creative Twists
Don’t be afraid to think outside the box when it comes to your peppermint meltaways! Consider incorporating nuts like crushed pistachios or almonds to add a delightful crunch that complements the meltaway texture. You could also experiment with adding a hint of spice by incorporating a dash of cayenne or cinnamon for those who enjoy a bit of heat alongside the coolness of peppermint.
Another fun idea is to create a sandwich cookie by filling two peppermint meltaways with a creamy filling of your choice. A simple cream cheese frosting or even a chocolate ganache would work wonders. Not only does this add an extra layer of flavor, but it also creates a delightful surprise for anyone biting into your cookies!
Lastly, you can explore different cooking methods. While peppermint meltaways are traditionally baked, you might consider a no-bake version for hot summer days. Simply prepare the dough, shape it into balls, and chill them in the refrigerator. Once firm, roll them in crushed chocolate or cocoa powder for a deliciously chilled treat that still captures the essence of peppermint meltaways.
In conclusion, the world of peppermint meltaways is vast and full of possibilities. With seasonal variations, dietary adaptations, and creative twists, you can keep this classic treat fresh and exciting for any occasion. So, gather your ingredients, unleash your creativity, and enjoy the journey of baking these delightful cookies!
Storage, Reheating, and Meal Prep for peppermint meltaways
When it comes to peppermint meltaways, a delightful confection that melts in your mouth, proper storage is key to preserving their delicious texture and flavor. Whether you’re making these treats for a holiday gathering or simply indulging yourself, knowing how to store them correctly will ensure that each bite is just as delightful as the first. Let’s delve into the various aspects of storing peppermint meltaways so you can enjoy them at their best.
Short-term Storage
If you’ve just whipped up a batch of peppermint meltaways, you might be eager to taste them right away. But if you plan to keep them for a few days, short-term storage is essential. The first step is to ensure your peppermint meltaways have completely cooled and set. This is crucial because any remaining warmth can create moisture, which may lead to soggy candies.
Once they are cool, place your peppermint meltaways in an airtight container. I recommend using glass containers or BPA-free plastic ones. Glass not only helps to maintain the flavor but also keeps the meltaways from absorbing any odors from your fridge. You can layer the meltaways between sheets of parchment paper to prevent them from sticking together. This simple trick allows you to grab just one or two without disturbing the entire batch.
In the refrigerator, peppermint meltaways can last for up to two weeks. Just be sure to keep them in a cool, dark place, away from any light or heat sources. If you find yourself with leftovers after a party, you can always wrap them in wax paper and tie them with a festive ribbon for a beautiful gift to share!
Freezing and Long-term Storage
For those moments when you want to make a large batch of peppermint meltaways ahead of time, freezing is a fantastic option. Freezing not only extends the shelf life of your delightful treats but also makes them a convenient go-to snack or dessert option. To freeze peppermint meltaways, start by arranging them in a single layer on a baking sheet lined with parchment paper. This prevents them from sticking together. Place the baking sheet in the freezer for about 30 minutes, or until the meltaways are firm.
Once they are solid, transfer the meltaways into a freezer-safe container or a resealable plastic bag. Make sure to remove as much air as possible to prevent freezer burn. If you’re using a bag, I recommend labeling it with the date for easy reference. Properly stored, peppermint meltaways can last in the freezer for up to three months! When you’re ready to enjoy them, simply take out the desired amount and let them thaw in the refrigerator for a few hours. This gentle thawing process will help maintain their creamy texture.
Reheating Best Practices
While peppermint meltaways don’t typically require reheating, there may be instances where you want to soften them slightly before serving. If you find your meltaways have become too firm after being in the fridge or freezer, you can gently warm them. Place them on a microwave-safe plate and heat them for about 5-10 seconds in the microwave. Be cautious not to overheat them, as this can lead to melting and loss of that delightful shape. Alternatively, you can let them sit at room temperature for about 15-20 minutes to regain their softness naturally.
Meal prep and batch cooking are excellent strategies for peppermint meltaways. I often make a large batch during the holiday season and share them with friends and family. The key to successful meal prep is to portion them out properly. Use small containers or bags to create individual servings, making it easy to grab a treat when the craving strikes. Not only does this allow for easy snacking, but it also helps manage portion sizes, especially during festive gatherings.
Food safety is paramount, especially when making confections. Always ensure your hands and work surfaces are clean before preparing peppermint meltaways. When storing, keep an eye on the expiration dates of your ingredients, particularly if you’re using dairy or cream. Knowing the shelf life expectations of your meltaways can help you enjoy them at their best. Generally, if stored properly, you can expect your peppermint meltaways to maintain their deliciousness for about 2 weeks in the fridge and up to 3 months in the freezer.
Finally, consider packaging tips if you plan to give peppermint meltaways as gifts. Use decorative tins or boxes lined with tissue paper for an elegant touch. Not only does this keep them fresh, but it also adds a personal flair that friends and family will appreciate. With these storage tips and techniques, you can ensure your peppermint meltaways remain a delightful treat for any occasion!
Nutritional Benefits and Health Information
As delightful as peppermint meltaways are, it’s important to understand their nutritional benefits and how they fit into a balanced diet. These sweet treats, often enjoyed during the holiday season or as a special dessert, offer more than just a delicious taste. Let’s unravel the nutritional profile of peppermint meltaways, explore the health benefits of their key ingredients, and discuss dietary considerations.
Nutritional Profile
The typical ingredients in peppermint meltaways include powdered sugar, butter, cream, milk, peppermint extract, and sometimes chocolate for coating. While the exact nutritional content can vary based on the recipe and serving size, here’s a general breakdown:
- Calories: A serving (about 2-3 meltaways) can range from 150 to 200 calories.
- Fats: Each serving contains approximately 8-12 grams of fat, primarily from butter and cream.
- Carbohydrates: With the addition of powdered sugar, meltaways can have around 20-30 grams of carbohydrates per serving.
- Protein: The protein content is relatively low, often around 1-2 grams per serving.
Most of the calories come from sugars and fats, which is typical for many confections. However, peppermint meltaways can be enjoyed in moderation without guilt, especially if you balance them with healthier food choices throughout the day.
Health Benefits
While peppermint meltaways are generally considered a treat, they do have some redeeming qualities, primarily due to the peppermint extract. Peppermint is known for its digestive benefits, often used to soothe stomach discomfort and reduce bloating. Additionally, the invigorating aroma of peppermint can help to enhance mood and focus, making these meltaways a delightful treat for both the taste buds and the mind.
However, it’s essential to consume them in moderation. The enjoyment of peppermint meltaways is often tied to special occasions, which can enhance the experience and make them a memorable part of your culinary repertoire.
Dietary Considerations
When it comes to dietary restrictions, peppermint meltaways can be modified to suit various needs. For those who are lactose intolerant, substituting dairy with lactose-free products can create a delicious alternative. Similarly, for vegans, using plant-based butter and non-dairy cream can make these treats accessible to a broader audience. Always check the labels on your ingredients, especially if you’re accommodating allergies, as some brands may contain traces of nuts or gluten.
In terms of calorie content and macronutrient distribution, peppermint meltaways can fit into various diet plans if consumed mindfully. For those tracking macros, enjoying a couple of meltaways after a balanced meal can satisfy a sweet craving without derailing your dietary goals. If you’re on a low-carb diet, consider exploring sugar alternatives or making modifications to the recipe that reduce the sugar content while still delivering a tasty treat.
For those who enjoy baking, consider some healthy modifications. You can experiment with using coconut oil instead of butter for a dairy-free version, or substitute part of the powdered sugar with a natural sweetener like erythritol. These adjustments can reduce the calorie count while maintaining the sweetness that makes peppermint meltaways irresistible.
In comparison to similar dishes, peppermint meltaways stand out as a delightful choice. Unlike heavier desserts like cakes or brownies, they offer a lighter, refreshing flavor profile that can satisfy your sweet tooth without leaving you feeling overly indulgent. They are a perfect example of balance—rich enough to satisfy yet light enough to enjoy without guilt.
In conclusion, while peppermint meltaways are indeed a sweet treat, understanding their nutritional benefits and accommodating dietary considerations can make them a more versatile option for your dessert repertoire. With thoughtful preparation and mindful consumption, peppermint meltaways can be a delightful addition to any celebration, providing joy and satisfaction in each creamy bite.
Frequently Asked Questions About Peppermint Meltaways
Best peppermint meltaways
The best peppermint meltaways are characterized by their rich, creamy texture and a perfect balance of sweetness and mint flavor. To achieve this, use high-quality peppermint extract and ensure your butter is at room temperature for easy mixing. Experiment with different types of chocolate for coating; dark chocolate often provides a nice contrast to the sweetness of the filling. Additionally, chilling the meltaways thoroughly before serving enhances their firmness and flavor. For a festive touch, consider adding crushed candy canes on top of the chocolate coating.
Peppermint meltaways recipe
A classic peppermint meltaways recipe typically includes ingredients like butter, powdered sugar, peppermint extract, and chocolate for coating. Start by creaming the butter and sugar until light and fluffy, then mix in the peppermint extract and a pinch of salt for flavor depth. Roll the mixture into small balls, flatten them slightly, and chill before dipping in melted chocolate. Ensure your chocolate is tempered properly to achieve a glossy finish. Once cooled, these meltaways can be garnished with festive sprinkles or crushed peppermint for added flair.
Old fashioned peppermint meltaways
Old fashioned peppermint meltaways are often made using simple, traditional ingredients that highlight the nostalgic flavors of the season. These recipes typically call for unsweetened chocolate, sugar, butter, and peppermint oil, creating a rich and indulgent treat. To replicate the classic texture, be sure to sift the powdered sugar to prevent any lumps. For a more authentic taste, consider using real peppermint oil instead of extract, as it provides a stronger flavor. These meltaways can be rolled in powdered sugar after chilling for a beautiful snowy finish.
Peppermint meltaways cookies
Peppermint meltaways cookies are a delightful twist on the traditional meltaway candy, incorporating cookie dough for a chewier texture. Start with a basic cookie dough base, adding in melted chocolate and peppermint extract to infuse that signature flavor. Chill the dough before rolling it into balls and baking to prevent spreading. Once baked, dip the cookies in melted chocolate and sprinkle with crushed peppermint for an eye-catching finish. Allow them to cool completely on a wire rack to maintain their shape and texture.
Peppermint meltaway cookies Cooking with Karli
Peppermint meltaway cookies featured in Cooking with Karli showcase a simple yet delicious approach to this festive treat. Karli emphasizes using room temperature ingredients to ensure a smooth batter and better incorporation of flavors. For an extra touch, she often suggests adding a drizzle of white chocolate on top after dipping in dark chocolate, which not only enhances flavor but also adds visual appeal. Ensure to chill the cookies after baking to allow the flavors to meld and the chocolate to set properly. For a fun variation, consider adding crushed nuts or sprinkles to the chocolate coating.
Easy peppermint meltaways
Easy peppermint meltaways can be made in just a few simple steps, making them a perfect last-minute treat for any occasion. Start by mixing softened butter, powdered sugar, and peppermint extract until well combined. The key to simplicity is using store-bought chocolate for coating; simply melt it and dip the chilled balls of peppermint mixture. To save time, consider using a silicone mold for uniform shapes instead of rolling by hand. These meltaways can be stored in an airtight container in the fridge for several weeks, allowing you to prepare them ahead of time.
Peppermint meltaways recipe easy
An easy peppermint meltaways recipe typically consists of just a few ingredients, making it accessible for beginner bakers. Combine softened butter with powdered sugar until creamy, then mix in peppermint extract and a pinch of salt. Roll the mixture into small balls, then chill them until firm enough to dip in melted chocolate. For an effortless finish, use a fork to dip the balls and tap off excess chocolate before placing them on parchment paper. Don’t forget to let them set in the fridge for a while to achieve the perfect melt-in-your-mouth consistency!
Peppermint snowball cookies
Peppermint snowball cookies are a delightful variation that combines the classic snowball texture with festive peppermint flavor. These cookies are made with finely chopped nuts, butter, powdered sugar, and peppermint extract, resulting in a melt-in-your-mouth treat. After baking, roll the cookies in powdered sugar while they are still warm for a snowy effect. For an extra minty kick, consider adding a few drops of peppermint extract to the powdered sugar before coating. These cookies not only taste great but also look beautiful on any holiday dessert platter!


