Spooky Halloween cookies are more than just a seasonal treat; they embody the spirit of creativity, festivity, and a hint of mischief that defines Halloween. I still remember the first time I decided to bake these delightful cookies. It was a chilly October afternoon, and the air was filled with the scent of fallen leaves and impending frost. My kids were buzzing with excitement, already planning their costumes and eagerly awaiting the night of tricks and treats. I wanted to channel that energy into something delicious and fun, so I turned to my go-to recipe for spooky Halloween cookies, a tradition that started years ago when I was a child myself.
The memory of making these cookies with my mother is etched in my mind. We would roll out the dough, sprinkle flour everywhere, and use an assortment of cookie cutters shaped like ghosts, pumpkins, and bats. As we decorated them with vibrant icing and sprinkles, laughter filled the kitchen, and the anticipation of Halloween night grew stronger. That experience not only sparked my love for baking but also created a cherished family tradition that I continue to pass down to my children.
The Story Behind This Recipe
Spooky Halloween cookies have a fascinating cultural background that intertwines with the celebration of Halloween itself. Halloween, which has origins in the ancient Celtic festival of Samhain, marks a time when the boundary between the living and the dead is believed to be blurred. As part of the festivities, people would light bonfires and wear costumes to ward off wandering spirits. Over time, this evolved into a holiday filled with trick-or-treating, haunted houses, and, of course, delicious treats like cookies.
What makes this recipe special is its versatility. You can customize the shapes, colors, and flavors to suit your family’s preferences, making it an excellent choice for busy families. While other recipes may require intricate techniques or lengthy preparation, spooky Halloween cookies can be whipped up in no time. The dough can easily be made ahead of time, and with a little creativity, even children can help with decorating, enhancing the family bond during this enchanting season.
These cookies are perfect for the autumn season—when the air is crisp, the days are shorter, and the nights are filled with mystery. The vibrant colors of fall leaves inspire the shades you can use for icing, while the flavors of cinnamon and nutmeg evoke warmth and comfort. Making these cookies can be a wonderful way to bring your family together, creating lasting memories that you’ll cherish for years to come.
Why You’ll Love This Dish
What truly connects me to spooky Halloween cookies is the emotional bond tied to their creation. Each batch tells a story, filled with laughter and love, as we gather around the kitchen counter, rolling dough and decorating our spooky creations. Every ghostly cookie we make is adorned with a unique face, reminding us of the playful spirit of Halloween. It’s a time to step away from our busy lives and indulge in the simple joy of baking together.
In this guide, you’ll learn not only how to make these delightful cookies but also various tips and tricks to personalize your spooky Halloween cookies. From choosing the right ingredients to mastering the art of decoration, I’ll share my personal experiences and expertise to ensure that you create cookies that are not just tasty but also a feast for the eyes. So, gather your family, turn up the Halloween tunes, and prepare for a fun-filled baking adventure that will leave you with a tray of spooky Halloween cookies and memories to last a lifetime.
The Rich History and Cultural Significance of spooky halloween cookies
The rich history and cultural significance of spooky Halloween cookies reflect the evolution of Halloween traditions over the centuries. This delightful treat is a modern interpretation of the ancient customs associated with the festival of Samhain, which marked the end of the harvest season and the beginning of winter. As the Celts celebrated this time, they believed that the souls of the deceased returned to the earth, prompting them to honor their ancestors with offerings of food and drink. Although the exact origins of cookie-making during this season remain somewhat murky, it is evident that the concept of sweet treats has been a part of the Halloween narrative for generations.
Origins and History
Spooky Halloween cookies as we know them today likely began to gain popularity in the early 20th century, particularly in the United States, where Halloween was becoming a recognized holiday. The tradition of baking cookies, especially in whimsical shapes and designs, became a fun way for families to engage with the holiday. As cookie-cutting machines became more accessible, bakers could create intricate shapes reminiscent of Halloween symbols, like witches, spiders, and skeletons. This playful spirit of Halloween cooking became a cherished part of American culture, inspiring countless recipes and traditions.
As time went on, the cookie-making process evolved. From simple sugar cookies to complex recipes filled with spices and flavors that reflect the season, spooky Halloween cookies have been adapted to suit various palates and preferences. Today, they can be found in countless variations, from gluten-free options to those infused with seasonal ingredients like pumpkin and apple cider. This evolution highlights the creativity of bakers and their ability to incorporate cultural influences into their treats.
Cultural Significance
Spooky Halloween cookies are not just a dessert; they embody the spirit of community and celebration. Families often come together to bake and decorate these cookies, strengthening their bonds and creating lasting memories. Schools and community organizations frequently host bake sales or Halloween parties, where these cookies become a staple. They serve as a fun way to celebrate the holiday while also embracing the themes of togetherness and creativity that Halloween inspires.
Across different regions, variations of spooky Halloween cookies can be found. For instance, in Mexico, the Day of the Dead (Día de los Muertos) features sugar skull cookies that pay homage to loved ones who have passed away. These cookies often incorporate colorful designs and intricate details that reflect the vibrant culture and the significance of remembering those who have died. Other cultures may have their own interpretations, showcasing how the concept of spooky cookies transcends borders and brings people together through shared traditions.
Nutritional Benefits
While spooky Halloween cookies are indeed a treat, they can offer some nutritional benefits, especially when made with wholesome ingredients. You can incorporate whole grains, reduce sugar content, or add ingredients like oats, nuts, or even dried fruits to enhance the nutritional profile. For families looking to balance indulgence and health, making these cookies at home allows for greater control over ingredients, ensuring that they are not only delicious but also somewhat nutritious.
In conclusion, spooky Halloween cookies are a delightful fusion of history, culture, and creativity. They bring families together, create cherished memories, and reflect the evolving traditions of Halloween celebration. As you embark on your cookie-making journey, remember that each cookie you craft is not just a treat; it’s a connection to the past and a celebration of the present.
Essential Ingredients for Perfect spooky halloween cookies
When it comes to baking spooky Halloween cookies, the magic truly begins with the ingredients. Each component plays a pivotal role in creating not just delicious treats but also delightful visuals that scream Halloween spirit. This section will explore each ingredient in detail, ensuring you understand why they’re necessary for crafting the perfect spooky Halloween cookies.
Essential Ingredients
- 1/2 cup (113 grams) unsalted butter, at cool room temperature: Butter is the cornerstone of any cookie recipe, offering richness and flavor. Using unsalted butter allows you to control the saltiness of your cookies. Be sure to bring it to a cool room temperature, as this helps in creaming it with sugars, creating a light, airy texture.
- 1/2 cup (100 grams) granulated sugar: This common sugar adds sweetness and contributes to the cookie’s crispiness. Granulated sugar helps to create a beautiful golden color as the cookies bake, enhancing their visual appeal.
- 1/4 cup (50 grams) brown sugar: Brown sugar not only sweetens but also adds moisture and a slight chewiness due to its molasses content. This contrast in texture is crucial for spooky Halloween cookies, offering a delightful bite.
- 1 teaspoon vanilla extract: Vanilla extract enhances the flavor of the cookies, grounding the sweetness and balancing the other flavors. Opt for pure vanilla extract rather than synthetic variants for the best taste.
- 1 egg, at room temperature: Eggs act as a binding agent, bringing all the ingredients together and adding richness. Ensure the egg is at room temperature to help it emulsify more easily into the batter.
- 1 cup (127 grams) all-purpose flour: Flour is the primary structure-building ingredient in cookies. It provides the necessary gluten, which helps the cookies maintain shape and texture.
- 1/2 cup (43 grams) black cocoa powder (or Dutch-process), sifted: This special ingredient gives our spooky Halloween cookies their distinctive dark color and a rich, deep chocolate flavor. Black cocoa powder is less acidic than regular cocoa, resulting in a milder taste.
- 1 tablespoon cornstarch: Cornstarch softens the cookie dough and helps create a tender texture. It also aids in giving cookies a softer, cakelike crumb, which is perfect for our spooky theme.
- 1 teaspoon fine sea salt: Salt amplifies sweetness and balances flavors. It’s essential to enhance the overall taste of your spooky Halloween cookies.
- 1/2 teaspoon baking soda: Baking soda is a leavening agent that helps cookies rise. It also reacts with the acids in brown sugar, contributing to the browning process.
- 1/4 teaspoon baking powder: While baking soda leavens the cookies, baking powder adds additional lift and lightness, creating a fluffy texture that’s delightful.
- 1/2 cup (85 grams) white chocolate chips, plus more for garnish: White chocolate chips add sweetness and contrast to the darker cookie base. They also create a lovely visual appeal, especially when the cookies are decorated.
- 1 cup (218 grams) Halloween M&Ms, plus more for garnish: These candies not only enhance the spooky theme with their festive colors, but they also add a fun crunch to every bite of your cookies.
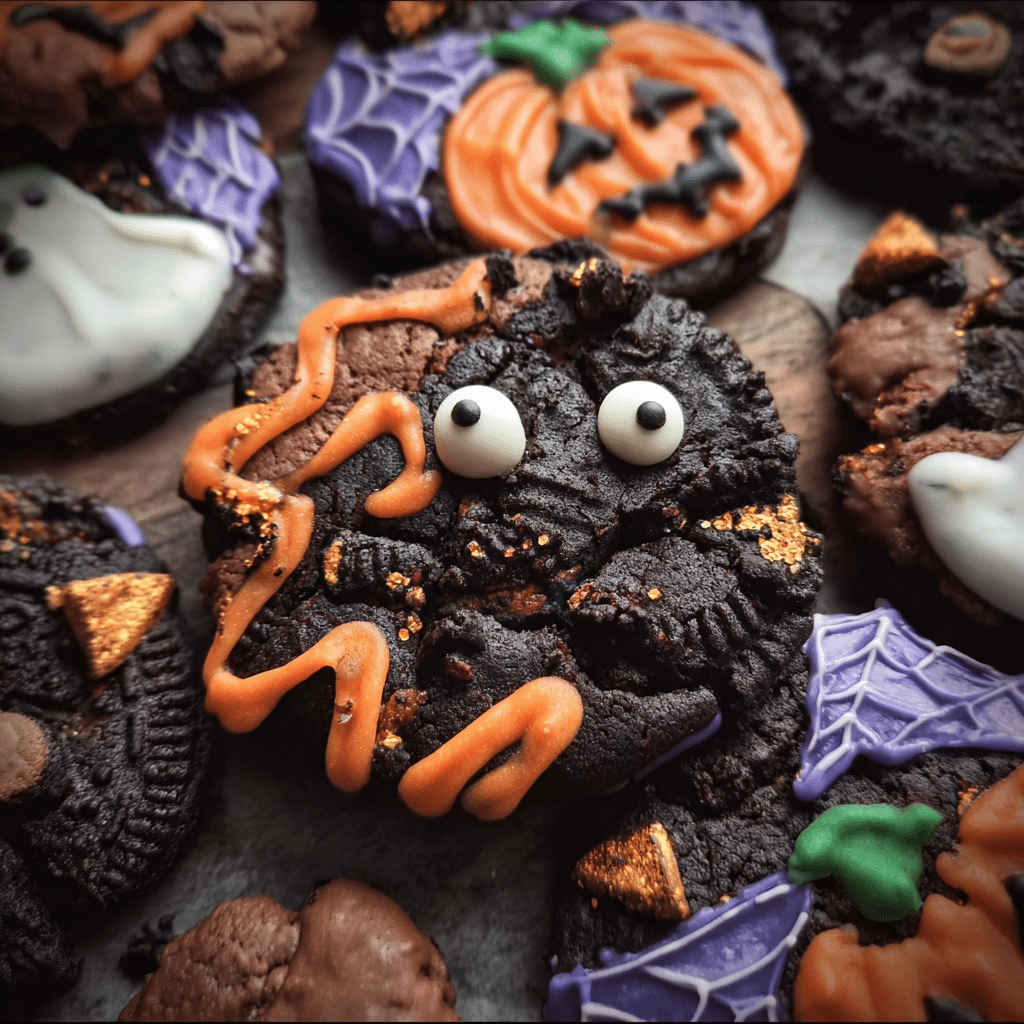
- Edible candy eyeballs, for garnish: These whimsical decorations turn your cookies into creepy creatures, making them perfect for Halloween. They add an element of fun and surprise, especially for kids.
Spooky Halloween Cookies
Ingredients
- 1/2 cup (113 grams) unsalted butter, at cool room temperature
- 1/2 cup (100 grams) granulated sugar
- 1/4 cup (50 grams) brown sugar
- 1 teaspoon vanilla extract
- 1 egg, at room temperature
- 1 cup (127 grams) all-purpose flour
- 1/2 cup (43 grams) black cocoa powder (or Dutch-process), sifted
- 1 tablespoon cornstarch
- 1 teaspoon fine sea salt
- 1/2 teaspoon baking soda
- 1/4 teaspoon baking powder
- 1/2 cup (85 grams) white chocolate chips, plus more for garnish
- 1 cup (218 grams) Halloween M&MS, plus more for garnish
- Edible candy eyeballs, for garnish
Instructions
-
Preheat oven to 350 degrees F. Line baking sheets with parchment paper.
-
In the bowl of a stand mixer fitted with the paddle attachment, beat the butter and sugars together on medium speed until light and fluffy, about 3 minutes. Scrape the bowl down before adding in the vanilla extract and egg, beating well to combine.
-
In a separate bowl, whisk together the flour, cocoa, cornstarch, salt, baking soda, and baking powder. Gradually add in the dry ingredients to the wet ingredients and beat until a slightly sticky dough forms. Fold in the white chocolate chips and M&Ms with a rubber spatula.
-
Using a large spring-loaded cookie scoop, drop 3-tablespoon sized balls of dough onto the prepared baking sheets, spacing them at least 2 inches apart. Dot the balls of cookie dough with extra chips, M&Ms, and candy eyeballs. Bake for about 12 minutes, until puffy but still soft, being careful not to overbake. Allow to cool on baking sheet for 5 minutes before removing to a wire rack to cool completely.
Shopping Tips
When shopping for these ingredients, quality matters. For example, choose high-quality cocoa powder for the best flavor. Brands like Valrhona or Ghirardelli are excellent choices. Look for butter that is rich and creamy, as this will influence the texture of your cookies significantly. When selecting chocolate chips, opt for brands with high cocoa content for a richer taste. Seasonal ingredients like Halloween M&Ms can often be found at local grocery stores or online as the holiday approaches, so stock up!
Substitutions and Alternatives
For those with dietary restrictions, there are plenty of substitutions available without sacrificing flavor. If you’re vegan, consider using plant-based butter and an egg replacer like a flax egg (1 tablespoon of ground flaxseed mixed with 2.5 tablespoons of water). For gluten-free options, you can substitute all-purpose flour with a 1:1 gluten-free flour blend. If you’re looking to cut down on sugar, consider using alternatives like coconut sugar or monk fruit sweetener, keeping in mind that this may slightly change the texture and flavor of your spooky Halloween cookies.
Storing your ingredients properly is crucial to maintain their quality. Keep flour in an airtight container in a cool, dry place, and ensure your butter is stored in the fridge until you’re ready to use it. Brown sugar can clump together, so store it in an airtight container to keep it soft. For chocolate chips, keeping them in a cool area will prevent them from melting or losing their shape.
As you embark on your spooky Halloween cookie adventure, remember that the right ingredients can make all the difference. Each component contributes to the overall success of the recipe, and understanding their roles will empower you to create cookies that are not only delicious but also visually stunning.
Detailed Step-by-Step spooky halloween cookies Cooking Instructions
Now that you have your ingredients ready, it’s time to dive into the fun part—baking your spooky Halloween cookies! The process can be as enjoyable as the final product, and I’m here to guide you through every step with detailed instructions and tips to ensure your cookies turn out perfectly.
Preparation Steps
- Gather Your Ingredients: Make sure all your ingredients are measured out and ready to go. This is known as mise en place, and it helps streamline your baking process. Having everything at hand will prevent any last-minute scrambling!
- Preheat Your Oven: Preheat your oven to 350°F (175°C). This ensures that your spooky Halloween cookies start baking immediately after you place them in the oven, which is crucial for achieving the right texture.
- Prepare Your Baking Sheet: Line a baking sheet with parchment paper or a silicone baking mat. This will prevent your cookies from sticking and make cleanup easier.
Cooking Process
- Cream the Butter and Sugars: In a large mixing bowl, add the unsalted butter, granulated sugar, and brown sugar. Using an electric mixer, cream the mixture on medium speed until it becomes light and fluffy, about 2-3 minutes. This process incorporates air into the butter, which will help your cookies rise.
- Add the Egg and Vanilla: Beat in the egg and vanilla extract until fully combined. The mixture should appear smooth and creamy. If you notice any lumps of butter, keep mixing until they are fully incorporated.
- Sift Dry Ingredients: In a separate bowl, sift together the all-purpose flour, black cocoa powder, cornstarch, sea salt, baking soda, and baking powder. Sifting helps to aerate the flour and ensures that there are no clumps, resulting in a smooth dough.
- Combine Wet and Dry Ingredients: Gradually add the dry ingredients to the wet mixture, mixing on low speed until just combined. Be careful not to overmix, as this can lead to tough cookies.
- Fold in the Chocolate Chips and M&Ms: Using a spatula, gently fold in the white chocolate chips and Halloween M&Ms. This step is essential for distributing the candies throughout your cookie dough.
Final Assembly
- Portion the Dough: Using a cookie scoop or tablespoon, portion out the dough onto the prepared baking sheet, leaving enough space between each cookie for spreading. I usually aim for about 2 tablespoons of dough per cookie.
- Garnish with Extra Chocolate and M&Ms: Press a few extra chocolate chips and M&Ms on top of each cookie dough ball to make them visually appealing and enticing.
- Bake the Cookies: Place the baking sheet in the preheated oven and bake for 10-12 minutes, or until the edges are set and the centers look slightly underbaked. They will continue to cook on the baking sheet after being removed from the oven.
- Cool the Cookies: Let the cookies cool on the baking sheet for 5 minutes before transferring them to a wire rack to cool completely. This resting period allows them to firm up and makes them easier to handle.
- Decorate with Edible Eyeballs: Once the cookies are cool, you can add edible candy eyeballs for that extra spooky touch. Simply press them gently into the center of each cookie.
Common mistakes to avoid include overmixing the dough, which can lead to tough cookies, and not allowing your butter to soften adequately, impacting texture. A professional tip is to chill the dough for 30 minutes before baking to enhance the flavors and prevent spreading. Remember, patience is key! The entire process should take around 30 minutes, but the enjoyment you’ll get from these spooky Halloween cookies will last much longer. Happy baking!
Professional Tips and Techniques for spooky halloween cookies
When it comes to baking spooky Halloween cookies, the right techniques can make all the difference between a batch of cookies that looks like they came straight from a haunted house and ones that could grace the pages of a gourmet magazine. Whether you are a novice in the kitchen or a seasoned baker looking to impress, these professional tips and techniques will ensure that your Halloween cookies are both delicious and visually stunning.
Professional Techniques
Before you dive into baking, let’s talk about some essential techniques that will elevate your spooky Halloween cookies to a professional level. First, understand the importance of measuring your ingredients accurately. Baking is a science, and even slight variations can lead to cookies that are too dry or too chewy. Use a digital scale for measuring flour and sugar; this will ensure you have the exact amount needed for the perfect consistency.
Next, consider the creaming method, which is crucial for achieving light, fluffy cookies. Start by beating your butter and sugar together until the mixture is pale and fluffy. This process incorporates air into the batter, leading to a lighter texture. If you’re using a stand mixer, use the paddle attachment and mix on medium speed. Don’t rush this step; it usually takes about 3-5 minutes.
Chilling your dough is another technique that cannot be overlooked, especially for spooky Halloween cookies. After mixing your dough, wrap it in plastic wrap and refrigerate for at least an hour. Chilling helps the flavors to meld and prevents the cookies from spreading too much while baking, keeping those spooky shapes intact.
Lastly, when it comes to baking, always preheat your oven. It may sound simple, but a properly preheated oven can drastically affect the outcome of your cookies. Invest in an oven thermometer to ensure that your oven is at the right temperature, as many home ovens can be off by a significant margin.
Troubleshooting Guide
Even with the best techniques, things can sometimes go awry in the kitchen. Here are some common problems you might encounter while making your spooky Halloween cookies and how to fix them.
- Cookies are too dry: This can happen if you over-measure your flour. Always spoon flour into your measuring cup and level it off with a knife, rather than scooping directly from the bag, which can compact the flour.
- Cookies spread too much: If your cookies spread too much while baking, it could be due to not chilling your dough long enough or using too much butter. Make sure to chill your dough and check your butter’s measurement.
- Cookies are too soft or doughy: If your cookies are undercooked, try increasing the baking time by a minute or two, but keep an eye on them to avoid overbaking. Always remember that cookies continue to bake slightly after being pulled from the oven.
Presentation Tips
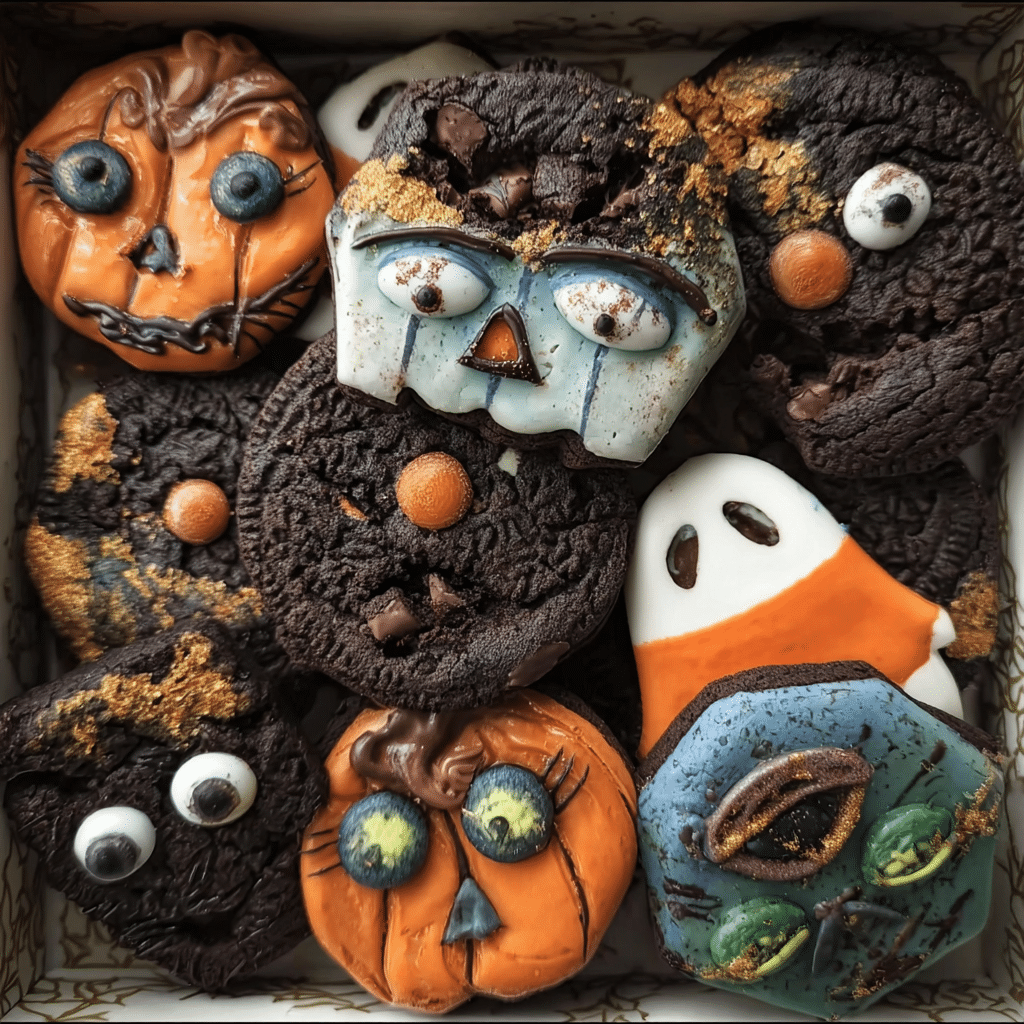
Presentation is key when it comes to spooky Halloween cookies. To create an eye-catching display, consider using a variety of shapes and colors. Use cookie cutters in Halloween-themed shapes such as ghosts, pumpkins, and bats. Decorating with royal icing can add a professional touch; pipe outlines and fill in with colored icing for a smooth finish. For an extra spooky effect, consider using edible glitter or sprinkles to add that festive flair.
Another fun and engaging way to present your cookies is to create a themed platter. Arrange your cookies on a black or orange serving platter and add props like small pumpkins, cobwebs, or fake spiders for a dramatic effect. This not only enhances the visual appeal but also sets a fun atmosphere for your Halloween gathering.
If you’re hosting a party or sending cookies as gifts, consider packaging them in clear cellophane bags tied with festive ribbons. This adds a personal touch and allows the cookies’ colors and designs to shine through.
Lastly, don’t forget about pairing your spooky Halloween cookies with drinks! A spooky punch or a warm spiced cider can complement the flavors of your cookies beautifully. If you’re feeling adventurous, consider serving them alongside a themed cocktail that echoes the flavors found in your cookies, such as a pumpkin spice martini.
In conclusion, mastering the art of baking spooky Halloween cookies is all about the details. From proper measuring and mixing techniques to creative presentation ideas, every step plays a crucial role in delivering a delicious and visually stunning treat. Embrace the spirit of Halloween and let your creativity shine through in both your baking and presentation.
Creative Variations and Adaptations of spooky halloween cookies
One of the most delightful aspects of baking spooky Halloween cookies is the endless possibilities for creativity and variation. Whether you’re looking to impress guests at a Halloween party or simply want to enjoy a spooky treat at home, there are plenty of ways to adapt your cookie recipes to suit different tastes and dietary needs. Let’s explore some creative variations and adaptations that will keep your Halloween baking fresh and exciting.
Seasonal Variations
When thinking about variations for your spooky Halloween cookies, seasonal ingredients can make all the difference. For instance, consider incorporating pumpkin puree into your cookie dough for a moist and flavorful treat that embodies the essence of fall. Pumpkin spice is another fantastic addition; a blend of cinnamon, nutmeg, and ginger can enhance the flavor profile and add that warm, cozy feeling we associate with the season.
Additionally, you can experiment with different types of chocolate. White chocolate chips can lend a ghostly appearance, while dark chocolate adds a rich depth of flavor. If you want to get extra creative, consider swirling in some orange or black food coloring into the dough for a marbled effect that screams Halloween!
Dietary Adaptations
In today’s world, dietary restrictions are more common than ever, but that doesn’t mean you have to sacrifice flavor or creativity when making spooky Halloween cookies. For those following a vegan diet, substitute the butter with coconut oil or a vegan butter alternative, and use flax eggs (1 tablespoon of ground flaxseed mixed with 2.5 tablespoons of water) as a binding agent. There are also many gluten-free flour blends available that can replace all-purpose flour in your recipe without sacrificing taste or texture.
If you’re looking for a low-carb option, consider making keto-friendly cookies. Use almond flour or coconut flour as a base, and sweeten with erythritol or another keto-safe sweetener. This way, everyone can enjoy the spooky fun without compromising their dietary preferences.
Creative Twists
Now let’s get into some fun, creative twists on traditional spooky Halloween cookies. Think about international flavors and fusion variations. For example, why not try a Mexican-inspired chocolate cookie with a hint of chili powder for a spicy kick? Or a coconut macaron that you can shape into spooky creatures? The possibilities are endless!
If you’re feeling adventurous, consider different cooking methods. While most cookies are baked in the oven, you could try making no-bake cookies using oats, peanut butter, and cocoa powder, which can be molded into spooky shapes and chilled until firm. Another fun idea is to create cookie bars that can be cut into shapes – this method is quicker and often leads to a wonderfully chewy texture.
Leftovers from your Halloween baking can also be transformed into new treats. Crumble leftover cookies into a parfait with layers of whipped cream and pumpkin pie filling for a delightful dessert, or use them as a topping for ice cream. You can even blend them into a crust for a spooky cheesecake—just imagine a pumpkin cheesecake topped with crushed Halloween cookies!
In conclusion, the world of spooky Halloween cookies is brimming with creative opportunities for variations and adaptations. From seasonal ingredients to dietary modifications, the sky’s the limit when it comes to creating delicious treats that cater to all tastes and preferences. So go ahead, unleash your creativity, and make this Halloween a memorable one with your innovative cookie creations!
Storage, Reheating, and Meal Prep for spooky halloween cookies
When it comes to baking spooky Halloween cookies, one of the most important factors to consider is how to properly store these festive treats. Whether you’re making a batch for a Halloween party, trick-or-treaters, or just a fun family activity, understanding the best storage techniques will help keep your spooky Halloween cookies fresh, delicious, and ready to be enjoyed. In this section, we’ll dive into the best practices for storage, reheating, meal prep, and food safety considerations, ensuring your cookies remain as delightful as the day they were baked.
Short-term Storage
Once your spooky Halloween cookies are cool and ready to be stored, the first step is to consider how you plan to use them. If you’re planning to enjoy them within a few days, short-term storage is all you need. Place your cookies in an airtight container, which will help lock in moisture and prevent them from becoming stale. If you have decorated cookies with icing or fondant, it’s best to place parchment paper between layers to avoid smudging or sticking.
For soft cookies, a simple, airtight container works wonders. You can stack them neatly, but don’t forget that the more delicate the decoration, the more care you should take. If the cookies are crunchy or have a firmer texture, they can handle being packed together a bit more tightly. A cookie tin can also be a charming way to store your cookies while adding to the festive atmosphere.
It’s also worth noting that if you live in a particularly humid area, consider adding a slice of bread in the container. This old trick helps absorb excess moisture and keeps the cookies from getting soggy. Just be sure to replace the bread slice every couple of days.
Freezing and Long-term Storage
If you are planning to bake your spooky Halloween cookies well in advance of the holiday, freezing is an excellent option. Freezing cookies allows you to enjoy them at a later date without sacrificing quality. Begin by letting your cookies cool completely at room temperature. Once cooled, you can either freeze them individually or as a batch.
For individual freezing, wrap each cookie tightly in plastic wrap or aluminum foil and place them in a freezer-safe bag or container. This method is particularly useful for decorated cookies, as it protects the design from breaking or becoming damaged. If you prefer to freeze them in batches, you can layer the cookies in an airtight container separated by sheets of wax or parchment paper. Just be careful not to stack too many layers, especially if they are decorated.
Cookies can typically be frozen for up to three months. When you’re ready to enjoy them, simply remove the desired number from the freezer and let them thaw at room temperature for a couple of hours. If you want to revive their original texture, a quick stint in the oven at a low temperature (around 300°F for 5-10 minutes) will do the trick.
Reheating Best Practices
Sometimes, you might find yourself needing to reheat your spooky Halloween cookies, especially if they’ve been frozen. Reheating cookies can help restore their soft, chewy texture and make them feel fresh again. The best way to reheat cookies is in the oven. Preheat your oven to 300°F, place the cookies on a baking sheet lined with parchment paper, and warm them for about 5 to 10 minutes. This method ensures that the cookies heat evenly without drying out.
If you’re in a hurry, you can also use the microwave, but you’ll need to be careful. Place a cookie on a microwave-safe plate and heat it for about 10-15 seconds. Keep an eye on it to avoid overcooking, which can lead to a tough texture. The microwave can dry the cookies out, so it’s best used for soft cookies rather than crunchy ones.
Meal prep is another consideration when it comes to spooky Halloween cookies. If you’re hosting a Halloween gathering or want to have treats readily available for trick-or-treaters, baking a large batch ahead of time is the way to go. You can freeze the cookies as mentioned earlier, or even prepare the dough in advance and freeze it. When you’re ready to bake, simply thaw the dough overnight in the refrigerator and bake as usual. This approach saves time and allows you to enjoy freshly baked cookies without the last-minute rush.
Food safety is also vital when it comes to cookie storage. Always ensure that your cookies are completely cooled before storing them to prevent condensation and mold growth. Label your storage containers with the date they were made or frozen to keep track of freshness. Generally, cookies can last for about a week at room temperature, two weeks in the refrigerator, and up to three months in the freezer.
Lastly, consider portioning and packaging your spooky Halloween cookies if you plan on giving them as gifts or party favors. Using fun, Halloween-themed boxes or bags can make your treats even more special. Plus, it’s a great way to share the joy of baking with friends and family.
Nutritional Benefits and Health Information
As we dive into the spooky Halloween cookies, it’s important to consider their nutritional profile. While these treats are undoubtedly delicious, understanding their health implications can help you enjoy them more mindfully. From the ingredients used to the overall caloric content, let’s explore the nutritional benefits and health information surrounding these festive delights.
Nutritional Profile
The nutritional breakdown of spooky Halloween cookies can vary significantly depending on the recipe and the ingredients used. However, on average, a standard cookie might contain around 100 to 150 calories per serving, depending on size and toppings. The primary macronutrients in cookies include carbohydrates, fats, and proteins. Typically, cookies are higher in carbohydrates due to the flour and sugars, which provide the sweetness and structure.
For a basic cookie, you can expect around 15-20 grams of carbohydrates, 5-8 grams of fat, and 1-2 grams of protein. However, if you add ingredients such as nuts, oats, or seeds, the protein content can increase significantly. Additionally, the use of whole grains can also enhance the fiber content, making the cookies a bit more filling.
Health Benefits
While spooky Halloween cookies are certainly a treat, they can also contain health benefits depending on their ingredients. For instance, if you incorporate whole grain flour instead of refined flour, you’re increasing the fiber content, which aids in digestion and helps keep you feeling full longer. Adding oats can provide additional fiber, vitamins, and minerals, such as magnesium and iron.
Using natural sweeteners, like maple syrup or honey, instead of refined sugar can also add some nutrients back into the mix. These alternatives often come with a lower glycemic index, which means they won’t spike your blood sugar levels as dramatically as white sugar might. You can also experiment with incorporating pumpkin puree, which is not only festive for Halloween but also packed with vitamins A and C, as well as fiber and antioxidants.
Dietary Considerations
When baking spooky Halloween cookies, it’s important to consider dietary restrictions and allergen information. Common allergens that may be present include gluten (in traditional flour), dairy (in butter or milk), and eggs. For those who are gluten-free, there are numerous flour alternatives available, such as almond flour, coconut flour, or gluten-free all-purpose mixes. These can often be substituted in equal amounts, but be sure to check specific recipes for best results.
For vegan options, you can replace eggs with flaxseed meal or chia seeds mixed with water, and use plant-based butter or coconut oil in place of dairy butter. Using nut or seed milk can also help create delicious cookies without animal products. It’s a great way to include everyone in the fun of Halloween baking!
When considering calorie content and macronutrient distribution, it’s essential to keep everything in perspective. Enjoying a spooky Halloween cookie as an occasional treat is perfectly fine, especially when balanced with healthy foods throughout the day. If you’re looking to indulge a bit more, consider pairing them with a source of protein, such as a handful of nuts or a piece of cheese, to balance your snack.
In comparison to similar festive treats, spooky Halloween cookies can be a more controlled indulgence. For instance, traditional Halloween candies can be much higher in sugar and lower in nutritional value. By making your cookies at home, you have the power to choose better ingredients and modify the recipe to suit your dietary needs.
In conclusion, while spooky Halloween cookies are a delightful addition to your Halloween festivities, being mindful of their nutritional content can help you enjoy them in moderation. By making informed choices about ingredients and considering dietary restrictions, you can create a treat that is both satisfying and enjoyable for everyone. So, whether you’re baking for a party or just craving a sweet snack, remember to balance indulgence with health!
Frequently Asked Questions About Spooky Halloween Cookies
Spooky halloween cookies for kids
Creating spooky Halloween cookies for kids is a fun and engaging activity that can spark their creativity! Start with a basic sugar cookie or gingerbread dough, as both are easy to shape and decorate. Encourage kids to use cookie cutters in fun shapes like ghosts, bats, and pumpkins. For decoration, use colorful icing, edible glitter, and candies to create spooky faces and designs. Make it a family event by letting each child decorate their own cookies, fostering both bonding and creativity.
Spooky halloween cookies recipes
There are numerous recipes for spooky Halloween cookies that cater to different tastes and skill levels. A simple recipe involves combining flour, sugar, butter, and eggs to create a basic dough, then chilling it before rolling out. For a spooky twist, add cocoa powder for a dark chocolate flavor or use food coloring to create vibrant hues. You can also explore variations like pumpkin spice cookies or oatmeal raisin cookies shaped like monsters. Don’t forget to include fun decorations like candy eyes or icing to bring your spooky creations to life!
Spooky halloween cookies recipe easy
An easy spooky Halloween cookie recipe can be made by using pre-made cookie dough, which saves time and effort. Simply roll the dough into balls, flatten them on a baking sheet, and use a toothpick to create designs before baking. After they cool, let kids decorate with frosting and sprinkles in Halloween colors like orange, black, and purple. For added spookiness, use edible markers to draw ghostly faces or spider webs on the cookies. This method provides a quick yet delightful way to celebrate Halloween without the stress of from-scratch baking.
Easy spooky halloween cookies
Easy spooky Halloween cookies can be crafted in just a few simple steps, making them perfect for last-minute baking. Start with a roll of refrigerated sugar cookie dough, which can be cut into various Halloween shapes using cookie cutters. Once baked, allow them to cool before decorating with store-bought frosting and toppings like gummy worms, candy corn, or chocolate sprinkles. For a fun twist, you can also drizzle melted chocolate over the cookies to create a creepy effect. These cookies are not only easy to make but also a guaranteed hit at any Halloween gathering!
Halloween cookies Pillsbury
Pillsbury offers a convenient way to whip up Halloween cookies with their ready-to-bake dough options. You can find a variety of spooky designs, such as pumpkin or ghost shapes, that eliminate the need for measuring and mixing ingredients. Simply follow the package instructions for baking, and then let your creativity shine during the decorating phase. Use colorful icing, sprinkles, and edible decorations to create fun and festive designs. This option is perfect for busy parents or those looking for a quick and easy way to join in on the Halloween fun!


