Spooky skeleton oreo’s are not just a treat; they are a delightful fusion of creativity, nostalgia, and seasonal celebration. I vividly remember the first time I stumbled upon this whimsical recipe while perusing a Halloween-themed cookbook. It was one of those crisp October afternoons, the air tinged with the scent of fallen leaves and pumpkin spice. My kids were buzzing with excitement, already plotting their costumes and counting down the days until Halloween. As I leafed through the pages, I was instantly captivated by the image of these adorable, spooky skeleton oreo’s, each one adorned with playful icing and candy eyes. It was the perfect combination of simple ingredients and delightful presentation that sparked my imagination and got my family involved in the kitchen.
The moment I decided to make spooky skeleton oreo’s, I knew it would become a family tradition. As we gathered around the kitchen counter, we spent hours laughing, decorating, and indulging in the sweet aroma of melting chocolate. My children, armed with their tiny spatulas and vibrant sprinkles, transformed the ordinary Oreo cookies into spooky sensations. The joy radiated from their faces as they created their own unique designs. This recipe is more than just a dessert; it’s a bonding experience, a way to create lasting memories during the Halloween season.
The Story Behind This Recipe
Diving into the origins of spooky skeleton oreo’s, we find a delightful blend of modern convenience and traditional spookiness. The idea of decorating cookies for Halloween is deeply rooted in the culture of this haunting holiday, with its origins tracing back to ancient Celtic festivals. The practice of creating festive food items to celebrate the season has evolved over centuries, but the playful spirit remains intact. Spooky skeleton oreo’s encapsulate this evolution perfectly; they take a classic cookie and elevate it into a festive treat that resonates with both children and adults.
While traditional Halloween treats often involve intricate baking, the beauty of spooky skeleton oreo’s lies in their simplicity. Using store-bought Oreo cookies, we can create a festive dessert without the stress of baking from scratch. This makes it an ideal choice for busy families looking for quick solutions during the hectic holiday season. Just grab some icing, candy eyes, and a sprinkle of creativity, and you’re ready to celebrate!
Why You’ll Love This Dish
What sets spooky skeleton oreo’s apart from other Halloween treats is their versatility and ease. You can customize them to fit your family’s tastes or dietary preferences. Whether you want to add a hint of orange to the icing or go full-on chocolate with dark cocoa flavor, the options are endless. This recipe is not only fun to make but also provides an opportunity for everyone to express their creativity. Plus, they make fantastic gifts for school parties or Halloween gatherings. Imagine the smiles on your friends’ and neighbors’ faces when you present them with a box of these adorable cookies!
Seasonally, spooky skeleton oreo’s are perfect for Halloween, of course, but they can also be a fun addition to any autumn-themed gathering. They embody the spirit of the season—the colors, the flavors, and the communal joy of creating something special together. The emotional connection to this dish comes from the shared experiences it fosters, turning simple moments into cherished memories.
In this comprehensive guide, you will learn everything there is to know about making spooky skeleton oreo’s—from the ingredients you’ll need to tips on decorating them like a pro. You’ll discover how to involve your kids in the process and make it a delightful family affair. By the end of this journey, you’ll not only have mastered the art of creating these spooky delights, but you’ll also have created new memories that will linger long after the last cookie has been devoured. So, roll up your sleeves, and let’s dive into the enchanting world of spooky skeleton oreo’s!
The Rich History and Cultural Significance of spooky skeleton oreo’s
The rich history and cultural significance of spooky skeleton oreo’s connect deeply with the evolution of Halloween traditions and the celebration of fall. While the exact origins of these delightful treats may not be as clear-cut as some traditional recipes, they certainly reflect the creativity and festivity associated with Halloween. The concept of decorating cookies to reflect the spooky themes of this holiday can be traced back to various cultural practices that celebrate the harvest and the supernatural.
Origins and History
Halloween, with its roots in the ancient Celtic festival of Samhain, marked the end of the harvest season and the beginning of winter. This festival was a time when the boundary between the living and the dead was thought to blur, leading to traditions that included lighting bonfires and wearing costumes to ward off wandering spirits. Over time, these customs evolved, and the modern celebration of Halloween began to take shape, particularly in the United States in the 19th century.
The idea of creating festive treats like spooky skeleton oreo’s draws upon the long-standing tradition of baking and decorating cookies for various holidays. In America, the practice became especially popular during Halloween, where families would engage in cookie decorating as a way to bond and celebrate the spooky season. The introduction of commercially available items, such as Oreo cookies, opened the door for more accessible and less time-consuming baking options, leading to the creation of fun, themed desserts like spooky skeleton oreo’s.
Cultural Significance
Spooky skeleton oreo’s have quickly become a staple in many households during the Halloween season. Their charm lies in their ability to bring people together. They are often featured at Halloween parties, school functions, and family gatherings, allowing everyone to partake in the festive spirit. The act of decorating these cookies fosters creativity and collaboration among family members, making it a cherished tradition in many homes.
Additionally, the cultural significance of spooky skeleton oreo’s extends beyond mere enjoyment. They serve as a reminder of the importance of family and community during this festive time. Sharing these treats with others reinforces bonds and creates a sense of belonging, which is especially important during the often hectic holiday season.
Nutritional Benefits
While spooky skeleton oreo’s are undeniably a treat meant for indulgence, there are ways to incorporate nutritional benefits into this festive dessert. For instance, by using natural food colorings for decoration or opting for organic cookie alternatives, families can create a version of spooky skeleton oreo’s that aligns more closely with their dietary preferences. Additionally, involving children in the preparation process can lead to discussions about ingredients and healthier options, promoting a balanced approach to treats during Halloween.
Furthermore, using ingredients that are lower in sugar or incorporating whole grains can make this dessert a bit more health-conscious. It’s important to remember that while spooky skeleton oreo’s are a fun treat, moderation is key, and they should be enjoyed as part of a balanced diet. Ultimately, these cookies are about bringing joy and celebration into our lives, reminding us of the importance of community and creativity during this festive time.
In conclusion, spooky skeleton oreo’s beautifully encapsulate the journey of Halloween traditions through their fun and festive presentation. From their origins rooted in ancient customs to their modern evolution as a beloved dessert, they serve as a delightful reminder of the joy and creativity that this season brings. As you prepare to make these spooky delights, remember that they are more than just a treat—they are an invitation to create, celebrate, and share with those you love.
Essential Ingredients for Perfect spooky skeleton oreo’s
When it comes to creating the perfect Halloween treat, the spooky skeleton oreo’s are not just a delightful dessert; they are a canvas for creativity, fun, and a bit of fright! To achieve the ideal spooky look and delicious flavor, it is crucial to gather the right ingredients. Below, I’ll break down each component of this Halloween masterpiece and explain its role, quality indicators, and even some shopping tips to help you in your quest for the best spooky skeleton oreo’s.
Essential Ingredients
- 8 Oreos, chilled: The classic Oreo cookie serves as the backbone of our spooky creation. Its rich chocolate flavor and crisp texture contrast beautifully with the sweet white chocolate coating. Chilling the Oreos before using them helps prevent them from becoming too soft when dipped.
- 200 grams of white chocolate or candy melts: This ingredient will create the ghostly coating for our spooky skeleton oreo’s. White chocolate offers a creamy, sweet contrast to the dark chocolate or black icing used for detailing. When selecting white chocolate, look for high-quality brands with cocoa butter listed in the ingredients for the best flavor and texture.
- 1 teaspoon vegetable or coconut oil: A small amount of oil is added to the melted white chocolate to achieve a smoother, more fluid consistency. This is particularly helpful when you’re dipping the Oreos, ensuring a nice, even coating. Coconut oil also adds a subtle flavor that pairs well with the sweetness of the chocolate.
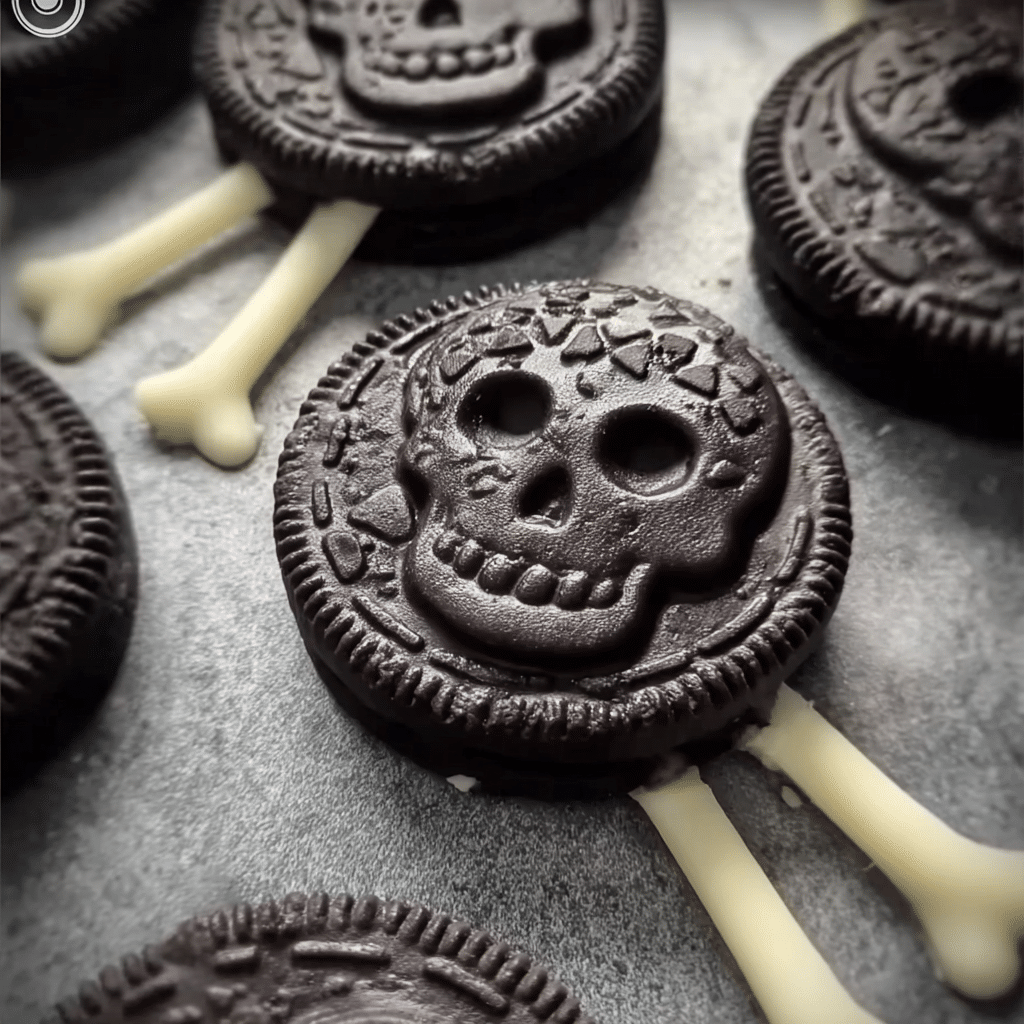
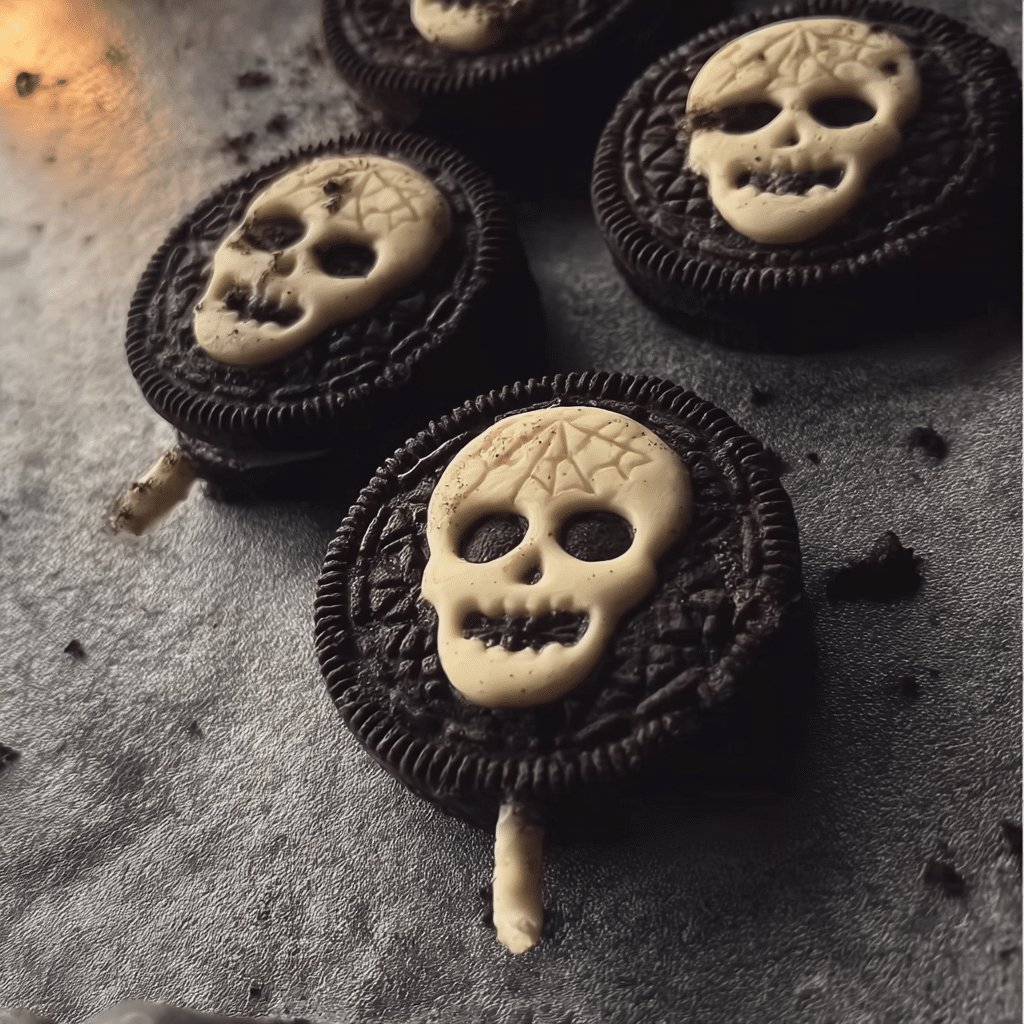
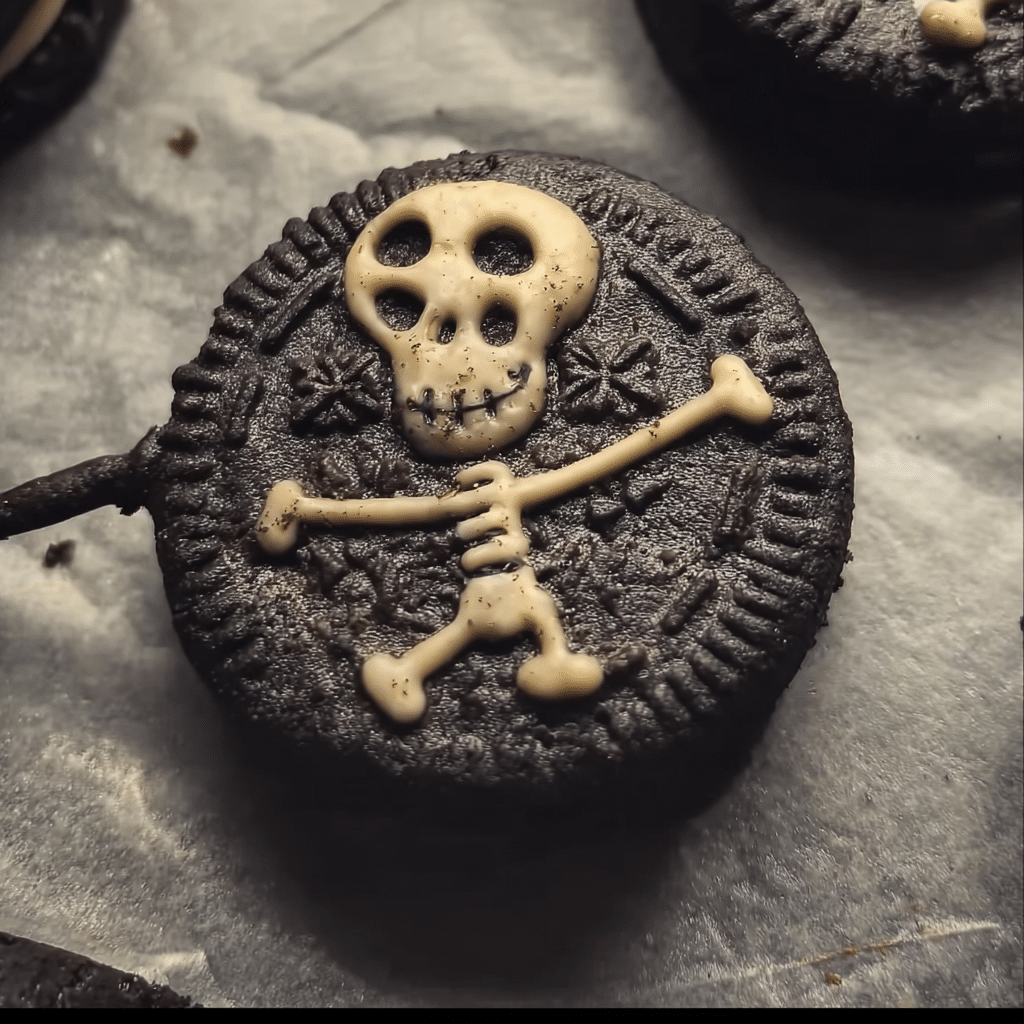
- Melted dark chocolate or black gel cookie icing: This ingredient will bring our spooky skeletons to life! Whether you choose to use melted dark chocolate or gel icing, it’s important to create those creepy, charming features on our skeletons. The deep color of dark chocolate or the vividness of gel icing provides a stark contrast against the white chocolate.

Spooky Skeleton Oreo’s Halloween Dessert
Ingredients
- 10 Oreos roughly 1 pack
- 50–80 g Icing sugar
- 1–2 tsp Cold water
- Black icing writing pen
- Straws
Instructions
- Mix together the icing sugar and cold water to make a thick white icing. If the consistency is too runny, just add more icing sugar. If the consistency is too thick, add a drop more water.
- Spoon the icing onto the Oreos to make a skeleton face. Leave the icing to dry and set completely (this will take about 10 minutes).
- Now use the black icing writing pen to draw skeleton faces on top of the icing.
- Cut the straws down the middle to make two short straws. Use your fingertips to flatten one end of the straws and gently push it into the Oreo filling.
Shopping Tips
When shopping for the ingredients for your spooky skeleton oreo’s, freshness and quality are key. Here are some tips to ensure you select the best components:
- Oreos: Check the expiry date and make sure the package is sealed. Fresh Oreos will have a better texture. Consider specialty flavors for a twist, but the classic is always a winner!
- White Chocolate: Look for brands that contain at least 20% cocoa butter. If you’re opting for candy melts, choose a brand that is known for a smooth melting consistency, which is essential for dipping.
- Vegetable/Coconut Oil: Choose organic options if possible. They not only taste better but are healthier too.
- Dark Chocolate or Gel Icing: For the best results, pick high-quality dark chocolate that has a cocoa percentage you enjoy. If using gel icing, ensure it is food-safe and suitable for decoration.
Substitutions and Alternatives
For those with dietary restrictions or preferences, there are several substitutions you can make without compromising the integrity of your spooky skeleton oreo’s:
- Gluten-Free: Use gluten-free Oreos or any gluten-free chocolate sandwich cookie available in stores.
- Vegan Options: Look for vegan white chocolate and dark chocolate brands. There are many delicious dairy-free alternatives on the market today.
- Healthier Choices: If you want to reduce sugar, consider using sugar-free Oreos or a sugar-free chocolate coating. Just be aware that the flavor and texture might differ slightly.
- Chocolate Alternatives: If you’re not a fan of chocolate, you could use yogurt melts or even a colorful candy coating to achieve a fun look that is still spooky!
Lastly, when it comes to storage, keep your ingredients in a cool, dry place. Once your spooky skeleton oreo’s are assembled, store them in an airtight container in the refrigerator. They’ll stay fresh for several days, making them perfect for Halloween parties or as a fun treat to share with friends and family.
Incorporating these tips and understanding the roles of each ingredient will help you create a batch of spooky skeleton oreo’s that are not only visually appealing but also deliciously irresistible. Now that we have our ingredients sorted, let’s dive into the fun part: making these spooky treats!
Detailed Step-by-Step spooky skeleton oreo’s Cooking Instructions
Creating the perfect spooky skeleton oreo’s is more than just following a recipe; it’s about enjoying the process, embracing creativity, and perhaps even a bit of friendly fright! Below, I’ll guide you through a detailed step-by-step cooking process that will ensure your skeletons turn out spooktacular. Let’s get started!
Preparation Steps
- Gather Your Supplies: Before diving into the cooking process, it’s essential to gather all your ingredients and equipment. You’ll need a microwave-safe bowl for melting chocolate, a baking sheet lined with parchment paper, a fork for dipping, and perhaps a piping bag if you choose to use melted chocolate for decoration. Having everything at hand will make the process much smoother and more enjoyable.
- Chill the Oreos: Take your Oreos out of their packaging and place them in the refrigerator for about 15-20 minutes. Chilling them ensures that they maintain their structure when dipped in the melted chocolate.
- Prepare Your Workstation: Create a clean, organized workspace. Lay out your parchment-lined baking sheet where you will place the dipped Oreos. This will help contain any mess and facilitate a more organized assembly line.
- Measure Ingredients: Measure out your white chocolate or candy melts and the vegetable/coconut oil. Having these ready will save you time and make the melting step easier.
Cooking Process
- Melting the White Chocolate: Place the measured white chocolate or candy melts in the microwave-safe bowl. Heat in the microwave in 30-second intervals, stirring between each interval until smooth. Be cautious; overheating can cause the chocolate to seize! The mixture should be glossy and fluid, perfect for dipping.
- Adding the Oil: Once melted, stir in the teaspoon of vegetable or coconut oil. This addition will help the chocolate achieve a smoother consistency, making the dipping process easier. If the mixture seems too thick, you can add a bit more oil to achieve the desired consistency.
- Dipping the Oreos: Take a chilled Oreo and use a fork to dip it into the melted white chocolate, covering it completely. Allow the excess to drip off before placing it on the parchment-lined baking sheet. This is where you can get creative; if you want a thicker coating, dip it twice!
- Letting Them Set: Once all your Oreos are dipped, let them sit at room temperature for about 10 minutes to allow the chocolate to set slightly. After that, you can place them in the fridge for about 20-30 minutes to fully harden.
Final Assembly
- Decorating with Dark Chocolate or Gel Icing: Once the white chocolate has set, it’s time to bring your spooky skeletons to life! If you’re using melted dark chocolate, place it in a piping bag (or a ziplock bag with a corner snipped off) and carefully pipe out spooky eyes, skeleton bones, or mouth shapes. If you’re using black gel icing, apply it similarly. Be as creative as you like!
- Finishing Touches: After decorating, let the icing or melted chocolate set for another 10-15 minutes. This step is crucial as it ensures that your designs won’t smudge when you move the cookies.
- Storing Your Spooky Creation: Once your spooky skeleton oreo’s are fully set and decorated, store them in an airtight container in the refrigerator. These treats can last up to a week, but I doubt they’ll last that long once your friends and family catch sight of them!
Creating spooky skeleton oreo’s is not just about the end product; it’s about the joy of cooking, the laughter shared, and the memories made while putting together these hauntingly delightful treats. Whether you’re making them for a Halloween party, a school event, or just for fun, enjoy every step of the process. Happy haunting!
Professional Tips and Techniques for spooky skeleton oreo’s
When it comes to creating the perfect spooky skeleton Oreo’s, a few professional tips and techniques can elevate your dessert from ordinary to extraordinary. As someone who loves experimenting in the kitchen, I can assure you that these insights not only simplify the process but also enhance your overall baking experience. Let’s explore some of the essential tips that will help you create these delightful Halloween treats with finesse.
Professional Techniques
First and foremost, let’s discuss the importance of quality ingredients when making spooky skeleton Oreo’s. Using high-quality Oreo cookies and premium chocolate can significantly influence the taste and texture. I’ve always believed that the foundation of any recipe is its ingredients. For these treats, opt for double-stuffed Oreos; the extra cream filling adds richness and helps hold the decorations better.
Next, mastering the chocolate melting process is crucial. Instead of simply microwaving your chocolate, consider using a double boiler. This method provides gentle heat, preventing the chocolate from burning or seizing, which can be a common issue for many home bakers. To create a smooth, pourable consistency, add a teaspoon of coconut oil to your melting chocolate. This not only thins it out but also gives your spooky skeleton Oreo’s a beautiful sheen.
When it comes to decorating, a piping bag will be your best friend. If you don’t have one, a zip-top bag with a corner snipped off works just as well. This allows for more control when applying your white chocolate or icing to create the spooky skeleton design. Remember, the key to achieving a professional-looking finish is patience. Take your time when piping; it’s better to go slow and steady than rush through the process.
Troubleshooting Guide
Even the most experienced bakers encounter hiccups along the way. If your chocolate isn’t setting properly, it might be due to humidity; ensure your kitchen is dry and free from moisture. If you’re finding that your icing is too thick, adding a few drops of water or milk can help achieve the desired consistency. Conversely, if it’s too runny, a little powdered sugar can thicken it up nicely.
Another common issue is the Oreos crumbling while you’re dipping them in chocolate. To prevent this, consider chilling the Oreos for about 30 minutes before dipping. This will firm them up and make them less prone to breaking. If you do encounter crumbles, don’t despair! You can easily turn them into a delicious crust for a cheesecake or sprinkle them over ice cream as a tasty topping.
Presentation Tips
Presentation is everything, especially for festive treats like spooky skeleton Oreo’s. After you’ve decorated your cookies, consider arranging them on a black or orange platter to enhance the Halloween theme. Adding props like small plastic skeletons or autumn leaves can create an eye-catching display. If you’re serving these at a party, consider individual treat bags tied with spooky ribbons. Not only does this make for a fun presentation, but it also makes it easy for guests to grab and go.
For an extra touch of elegance, you can dust the finished cookies with edible glitter or a light sprinkle of cocoa powder to give them a spooky, ghostly appearance. This little detail can make your spooky skeleton Oreo’s stand out even more, impressing your friends and family and making your dessert the centerpiece of the Halloween festivities.
As for beverage pairings, I recommend serving these spooky treats with a glass of chilled milk, as it perfectly balances the sweetness of the Oreos. If you’re feeling adventurous, a pumpkin spice latte can add a seasonal twist that complements the flavors beautifully. For adults, consider a spiced rum or a pumpkin-flavored cocktail to keep the spirit of Halloween alive. Ultimately, the goal is to create a delightful experience that combines taste and visual appeal, ensuring your spooky skeleton Oreo’s are a hit at any Halloween gathering.
Creative Variations and Adaptations of spooky skeleton oreo’s
Now that we’ve mastered the basics of spooky skeleton Oreo’s, let’s dive into some creative variations and adaptations that will keep your Halloween celebrations fresh and exciting. The beauty of this dessert lies in its versatility; with a few tweaks, you can create an entirely new experience while maintaining the spirit of the original recipe. Here are some ideas to inspire your spooky treats this Halloween.
Seasonal Variations
First, let’s talk about seasonal variations. Halloween isn’t the only time to enjoy spooky skeleton Oreo’s. You can easily adapt this recipe for other holidays. For example, during Christmas, swap out the black and white colors for festive red and green. Use red candy melts and green icing to create Christmas-themed designs. You could even turn the skeletons into little Santa Claus or Christmas tree shapes. This not only makes for a fun holiday treat but also allows you to get creative with your decorations.
Another idea is to incorporate seasonal flavors. Consider using pumpkin spice Oreo’s in the fall to give your spooky skeletons a hint of seasonal flavor. You could also use peppermint Oreo’s during the winter months, which would pair perfectly with chocolate and white icing for a winter wonderland theme.
Dietary Adaptations
For those who are following specific dietary restrictions, fear not! There are plenty of adaptations you can make to ensure everyone can enjoy these spooky skeleton Oreo’s. If you’re looking for a gluten-free version, substitute regular Oreos with gluten-free Oreos. They are just as delicious and will allow those on a gluten-free diet to partake in the fun.
If you’re vegan, you can find plant-based chocolate options and use dairy-free cream cheese for the filling. There are also vegan Oreo varieties available, making it easy to create a spooky treat that everyone can enjoy. Don’t be afraid to get creative with your ingredients; many stores now carry a variety of alternatives that can match the traditional flavors without compromising quality.
Creative Twists
Let’s not forget about the creative twists you can add to your spooky skeleton Oreo’s. Consider adding crushed candy corn or Halloween-themed sprinkles on top of the chocolate before it sets for an extra crunch and visual appeal. You could also dip the Oreos in white chocolate and then drizzle dark chocolate over them for a marbled effect, adding depth and richness to the presentation.
Another fun idea is to incorporate different flavor profiles. Instead of using just white chocolate, experiment with flavored melts such as caramel or even matcha green tea for a unique spin. This not only changes the color but also offers a delightful surprise for those tasting it for the first time.
Finally, if you find yourself with leftover spooky skeleton Oreo’s, get creative! Crumble them into a layered dessert with whipped cream and pudding, or mix them into a milkshake for an indulgent treat. The possibilities are endless, and utilizing leftovers can help reduce waste while still providing delicious options for your guests.
The beauty of spooky skeleton Oreo’s lies in their adaptability. Whether you’re celebrating Halloween or simply looking for a fun dessert to make, these variations allow you to tailor the recipe to your taste and dietary preferences. So, don your apron, unleash your creativity, and get ready to impress your friends and family with your own unique take on these festive treats!
Storage, Reheating, and Meal Prep for spooky skeleton oreo’s
When it comes to creating delightful desserts, especially for special occasions like Halloween, nothing beats the charm of Spooky Skeleton Oreo’s. These whimsical treats not only look fantastic but also taste delicious. However, after whipping up a batch, you might find yourself wondering how to properly store them to maintain their freshness and flavor. In this section, we’ll dive into the nitty-gritty of storing, reheating, and even meal prepping these delightful skeleton-themed cookies, ensuring that you can enjoy them for days to come.
Short-term Storage
After you’ve crafted your Spooky Skeleton Oreo’s, the first step is to store them correctly for short-term enjoyment. Ideally, you want to consume these treats within a week of making them to ensure they retain their optimal taste and texture. To store them, place the Oreos in a single layer in an airtight container. If you’re stacking them, I recommend placing parchment paper or wax paper between layers to prevent them from sticking together.
In my experience, a simple Tupperware or a dedicated cookie jar works wonders. Ensure that the lid seals tightly to keep the moisture out. It’s important to keep the container in a cool, dry place, away from direct sunlight. If you can, store them in the refrigerator, especially if your spooky skeleton decorations include cream cheese or any other perishable ingredients. That little extra chill can help maintain their freshness.
Freezing and Long-term Storage
What if you want to prepare your Spooky Skeleton Oreo’s well in advance? Freezing is a great option! These cookies freeze exceptionally well, allowing you to enjoy them even weeks after you’ve made them. To freeze your cookies, first, make sure they are completely cooled. Then, place them in a single layer on a baking sheet and freeze for about 1-2 hours. This prevents them from sticking together. Once frozen, transfer the cookies into a freezer-safe container or a zip-top freezer bag, removing as much air as possible. Label the container with the date so you can keep track of their freshness.
When it comes to thawing, I suggest letting them sit at room temperature for about 30 minutes before serving. This will help them regain their original texture. Just remember that while freezing can extend the life of your Spooky Skeleton Oreo’s, they are best consumed within 2-3 months for peak flavor and freshness.
Reheating Best Practices
Reheating cookies can be a bit tricky, especially when it comes to maintaining the soft, chewy texture we all love. Luckily, Spooky Skeleton Oreo’s are quite forgiving! If you find that they’ve become a tad stale after storage, you can use your oven for a quick refresh. Preheat your oven to 350°F (175°C), and place the cookies on a baking sheet lined with parchment paper. Heat them for about 5-7 minutes—just long enough for them to warm through without overcooking.
Alternatively, if you’re craving a warm cookie right away and don’t want to wait for the oven, a microwave can do the trick as well. Place a cookie on a microwave-safe plate, cover it with a damp paper towel, and microwave for about 10-15 seconds. This method works wonders for reviving those delicious flavors without turning them into a chewy mess.
Meal Prep and Batch Cooking Strategies
Meal prepping can save you time, especially during the busy Halloween season when you might be juggling parties, school events, and family gatherings. Making a double batch of Spooky Skeleton Oreo’s is a fantastic way to ensure you always have a festive treat on hand. Consider setting aside a day to bake multiple batches, store them properly, and even prepare a variety of designs to keep the festivity going!
When meal prepping, I often find that organizing my ingredients and workspace helps streamline the process. Measure out your dry ingredients in advance, and even prepare some decorations ahead of time. You can also create themed packaging to make the cookies easy to grab and go. Use small bags or boxes decorated with Halloween motifs for gifting or sharing with friends and family.
Food Safety Considerations and Guidelines
Food safety is paramount when it comes to storing any kind of dessert, including our beloved spooky skeleton Oreo’s. Always ensure that your hands, utensils, and surfaces are clean during the preparation and storage phases. If your cookies contain any perishable items, like cream cheese frosting, be especially diligent about refrigeration and consuming them within a few days.
Pay attention to any signs of spoilage when retrieving your cookies from storage. If they smell off or have developed an unusual texture, it’s best to err on the side of caution and discard them. Keeping an eye on the shelf life expectations—typically about a week at room temperature and up to three months in the freezer—will help ensure you enjoy your spooky treats at their best.
Portioning and Packaging Tips
If you plan to share your Spooky Skeleton Oreo’s or bring them to a gathering, proper packaging can make all the difference. Consider using clear cellophane bags tied with festive ribbons or even small boxes adorned with Halloween stickers. Not only does this add a personal touch, but it also keeps your cookies fresh while making them easy to transport. Portioning them out into individual servings not only makes sharing easier but also allows everyone to grab a treat without too much fuss.
Remember, the goal is to enjoy your Spooky Skeleton Oreo’s while keeping them fresh and tasty! By following these storage guidelines, reheating best practices, and meal prep strategies, you’ll be set for a spooktacular Halloween filled with delicious treats that everyone will love!
Nutritional Benefits and Health Information
When indulging in delightful Halloween treats like Spooky Skeleton Oreo’s, it’s always interesting to consider their nutritional value. While these cookies are undoubtedly a fun and festive way to celebrate, understanding their nutritional benefits and how they fit into various dietary plans can enhance your overall experience. Let’s embark on a journey through the nutritional landscape of these sweet delights.
Nutritional Profile
To break down the nutrition of Spooky Skeleton Oreo’s, we must consider their primary ingredients: Oreo cookies, cream cheese (or another frosting), and any additional toppings or decorations you choose to use. A standard serving size of two Oreo cookies (about 34 grams) contains approximately 160 calories. This includes around 7 grams of fat, 25 grams of carbohydrates, and 1 gram of protein. The calorie content can vary based on the type of frosting or added toppings, so it’s essential to consider these variations when calculating your intake.
Oreo cookies themselves are primarily made from sugar, flour, and cocoa, which contribute to their sweet and chocolatey flavor. The cream cheese or frosting adds a deliciously rich texture but also increases the calorie count significantly. For example, if you use a standard cream cheese frosting, it can add around 50-100 calories per serving, depending on how much you apply. Therefore, it’s crucial to keep portion sizes in mind to enjoy these treats without overindulging.
Health Benefits
While Spooky Skeleton Oreo’s are primarily a dessert, they do bring some enjoyment to your life! The ingredients, especially when you consider the fun factor, can have their perks. For instance, dark chocolate, which is often found in the cookie, contains antioxidants that may help improve heart health. Additionally, if you choose to incorporate a few healthier ingredients into your frosting or decorations—like using a yogurt-based frosting or incorporating nuts as toppings—you can add some beneficial nutrients, such as protein and healthy fats.
Moreover, baking can bring a sense of joy and accomplishment. Cooking and sharing these spooky treats with friends and family can provide emotional benefits as well. Engaging in festive cooking can boost your mood, enhance your social interactions, and create lasting memories, which are invaluable for overall well-being.
Dietary Considerations
When it comes to dietary considerations, Spooky Skeleton Oreo’s may not fit into every dietary plan. They are not gluten-free or suitable for those with dairy allergies unless you make specific substitutions. However, for those who can enjoy them, these cookies offer a fun, festive treat. If you’re looking to enjoy a similar dessert with fewer calories or sugar, consider making homemade versions using almond flour or coconut flour as a base and natural sweeteners like honey or maple syrup.
For those watching their sugar intake, using sugar-free Oreos or alternative sweeteners in your frosting can help lower the overall sugar content. Keep in mind that while these substitutions can make the dessert healthier, they may also alter the flavor and texture, so experimentation is key!
In terms of nutrient density, Spooky Skeleton Oreo’s are not a significant source of vitamins or minerals. However, they can be enjoyed in moderation as part of a balanced diet. Pairing them with a source of protein, such as a glass of milk or a yogurt dip, can help create a more satisfying snack, balancing the sugar with some nutritional benefits.
Finally, when comparing Spooky Skeleton Oreo’s to other Halloween treats, they may hold a moderate position. While they are certainly sweeter than some fruit-based options, they might be more appealing than richer desserts like cakes or brownies, especially for those who prefer lighter, crunchy snacks. The key is to enjoy these cookies as part of a broader approach to festive eating—one that values moderation and enjoyment.
In conclusion, while Spooky Skeleton Oreo’s are certainly a treat, they can also fit into a balanced lifestyle with some thoughtful consideration. By being mindful of portion sizes, exploring healthier ingredient options, and embracing the joy of baking and sharing, you can enjoy these festive cookies guilt-free. So, gather your loved ones, whip up a batch of these delightful treats, and celebrate the spooky season with a smile!
Frequently Asked Questions About Spooky Skeleton Oreo’S
What are Spooky Skeleton Oreo’s and how can I make them for Halloween?
Spooky Skeleton Oreos are a fun and festive Halloween treat that combines classic Oreo cookies with a spooky twist. To make them, you will need regular Oreo cookies, white chocolate (or candy melts), and edible decorations such as black icing or candy eyes. Start by melting the white chocolate in a microwave-safe bowl, stirring until smooth. Dip each Oreo in the melted chocolate, allowing any excess to drip off, and then place them on parchment paper to cool. Once they are set, use black icing to draw skeleton features or attach candy eyes for a cute yet eerie effect. For an extra touch, you can also sprinkle edible glitter or use colored sugar to add some sparkle!
Do I need any special tools or ingredients to make Spooky Skeleton Oreos?
While you don’t need any specialized tools to make Spooky Skeleton Oreos, a few items can make the process easier and more enjoyable. A microwave-safe bowl for melting chocolate and a fork to dip the Oreos are essentials. Additionally, using a piping bag or a zip-top bag with a corner snipped off will help you create precise designs when decorating with icing. In terms of ingredients, it’s best to use high-quality white chocolate or candy melts for a smooth coating, and consider using different types of edible decorations like sprinkles or colored icing to enhance the spooky theme.
How can I store my Spooky Skeleton Oreos after making them?
To keep your Spooky Skeleton Oreos fresh and delicious, store them in an airtight container at room temperature for up to a week. If you live in a particularly warm climate, it might be best to keep them in the refrigerator to prevent the chocolate from melting. Just be sure to let them come to room temperature before serving, as this will help maintain their delightful texture. If you’re making a large batch, consider layering the cookies between sheets of parchment paper to prevent them from sticking together.
Can I customize the design of my Spooky Skeleton Oreos?
Absolutely! Customizing your Spooky Skeleton Oreos is part of the fun and creativity of making these treats. You can change the colors of the chocolate coating by using colored candy melts, such as orange or purple, for a more festive look. Additionally, you can experiment with different skeleton designs by using various piping techniques, like creating skulls, bones, or even spooky ghosts. Don’t hesitate to add your personal touch with themed sprinkles, edible glitter, or even using food-safe markers to draw additional details on the chocolate once it has set.
Are there any alternatives to Oreos for making Spooky Skeleton treats?
If you’re looking for alternatives to Oreos, there are several options that can still yield delightful spooky treats. You can use chocolate-covered biscuits or graham crackers as a substitute, which will provide a similar taste and texture. For a gluten-free option, consider using gluten-free cookies that match the flavor profile of Oreos. Additionally, you might even explore making homemade cookies using chocolate cookie dough for a fresh twist. Just be sure to adjust your melting and decorating techniques accordingly to achieve the best results!


