Craving a meal that marries the savory comfort of a cheeseburger with the portable ease of a hand pie? Allow us to introduce you to Cheeseburger Pockets, a recipe that’s about to become a staple in your kitchen. This ultimate guide will cover everything you need to know, from selecting the perfect dough (hint: pizza dough is a game-changer) to serving them for family dinners, festive parties, or even satisfying the pickiest of eaters.

We will delve into inventive variations like fluffy cheeseburger biscuit bombs and flaky pastry pockets, provide solutions for common problems like soggy dough, and detail the best methods for freezing and reheating. We’ll also tackle some of the internet’s most asked questions, such as finding the best cheeseburger hot pocket recipe and determining if burger pocket holders are a worthwhile purchase.
What Are Cheeseburger Pockets?
Origin and Concept of Cheeseburger Pockets
Cheeseburger pockets are precisely what their name implies: miniature stuffed sandwiches that capture the full flavor of a classic cheeseburger within a conveniently sealed, portable pouch. Imagine them as a culinary hybrid of a calzone, a turnover, and a hot pocket, but filled with savory ground beef, molten cheese, onions, and your other favorite burger toppings.
This clever concept likely arose from the need for busy families to create delicious, prep-ahead meals. Their popularity exploded in home kitchens and on viral recipe platforms, where they were celebrated for being affordable, highly customizable, and a guaranteed hit with children.
Given that the cheeseburger is a culinary icon in the U.S., it was a natural evolution to encase its beloved flavors in pizza or biscuit dough, creating a satisfying meal that requires no cutlery.
For a different take on ground beef, check out our creative fusion recipe: [Easy Korean Ground Beef and Broccoli Recipe]
How They Differ from Traditional Cheeseburgers and Hot Pockets
In contrast to a standard cheeseburger served on a bun, cheeseburger pockets are fully enclosed and baked or air-fried, which keeps the filling wonderfully warm and gooey. They are significantly easier to eat on the move and resist becoming soggy much better than their traditional counterparts.
When compared to store-bought hot pockets, these homemade versions provide superior control over the ingredients, meaning less sodium, no preservatives, and a far better taste. You have the freedom to enhance the flavor by sautéing onions, using expertly seasoned meat, or mixing condiments like mustard and ketchup directly into the filling.
Here is a brief comparison:
| Feature | Traditional Cheeseburger | Homemade Cheeseburger Pocket | Store-Bought Hot Pocket |
| Portability | No | Yes | Yes |
| Customization | Medium | High | Low |
| Meal Prep | Low | High | High |
| Texture | Crunchy/Soggy | Soft/Golden | Often Mushy |
| Utensils | Yes | No | No |
If this concept is new to you, cheeseburger pockets serve as a perfect introduction to crafting savory, handheld meals that deliver the satisfaction of a burger with the ease of a snack.
Key Ingredients for Cheeseburger Pockets
Crafting the Perfect Filling and Dough
Creating the ideal cheeseburger pocket begins with selecting the right ingredients. Every component, from the succulent ground beef to the perfectly melted cheese and the choice of dough, contributes to the overall flavor, texture, and satisfying experience.
Print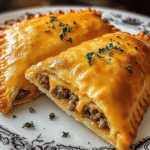
The Best Cheeseburger Pockets
Ingredients
- 2 8 ounce packages refrigerated biscuits
- ½ pound ground beef
- ¼ cup chopped onions
- 2 garlic cloves minced
- Salt and pepper to taste
- 8–16 slices American cheese or your favorite cheese for cheeseburgers
Instructions
-
-
In a large skillet over medium heat, brown ground beef with onions and garlic. Cook until no longer pink. Drain. Set aside.
-
Open one tube refrigerated biscuits, and roll out to flatten slightly.
-
Place a slice of cheese on each biscuit.
-
Spoon ground beef mixture evenly on all 8 biscuits.
-
**Optional: Place an additional piece of cheese on top of ground beef mixture on each biscuit.
-
Open the other tube of refrigerated biscuits, and roll out to flatten again.
-
Place the newly rolled out biscuits on top of the ground beef mixture. Then score the outside edges with a fork to seal.
-
Bake in a 400° oven for about 10 minutes, until biscuits are golden and cheeseburger pockets are heated through.
-
-
Serve warm with ketchup, mustard, or additional hamburger toppings, if desired.
Best Meats and Cheeses to Use
The filling is the soul of your cheeseburger pocket, and your choice of meat and cheese can transform your dish from merely good to truly exceptional.
Meat Options:
- Ground Beef (80/20): This classic choice yields the most flavorful and juicy results due to its balanced fat content.
- Ground Turkey or Chicken: These leaner options are excellent for a lighter pocket; just be sure to season them generously.
- Plant-Based Crumbles: An ideal choice for vegetarian pockets. Select brands designed to mimic the texture of beef for the best outcome.
Seasoning Suggestions:
To capture that authentic burger taste, season your meat with:
- Garlic powder
- Onion powder
- Paprika
- Mustard powder
- Worcestershire sauce
- Salt & black pepper
Cheese Options:
- American Cheese: Provides a flawless melt and that classic, nostalgic cheeseburger flavor.
- Cheddar: Delivers a sharper, more distinct cheese taste.
- Mozzarella: Known for its fantastic stretch and mild flavor, it works well when mixed with a bolder cheese.
- Pepper Jack: Adds a spicy kick for those who like a bit of heat.
Step-by-Step Cheeseburger Pocket Recipe
Bringing It All Together
Ready to get started? With your ingredients selected, it’s time to assemble them into a delicious, mess-free pocket. Here, we’ll walk you through the most popular method using pizza dough, complete with tips for achieving baking perfection.
Making Cheeseburger Pockets with Pizza Dough
Using pizza dough results in a cheeseburger pocket with a delightful crispy-chewy texture, similar to a calzone but filled with all the flavors of a great burger.
Ingredients (Makes 8 pockets):
- 1 lb ground beef (80/20)
- 1 cup shredded cheddar cheese (or American cheese slices)
- ½ onion, finely chopped
- 1 tbsp ketchup
- 1 tbsp mustard
- 1 tbsp Worcestershire sauce
- Salt and pepper to taste
- 1 tsp garlic powder
- 1 package store-bought pizza dough
- 1 egg, for egg wash
- Optional: diced pickles, bacon bits, sesame seeds
Instructions:
- Preheat your oven to 375°F (190°C) and line a baking sheet with parchment paper.
- In a skillet over medium heat, cook the beef with the onion, garlic powder, salt, and pepper. Once browned, drain the excess grease.
- Mix in the ketchup, mustard, and Worcestershire sauce, and let it simmer for 3 minutes.
- Remove the skillet from the heat and allow the filling to cool slightly before mixing in the cheese and any optional add-ins like pickles.
- On a floured surface, roll out the pizza dough and cut it into 8 equal rectangles.
- Spoon the filling onto the center of each rectangle, leaving enough room around the edges to seal.
- Fold the dough over the filling, crimp the edges with a fork, and transfer the pockets to the baking sheet.
- Brush the tops with egg wash and, if desired, sprinkle with sesame seeds.
- Bake for 18–22 minutes, until golden brown.
- Let the pockets cool slightly before serving, as the filling will be very hot.
For another great fusion recipe, don’t miss our [Easy Monte Cristo Rolls Recipe – Perfect for Brunch or Parties]
Seasoning, Assembling, and Baking Tips
For cheeseburger pockets that are perfectly crispy on the outside and gooey on the inside, follow these expert tips:
Season Like a Pro:
- Incorporate onion powder and mustard powder for a deeper, more authentic “burger” taste.
- A pinch of smoked paprika can add a wonderful depth of flavor.
Assembly Tips:
- Avoid overfilling the pockets to prevent leaks and ensure a proper seal.
- Add the cheese last to help it melt evenly during the baking process.
- For a firmer crust, chill the assembled pockets in the refrigerator for 10 minutes before baking.
Perfect Baking:
- Always ensure your oven is fully preheated before putting the pockets in.
- Use parchment paper or a silicone baking mat to prevent them from sticking.
- Let the pockets rest for a few minutes after baking to allow the cheese to set.
Here is a helpful cheat sheet:
| Step | Pro Tip |
| Filling | Let the meat cool before adding the cheese to prevent sogginess. |
| Dough Prep | Lightly flour your work surface to keep the dough from sticking. |
| Folding | Use a fork to crimp the edges for a tight, secure seal. |
| Topping | An egg wash will give you a beautiful, golden, and shiny crust. |
| Cooling | Wait at least 5 minutes before eating to avoid a burnt tongue. |
Creative Cheeseburger Pocket Variations
Beyond the Classic Recipe
Once you’ve perfected the classic cheeseburger pocket, it’s time to experiment in the kitchen. From fluffy cheeseburger biscuit bombs to elegant and flaky cheeseburger turnovers, the possibilities are both endless and delicious. These variations add excitement to your meal rotation and can be tailored to different tastes and occasions.
Cheeseburger Biscuit Bombs
Biscuit bombs are smaller, fluffier, and incredibly satisfying. Using refrigerated biscuit dough significantly reduces prep time while delivering all the rich flavors of a cheeseburger in each bite.
Ingredients:
- 1 can refrigerated biscuit dough
- ½ lb ground beef
- 1 tsp seasoning salt
- 1 cup shredded cheddar or pepper jack cheese
- 1 tbsp ketchup + 1 tsp mustard (optional)
- 1 egg, for egg wash
- Optional: bacon bits, jalapeños, or pickles
Instructions:
- Cook and season the ground beef as you would for the classic recipe, and let it cool slightly.
- Flatten each biscuit into a 4-inch round.
- Place a small spoonful of the beef mixture in the center, top with cheese, and fold the dough over the filling, pinching the edges to seal.
- Arrange the bombs seam-side down on a lined baking sheet.
- Brush with egg wash and bake at 350°F (175°C) for 15–18 minutes, until golden.
These are ideal as party appetizers or game-day snacks, with a soft, buttery texture that contrasts beautifully with the savory filling.
Cheeseburger Turnovers and Pastry Pockets
For a more sophisticated take, use puff pastry to transform a simple cheeseburger filling into a golden, flaky turnover that’s perfect for brunch or as an impressive appetizer.
Ingredients:
- 1 sheet frozen puff pastry, thawed
- ½ lb ground beef
- ¼ cup finely diced onion
- ¾ cup shredded sharp cheddar cheese
- 1 tbsp Dijon mustard (optional)
- 1 egg, beaten for wash
Instructions:
- Cook the beef and onion together, season as desired, and let it cool before mixing in the cheese and mustard.
- Roll out the puff pastry and cut it into squares or circles.
- Add the filling, fold it over, and seal the edges with a fork.
- Brush with egg wash and bake at 400°F (205°C) for 15–20 minutes, until puffed and golden brown.
Tips for Turnover Success:
- Always chill the assembled turnovers for 10 minutes before they go into the oven.
- For an elegant touch, sprinkle the tops with sesame or poppy seeds.
- Serve with elevated dipping sauces like garlic aioli or a spicy ketchup.
| Type | Texture | Crowd Favorite For | Cooking Temp |
| Biscuit Bombs | Soft/Fluffy | Kids, parties, lunches | 350°F |
| Puff Pastry Turnovers | Flaky/Buttery | Brunch, appetizers | 400°F |
Equipment & Storage Tips
Making Your Pockets Last
After you’ve perfected your cheeseburger pocket recipe, the next step is ensuring they stay fresh and are easy to manage. This section covers the best tools and methods, from the viral burger pocket holder trend to expert advice on freezing and reheating.
Burger Pocket Holders: Are They Worth It?
You may have seen these gadgets on social media—reusable silicone or plastic sleeves designed to keep your hands clean while enjoying messy foods like burgers or these pockets.
Pros:
- Eliminates greasy fingers, which is great for kids.
- Ideal for on-the-go meals and packed lunches.
- They are reusable and environmentally friendly.
Cons:
- Can trap steam, which may soften a crispy crust.
- They are an additional item to wash.
- Unnecessary for at-home dining.
If you frequently pack these pockets for kids’ parties or road trips, they might be a worthwhile investment. Otherwise, simple parchment paper or aluminum foil will do the trick.

How to Freeze and Reheat Cheeseburger Pockets
Homemade cheeseburger pockets are exceptionally freezer-friendly, making them perfect for meal prep.
Freezing Instructions:
- After baking, allow the pockets to cool completely.
- Wrap each pocket tightly in plastic wrap or aluminum foil.
- Place the individually wrapped pockets into a freezer-safe bag or an airtight container.
- Label with the date. They are best enjoyed within 2–3 months.
Pro Tip: To prevent them from sticking together, freeze them in a single layer on a baking sheet before transferring them to a bag.
Reheating Options:
| Method | Instructions | Best For |
| Oven | Bake at 375°F (190°C) for 15–18 mins if thawed, or 25 mins if frozen. | A crispy exterior. |
| Air Fryer | Air fry at 350°F (175°C) for 10–12 mins from frozen. | Speed and crispiness. |
| Microwave | Wrap in a damp paper towel and heat for 60–90 seconds. | A soft texture when in a hurry. |
Storage Chart:
| Storage Method | Duration | Prep Needed |
| Fridge | Up to 3 days | Wrap in foil or store in an airtight container. |
| Freezer | 2–3 months | Wrap individually, label, and freeze flat. |
Reheating frozen pockets in an oven or air fryer will always yield a better texture than using a microwave.
Serving Suggestions and Side Dishes
Completing the Meal
You’ve created the perfect cheeseburger pocket—now, what should you serve with it? The right sides and sauces can elevate your pockets from a simple snack to a complete and satisfying meal.
Best Dips and Sauces to Pair With
While cheeseburger pockets are flavorful on their own, a great dipping sauce can add a new dimension of taste and texture.
Top Dipping Sauces:
- Spicy Ketchup: Mix regular ketchup with your favorite hot sauce.
- Burger Sauce: Combine mayonnaise, ketchup, mustard, and a bit of pickle juice.
- Ranch Dressing: A creamy, herby classic that’s always a winner.
- Garlic Aioli: Adds a touch of gourmet flair.
- Honey Mustard: Its sweet and tangy profile is perfect with biscuit or pastry versions.
- BBQ Sauce: A smoky and bold choice, especially with bacon-filled pockets.
DIY Burger Sauce Recipe:
| Ingredient | Amount |
| Mayonnaise | ½ cup |
| Ketchup | 2 tbsp |
| Yellow Mustard | 1 tbsp |
| Pickle Relish | 1 tbsp |
| Garlic Powder | ½ tsp |
| Onion Powder | ½ tsp |
| Paprika | ¼ tsp |
Mix all ingredients well and chill before serving. This sauce is also delicious when added directly inside the pockets.
Side Dishes That Complement Cheeseburger Pockets
To round out your meal, choose sides that are fun and balanced.
Classic Comfort Sides:
- French Fries or Tater Tots: The quintessential crispy companion.
- Coleslaw: Provides a fresh, crunchy contrast to the rich filling.
- Potato Wedges: A great option if you’re already using the oven.
Lighter Sides:
- Garden Salad: With a light vinaigrette to balance the meal.
- Steamed Veggies: A simple and healthy choice, especially for kids.
- Apple Slices or Grapes: A sweet and juicy option.
Fun Party Sides:
- Mini Corn on the Cob: Buttery, sweet, and enjoyable to eat.
- Macaroni Salad: A creamy and cool side dish.
- Pickle Spears or Chips: Adds a crucial acidic crunch.
| Side Dish | Flavor Balance | Perfect For |
| French Fries | Salty & Crispy | Kids, game night |
| Coleslaw | Fresh & Tangy | BBQs, summer meals |
| Garden Salad | Light & Crisp | Lunch or low-carb pairing |
| Pickle Chips | Acidic & Crunchy | On-the-go lunchbox |
| Garlic Aioli Dip | Creamy & Rich | Fancy party platters |
Cheeseburger Pockets for Different Occasions
A Pocket for Every Event
One of the greatest advantages of cheeseburger pockets is their incredible versatility. They can be adapted to fit any occasion, from kids’ lunches and parties to quick weeknight dinners.
Kid-Friendly Versions
If your children love burgers but you dislike the mess, cheeseburger pockets are the perfect solution.
Tips for Making Kid-Friendly Pockets:
- Smaller Portions: Use mini biscuit or pastry rounds to create snack-sized pockets.
- Simple Fillings: Stick to the basics, like ground beef and American cheese.
- Hidden Veggies: Finely grate carrots or zucchini and mix them into the beef.
- Fun Shapes: Use cookie cutters to make your pockets into stars, hearts, or dinosaurs.
They can be packed in a thermos to stay warm for school lunches.
Party Platters and Make-Ahead Ideas
Cheeseburger pockets are an ideal finger food for parties and can be prepared in advance.
How to Prep for a Party:
- Make and freeze them up to three days ahead of time.
- Reheat in an oven or air fryer to restore their crispy crust.
- Arrange them on a platter with various dipping sauces.
Mini Pocket Bar:
For an interactive party activity, set up a “make-your-own” pocket station with:
- Doughs: Pizza, biscuit, and puff pastry options.
- Fillings: Ground beef, turkey, or shredded chicken.
- Toppings: Different cheeses, pickles, onions, and mushrooms.
| Occasion | Version to Try | Why It Works |
| School Lunch | Mini biscuit bombs | Mess-free and lunchbox-friendly |
| Game Night | Puff pastry turnovers | Easy to prep and serve with sauces |
| Birthday Parties | Make-your-own pocket bar | Customizable and fun |
| Busy Weeknights | Frozen pre-baked pockets | Just reheat and serve |
| Brunch | Flaky cheeseburger turnovers | Classy yet satisfying |
Troubleshooting & Common Mistakes
Perfecting Your Pockets
Even the most well-planned cheeseburger pockets can encounter issues. From soggy dough to disappearing cheese, this guide will help you identify and fix common mistakes.

Why Your Dough Might Be Too Soggy or Dry
Achieving the right texture with stuffed dough is a balancing act.
Common Dough Mistakes:
- Too Wet Inside? This is often caused by not draining the beef grease thoroughly.
- Crust Too Dry or Cracked? The dough might have been rolled too thin or overbaked.
- Uneven Cooking? Ensure all pockets are a uniform size and are not overcrowded on the baking sheet.
Pro Fixes:
- Always let the filling cool completely before sealing to prevent steam from making the dough soggy.
- Chill the filled pockets for 10–15 minutes before baking.
- Bake at a higher temperature (375°F or more) for a golden exterior.
How to Avoid Overfilling or Underseasoning
The amount of filling is crucial for success.
Signs You Overfilled:
- Leaking juices or cheese.
- Pockets that have “exploded” or have open seams.
- Dough that is difficult to seal.
Tips to Fix It:
- Use a measuring spoon (2–3 tablespoons is usually sufficient).
- Leave a clear border around the edges for sealing.
- Distribute the cheese evenly within the filling.
Seasoning Matters:
If your pockets taste bland, the filling was likely underseasoned. Add:
- A dash of Worcestershire sauce for umami.
- A pinch of smoked paprika for depth.
- Mustard powder for a classic burger flavor.
What To Do If the Cheese “Disappears”
To prevent cheese from melting away or drying out, follow these tips:
- Use high-moisture cheeses like American or mozzarella.
- Place the cheese in the center of the filling.
- Add the cheese only after the filling has cooled.
| Problem | Cause | Fix |
| Soggy Dough | Wet filling, not cooled | Drain and cool meat, avoid overstuffing. |
| Dry Pockets | Overbaked, too little filling | Reduce oven time, check dough thickness. |
| Bursting While Baking | Overfilled or weak seal | Use less filling and seal tightly. |
| Bland Flavor | Underseasoned meat | Add garlic, onion, Worcestershire, etc. |
| Cheese Vanishes | Wrong cheese or placement | Use melty cheeses and center properly. |
Nutrition, Substitutions & Dietary Tweaks
Making Pockets for Every Lifestyle
Cheeseburger pockets can be easily adapted for various dietary needs, including low-carb, gluten-free, and vegetarian.
Low-Carb and Gluten-Free Cheeseburger Pockets
You can still enjoy this comfort food while sticking to a keto or gluten-free diet.
Low-Carb Dough Options:
- Fathead Dough: A keto-friendly dough made from mozzarella, almond flour, and egg.
- Almond Flour Tortillas: Fold them like an empanada and crisp them in an air fryer.
- Lettuce Wraps: For a fresh, no-bake version, wrap the filling in crisp lettuce leaves.
Tips to Reduce Carbs:
- Use lean ground meat.
- Swap ketchup for a sugar-free variety.
- Use a sharp cheese to get more flavor with less volume.
| Option | Texture | Carb Content |
| Fathead Dough | Chewy, rich | Very low |
| Almond Tortilla | Crisp after frying | Low |
| Lettuce Wrap | Fresh, crunchy | Zero |
Swaps for Dairy-Free or Vegetarian Versions
These pockets can be modified to suit many dietary requirements.
Dairy-Free Substitutions:
- Cheese: Use dairy-free cheddar-style shreds.
- Dough: Most refrigerated pizza doughs are dairy-free, but always check the label.
- Sauces: Use a vegan mayonnaise to create a dairy-free burger sauce.
Vegetarian Options:
- Filling: Use lentils, black beans, or seasoned soy crumbles.
- Flavor Boosters: Add mushrooms or caramelized onions.
- Extras: Use nutritional yeast for a cheesy flavor.
Pro Tip: To achieve a meaty flavor in vegetarian versions, season your filling with smoked paprika, garlic powder, and a dash of soy sauce.
| Dietary Need | Swap Suggestion | Flavor Tip |
| Dairy-Free | Vegan cheese, mayo-free sauces | Add herbs or spice for richness. |
| Vegetarian | Beans, lentils, soy crumbles | Use umami seasonings. |
| Gluten-Free | Almond or coconut flour dough | Add herbs to mask nutty flavor. |
| Low-Carb | Fathead or tortilla-based wraps | Pair with sugar-free ketchup. |
Frequently Asked Questions
Can I make these ahead of time?
Yes. You can assemble the unbaked pockets and refrigerate them for up to 24 hours before baking. Alternatively, you can bake them completely, cool them, and store them in the refrigerator for up to 3 days.
How do I reheat them?
The best way to reheat them is in an oven or air fryer at 350°F for 5–15 minutes, until crispy and warmed through. A microwave will work but will result in a softer crust.
How do I prevent the filling from leaking out?
The keys are to not overfill them and to seal the edges tightly. Use about 1/4 cup of filling per pocket and press the edges firmly with a fork to create a strong seal.
Can I freeze cheeseburger pockets?
Yes, they freeze very well. After baking and cooling, wrap each pocket individually and store them in a freezer-safe bag for up to 3 months. Reheat from frozen in a 375°F oven for 20–25 minutes.
Conclusion: Your Kitchen, Your Rules
The cheeseburger pocket is more than just a recipe—it’s a versatile template for your culinary creativity. It demonstrates how a simple idea can be adapted to suit everyone at the table, no matter their dietary preferences. Whether you’re making a keto-friendly snack, a gluten-free dinner, or a plant-based party appetizer, the fundamental experience remains the same: a warm, golden crust encasing a savory, cheesy, and deeply satisfying filling.
So, feel free to mix and match ingredients, experiment with new fillings, and truly make this recipe your own. That classic “burger in a blanket” experience is ready for you to enjoy.
Happy cooking